|
|
|

|
|
| Search | Car Forums | Gallery | Articles | Helper | Air Dried Dog Food | IgorSushko.com | Corporate |
|
| Latest | 0 Rplys |
|
|||||||
| WIP - Motorsports Post topics for any "Work In Process" motorsports vehicles in this sub-forum. |
 |
 Show Printable Version | Show Printable Version |  Email this Page | Email this Page |  Subscribe to this Thread
|
|
|
Thread Tools |
 04-20-2008, 04:32 PM
|
#1 | |
|
AF Enthusiast

Join Date: Feb 2006
Location: Chichester
Posts: 755
Thanks: 9
Thanked 1 Time in 1 Post
|
WIP: Joest Porsche 962C 1/24
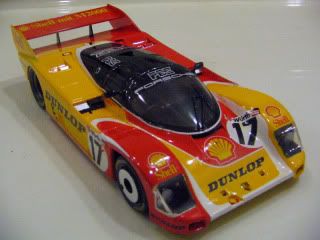
My new project is going to be the Joest Porsche 962C from 1989. No reason for this except I love the colour scheme.
 This will be another curbside (Booooo!) and therefore the details will be minimal however I will add a few doo-dads in the cockpit but as I'm not opening the doors this time I'm not going overboard with this one. I do have some smart S27 metal wheel and etch set along with a Speedline set too which should help to add a little detail, other than that this is going to be OOB.  This is the beauty (although not quite in the same scheme as the one I'm building) nevertheless I think it looks really stunning.  This is a little more closer to the version I'm building apart from the rear wing...  and so the first observation...  whoever it was at Tamiya who thought having the glass pre-set into the shell was a good idea wants shooting at Dawn  . I have read that you can sand these off and then polish them out using compounds and polishing sticks - does this work well and completely remove them? . I have read that you can sand these off and then polish them out using compounds and polishing sticks - does this work well and completely remove them?I have never tried it so any advice greatly appreciated.
__________________
Sean _______________________________ http://www.scalereproductions.co.uk _______________________________ WIP: Ferrari F40 |
|

|

|
|
04-20-2008, 06:39 PM
|
#2 | |
|
AF Enthusiast
Join Date: Aug 2005
Location: where "sky grey" is a colour
Posts: 823
Thanks: 3
Thanked 32 Times in 29 Posts
|
Re: WIP: Joest Porsche 962C 1/24
HI Sean
Nice project. Coincidentally i picked up one of these for a good price at a model show this week. Mine will become the 1993 Joest with modified bodywork and rear wing.....one day....hopefully :-) About the glass pieces....they can be polished. I usually go through the Micromesh pads and then use some acrylic glass polish. But there's another way too, that I'll go whenever i get to my 962s. Cut out the glass pieces and replace them with vacform ones from the Hiro 962. I got a set for 4 through "my" Hiro dealer:-) They'll make painting the body and detailing the headlights easier and should look better too because they are thinner. One other thing....if you haven't noticed yet: take a closer look at the radiator ducts besides the cockpit. They are way too shallow. You should be able to change that:-) Looking forward to see what you do with this one:-) |
|
|
|
|
|
04-20-2008, 07:07 PM
|
#3 | |
|
AF Regular
 
Join Date: Oct 2007
Location: Union City, California
Posts: 207
Thanks: 0
Thanked 0 Times in 0 Posts
|
Re: WIP: Joest Porsche 962C 1/24
I built the Dunlop/Shell yellow and red version a couple of years ago and the headlights and windows were part of the body as well. Someone said it used to be a motorized kit, hence the lack of details. I don't know about your kit, but mine had only about 40 parts to it.
 btw, I have tried using sanding sticks and compounds for the clear window parts, but it doesn't really do much for me. Although when I use Tamiya wax on them, they appear a lot clearer and thinner. I think it looks better than dipping it in Johnsons/Future, and less messy too.
__________________
Completed:      
|
|
|
|
|
|
04-20-2008, 11:41 PM
|
#4 | ||
|
AF Fanatic

Join Date: Dec 2004
Location: Up the creek with no paddle
Posts: 5,889
Thanks: 7
Thanked 16 Times in 15 Posts
|
Re: WIP: Joest Porsche 962C 1/24
Looking forward to following along.
Quote:
  j/k j/k
__________________
Guideline for happy modeling: Practice on scrap. Always try something new. Less is more. "I have a plan so cunning, you could put a tail on it and call it a weasel" - Edmund Blackadder |
||
|
|
|
|
04-21-2008, 08:22 AM
|
#5 | |
|
AF Regular

Join Date: Feb 2005
Location: Copenhagen
Posts: 276
Thanks: 4
Thanked 14 Times in 11 Posts
|
Re: WIP: Joest Porsche 962C 1/24
Hi
Originally it was a radiocontrolled car in the Tamtech series, that was modified to take a static display underbody. But the problems with the doors and glass were left as they were. There's also the holes in the side of the body where the catches are for the RC underbody. Needs to be fixed as well. Flemming |
|
|
|
|
|
04-21-2008, 08:06 PM
|
#6 | |
|
Blarg! Wort Wort Wort!
Join Date: Mar 2006
Location: Quezon City
Posts: 2,120
Thanks: 64
Thanked 101 Times in 100 Posts
|
Re: WIP: Joest Porsche 962C 1/24
sweet! nice to see a 962C here in the WIP.
 i miss my [FromA] 962C, which brittled and cracked everywhere after i dipped it too long in household thinner (yeah, i was a kid back then).
__________________
olly olly oxen free |
|
|
|
|
|
04-24-2008, 02:51 PM
|
#7 | |
|
AF Enthusiast
Thread starter
Join Date: Feb 2006
Location: Chichester
Posts: 755
Thanks: 9
Thanked 1 Time in 1 Post
|
Re: WIP: Joest Porsche 962C 1/24
progress...
well a little anyway! I have ordered a further etch set from S27 for the kit and also some new headlight lenses so while I am waiting for those to come I don't to go to far until I know what upgrades are in the set. However the bits I have done... the original cockpit divider is solid in the kit but kindly has the holes preformed (why they didnt just have these hollow in the first place is odd)  after a few various sizes of drills in the Dremel...  speaking of which here is the cockpit, plenty of scope for detailing here...  first thing to come out will be the extinguisher and then i will take a look at the bulkhead which looks basic compared to my reference pics. Back onto the shell and the central wing supports are crude at best, these will be removed and replaced with 2 thin 'V' shaped tubular supports again as per my reference pics.  I also drilled out the exhausts either side of the shell leaving a nice thin looking tubular exhaust end. Had to be carefull here as using too bigger drill would have ruined the moulded exhaust.  Finally, as Jaykay correctly pointed out the vents either side of the cockpit are way to small as can be seen here...  In the picture above you can see where I made the first (very gentle) cuts to the bodywork using my little etchsaw from hasegawa   I remade the centre support from plascard and with a little gentle persuasion pushed the bodywork down somewhat and fixed the support in place with CA glue. I have also made two new sections for the doors and will now let this all set. I will add a little filler and then sand everything smooth and (hopefully) seemlessly! thats it for now, thanks as always for following and for your comments. More again soon.
__________________
Sean _______________________________ http://www.scalereproductions.co.uk _______________________________ WIP: Ferrari F40 |
|
|
|
|
|
05-01-2008, 05:47 AM
|
#8 | ||
|
AF Regular

Join Date: Oct 2006
Location: Most
Posts: 151
Thanks: 0
Thanked 3 Times in 3 Posts
|
Re: WIP: Joest Porsche 962C 1/24
Quote:
 Good work so far, I'm looking forward to se those PE sets |
||
|
|
|
|
05-01-2008, 01:10 PM
|
#9 | |
|
AF Newbie
 
Join Date: Apr 2008
Location: Sevenoaks
Posts: 56
Thanks: 0
Thanked 0 Times in 0 Posts
|
Re: WIP: Joest Porsche 962C 1/24
I actually managed to pick up a Hasegawa version of this kit from an old toy shop just yesterday so I'll be following your progress closely
It's looking good so far though!! |
|
|
|
|
|
05-30-2008, 03:03 AM
|
#10 | |
|
AF Enthusiast
 
Join Date: Feb 2006
Location: Manchester
Posts: 759
Thanks: 0
Thanked 2 Times in 2 Posts

|
Re: WIP: Joest Porsche 962C 1/24
Great subject and you have made your usual excellent start Sean.
The modification to the air intakes look spot on. I had a quick look for any other differences I could see between the reference pictures you posted and the moulded body... all I could spot was a missing vertical central support on the air intake directly below the windscreen. Hope that helps. Bill
__________________
On the workbench: Completed WIPs: Completed Models Gallery: |
|
|
|
|
|
07-03-2008, 09:46 AM
|
#11 | |
|
AF Enthusiast
Thread starter
Join Date: Feb 2006
Location: Chichester
Posts: 755
Thanks: 9
Thanked 1 Time in 1 Post
|
Re: WIP: Joest Porsche 962C 1/24
yes guys, Im still alive - and thanks for your emails - I promise to get onto replying to all those who have emailed me through the forum soon, as well as the triple figures of emails I also have on my pc... urghhh
 So I have had nearly two months working away which has been fun but tedious for the last couple of weeks, still no more working away for the rest of the year thankfully. Since I got back I have made a lot of progress on the Porsche, basically all that is left now is the shell which I am just in the middle of masking and preparing for paint. I couldnt resist but add a few details to the partial engine/transmission just to add a little interest when looking through the back ofthe car...  As for the cockpit, I removed most of the moulded details and added some hoses and ends to the cyclinders, replacedthe straps on the extinguisher and also added a connector to the end too. I replaced the elctric connects on the box with Perfect parts versions and added cables and heat shrink around the ends. For the seat I used the usual embossing powder and the belts are again from my Modelers set...  Wheels are fabulous and only needed a little polishing and painting here and there, I only added some tyre valves...  the front wheel 'discs' were made up from the etch parts included, I have only to add the tyre markings and then these are done...  FOr the front headlights I removed the moulded surrounds and replaced them with some turned versions and added some glass from the spares box. I also scratched the indicators too as these were missing from the kit...  The dashboard is basically as per the kit, with a little carefull painting and the addition of the a red ignition key (from a S27 seat belt set)...  and finally all in place...   should have some progress on the shell over the next couple of days, I have used the Tamiya supllied masks which came with the kit so hopefully these will be ok.  It's good to be back and for those waiting replies to emails I will be in touch soon, apologies for not getting back to you. cheers guys!
__________________
Sean _______________________________ http://www.scalereproductions.co.uk _______________________________ WIP: Ferrari F40 |
|
|
|
|
|
07-03-2008, 11:38 AM
|
#12 | ||
|
AF Enthusiast
Thread starter
Join Date: Feb 2006
Location: Chichester
Posts: 755
Thanks: 9
Thanked 1 Time in 1 Post
|
Re: WIP: Joest Porsche 962C 1/24
Quote:
thanks for your hints, I added the little centre support to the front duct just as you pointed out.
__________________
Sean _______________________________ http://www.scalereproductions.co.uk _______________________________ WIP: Ferrari F40 |
||
|
|
|
|
07-03-2008, 01:04 PM
|
#13 | |
|
AF Enthusiast

Join Date: Mar 2003
Location: Rostock
Posts: 1,569
Thanks: 0
Thanked 0 Times in 0 Posts
|
Re: WIP: Joest Porsche 962C 1/24
Stunning and inspiring! Great job on all the details. Everything looks just right.
Robert
__________________
Recently finished Projects:
Porsche 911 Carrera RS 3.0 Current Projects: Ferrari 250 GTO LM 1962 (chassis #3387)   |
|
|
|
|
|
07-03-2008, 03:05 PM
|
#14 | |
|
AF Enthusiast
Join Date: Aug 2005
Location: where "sky grey" is a colour
Posts: 823
Thanks: 3
Thanked 32 Times in 29 Posts
|
Re: WIP: Joest Porsche 962C 1/24
All very neat and clean! Looking good!
|
|
|
|
|
|
07-03-2008, 04:25 PM
|
#15 | |
|
AF Regular
Join Date: Oct 2006
Location: Most
Posts: 151
Thanks: 0
Thanked 3 Times in 3 Posts
|
Re: WIP: Joest Porsche 962C 1/24
Yes, he's back!
Great work on that kit. I'm looking forward to another update  But there is something you can fix now. The edges of the seatbelts look a bit "teared" so they are white, wash them with blue marker or blue colour |
|
|
|
|
|
|
POST REPLY TO THIS THREAD |
 |
|
|

