|
|
|

|
|
| Search | Car Forums | Gallery | Articles | Helper | Quality Dog Food | IgorSushko.com | Corporate |
|
| Latest | 0 Rplys |
|
|||||||
| WIP - Motorsports Post topics for any "Work In Process" motorsports vehicles in this sub-forum. |
 |
 Show Printable Version | Show Printable Version |  Email this Page | Email this Page |  Subscribe to this Thread
|
|
|
Thread Tools |
 10-24-2005, 07:52 PM
|
#1 | |
|
AF Enthusiast

Join Date: Feb 2004
Location: Brisbane
Posts: 751
Thanks: 0
Thanked 9 Times in 9 Posts
|
F1 - Leyton House CG901B (1/20) - Progress Pics
Tamiya 1/20 Leyton House CG901B
Howdy all, Time to give this beautiful blue machine a third attempt As you can see from the pic below Ive tried a couple of times before (looong ago), with various levels of success or lack thereof. At least Ive got a bunch of spares that will, and have already, come in handy! I plan on doing a few little extras to this kit. Ill be using Bare Metal Foil for the first time, as well as some Carbon Fiber decals also. Ill also be chopping up suspension springs and scratch building something a bit better than what the kit offers. Im not sure about engine plumbing and wiring yet, as reference pics are hard to come by, and this is a skill Ive yet to learn. Anyway, on with some pics. Previous attempts 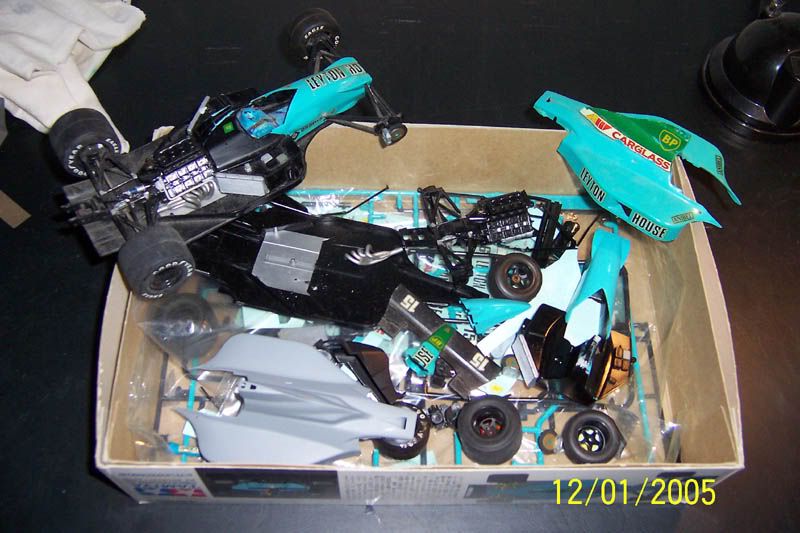 Ill also be using aftermarket decals from Museum Collection. These also come with somewhat dodgy looking seatbelt ribbons, and some photoetch belt parts. Im not happy with these, so will be buying another aftermarket seatbelt set. Im of two minds about Museum Collection the first set of these decals I had came with HUGE holes in the decals! Apparently this was within acceptable standards for MC, so they wouldnt replace them WTF! The online store I dealt with did replace them however with a set that the ink has run on! Again WTF! Other MC decals Ive bought however have been fine, so I dunno. Just the luck of the draw I suppose. Still, if I can avoid MC in the future I defintely will. 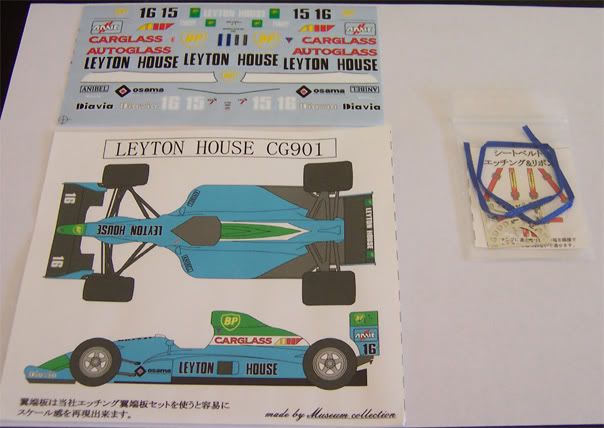 Now to get the building started and there are some problems to fix right off the bat. Youll notice on the following picture where the nose doesnt fit correctly onto the cockpit section. Dodgy, and easy to see in person, but fixable with some stuffing around.  The most effective way to fix this I believe is to glue the two halves of the cockpit together first, then glue the nose on , and sand it all flush this presents more challenges The suspension arm in the following pic is virtually impossible to insert when the cockpit is glued together 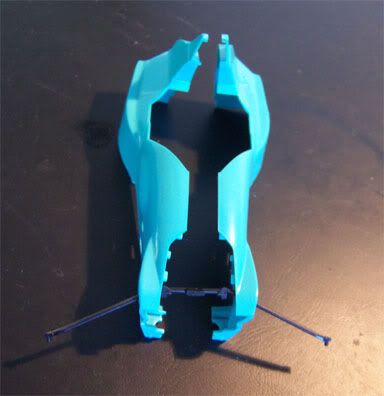 So we have to chop it up! Simply cut away the small sticky-outty-bits you see in the yellow circles, and its problem solved! The piece can be put in place when the cockpit is glued, and this doesnt appear to cause any structural problems. Ive had the luxury of testing this on two previous kits remember, so Im confident in this fix so far. 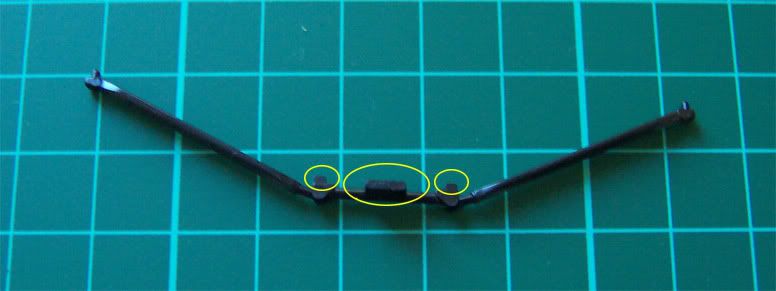 Theres only one other suspension piece that needs cutting, which you can see in the following pic. I recommend that once the cockpit and nose is glued, painted and polished, that you THEN put this suspesion piece in place and use some super glue to glue it back together. Otherwise youll have a hell of a time (or it may be impossible) if youve put the seat in and glued it all to the floorpan.  Before the nose goes on though, I had to make the bottom of the cockpit thinner so there was a better fit to the nose. I managed this by wedging a piece of 240grit sandpaper in as you can see in the following pic, and sanding away, test fitting the nose at regular intervals. Note, for those who may try this, that one side needs sanding more than the other pay attention to this, and note the side my sandpaper is sanding in the pic! 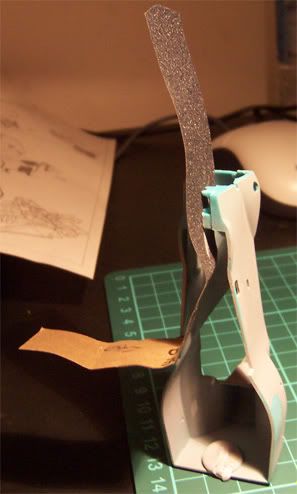 And finally the nose goes on a coat of Tamiya Coral Blue some polishing and rubbing back 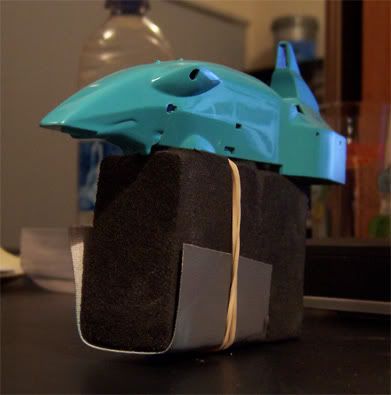  For those of you not yet converted to sanding your F1 tires, this is what youre missing out on. I used 240 and 400grit sandpaper to sand this section for simple demonstration of how much better it can look. You may also want to mount the tire on a drill and spin it round on some sandpaper its a lot quicker this way, and more fun!  Next it was time to finish the floorpan. A quick coat of black first up, and then tearing my hair out trying to paint the silver heat shield sections. In the end I gave up and ordered some Bare Metal Foil (matte aluminium). I used Tamiya masking tape to cover the exact area on the floorpan I wanted to have covered with the BMF. I then took the tape off the floorplan and put it onto the BMF sheet.  Once this was done I cut neatly around the masking tape template Id made, and CAREFULLY peeled it from the BMF. (PRACTISE THIS FIRST!!!) Luckily I had the luxury of practising on one of the old Leyton House floorpans Id started yonks ago. Ultimately though, the BMF lifts off the part easily if you stuff it up, but the main trick is not tearing the BMF while handling, and laying it down without creases in it. And the finished floorpan  Hope youre all enjoying it so far. Comments always welcome. Next Ill be tackling the green areas on the rear wing, nose and cowl, and will have my first attempts at laying down some CF decals. Cheers all, Mark
__________________
 
|
|

|

|
|
10-25-2005, 12:06 AM
|
#2 | |
|
AF Regular

Join Date: Jul 2003
Location: Pittsburgh, Pennsylvania
Posts: 253
Thanks: 0
Thanked 0 Times in 0 Posts
|
Awesome, I can't wait to watch the progress on this as I have one on the shelf waiting to be built
 Looks like you are off to a good start, as you have some experience :-D Looks like you are off to a good start, as you have some experience :-D
__________________
https://www.instagram.com/reality_scaled |
|
|
|
|
|
10-25-2005, 03:58 AM
|
#3 | |
|
AF Fanatic
 
Join Date: Jan 2005
Location: Anywhere but here
Posts: 1,676
Thanks: 0
Thanked 0 Times in 0 Posts
|
Mark,
Good luck with the rebuild. Should be a little less stressful then the BAR hopefully Keep us posted of any updates etc.. |
|
|
|
|
|
10-25-2005, 07:56 PM
|
#4 | |
|
AF Regular

Join Date: Jun 2004
Location: Hong Kong SAR
Posts: 377
Thanks: 0
Thanked 0 Times in 0 Posts
|
Re: F1 - Leyton House CG901B (1/20) - Progress Pics
You've got a good start and keep it up
 Mikusen |
|
|
|
|
|
10-26-2005, 01:32 AM
|
#5 | |
|
AF Enthusiast

Join Date: May 2003
Location: Sunshine Coast, AUSTRALIA
Posts: 2,218
Thanks: 16
Thanked 8 Times in 8 Posts
|
Re: F1 - Leyton House CG901B (1/20) - Progress Pics
great start!
__________________
Rob 
|
|
|
|
|
|
10-26-2005, 05:48 AM
|
#6 | |
|
AF Enthusiast
Thread starter
Join Date: Feb 2004
Location: Brisbane
Posts: 751
Thanks: 0
Thanked 9 Times in 9 Posts
|
Thanks for the positive words guys!
I've been test fitting a few parts, and thought I'd once again help feed everyone's need for eye-candy. Nothing too dramatic here just yet, but some generally nice pics all the same. I've completed most of the nose and cockpit, except for the CF decals. For better or worse, I've clear coated it in Tamiya enamel clear (having used Coral Blue lacquer and Green enamels for top coats). As you'll see I've actually got a very good glossy clear coat on, so am debating whether or not to actually polish it up. It's not quite mirror smooth when you look at it in person, but it photographs very well. We'll see how lucky I feel a few weeks down the track as to whether I break out the compound and 12000 grit sandpaper... 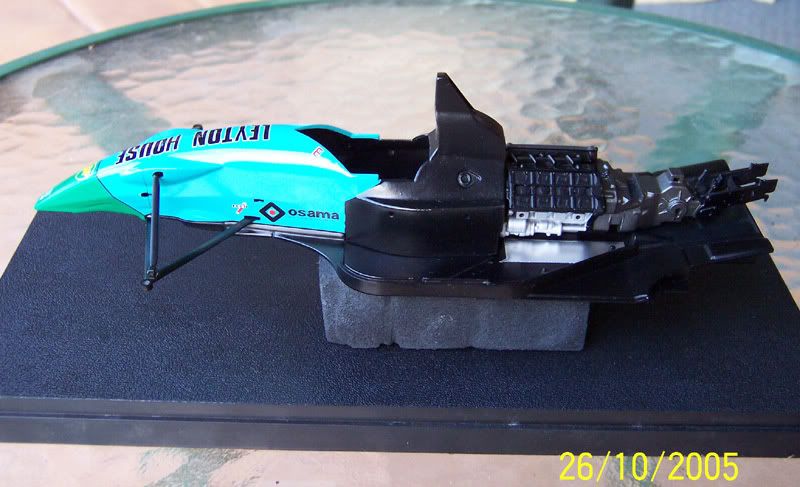 I had some problems with the hi-tech decals (I think that's the correct term), in that once they set, I pulled up the protective film and the yellow BP decal came with it! I think all the MicroSol I used was still doing it's work actually. Lesson: make sure you leave the decals for quite a while, say at least a day, before pulling the protective film off these kinds of advanced decals. As part of the yellow decal was ruined, I was forced to cut small sections from the kit decal (MUCH lesser quality) and jigsaw it all back together over the aftermarket decal. It actually came up much better than expected, especially after the clear coat! 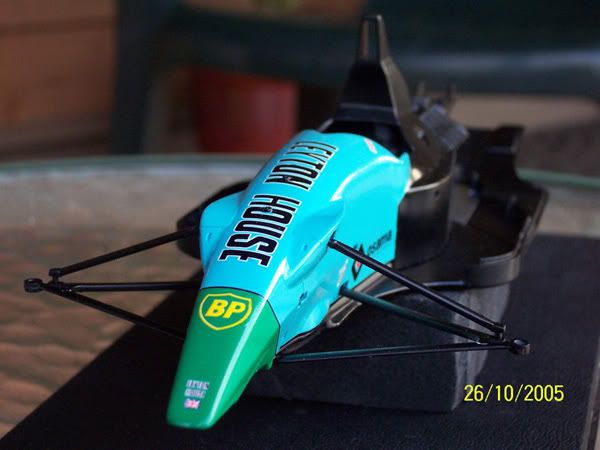 And the engine has been started also. The center metallic grey section is perhaps a bit too metallic, and a bit too grey... but these engines are so sparse at the best of times, unless a LOT of detail work is done, so I added a bit more metallic grey for a greater contrast of colours and hopefully a better looking engine. 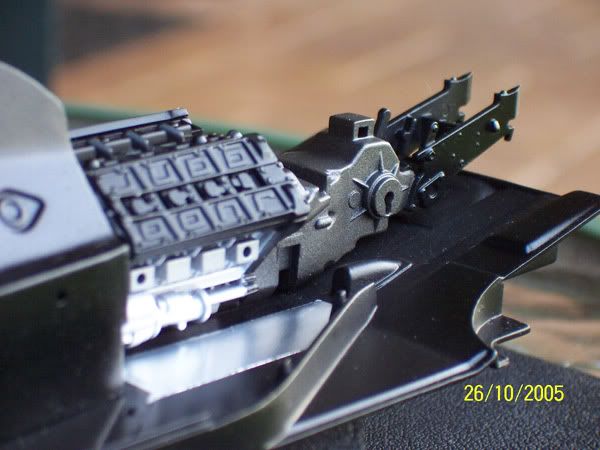 I'm debating whether or not to put a wash over the engine or not - I figure these engines don't get very dirty at any point, but then a slight wash may help to bring some details out. We'll see. I'm also starting to plan what plumbing and detail work I'll be doing. I've got a number of engine pics for reference, but they're all a bit dodgy, so we'll see. Although even if I get a few things incorrect, there's very few people on the planet who will be able to tell me I'm wrong... hehehe I'm actually REALLY enjoying this kit! Everything seems to be going right... for once. Not like that resin dog I've now banished to the darkest reaches of my cupboard! Lets hope this successful trend continues for the entire build! All comments very much appreciated. Cheers for now! M
__________________
|
|
|
|
|
|
10-26-2005, 06:08 AM
|
#7 | |
|
AF Enthusiast
 
Join Date: Feb 2003
Location: Antwerp
Posts: 674
Thanks: 0
Thanked 0 Times in 0 Posts
|
Looking good! I have that kit somewhere on my "to do" stockpile so obviously I'm gonna follow this thread closely...
|
|
|
|
|
|
10-26-2005, 06:13 AM
|
#8 | ||
|
AF Enthusiast
Join Date: Feb 2003
Location: Antwerp
Posts: 674
Thanks: 0
Thanked 0 Times in 0 Posts
|
Re: F1 - Leyton House CG901B (1/20) - Progress Pics
Quote:
|
||
|
|
|
|
10-26-2005, 09:50 AM
|
#9 | |
|
AF Fanatic
Join Date: Jan 2005
Location: Anywhere but here
Posts: 1,676
Thanks: 0
Thanked 0 Times in 0 Posts
|
Looks great, top job on the paint work. What are high tech decals? Not heard of them before. I'll have to do a search and see what those are.
Sanded tyres do look a lot better. I didn't sand my RA272 tyres, as they looked good already, but I'm currently (well trying to) buidling a C5-R and I will sand the tyres on this, no doubt about it.. Keep up the great work. |
|
|
|
|
|
10-27-2005, 07:04 AM
|
#10 | |
|
AF Enthusiast
Thread starter
Join Date: Feb 2004
Location: Brisbane
Posts: 751
Thanks: 0
Thanked 9 Times in 9 Posts
|
AAAAAAAAAAAAAAAAAAAAAAAAAARRRGGGGGGGHHHHHHHHHHHHH. ..!!!
I can't believe it... I've managed to work around all the small issues I've had with the Museum Collection decals, until now. Long story short, they printed a large engine cowling decal slightly out of shape, and missing a vital slice so it could conform properly. Unfortunately I only picked it after about 45 minutes of pushing and proding, lots of Micro-Sol, etc... the end result is a decal that's set incorrectly with creases in it, and paint work that's slightly ruined around decal. I'm not even angry anymore, just REALLY dissappointed, and a little bitter at MC for such woeful decals I handed over my money for. I'm just stunned that they've made such glaring errors! And the decals aren't exactly cheap either! Anyway, I'm going to forget the engine cowling for now, even though I've got another primed and ready to top-coat. I'm going to continue with the build - I figure if I'm forced to delay the cowling for so long and display the model without it, then I'll just have to put more effort into detailing the engine! In the spirit of looking for the positive I'm going to post some pics of the rear wing end plates I've recently finished. It's not much, but it'll make me feel better... [grin] Cheers all, M
__________________
|
|
|
|
|
|
10-27-2005, 03:13 PM
|
#11 | |
|
AF Fanatic
Join Date: Jan 2005
Location: Anywhere but here
Posts: 1,676
Thanks: 0
Thanked 0 Times in 0 Posts
|
Ah now I bet that has really peeved you... You buy what you think are better decals, and they are not..
These upgrades to F1 cars etc are not cheap.. I've paid £50 for a Tamiya F1 2000 super detail kit, and the FW24 is even more..!! Tis not a cheap hobby this.. My credit card is taking a massive beating... |
|
|
|
|
|
10-27-2005, 03:19 PM
|
#12 | |
|
AF Enthusiast

Join Date: Jul 2003
Location: Aveiro
Posts: 1,032
Thanks: 0
Thanked 0 Times in 0 Posts

|
Re: F1 - Leyton House CG901B (1/20) - Progress Pics
Mark, if you need some reference pictures, please feel free to download them here. I just ask you to be quick, as the server will get cleaned up tomorrow.
BTW, nice paint.. Best Regards, Pedro
__________________
Pedro Click the picture to check my progress thread: 
|
|
|
|
|
|
10-27-2005, 06:57 PM
|
#13 | |
|
AF Enthusiast

Join Date: Jun 2004
Location: Houston, Texas
Posts: 1,885
Thanks: 0
Thanked 0 Times in 0 Posts

|
Re: F1 - Leyton House CG901B (1/20) - Progress Pics
nice!
__________________
 
|
|
|
|
|
|
10-27-2005, 08:48 PM
|
#14 | |
|
AF Newbie
 Join Date: Sep 2005
Location: Enschede
Posts: 24
Thanks: 0
Thanked 0 Times in 0 Posts
|
Re: Re: F1 - Leyton House CG901B (1/20) - Progress Pics
that link is just awesome! I didn't know there was a link like that!
Really, you are my hero for today! |
|
|
|
|
|
10-28-2005, 12:16 AM
|
#15 | |
|
Zomby Woof
 
Join Date: Nov 2002
Location: Oz
Posts: 8,871
Thanks: 0
Thanked 1 Time in 1 Post
|
Re: F1 - Leyton House CG901B (1/20) - Progress Pics
Great progress thread.
Your March ( ) is coming along great guns. ) is coming along great guns.That reference link won't work for me in either browser or FTP.  |
|
|
|
|
|
|
POST REPLY TO THIS THREAD |
 |
|
|


