|
|
| Search | Car Forums | Gallery | Articles | Helper | Air Dried Beef Dog Food | IgorSushko.com | Corporate |
|
|||||||
| WIP - Street Post topics for any "Works In Progress" street vehicles projects in this sub-forum. |
 |
 Show Printable Version | Show Printable Version |  Subscribe to this Thread
|
|
|
Thread Tools |
|
#1
 03-04-2010, 11:53 PM
|
||||
|
||||
|
Ferrari 599 Hamann
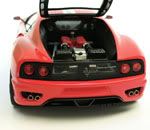
Ok, after a long absence, Im back with what I hope be an interesting WIP for you, the subject is the Ferrari 599 on one of its most beautiful tuning versions, the Hamann, the car I want to replicate is this:
  As a purist and big fan of exotic European cars, particularly Ferrari and Porsche, the idea of a customized Ferrari was something that didnt match my basic ideas; I've always thought that any attempt to customize a Ferrari would result in an alteration of a perfect design that couldnt result any better or it would compromise the balance between beauty and functionality that characterize a Ferrari, but Then I saw a Hamann Ferrari, and everything changed The way Hamann delicately incorporates their stylish aerodynamic packages into the natural design of the 599 is simply astonishing, and this changed my mind, and now I want to replicate one of this machines The modifications made by the specialists from Laupheim, Germany to the 599 are minimal but with great results; the power is enhanced by fitting a high performance sports header for an extra 53 BHP and this setup is complemented with a sports rear muffler with 90mm tailpipes to generate an even more awe-inspiring sound. To the body, Hamann adds a few touches of its own whether made of fiberglass or Carbon-Kevlar, a stylish front spoiler generates greater downforce at the front while a pair of rear wings does the work at the rear, to the sides, Hamann adds door sills blending harmoniously into the vehicle styling and increasing significantly the muscular appearance of the car and since the 599 GTB is conceptually a race car for the road, the rear end is equipped with a three-piece diffuser matching the rest of the technology to finally become an spectacular view from every angle. The wheels are replaced with Hamann own creation Edition Race a three-piece ultra-light, forged rim in a nine cross-spoke design framed with a mirror finished rim flange and featuring titanium wheel bolts which in conjunction with the tires, 245/30 ZR21 at the front and 345/25 ZR21 at the rear result in the most aggressive look the Maranello creation could get. The interiors are left to the customers own individual needs, adding only Hamann black mats. Beginning the model For this project Ill combine the best of the two kits available Fujimis (kit 12277) and Revells (kit 4204)  The Fujimi kit will be used as a base since it has the best body engraving, assembly and detail from my point of view. The Revell kit will provide the engine and rear suspension detail, which are not included in the Fujimi version and will provide also the exhaust system which the Fujimi kit has molded in the chassis, while the Revell version consists of two separate and well detailed parts. Additionally I will use the detail set from Crazy Modelers (CM-EP0047) which includes every mesh/grill in the car, AC air vents for the dashboard, speaker grills, badges, instrument cluster, shift pads, foot-rests, center console details, radio, wipers, seat belt hardware, luggage belts, etc, plus this set includes detailed three piece brake discs that invite to make them workable  And the work starts The first step is to look for the appropriate wheels, when I started this project there werent in the market the nice resin Hobby Design wheel we have now, so the closest approach were the Fujimi BBS for the Challenge version, these wheels are 19 but with some work they can be converted to 21s.  The wheel size definitely contributes to the aggressive look of the car, so, to convert the 19 BBS to 21 I will add an aluminum machined rim. The plastic wheel needs some work to fit in a new wheel ring so the plastic flange is eliminated  And a new aluminum rim is machined with a diameter of 23.66 mm, the rear wheels will be wider than the front ones to accommodate the 335 and 225 tires  The assembled wheels, the chrome finish of the Fujimi wheels was eliminated with Easy Off, later the center will be painted flat black  The new wheels have to be adapted to the Fujimi suspension considering: - The fixation system. - Adaptation of the photoetched brake discs. - Modifications required to the suspension parts to ensure correct height and position of wheels against the body. Starting the building process: Fixation system of the new wheels: In this case, since the new wheels are also Fujimi, they require only a minimal reduction to the diameter of the polycap housing, allowing this part to fit inside the brake discs and to freely rotate inside the wheel bearing housings of the front suspension, for the rear, the suspension parts of the Revell kit will be used together with the Fujimi metal axle Adaptation of the photoetched brake discs The Crazy Modeler detail set includes very nice multipart brake discs, thus inviting to do the required modifications to allow them to rotate inside the brake calipers and fixed to the wheel as in the real cars, so, the first step is to assemble them  Bending the flaps of the central section is a long task, you need to ensure that these flaps be perpendicular to the center once bent, what I did is bending the flaps alternatively so it is possible to center every flap against the adjacent ones  Finished brake discs  The next step is to separate the brake calipers and wheel hubs from the plastic discs, I started separating the whole caliper and latter perforating a grove for the metal brake disc, but this resulted to be a little complicated  So for the other three I separated them from the discs and cut the faces, latter a small plastic strip was added to the assembly, this was easy and improved the function of the discs inside the calipers   Then the calipers are assembled to the wheel bearing housing, the yellow papers in the picture were used as spacers to ensure the discs will rotate freely latter  The caliper is assembled to a bracket by 2 plastic bolts; these brackets are assembled to the wheel bearing housing   To make the disc rotate with the wheel a small dowel is added to the discs, this dowel will fit into a groove perforated in the polycap housing of every wheel  The whole assembly, you can see the slot for the disc dowel  Modifications required to the suspension parts to ensure correct height and position of wheels against the body Once the wheels are ready, modifications to the suspension are made to set the ride height and position of the wheels against the body To make assembly tests easier, some preparations to the body are required, since the car will have an engine, the hood is removed from the body using the back of an X-acto blade, the masking tape is used to protect the body surrounding areas  The Fujimi chassis requires minor modifications to accept the Revell Engine, these modifications affect the front suspension parts since the upper wishbones are molded in one part, along with the front wheel wells (parts B5 and B1 respectively)  Since the upper wishbones will be separated, their fixation points to the chassis will be lost and the position of the front suspension would be compromised, so, before separation, the whole suspension parts are glued to the chassis and then the central section is removed to make room for the engine   The whole front suspension is assembled and found that the front wheels are not parallel, presenting some degrees of divergence; I observed this on a friends assembled model, so I think is a defect of the kit, because I didnt modified the position of the suspension arms at all  To correct this divergence problem, the steering bar is shortened  In the rear axle, the Fujimi chassis is way too simplified, so the original fixations for the metal axle are eliminated and the Revell rear suspension parts will be adapted  From the Fujimi kit will be used the wheel wells and the lower wishbones and from the Revell kit, will be used the wheel bearing housings, the upper wishbones, the adjusting rods and the shock absorber  The rear wheel bearing housing is perforated to admit the drive shaft (metal axle) and an extension is added to assemble the brake caliper, a small piece of plastic rod is added as a receptacle for the handbrake cable.  The complete assembly of the rear wheel, (The rear brake discs also have a small wedge to fixate them to the wheels)  Then, front and rear suspensions are assembled to the chassis for test fitting and to verify ride height and wheel positions, at the front the ride height was a little bit higher than rear wheels, so, spacers were added to the lower wishbones and also, the front wheels resulted a little too deep into the body, so spacers were added between the front brake discs and the wheels. And now everything is ok   Checking for the same ride height in both sides and ensuring the 4 wheels touch the floor at the same time  The shock absorbers are machined from 4.8mm diam. aluminum rod, the piston rod is made with chromed steel rod of 0.8mm diam. The dimensions are taken from a picture of a 599 shock absorber  The spring is made rolling 0.5 mm diam. wire around a machined tube to obtain the required diameter of 3.5 mm  With this, the wheel adaptation and suspension modifications are finished, in the next update, Ill start with one of my personal favorite parts of every model, the engine. Well, Thanks for looking, I hope you all like it and any comments, suggestions or advices, are always welcome.
__________________
Happy modeling! Ramon Garcia Puebla, Mexico 
|
|
#4
03-05-2010, 01:02 AM
|
||||
|
||||
|
Re: Ferrari 599 Hamann
Wow, this is REALLY in-depth. I had a good read through all of it, thanks for sharing your thoughts and processes.
|
|
#7
03-05-2010, 11:16 AM
|
||||
|
||||
|
Re: Ferrari 599 Hamann
Great job, mate. Bravo.
Max 
|
|
#9
03-05-2010, 11:57 AM
|
|||
|
|||
|
Re: Ferrari 599 Hamann
Excellent choice of subject with great modifications. I will certainly follow it!
Quote:
Keep it up. 
|
|
#10
03-05-2010, 03:20 PM
|
||||
|
||||
|
Re: Ferrari 599 Hamann
I like how you machined new sleeves from metal and used the fujimi spokes for the inside. Keep us posted, as we don't normally see great progress threads like this one.
 BTW I think the shocks look sweet.
__________________
In Progress    
|
|
#12
03-05-2010, 04:58 PM
|
||||
|
||||
|
Re: Ferrari 599 Hamann
Great modelling effort. It´s definately nice to follow your WIP and your abilities to make a fantastic model as well a your attention to detail.
Keep it up and show us your steps to competlion in this well known manner. Robert
__________________
Recently finished Projects:
Porsche 911 Carrera RS 3.0 Current Projects: Ferrari 250 GTO LM 1962 (chassis #3387)  
|
|
#14
03-05-2010, 08:36 PM
|
|||
|
|||
|
Re: Ferrari 599 Hamann
Simply inspiring. I REALLY need to get a lathe/mill.
I think the front end is still a bit to high in comparison to the 1:1, but that may just be my perception. also I think the tires have to much sidewall which may be making me think the suspension is off.
__________________
There is a very fine line between "hobby" and "mental illness." 
|
|
|
POST REPLY TO THIS THREAD |
 |
|
|