|
|
| Search | Car Forums | Gallery | Articles | Helper | Air Dried Beef Dog Food | IgorSushko.com | Corporate |
|
|||||||
| How-to | Technical Info A wealth of information at your disposal. |
 |
 Show Printable Version | Show Printable Version |  Subscribe to this Thread
|
|
|
Thread Tools |
|
#1
 11-24-2005, 03:07 AM
|
|||
|
|||
|
Lower Manifold Gasket
I've been meaning to do a writeup on a lower gasket install seeing as I did it not too long ago. I've learned and been helped a great deal from this forum so I'm glad to offer something back.
I apologize in advance for my lack of artistic ability. PLEASE NOTE: This job must be done when the vehicle is completely cold, lest you risk warping your aluminum intake manifold. I was already changing the CPI out so I figured I might as well go all out.. it was another 10 bucks for the lower gasket and I knew it would give me a chance to get everything really clean. Little did I know that a few mistakes would REALLY foul up this job in a hurry. I'll go in to detail as I explain. Step One - remove upper intake plenum and all sensors, exposing CPI: 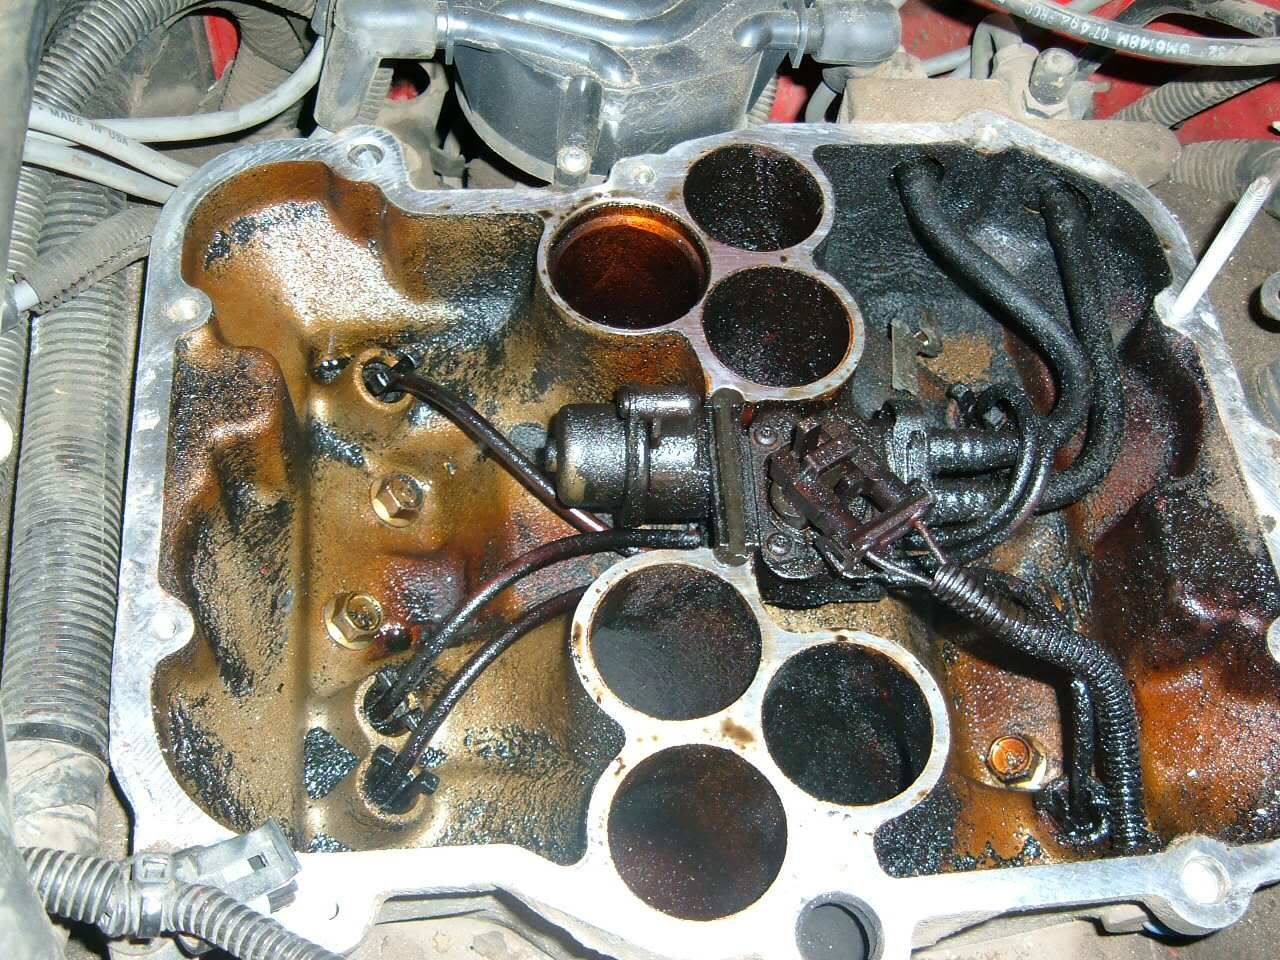 Step 2 - Remove AC compressor mounting bracket, disconnect coolant line and heater hose. Disconnect inlet and return fuel lines. Remove spark plug wires from cap, remove cap, and mark position of rotor on distributor. Step 3 - Remove bolts. It is recommended that you unbolt the outer first, removing the bolts inside the manifold (surrounding the CPI) last.   Step 4 - Clean the lower gasket surface. Do yourself a favor and get a razor blade rather than those crappy gasket scrapers and go to town on it (making sure not to gouge it). Razorblade + acetone works very nicely. While you're at it you may wish to remove carbon from the EGR port. I had to chip it and vacuum it out. As you can see, doing this job I got some debris in the lifter valleys that I had to vacuum out, and I had to soak up a little bit of coolant. More went in the crankcase, so I changed my oil immediately afterwards. Once you have it all cleaned up put some of that weatherstrip adhesive in the groove on the portion of the gasket that goes around your coolant ports (four total, two front and back). Let it stick for a few minutes so it doesn't slide when seating the manifold by hand tightening a few screws in. Once the gasket has had a few minutes to stick you can remove the bolts holding it in place, and apply your RTV to the front and back of the lower manifold area. Use 1/4" bead along the entire surface making sure to leave no holes. Seat the lower manifold immediately. Bolt the center in first, followed by the outer, tightening each bolt slowly. Torque to spec. Use some thread sealant as these are going in to the lifter valleys. Also use thread sealant when reconnecting the inlet and return fuel rails. 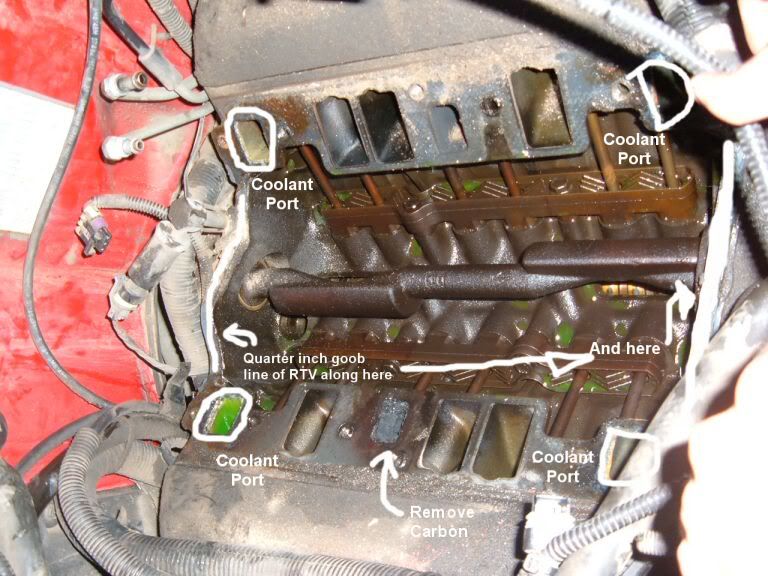 Now remember, RTV takes 24 hours to fully cure so don't even think about driving your truck for a while! A few pointers for this job. Some are requirements, some are just suggestions: -don't overtighten your bolts -have two sets of hands for seating the lower manifold (there are a lot of wires that can get in the way -connect the inlet and return lines BEFORE bolting the manifold back on -Any bolts that are holding on little brackets (or the distributor) should be kept together with their respective pieces. They are of differing lengths. -Before reconnecting heater and coolant hoses reconnect your coolant temp sensor as this one is a pain!
__________________
Quote:

|
|
#2
11-24-2005, 03:24 AM
|
||||
|
||||
|
Re: Lower Manifold Gasket
Excellent write-up and pictures! I admit - I wussed out when mine broke apart and I took it to a shop. They too did the work in about 3 hours or so, and it required fresh coolant, oil and oil filter.
|
|
#3
11-24-2005, 03:47 AM
|
||||
|
||||
|
Re: Lower Manifold Gasket
Did you use a torque wrench for the job?
what was the tightening sequence for the lower intake manifold bolts?
__________________
1995 Factory Blazer Service Manual for sale, PM if interested.
|
|
#4
11-24-2005, 10:57 AM
|
|||
|
|||
|
Re: Lower Manifold Gasket
I didn't do them in any sequence other than inside then outside, cris-crossing and tightening bolts in increments. Don't have my Haynes on me here at work for the torque spec though.
__________________
Quote:
|
|
#6
11-25-2005, 12:52 PM
|
|||
|
|||
|
Re: Lower Manifold Gasket
Yeah.. I've heard bad things about not torquing the lower manifold to spec.. something about the balance shaft twisting or something. Torque em to 35 in increments.
__________________
Quote:
|
|
|
POST REPLY TO THIS THREAD |
 |
|
|


