|
|
| Search | Car Forums | Gallery | Articles | Helper | Air Dried Fresh Beef Dog Food | IgorSushko.com | Corporate |
|
|||||||
| WIP - Motorsports Post topics for any "Work In Process" motorsports vehicles in this sub-forum. |
 |
 Show Printable Version | Show Printable Version |  Subscribe to this Thread
|
|
|
Thread Tools |
|
#1
 08-15-2005, 12:21 PM
|
|||
|
|||
|
Introduction and Eighties Contest Entry: 1988 McLaren MP4/4
Hi everybody!
I have watched your Le Mans contest during the earlier part of the year with great interest but i was way too late to join. Now with the new contest i'll give it a try:-) With a deadline 11 months away even i may have a chance to finish something in time. My interest if it comes to modeling are F1 and LM cars from 1:43rd up to 1:12 scale. To be honest though i have finished only one 43rd car in "recent times" and a couple under progress on my desk ( for longer than i'd like to admit:-). The contest theme has now changed my planned schedule and against my promises i have started something new. My choice was in between a Rothmans 956, a Sauber C9, the McLaren MP4/4 and a Ferrari F189 ( aka 640 ) ( all by Tamiya ). Since the Porsches and Saubers seem to be very popular here i decided to go F1 and while the Ferrari is my favourite F1 car the McLaren finally won for a couple of reasons. - Reference.... I managed to take a bunch of pictures of the real thing during the last two Goodwood FOS.....very important :-) - Modeling problems.... i have a 1993 McLaren MP4/8 on the desk which is about half finished. It has become a testbed for my modeling skills and various techniques and after i had my fair share of problems with it this will make the 4/4 a bit quicker ( hopefully ). The Ferrari would be more trying new things out again.... - Detail..... I think the Ferrari would be a bit too short on details for this contest in fact. One of the things i like about that car is its cleanliness! There's just so little in comparison to other cars ( especially an active suspension MP4/8 ) but since i want to add some serious detail for the contest the McLaren looks like the better option:-) - History....and success. I wanted something great as a topic and if it comes to successful F1 cars of the '80s this is the one! Driven by Senna and Prost it won 15 of the 16 races that year and would have won all of them if not for an end of race collision of Senna laping J.L.Schlesser ( Sauber C9 anyone :-) at Monza....but that's history;-) Senna finally won his first championship in the 4/4 that season and i guess it will look great next to the 4/8 ( his first next to his last McLaren ). The Ferrari was more innovative one year later but unfortunately very unreliable.....it's still the nicer car though:-) So much talking for now! Watch this space until i have figured out how to post pictures here and then i'll start the build diary. So far the forum rules at the bottom of the page say i may not post attachments!? What do i have to do? Any hints are very welcome! Cheers Jaykay 
|
|
#2
08-15-2005, 12:47 PM
|
||||
|
||||
|
Re: Introduction and Eighties Contest Entry: 1988 McLaren MP4/4
Welcome! This should be an interesting build, I'll be keeping an eye on it.
As for posting pictures, my advise is to foind some webspace to put them in (your ISP might give you some with your account, or you could by a domain and some space like I have). Upload your pictures there and then when you create a new post you can click on the icon of the picture frame and link the pictures in. You do get a gallery with your AF membership but there's a limit on the size of pictures you can upload, and the number. If you are like me you'll run out very quickly!!!
__________________
My current work-  
|
|
#3
08-16-2005, 11:31 AM
|
|||
|
|||
|
Thanks for the welcome:-)
My first step to adding pictures.....is by link. It works only like this but i want the image to show up in the thread of course! Have to find a better place to host them. So far i'm using the company account and i can't host pictures here:-( I'll see.... 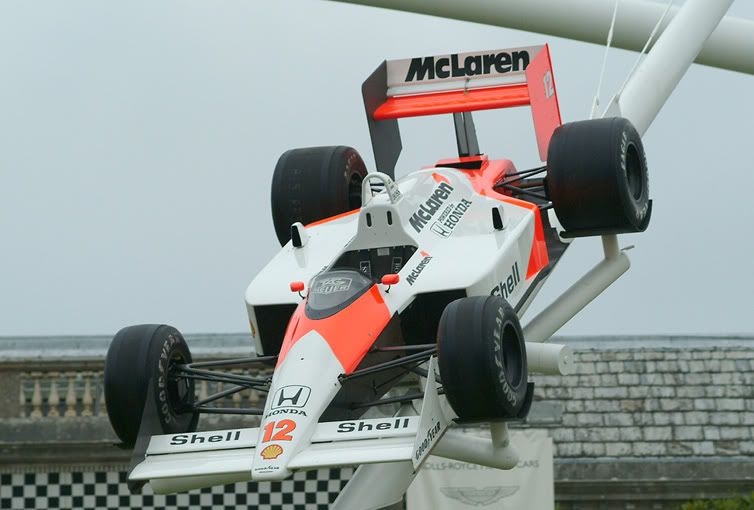 This is the real thing on aerial display at this year's Goodwood Festival of Speed. It's the "early season" version with turbo air intakes coming out on top of the sidepods. I will build the late season one without them. More to that later:-) Next one is the kit contents: 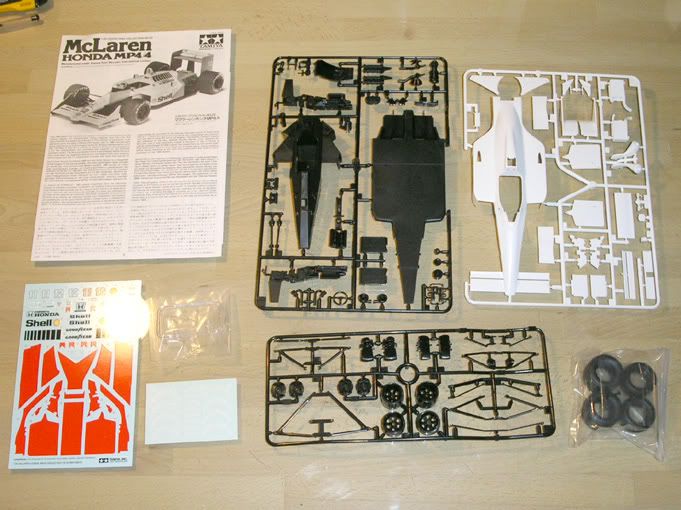 It's not a lot and you can see it's an old kit if you compare the quality and amount of parts to one of Tamiya's later F1 kits like the Williams FW24 but it's a good starting point:-) Last edited by jaykay640; 08-16-2005 at 12:49 PM.
|
|
#4
08-16-2005, 12:07 PM
|
||||
|
||||
|
Welcome,
Looks to be a good subject for the 80's contest. i would highly recomend that you paint all the red on the body instead of using the decals. its pretty easy to mask these areas off. Also you can use the AF gallery to post your pictures. Go the Gallery, the link is at the top of the page. once in the Gallery at the top right there is a button that says upload image, click it. now hit "browse" and find the picture you want to upload. then hit "upload and submit". then you need to hit "process image". now your image is in the AF Gallery. go back to the Gallery and click on your picture. it will now be full-size and just under the picture there will be text that is the link to your picture. right click the link (and NOT the picture) and select copy. now you can paste the link in your post and the image will show up in your post. Hope this helps!
__________________
Friends dont let friends buy die-casts... "If it can't run 24hrs., it aint sh!t...." -me   
|
|
#5
08-16-2005, 12:13 PM
|
||||
|
||||
|
Re: Introduction and Eighties Contest Entry: 1988 McLaren MP4/4
Hi Jaykay, great entry, I look forward to seeing your progress. On the subject of image hosting, I use www.photobucket.com You can upload your pictures there and it gives you the [img] link below the picture. You can then just cut and paste this into the forum and your pic will display.
Good luck with both the pic hosting and the build.
__________________
The Willster....
|
|
#6
08-16-2005, 12:56 PM
|
|||
|
|||
|
Wahey!!!!
Thanks for the tip with photobucket willster! I read about it before once but had forgotten about it. I had a look at fotki but this will work fine for the moment and if i need to upgrade it's half the price:-) As you can see the pictures show up now! So on we go:-) freakmech..... the stripes will of course be painted! As i mentioned i am a bit more advanced with the 4/8 who got the same treatment ( fully painted with 2K-primer, 2K-white, 2K-RAL3024 ( that's the exact McLaren fluorescent red ) and 2K-clear!
|
|
#7
08-16-2005, 01:26 PM
|
|||
|
|||
|
First comes a picture of the monocoque as it comes off the sprue....can't stay like that:-)
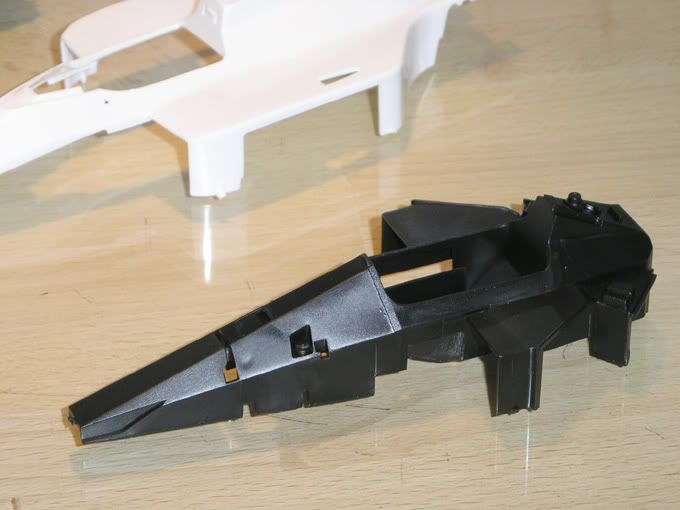 The nosecone will get a different trim and for the installation of suspension and other components it's in my way anyway. If you do it the way the instructions say you will get shutlines where they shouldn't be and other problems. I'll do it my way. Same goes for the sidepods. Their material is way too thick anyway so off they go....:-) 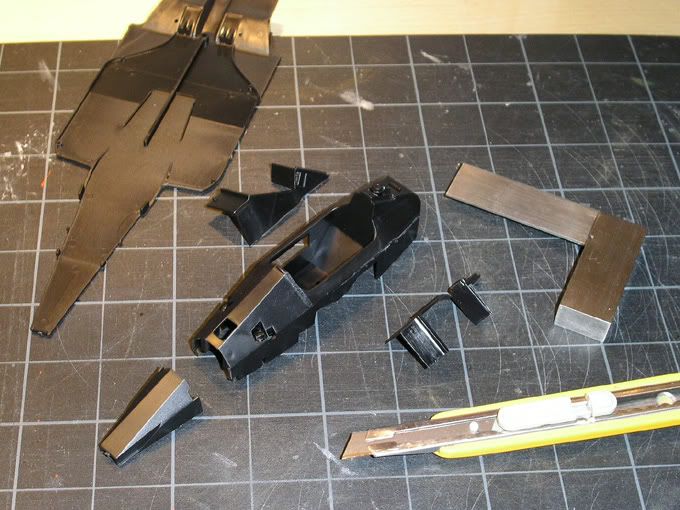 The undertray loses the holes where the body pins are supposed to go. That's all wrong and would look very toyish... 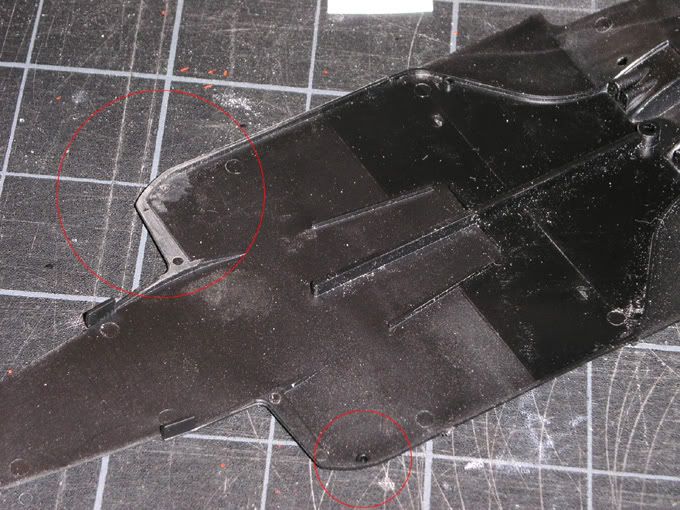 The rear end of the undertray is also plagued by the "injection molded model material thickness"-problem: 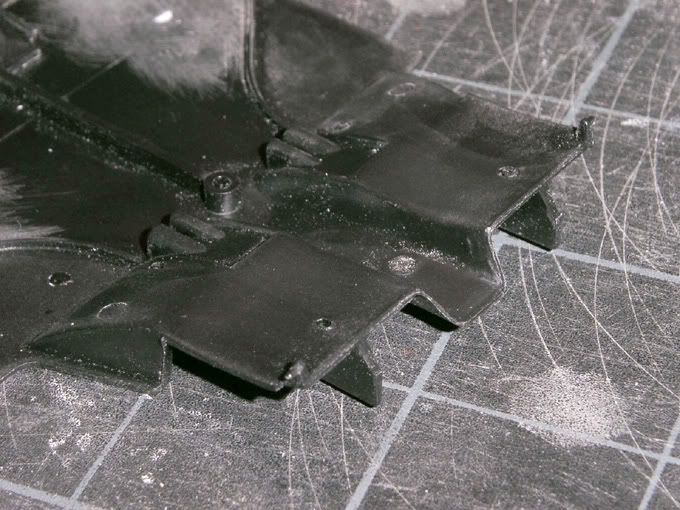 That diffusor is waaay too thick.... 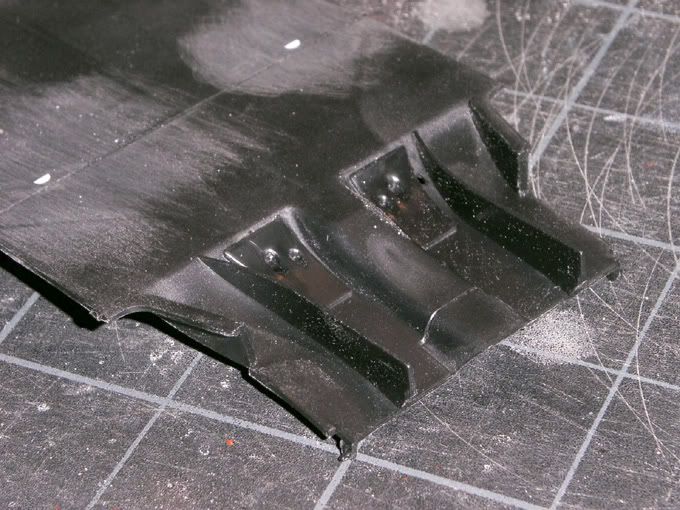 ...so it follows the sidepods:-) 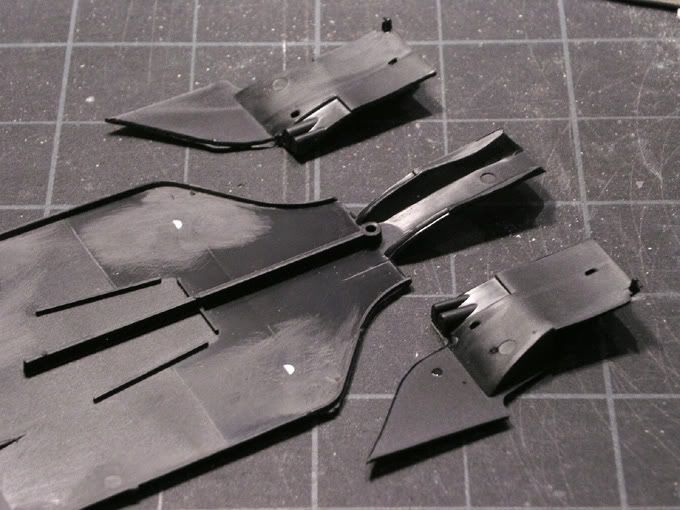 That's it for now.....gotta go for a birthday party:-)
|
|
#8
08-16-2005, 05:43 PM
|
||||
|
||||
|
Re: Introduction and Eighties Contest Entry: 1988 McLaren MP4/4
Welcome to AF and the Eighties Comp jaykay!
 Good luck with the MP4/4 - looks like you know what you are doing. 
|
|
#9
08-17-2005, 10:52 AM
|
|||
|
|||
|
Thanks RallyRaider....i hope:-)
Here we go with some more progress: After cutting the rear end pieces off i filed and sanded the middel part thin to about 0.3mm ( very annoying job with PS but there will be more...) and started replacing the pieces with 0.3mm sheet-PS using the old pieces as templates. This creates a more realistic undertray and diffusor thickness. In the background you can see i also started filling holes on the monocoque with sheet-PS superglued in and then i sanded all surfaces to get them straight and even. 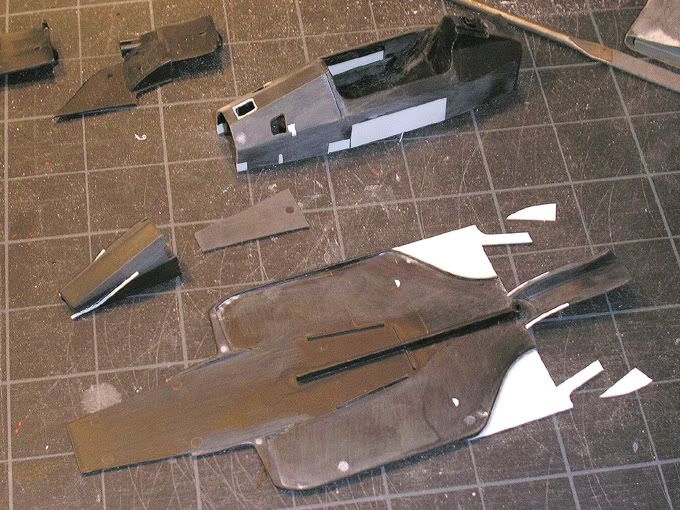 In the next photo you see the diffusor in an advanced state. The middle fins are missing. They will be seperate pieces also from 0.3mm PS and follow later. Around the sides you see a 0.15mm thick brass strip. This is also superglued and creates a flange like on the real car that will later fix the body. My first try to do this on the MP4/8 was with a plastic strip but that didn't last. Metal is the much better solution here:-) In the rear part where the body tapers that flange on the real car has a kink downwards. In the kit that's just a straight edge so i filed it about 0,7mm lower. I'll also have to change it on the body part. 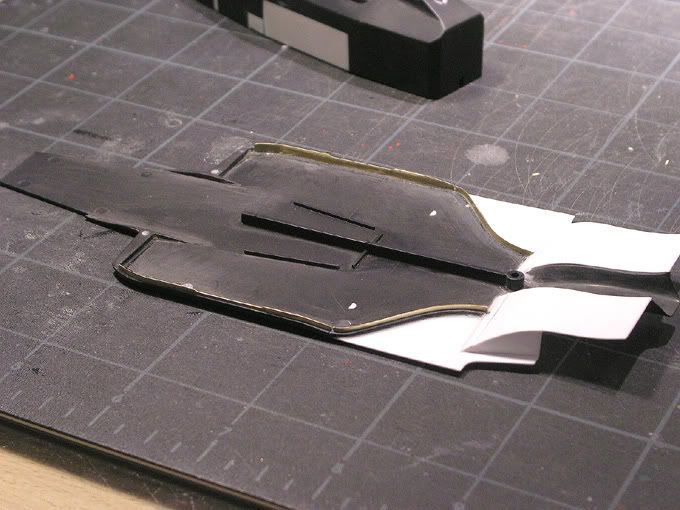 This is the real nosecone:  The kit piece looks like this and needs changes: 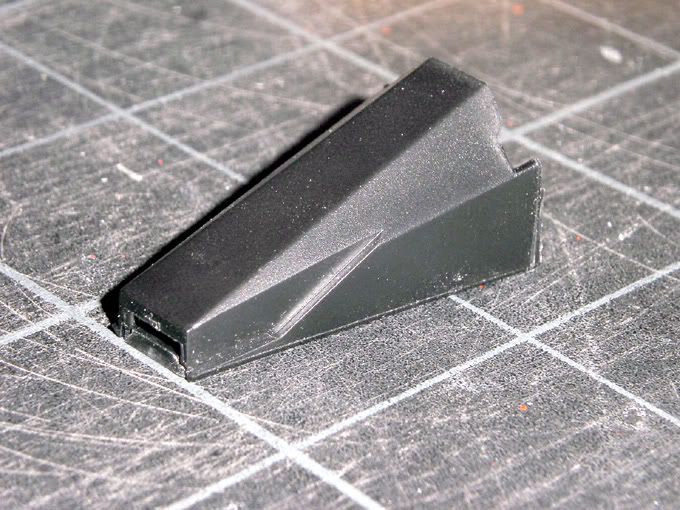 This is another view of the nose where the nosecone meets the monocoque. You can see the black piece in between that also has the mounting points for the upper front suspension arms. 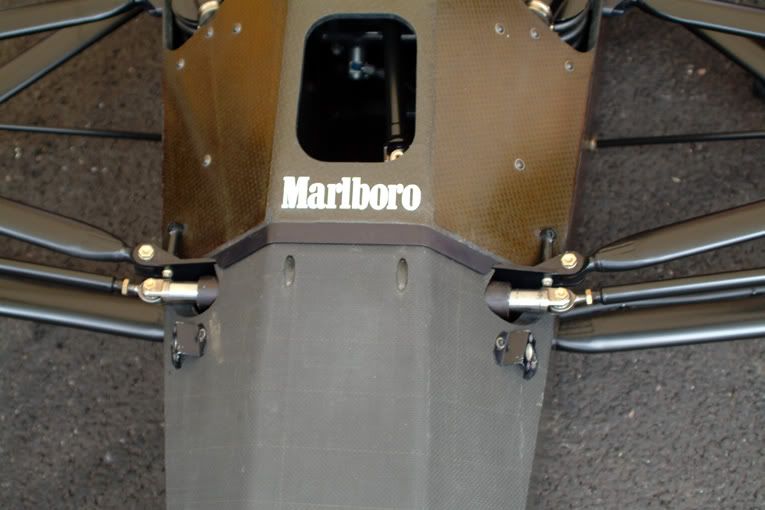 I built this from 0.15mm sheet brass and a brass U-profile ( soldered together and then filed a lot....). Plastic again doesn't do the job ( yes i tried before :-) 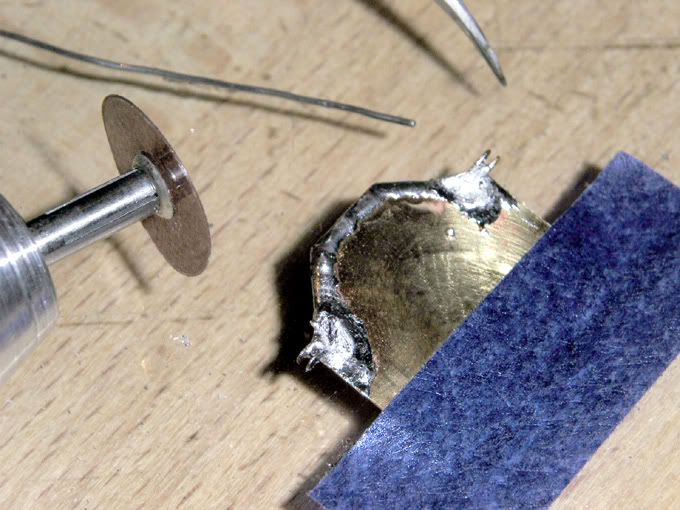 It now looks like this: 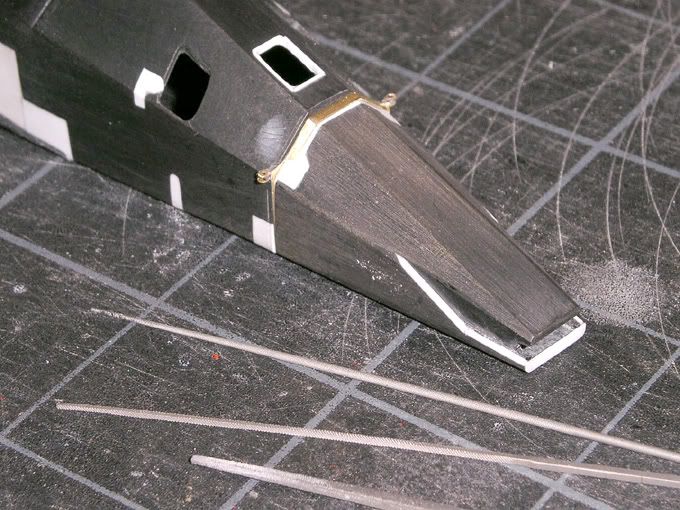 The white bits show where i added material to fill the holes or change the shape ( nosecone....to get it right...see original ). The hole on top through which the pedals and steering column will be visible later was too big. The openings for the pullrod dampers in turn were to small and i changed the shape slightly. I cut the molded in dampers off to replace them with extra bits in a deeper hole later ( that's gonna be tricky in fact because i want to do it after CF-decaling and painting to get seperate pieces like in reality ( see next picture ). I'll see how i get that done:-) 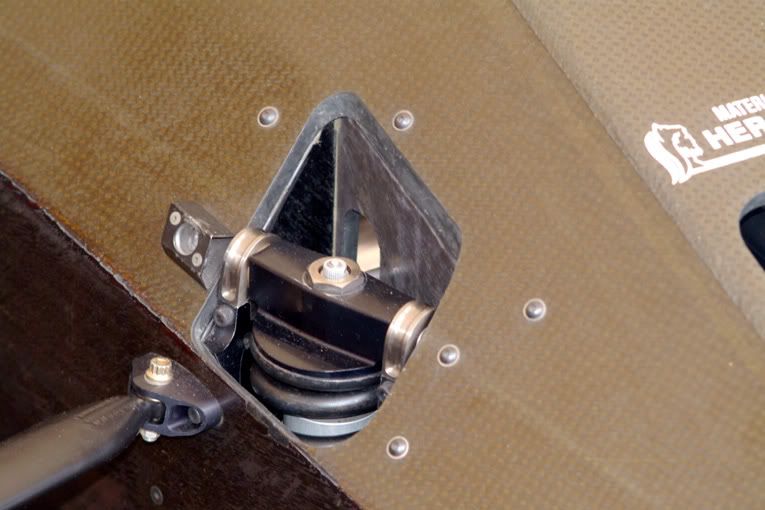 Next is a picture of the real cockpit: 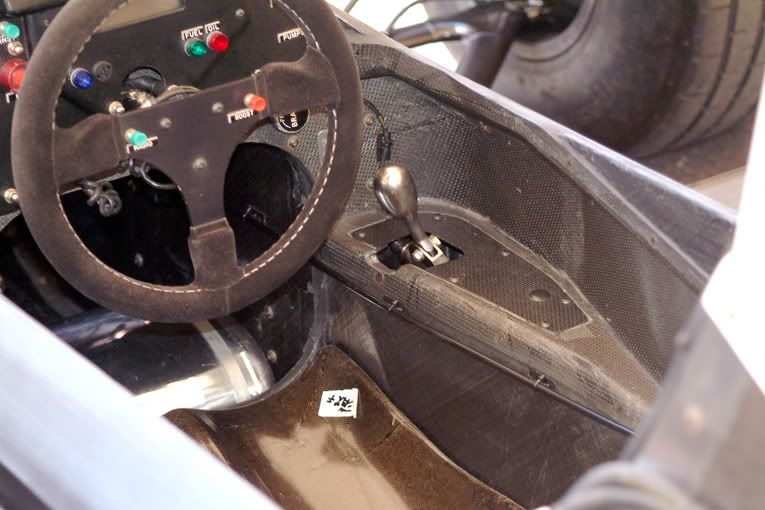 The armrest/gearshift in the kit ( the black piece ) is way too rough so i cleaned the sidewall and scratchbuilt one from 0.3mm ps ( step by step always with superglue ). It has a bigger hole like in reality and will get an insert with the gearshift. They will stay extra bits through painting and CF-decaling. This will make that job much easier:-) 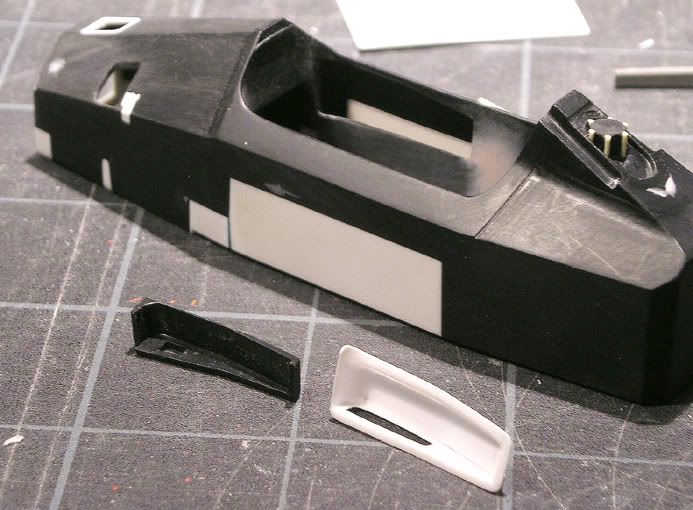 This is the piece in place: 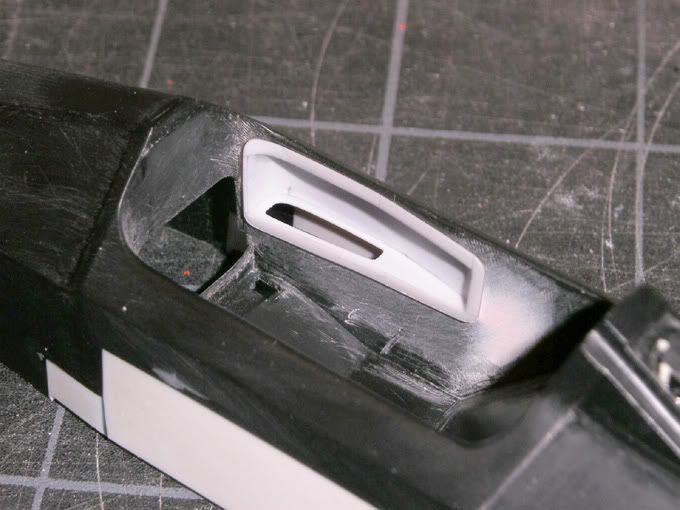 That's it for the moment. I had some holidays which gave me more time to model so now i need to carry on ( job permitting :-) Don't expect daily updates:-)
|
|
#11
08-17-2005, 06:59 PM
|
||||
|
||||
|
this is some incredible work your doing! im building the Lotus Honda 99T as one of my entries, but i dont stand a chance of acheiving this kind of detail due to lack of reference. you wouldnt happen to have some good reference pics of the 99T you could send me? you know... to make things fair
 Keep up the great work!
__________________
Friends dont let friends buy die-casts... "If it can't run 24hrs., it aint sh!t...." -me
Last edited by freakmech; 08-18-2005 at 01:33 AM.
|
|
#12
08-17-2005, 09:22 PM
|
|||
|
|||
|
Re: Introduction and Eighties Contest Entry: 1988 McLaren MP4/4
Quote:
Nic
|
|
#13
08-19-2005, 02:28 AM
|
|||
|
|||
|
Re: Introduction and Eighties Contest Entry: 1988 McLaren MP4/4
Quote:
Well i don't have anything i took but instead of building on my model last night i gave my scanner a workout and got you the stuff i have in my reference books. There are three pages in the F1Modeling Ayrton Senna Giga Special ( which i guess you don't have and won't get anymore:-) and some others. I can't post them here obviously so pm me where to send them ( some are big....). For more i recommend you get over to F1M.com and ask. There should be someone who took pictures of it last year at Goodwood.....i just didn't have enough time:-) Now you know what that means.....i wanna see some results from you here!!:-) Cheers Jaykay
|
|
#14
08-19-2005, 04:30 AM
|
||||
|
||||
|
Re: Re: Introduction and Eighties Contest Entry: 1988 McLaren MP4/4
Quote:
|
|
#15
08-22-2005, 11:04 AM
|
|||
|
|||
|
More progress over the weekend:-)
I started to work on the seat. This is the piece that comes in the kit: 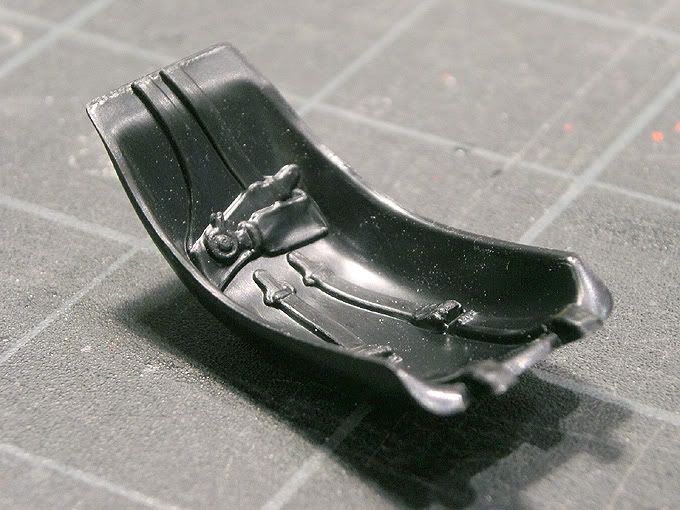 It's supposed to look a bit more like this: 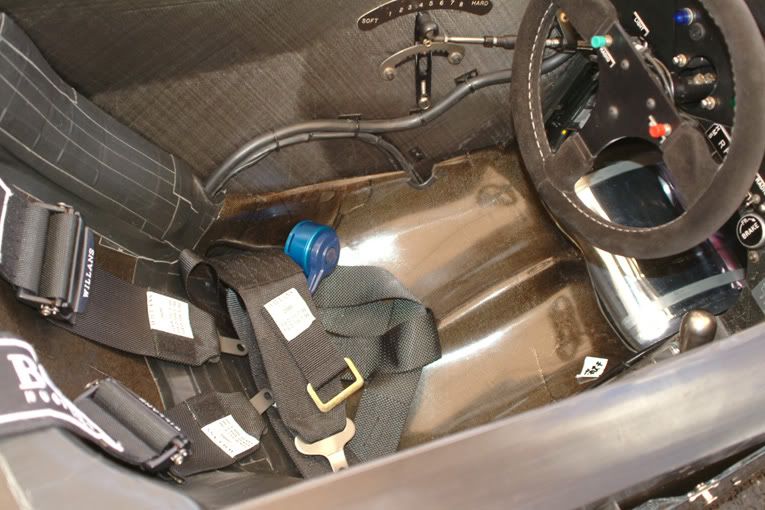 First of all the molded in seatbelt had to go ( rotary tool, files and sandpaper ) and then it needed some shape around the legs! I put styrene strips on the sides and the middle, then shaped the edges and filled them up with polyester putty. With more filing and sanding i got the right surface and then drilled and filed holes for the lower seatbelts and some cables. These are also thinned out from the rear to get the material very thin at the holes' edges. Now it needs some primer. 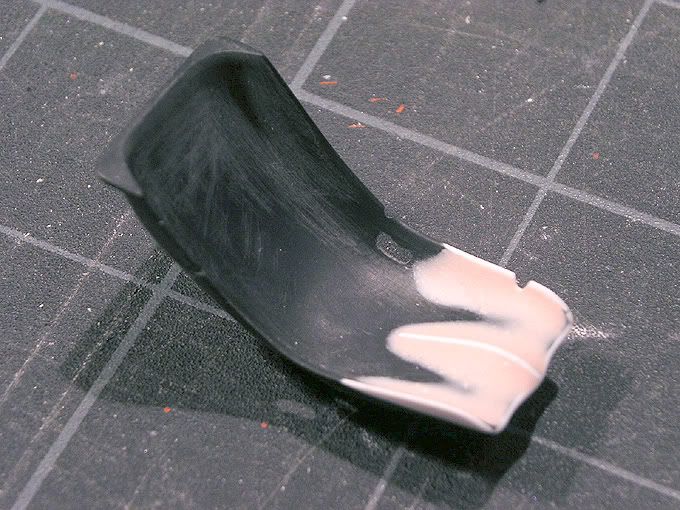 I also changed the armrest again....got the rear end wrong the first time:-( It still needs a little cutout near the gearstick and the insert bit. 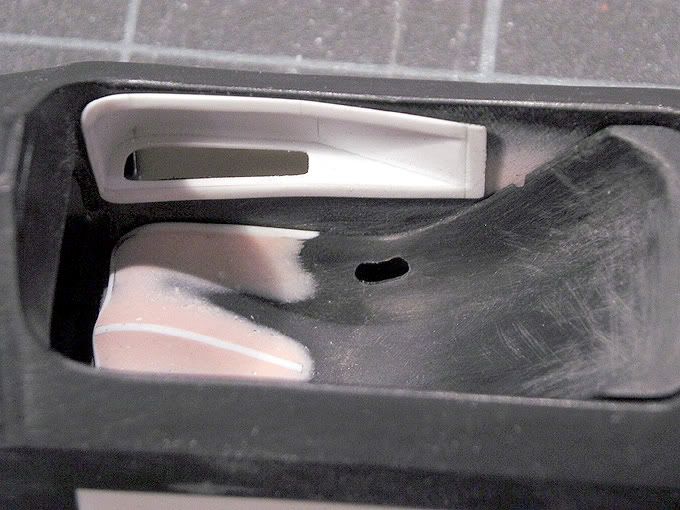 I then decided to attack the cowling. The kit part comes like this: 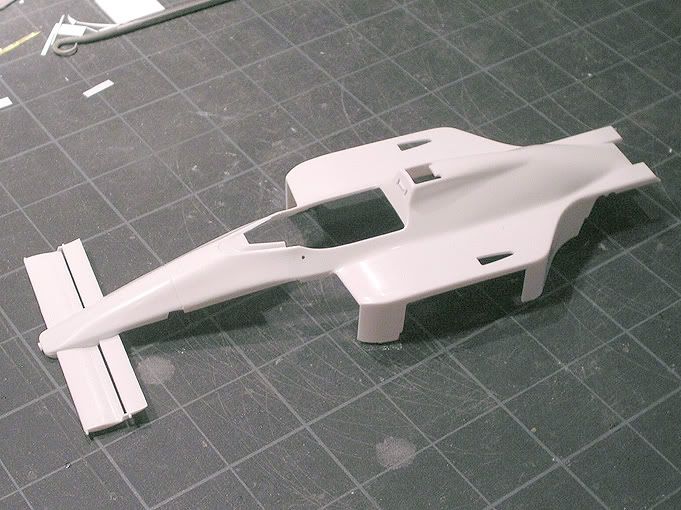 Generally speaking it's not bad but needs some work all over. I started by closing the holes for the turbo air intakes on the sidepods and the mirror holes with bits of styrene and then sanding all outer surfaces to get them straight. Below the front wing i closed some holes ( wonder what they were meant for in the first place....) and ejection marks and sanded the wing elements. The trailing edges needed some thinning and i cut of a little piece of plastic that connected the flaps on each side. That will later be replaced with PE. Then started the really annoying part....thinning the whole cowling. Due to the injection molding process all the walls are way too thick for that scale ( like on the undertray before ) but instead of replacing the only choice here is "dremeling", filing and sanding. The inside of this cowling is not very clean anyway. You can see there's been some serious improvement in mold making during the last 15 years:-) It's a bit difficult to show here ( especially on this white piece ) but this is one of the sidewalls before treatment: 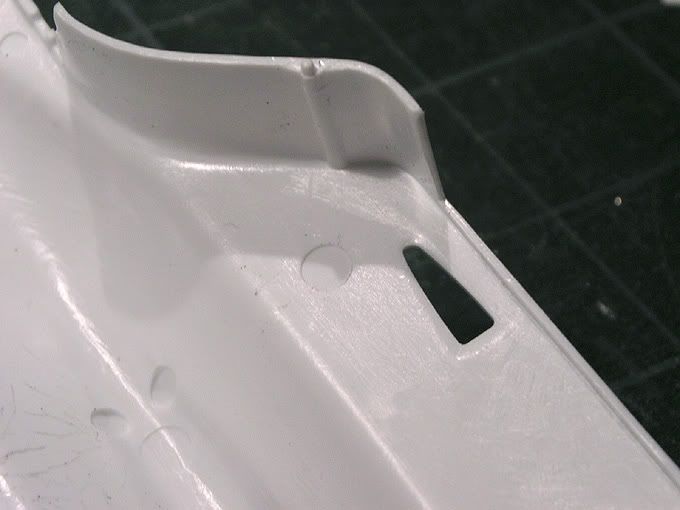 ....and this is another corner afterwards. 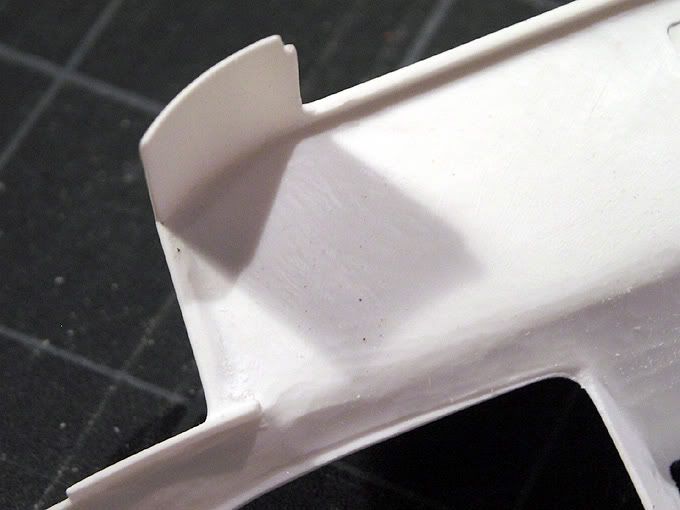 I try to get the walls quite thin especially where it's very obvious ( to around 0,5mm - 0,7mm ) because that looks better and helps with space when i add details later. With several layers of paint and decals in some areas they'll grow some "fat" later on anyway. The material stays pretty strong but it's a major league p.i.t.a. to work on. Resin is nicer in that respect but it breaks more easily of course. So much about this. I have another couple of hours to file and sand along and you wont see much of that in a photo but it needs to be done:-) I figured i have to do it now before i start scratchbuilding the sidepods and putting the engine to get the height correct.... Also i have to get the cowling and the monocoque alligned before i get into the internals! Jaykay
|
|
|
POST REPLY TO THIS THREAD |
 |
|
|


