|
|
|

|
|
| Search | Car Forums | Gallery | Articles | Helper | AF 350Z | IgorSushko.com | Corporate |
|
| Latest | 0 Rplys |
|
|||||||
| How-to | Technical Info A wealth of information at your disposal. |
 |
 Show Printable Version | Show Printable Version |  Email this Page | Email this Page |  Subscribe to this Thread
|
|
|
Thread Tools |
 03-30-2006, 11:38 PM
|
#1 | |
|
AF Enthusiast
 Join Date: Jan 2005
Location: jamestown, Rhode Island
Posts: 507
Thanks: 0
Thanked 2 Times in 1 Post
|
Before you start reading...take note that I spent a day and a half trying to remove the bottom balljoint on just one side WITHOUT removing the whole hub assembly. Instead of saving time, I wasted it and ended up removing the whole assembly anyway. Had I done that from the beginning, I probably would have finished in HALF the time.
ALSO! I got my balljoints from AUTOZONE because they were the cheapest and I was trying to save cash. Dealer wanted $1800 for the job, and independant shop wanted $700. I first got $20/ea BallJoints from them made by ValuCraft, to get it all apart and find out that the top balljoints were too big for their port in the control arm. I went back and got the $40/ea BallJoints made by Duralast. These were smaller, but I still needed to slightly file the edges of the hole to fit it. Im sure the expensive ones from the Dealer would have been an exact fit...although I can't see paying near $100 per balljoint. MORAL OF THE STORY - Stay away from "ValuCraft", and you get what you pay for. In the process, I forgot to take the pix, so forgive me...I took them as I reinstalled and tried to put them in the correct order. It fits pretty well. Any questions email me. 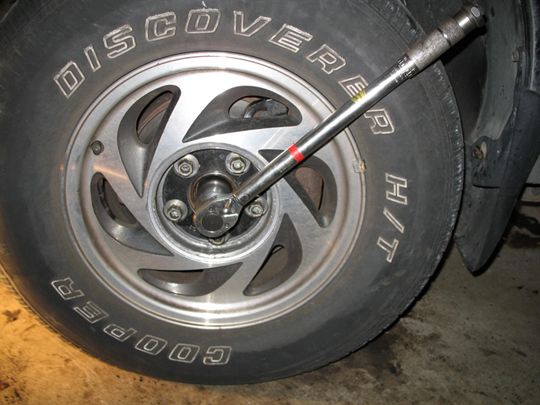 Break the torque on the hub assembly BEFORE you jack the car up. (Use a breaker bar for this...Torque Wrench for illustration purpose only.) 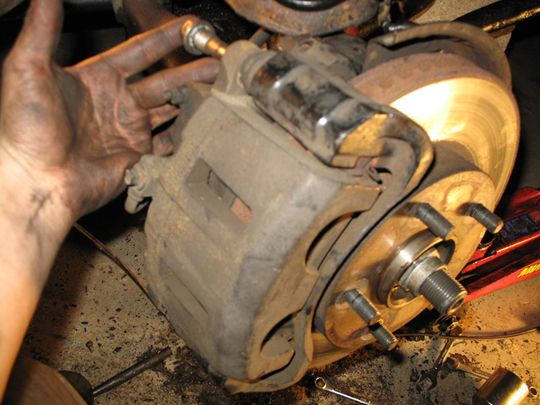 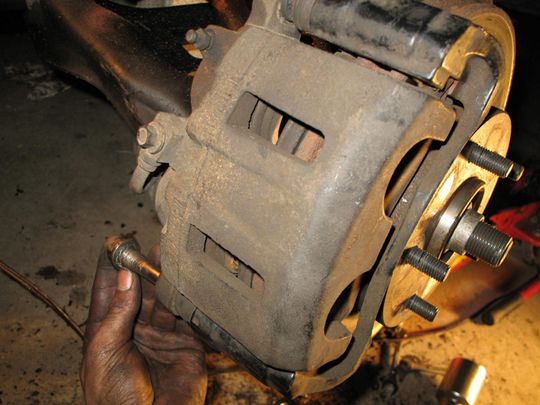 Once you've removed the tire, remove the top and bottom 18mm bolts from the brake caliper. 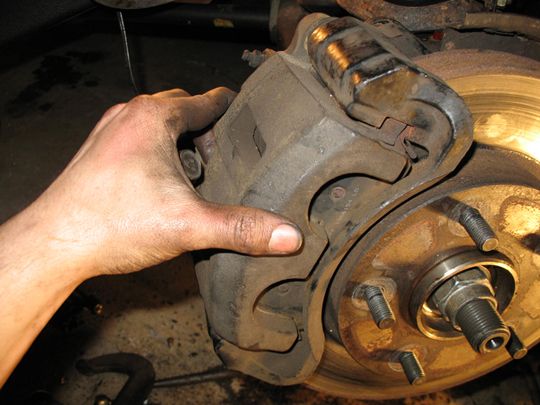 Remove the brake caliper. 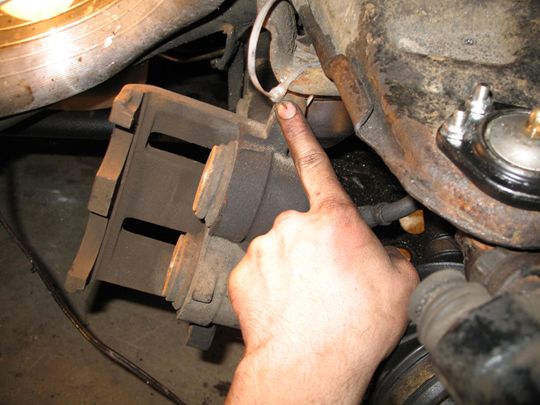 Using a tie-wrap, wire, or string, support the brake caliper out of your way to keep any stress from the brake line. 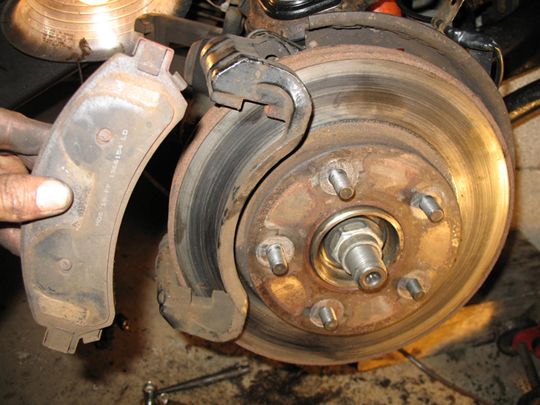 Remove the brake pads. 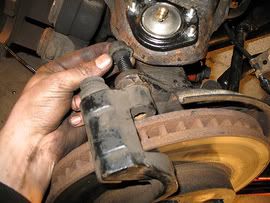 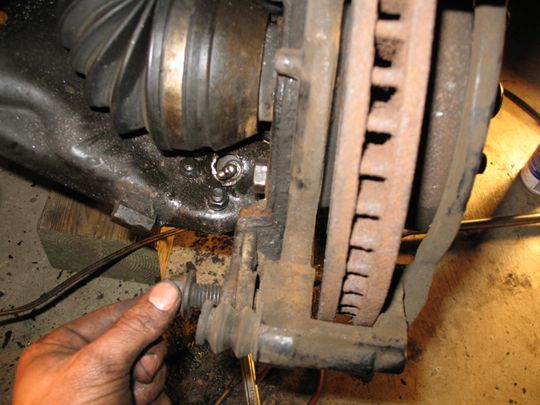 Remove top and bottom 18mm bolts from brake pad housing (for lack of correct term) 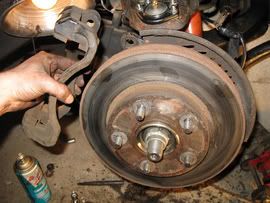 Remove the brake pad housing. 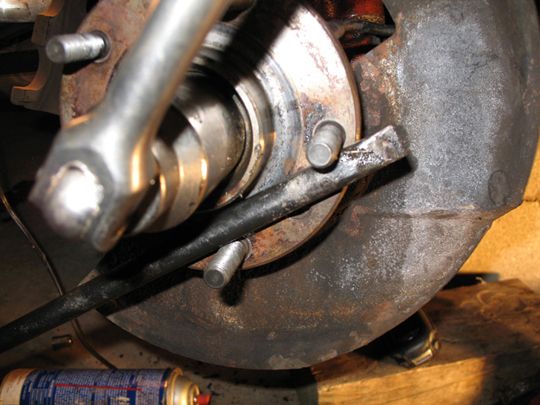 Using a bar to brace the hub from turning, back the hub nut off the rest of the way. Careful not to damage hub threads in the process. 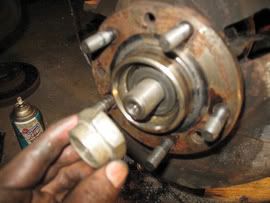 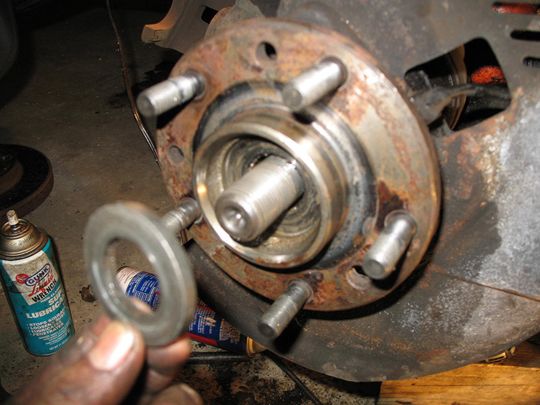 Remove the hub nut, and washer. 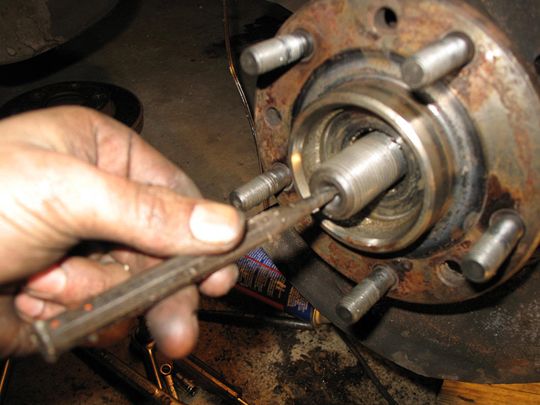 Using a punch in the center of the drive shaft hammer the shaft inward and out of the hub spline. This can be done with a 2x4 instead of a punch. Careful not to damage the shaft threads. Heat and/or liquid wrench may assist the process if the shaft spline is rusted inside the hub. 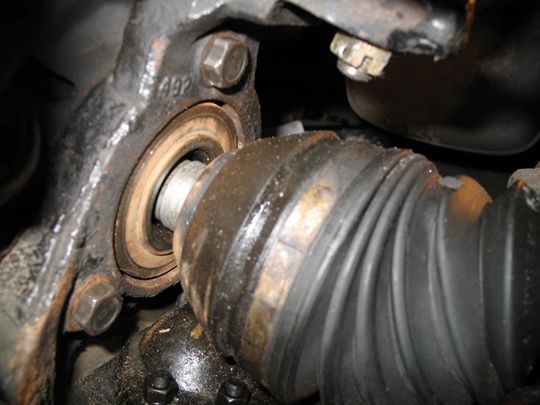 Inner view of shaft backed out of hub. Now remove the three 18mm bolts securing the hub assembly. (max amount the shaft should be back out at the this time shown) 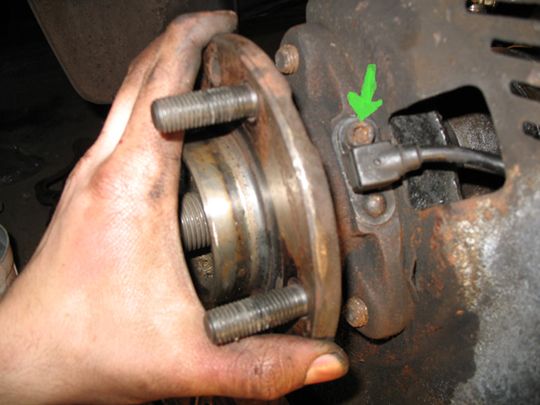  Using correct allen head, remove the one bolt shown here, securing the ABS sensor. Once the bolt is removed, wiggle it side to side and pull it out, and remove the nut securing its wire to the control arm. Now again using your punch, carefully tap the shaft out the rest of the way from the hub, and remove the hub assembly. Put it somewhere clean to avoid debris entering the bearing. 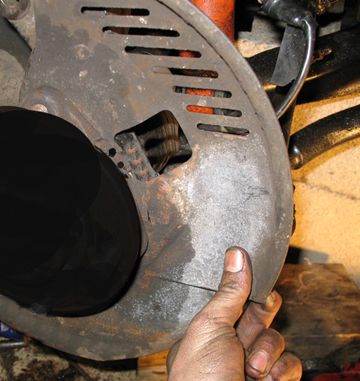 Remove the hub shielding, and now you should have a clear view of both the top and bottom ball joints. 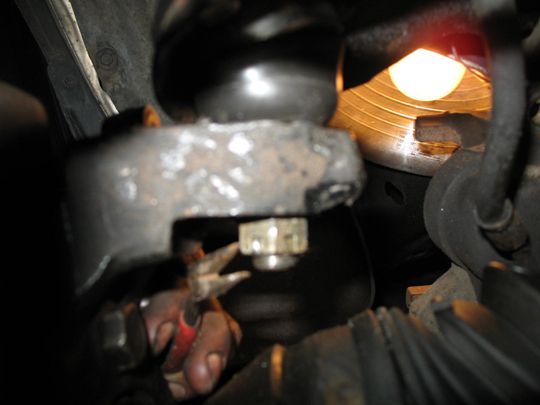 Remove the cotter pin from the top ball joint threads, and back the nut off. 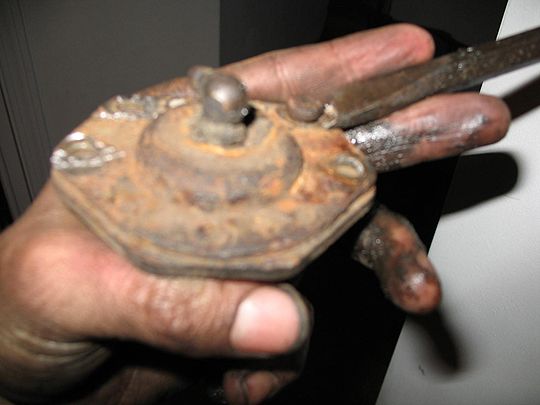 If the ball joints are stock, you will have to use a hammer and chisel to shear the heads off all 4 rivets. This is a quicker process then drilling them out, although you may need to do both. This will take the majority of the job time. 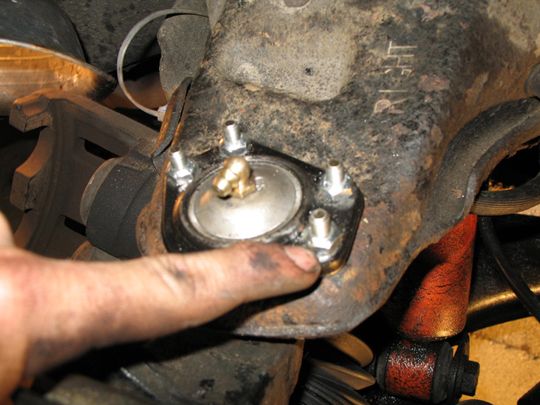 If they've been replaced before, just remove the nuts and bolts. 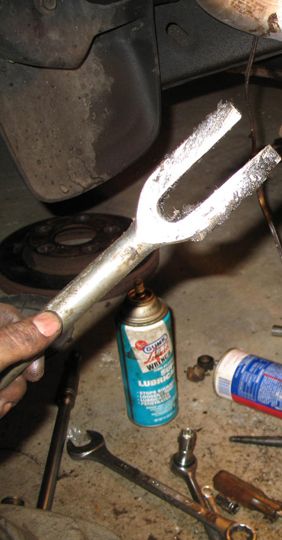 You will now need the "pickle fork" tool that can be rented at most part stores. 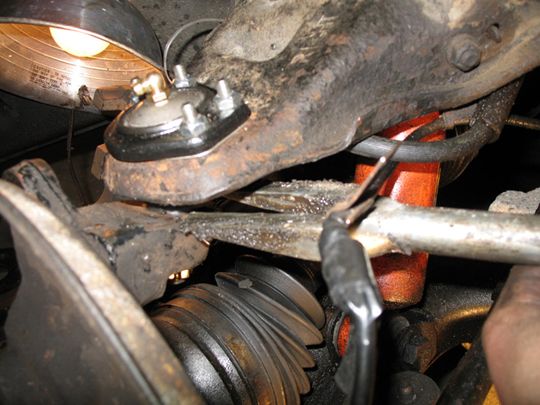 Push the fork into the balljoint shaft so that the threads sit in the middle of the fork. Using a hammer, drive the fork inward till the gradual gap in the fork POPS the ball joint. Keep yourself clear, and be sure to wear eye protection. (NOTE: picture shown still has balljoint nuts and bolts secured, at this time they would be removed) 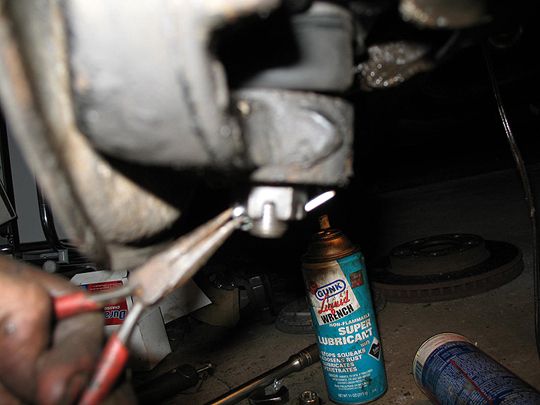 Remove the cotter-pin and nut from the bottom balljoint. 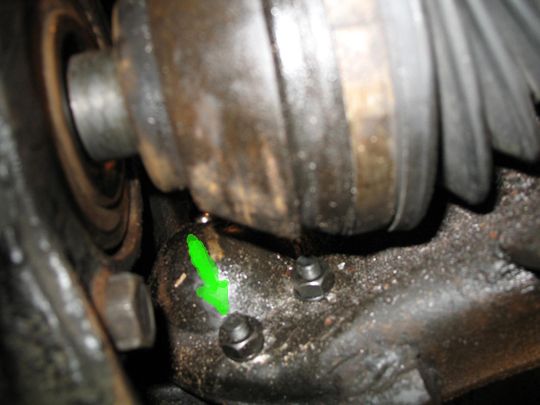 Again remove the four rivets (if stock), or nuts and bolts if they've previously been replaced. 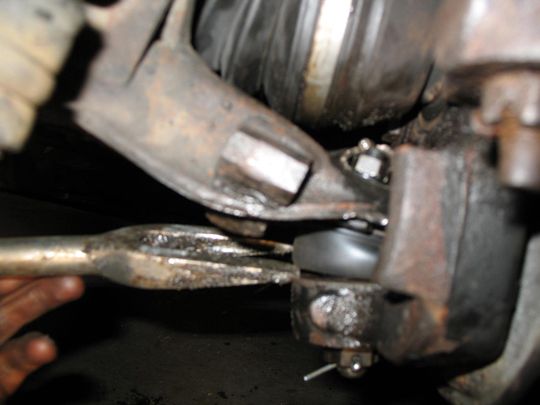 Again, using the "pickle-fork", pop the bottom balljoint out, same as the top, and remove its rivets, or nuts and bolts. After they've been removed, knock the balljoint downward and out of its hole. This was the hardest part of the job. It took a lot of beating with the hammer, some drilling of the rivets, and a full can of liquid wrench. For some reason the bottom ones rust themselves in much worse. It may take hours on just the bottoms....stick with it...they WILL come out eventually! INSTALLATION IS REVERSE OF REMOVAL. I DID THE TOP JOINT FIRST, THEN THE BOTTOM. Before lowering the vehicle, grease all four ball joints, gently till you feel resistance in the grease gun. BE CAREFUL NOT TO OVER PUMP IT, OR YOU WILL BUST THE BOOT! 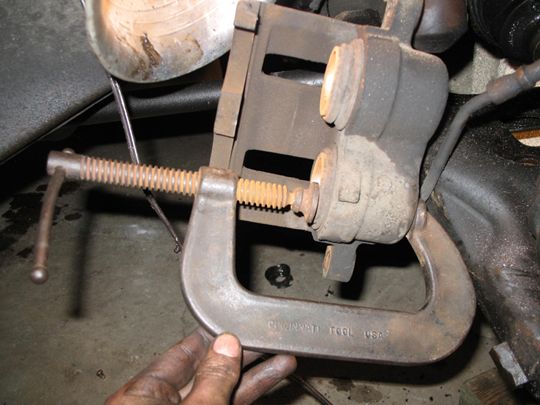 During reinstall, you'll need to compress the caliper to fit it over the break pads. Compress them slowly as to not lock them up. I reccommend using the old pad to compress the pistons simultaniously. I was just struggling to take photos and finish the job. It was 9pm, and I was holding it in one hand, and the camera in the other.  Be prepared when you take it for the first test drive to have spongey breaks till it retightens around the break pads. A dozen or so slow spaced pumps on the brakes should bring it back to normal. Just dont race out and go to hit the brakes fast. You won't stop! After everything is reinstalled, and the truck is back on the ground, retorque hub nut to 123 ft. lbs. Last edited by JoshBarber; 03-31-2006 at 11:08 AM. |
|

|

|
|
03-30-2006, 11:48 PM
|
#2 | |
|
AF Enthusiast

Join Date: Mar 2004
Location: Sussex, Wisconsin
Posts: 1,073
Thanks: 1
Thanked 2 Times in 2 Posts
|
Re: BALL JOINT REPLACEMENT HOW TO (w/ pix)
Nice pics.
Great post. Should help some of the recent posters who've been asking/having trouble. But why are you removing brand new joints towards the end of your post? (I know it's just for illustration purposes) Bet your Mom is proud of your fingernails ..... NOT. 
__________________
It's my opinion, don't take it personal. '04 T&C,'01 Blazer ZR2, '97 Blazer, '97 Sunfire, '85 Vette, '79 Civic, 94 FLSTC |
|
|
|
|
|
03-30-2006, 11:53 PM
|
#3 | |
|
AF -Advisor
 
Join Date: Sep 2003
Location: Sudbury
Posts: 13,565
Thanks: 0
Thanked 1 Time in 1 Post
|
Re: BALL JOINT REPLACEMENT HOW TO (w/ pix)
Excellent thread.
I will definitely keep this in mind. Scared me at first when you were using the torque wrench to break the center nut in the first pic.
__________________
1995 Factory Blazer Service Manual for sale, PM if interested. |
|
|
|
|
|
03-31-2006, 12:01 AM
|
#4 | |
|
AF Enthusiast
Join Date: Jan 2005
Location: jamestown, Rhode Island
Posts: 507
Thanks: 0
Thanked 2 Times in 1 Post
|
Re: BALL JOINT REPLACEMENT HOW TO (w/ pix)
yea, Im definately a visual guy. pix make it much easier, thats why I like to help out with them. BlazerLT, no worries...I didnt really use it to break torque...just for illustration purposes
|
|
|
|
|
|
03-31-2006, 12:14 AM
|
#5 | |
|
AF Enthusiast
Join Date: Jan 2005
Location: jamestown, Rhode Island
Posts: 507
Thanks: 0
Thanked 2 Times in 1 Post
|
Re: BALL JOINT REPLACEMENT HOW TO (w/ pix)
question for ya'll. although the balljoint itself had grease in it, the rubber section did not. do you think youre supposed to add grease on a new install?
|
|
|
|
|
|
03-31-2006, 02:15 AM
|
#6 | ||
|
AF Regular
 Join Date: Nov 2005
Location: N/A
Posts: 111
Thanks: 0
Thanked 0 Times in 0 Posts
|
Re: BALL JOINT REPLACEMENT HOW TO (w/ pix)
Quote:
i sure couldve used this post about a week ago i was pullin my hair out trying to do mine |
||
|
|
|
|
03-31-2006, 02:26 AM
|
#7 | |
|
AF Regular
 
Join Date: Aug 2005
Location: Taneytown, Maryland
Posts: 291
Thanks: 0
Thanked 0 Times in 0 Posts
|
Re: BALL JOINT REPLACEMENT HOW TO (w/ pix)
Glad everything went well for you. Excellent post, and nice pics too.
I have to agree with Sultan Gris, this would have been great two weeks ago before I did mine. But, now we have something new for the How To section. Great Post!!
__________________
billibong 99 4X4 Blazer LS Vin W Repairs: U/L Ball Joints, I/O Tie Rod Ends, New Tie Rod Adjusting Sleeves, New Idler Arm, R & L Front Hubs, R & L Upper CA Bushings, New Gabriel Ultramax Shocks (what a difference) F & R Brakes and Rotors at 110,000. Infinity Speakers to replace the blown factory sets. 162K+ and still kicking. |
|
|
|
|
|
03-31-2006, 03:05 AM
|
#8 | ||
|
AF -Advisor
Join Date: Sep 2003
Location: Sudbury
Posts: 13,565
Thanks: 0
Thanked 1 Time in 1 Post
|
Re: BALL JOINT REPLACEMENT HOW TO (w/ pix)
Quote:
__________________
1995 Factory Blazer Service Manual for sale, PM if interested. |
||
|
|
|
|
03-31-2006, 09:34 AM
|
#9 | |
|
Problem?
 
Join Date: Dec 2004
Location: Florida
Posts: 6,247
Thanks: 63
Thanked 113 Times in 93 Posts
|
Re: BALL JOINT REPLACEMENT HOW TO (w/ pix)
Good job Josh. I added it to the FAQ thread.
BlazerLT is right, you have to grease the new joints after installing them or they will fail prematurely. Pump in the grease and watch the boots. When the boots fill and become slightly firm to the touch, you're done. Also, I recommend putting something between the C-clamp and the piston of the caliper while compressing it. I usually use one of the old pads so that you press it evenly and have less of a chance of damaging it. |
|
|
|
|
|
03-31-2006, 10:41 AM
|
#10 | |
|
AF Enthusiast
Join Date: Jan 2005
Location: jamestown, Rhode Island
Posts: 507
Thanks: 0
Thanked 2 Times in 1 Post
|
Re: BALL JOINT REPLACEMENT HOW TO (w/ pix)
I just added the note about the grease. Did it this morning before work. I'm always terrified that it's going to bust the boot, cuz I've done it before. This time, I just pumped gently till I felt a bit of resistance in the grease gun. Then stopped. It's hard to tell when they're full sometimes till POP out comes the grease.
And I totally agree about the old pad to compress the pistons simultaniously. (I edited and added the note) I was just struggling to take photos and finish the job. It was 9pm, and I was holding it in one hand, and the camera in the other. But yes, I agree...use a pad and compress both pistons evenly to avoid locking it up. I may to the Idler and Pitman myself, I'm still debating. If I do, I'll post HOW TO's with pix on those as well. I wish MORE people did that...jobs would be a lot easier for everyone doing it the first time! It's always nicer to learn from SOMEONE ELSES mistakes |
|
|
|
|
|
03-31-2006, 12:09 PM
|
#11 | |
|
AF -Advisor
Join Date: Sep 2003
Location: Sudbury
Posts: 13,565
Thanks: 0
Thanked 1 Time in 1 Post
|
Re: BALL JOINT REPLACEMENT HOW TO (w/ pix)
Just remember to put a couple of pump of grease in every 3 months with no weight on the tire.
I just jack up that corner, throw in 3 pumps of grease into them and let it back down. I always pump enough so the boot is firm to the touch. Sometimes up to 5 pumps is needed. Anyone know where the damn grease goes? I don't see it leaking anywhere, I just keep pumping it in.
__________________
1995 Factory Blazer Service Manual for sale, PM if interested. |
|
|
|
|
|
03-31-2006, 12:11 PM
|
#12 | ||
|
Problem?
Join Date: Dec 2004
Location: Florida
Posts: 6,247
Thanks: 63
Thanked 113 Times in 93 Posts
|
Re: BALL JOINT REPLACEMENT HOW TO (w/ pix)
Quote:
|
||
|
|
|
|
03-31-2006, 12:15 PM
|
#13 | ||
|
AF -Advisor
Join Date: Sep 2003
Location: Sudbury
Posts: 13,565
Thanks: 0
Thanked 1 Time in 1 Post
|
Re: BALL JOINT REPLACEMENT HOW TO (w/ pix)
Quote:
Just weird don't you think. Always in, never out. The black hole of grease death. 
__________________
1995 Factory Blazer Service Manual for sale, PM if interested. |
||
|
|
|
|
03-31-2006, 12:37 PM
|
#14 | |
|
AF Regular
Join Date: Aug 2005
Location: Taneytown, Maryland
Posts: 291
Thanks: 0
Thanked 0 Times in 0 Posts
|
Re: BALL JOINT REPLACEMENT HOW TO (w/ pix)
As the grease does its job it begins to break down. It becomes more viscous and much thinner withthe heat and wear applied to it. As it breaks down it seeps out through the seals and basically just blows off like an oil leak.
What you are replacing is the grease that has broken down and leaked out, and what the grease goblins suck out to feed to their babies....  
__________________
billibong 99 4X4 Blazer LS Vin W Repairs: U/L Ball Joints, I/O Tie Rod Ends, New Tie Rod Adjusting Sleeves, New Idler Arm, R & L Front Hubs, R & L Upper CA Bushings, New Gabriel Ultramax Shocks (what a difference) F & R Brakes and Rotors at 110,000. Infinity Speakers to replace the blown factory sets. 162K+ and still kicking. |
|
|
|
|
|
03-31-2006, 03:26 PM
|
#15 | |
|
AF -Advisor
Join Date: Sep 2003
Location: Sudbury
Posts: 13,565
Thanks: 0
Thanked 1 Time in 1 Post
|
Re: BALL JOINT REPLACEMENT HOW TO (w/ pix)
nice.Yum....
__________________
1995 Factory Blazer Service Manual for sale, PM if interested. |
|
|
|
|
|
|
POST REPLY TO THIS THREAD |
 |
|
|

