|
|
|

|
|
| Search | Car Forums | Gallery | Articles | Helper | AF 350Z | IgorSushko.com | Corporate |
|
| Latest | 0 Rplys |
 08-08-2010, 05:27 PM
|
#226 | |
|
AF Enthusiast
Thread starter
Join Date: Aug 2005
Location: where "sky grey" is a colour
Posts: 822
Thanks: 3
Thanked 32 Times in 29 Posts
|
Re: Jordan 191
Its been quite some time since the last update, but heres a quick one finally. I wanted to show something else at this point but the last parts I built for the engine didnt fit ( after a lot of work
my own stupid mistake
and Tamiyas a bit too :-) so I have to do them all over again. So for my own motivation to get back into this build here are some pictures of the wheels.
On the insides of the rims I glued etched bits with a hole pattern that corresponds to the pins on the brake hubs. I blended them in going through primer, sanding and then black paint for all the rims. Then I added the decals. They are a mix of Studio27 and Tamiya. This was followed by 2K-clear and some very light sanding and polishing where possible. On the insides I put a misty coat of Jet Black because I guess the original wheels arent too shiny there :-) I then mounted the tyres ( after sanding them ) and applied the Goodyear logos using an etched template and Zero Pure White, followed by a thin coat of semi gloss clear on the sidewalls. Finally I added some tiny tyre valves, scratch built from etched nuts, wire and bits of 0,45mm injection needle. 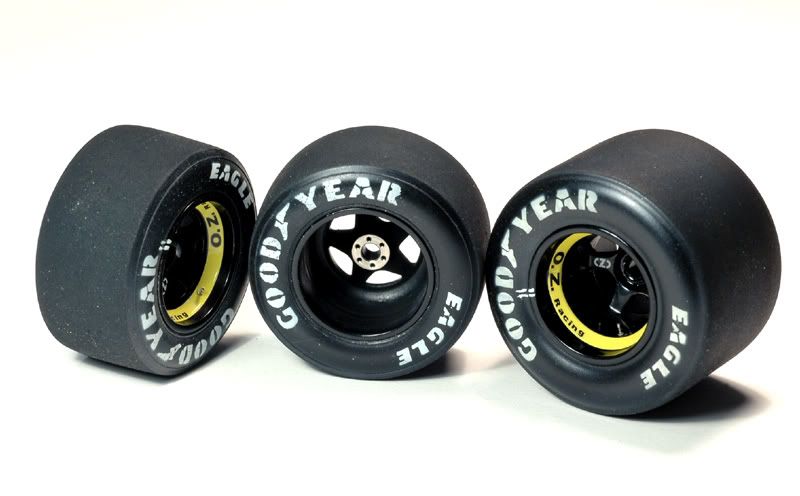 I was surprised how long it took to get a nice even surface when sanding those damn tyres and even more so until all the logos were painted more or less in the right places. The sad truth is Ive been building models for years now but this is in fact the first time I get a 1:20 build as far as doing the tyres I may wear the wheels a bit more at a later point. Also I could add some more tyre markings. I have a picture with Schumacher in the Spa grid where some extra mechanics markings are visible. I cant replicate that by hand with a brush though. Maybe Ill do some decals for that. Next I painted the wheel nuts. Theyre red on the right hand side and black on the left. The red paint looks nice but it peels off almost if you look at it too strong. I have to try some other brands and hope one of them will stick better. I wanted to wear some of the paint off at the edges of the nuts, but like this that doesnt work. 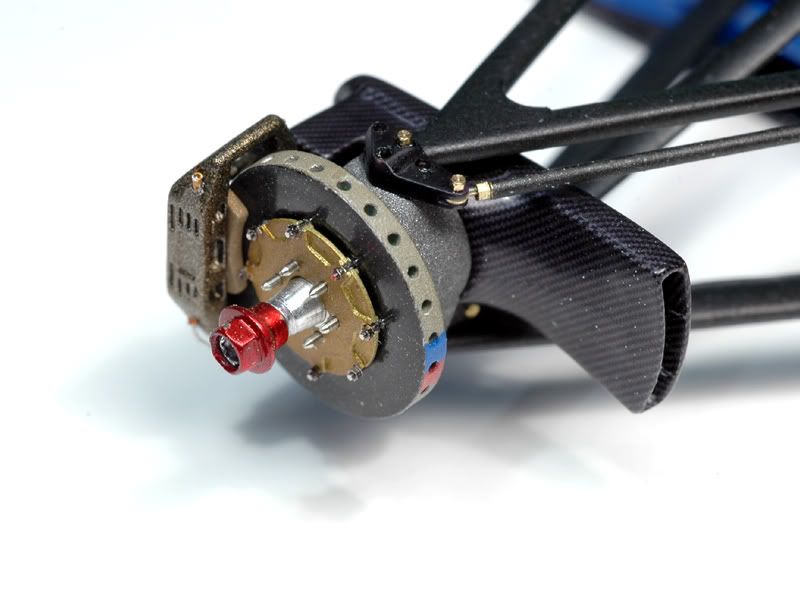 Finally heres a close look of the right front wheel mounted. 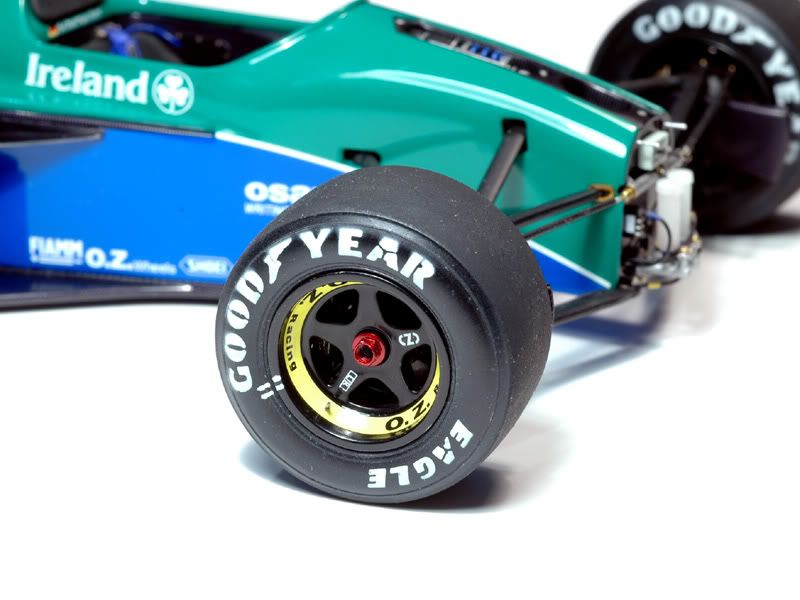 And of course a shot with all four wheels. They all touch the ground and the car sits nicely so the jig to set up the suspension worked :-) 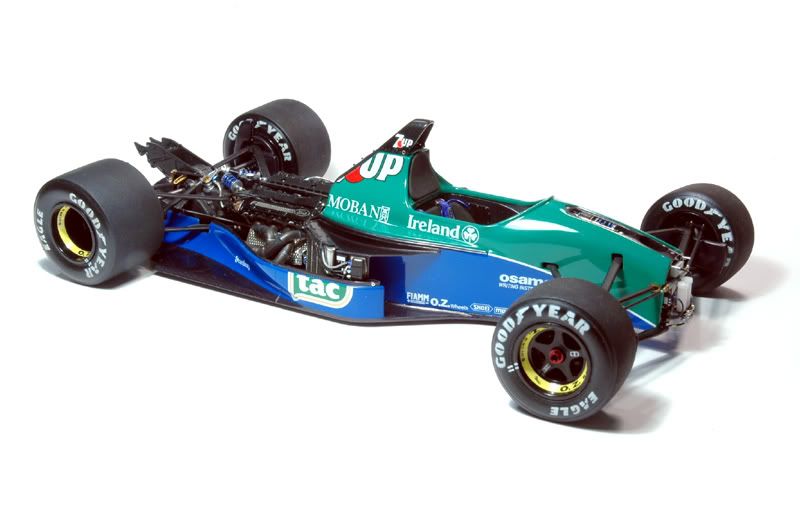 So thats it for now. Thanks for stopping by! |
|

|

|
|
08-09-2010, 02:51 AM
|
#227 | |
|
AF Enthusiast

Join Date: Nov 2002
Location: London
Posts: 1,402
Thanks: 0
Thanked 7 Times in 6 Posts
|
Re: Jordan 191
Absolutely Amazing!!!!!!!!!!!!!!!!!!!!!
Not too long now until completion? |
|
|
|
|
|
08-10-2010, 02:11 PM
|
#228 | ||
|
Getting Old...
 Join Date: May 2003
Location: Lugano, Switzerland
Posts: 753
Thanks: 0
Thanked 0 Times in 0 Posts
|
Re: Jordan 191
Quote:
You must have a secret technique, or at least a secret grade of sandpaper that you can tell us about? I can't recall, but I think your wheelnuts are made from brass. But maybe you're really motivated, and thinking about making them from alumimun....and then doing a home-annodizing sort of operation that would color them red? (maybe overambitious, but knowing your skills and history of experimentation, could be a possibility?? I think there are quite a few how-to's on the net..... and knowing that you do you're own PE, it's likely something you coud do...) Or, maybe you can get some machinist's dye (the blue stuff they use to mark out the metal), except in red color?? Thanks for the update. Really fantastic.Now I can enjoy the rest of the summer.... (but I'll be checking back for updates with annodized wheel nuts....  ) ) Murray |
||
|
|
|
|
08-10-2010, 03:43 PM
|
#229 | |
|
AF Enthusiast

Join Date: May 2003
Location: Sunshine Coast, AUSTRALIA
Posts: 2,215
Thanks: 16
Thanked 8 Times in 8 Posts
|
Re: Jordan 191
Superb!!!!!!
__________________
Rob 
|
|
|
|
|
|
08-10-2010, 03:46 PM
|
#230 | |
|
AF Enthusiast
Thread starter
Join Date: Aug 2005
Location: where "sky grey" is a colour
Posts: 822
Thanks: 3
Thanked 32 Times in 29 Posts
|
Re: Jordan 191
Hi Murray, i don't have a special technique for the tyres. I chucked them in my lathe ( which probably makes it easier than turning them on a hand drill :-) and then tried out various grades of sandpaper and even files. 360 grit sandpaper worked the best. The rear tyres worked pretty well but the front ones strangely gave me a lot of trouble. They kept smearing in places and were hard to sand to a uniform surface. I even tried to freeze them to improve their behaviour ( didn't really work...). Somehow after a lot of fiddling i got them to look right.
About the wheelnuts i'll first try some other paints. Maybe there's one that sticks better than the Humbrol clear red i used here. My last resort is in fact to make new nuts. I have a type of aluminium sitting around that's supposed to be good for annodizing. I haven't heard of a DIY way of doing that so far but will have a look into that. Otherwise i'll find someone to do them for me :-) |
|
|
|
|
|
08-10-2010, 07:34 PM
|
#231 | |
|
AF Enthusiast

Join Date: Oct 2008
Location: Auckland
Posts: 2,761
Thanks: 51
Thanked 136 Times in 134 Posts
|
Re: Jordan 191
Amazing as per usual!! I cant believe the pic of the brake, everything looks real, it doesnt look like plastic (even though parts are metal in there). Simply stunning!!
__________________
 It's Not wheather you Win or Lose, its how you look while you play the Game |
|
|
|
|
|
08-10-2010, 10:34 PM
|
#232 | |
|
AF Regular
Join Date: Feb 2005
Location: Newcastle
Posts: 209
Thanks: 0
Thanked 1 Time in 1 Post
|
Re: Jordan 191
Great progress jaykay, I am really looking forward to seeing it finished (so please finish it).
On the wheel nuts, doesn't tamiya make a metal primer in a can that is clear? maybe you could put that on first then the clear red. |
|
|
|
|
|
08-11-2010, 04:57 AM
|
#233 | |
|
AF Enthusiast

Join Date: Oct 2005
Location: Monza
Posts: 1,150
Thanks: 21
Thanked 56 Times in 38 Posts
|
Re: Jordan 191
Simply outstanding jay, as the rest of this epic build...
Robi |
|
|
|
|
|
08-11-2010, 08:28 AM
|
#234 | |
|
AF Enthusiast
Join Date: May 2007
Location: Chicago, Illinois
Posts: 1,000
Thanks: 5
Thanked 29 Times in 26 Posts
|
Re: Jordan 191
Another good update. Can't wait to see the final product!!
Tom Tanner/Scale Designs/Ferrari Expo model contest and expo-Chicago April 2011 |
|
|
|
|
|
08-13-2010, 10:33 PM
|
#235 | ||
|
AF Regular
Join Date: Jul 2003
Posts: 446
Thanks: 5
Thanked 1 Time in 1 Post
|
Re: Jordan 191
Quote:
I believe the one on top of the bell housing is basically a catch tank/de-aerator(so it has internal baffles with holes in them allowing the oil to return and collect at the bottom without entrained oil). I had long discussions with a few friends over the arrangement for the B192 Cosworth which is similar.
__________________

|
||
|
|
|
|
08-14-2010, 01:00 PM
|
#236 | |
|
AF Regular

Join Date: Jan 2005
Location: Puebla
Posts: 439
Thanks: 6
Thanked 13 Times in 3 Posts


|
Re: Jordan 191
AMAZING!!!
(Can't say more, I'm speechless)
__________________
Happy modeling! Ramon Garcia Puebla, Mexico |
|
|
|
|
|
08-14-2010, 06:31 PM
|
#237 | ||
|
AF Regular
Join Date: Apr 2006
Location: Vancouver
Posts: 124
Thanks: 0
Thanked 3 Times in 3 Posts
|
Re: Jordan 191
Quote:
|
||
|
|
|
|
09-07-2010, 05:47 PM
|
#238 | |
|
AF Enthusiast
Thread starter
Join Date: Aug 2005
Location: where "sky grey" is a colour
Posts: 822
Thanks: 3
Thanked 32 Times in 29 Posts
|
Re: Jordan 191
Hi there
Progress is still pretty slow ( work and life and so on :-) but heres some new bits after all. I finally finished the nosecone/front wing. All the wing elements were individually painted and CFd were appropriate, sanded and polished. I put them together mostly with epoxy glue. Its pretty unnerving stuff to put glue on parts whose surfaces you have worked on for hours knowing that you have pretty much one shot or an annoying mess :-) The epoxy glue at least is a bit more forgiving than super glue in that respect. 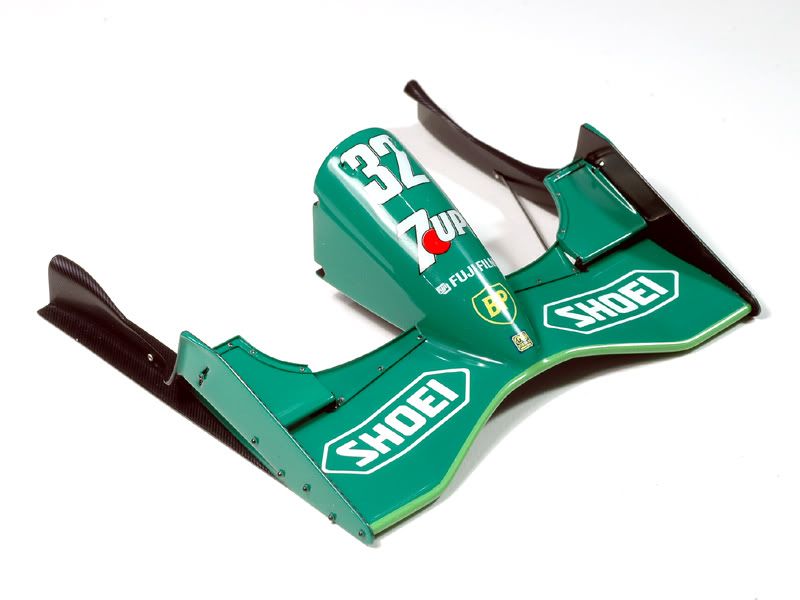 To attach the endplates and adjustable flaps I used brass rivets over etched SMS washers ( all individually painted ) to reinforce the connection and as locator pins for gluing. That takes a bit more time but helps the result a lot. Also Im getting better at fixing my mess ups :-) I CFd and painted the inside of the nosecone, trying to not build up too much material for a small gap with the monocoque. 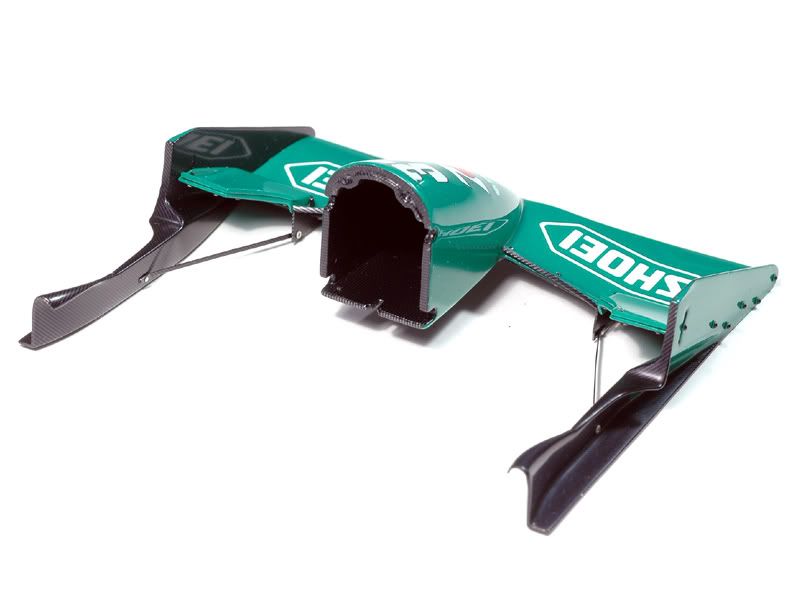 All the flaps were dressed up with etched bolts top and bottom as per the original. I glued those with clear enamel paint ( easy to clean off the 2K-clear with some alcohol while fresh, in case I make a mess ). I put new vertical strakes where I had cut off the bigger Tamiya ones and connected them to the endplates with 0,1mm metal strips ( CFd and painted once more ) like on the real front wing. 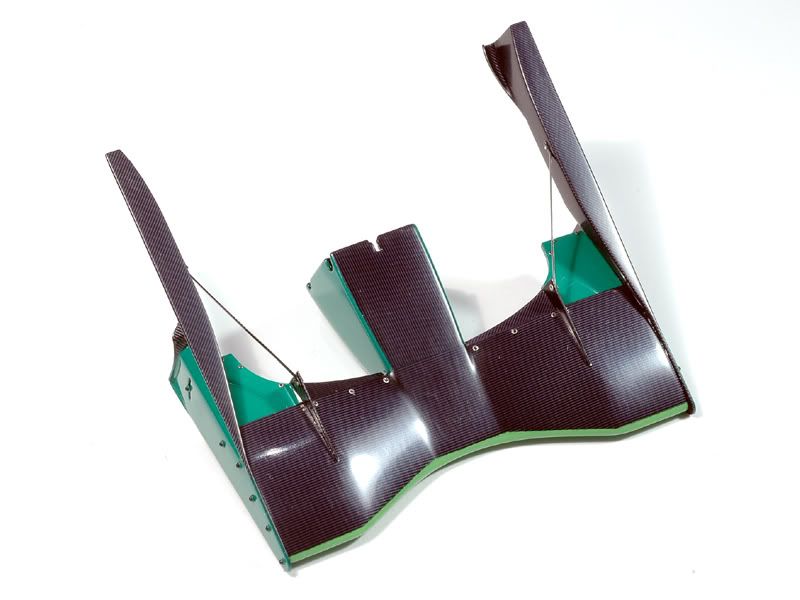 I also fixed the tyre markings. Now the painted on white stripes match the tyre valves as they should and I also added the hand written mechanics tyre markings indicating driver, direction and set ( Schumacher really started the race with set 14 according to the pictures ). I created the necessary data from pictures of the Spa weekend and got some dry transfers made ( different for each wheel :-) They are really delicate and I painted the sidewalls over with some semi gloss clear to hopefully protect them. 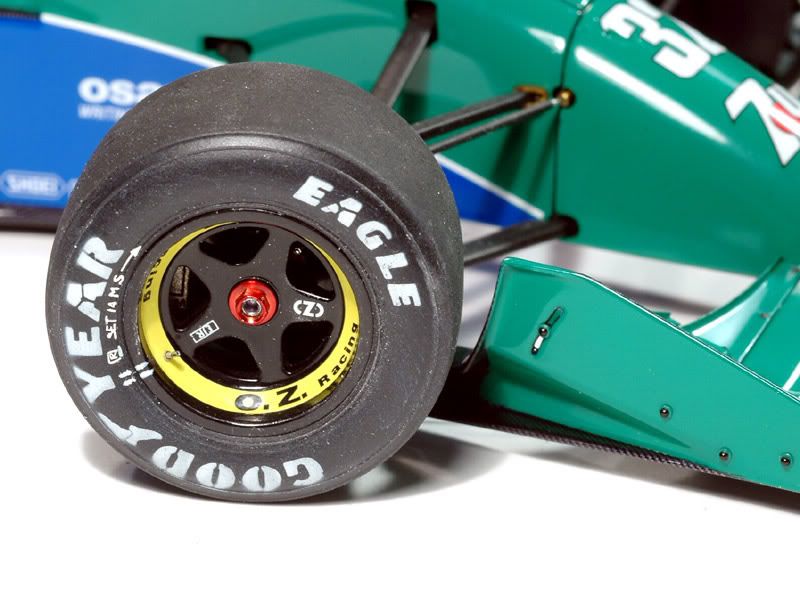 Finally two shots with the car plus frontwing as it is right now ( couldnt resist :-) I was aiming for a smaller gap between nose and monocoque but I cant really complain, considering the mounting system with just the two turned aluminium pins at the front of the monocoque actually works as planned and I have a removable frontwing.  Thanks for stopping by and see you for the next update at some point :-) 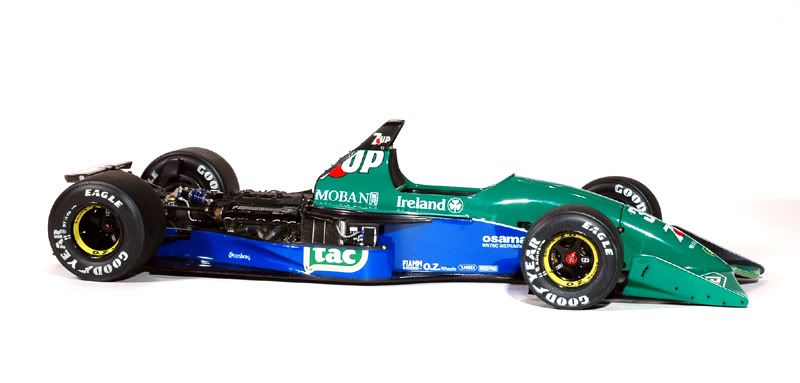 |
|
|
|
|
|
09-07-2010, 06:01 PM
|
#239 | |
|
AF Enthusiast
Join Date: May 2007
Location: Chicago, Illinois
Posts: 1,000
Thanks: 5
Thanked 29 Times in 26 Posts
|
Re: Jordan 191
SUPERB AGAIN. Keep those updates coming.
Tom Tanner/Scale Designs/Ferrari Expo 2011 model/photo contest and show-Chicago April 2011 |
|
|
|
|
|
09-07-2010, 07:38 PM
|
#240 | |
|
AF Regular
Join Date: Jul 2003
Posts: 446
Thanks: 5
Thanked 1 Time in 1 Post
|
Re: Jordan 191
Fantastico!!!!!!!!!
__________________
|
|
|
|
|
|
 |
POST REPLY TO THIS THREAD |
 |
|
|


