|
|
|

|
|
| Search | Car Forums | Gallery | Articles | Helper | AF 350Z | IgorSushko.com | Corporate |
|
| Latest | 0 Rplys |
|
|||||||
| WIP - Motorsports Post topics for any "Work In Process" motorsports vehicles in this sub-forum. |
 |
 Show Printable Version | Show Printable Version |  Email this Page | Email this Page |  Subscribe to this Thread
|
|
|
Thread Tools |
 08-22-2005, 12:15 PM
|
#16 | |
|
AF Enthusiast

Join Date: Jul 2003
Location: New Orleans, Louisiana
Posts: 1,609
Thanks: 0
Thanked 0 Times in 0 Posts

|
nice work. ill be watching this progress carefully for tips as F1's arent my speciality
 im dreading having to remove the seat belts on the 99T but over all accuracy seems a bit better then your 4/4 seat. keep the progress coming, its great to watch! im dreading having to remove the seat belts on the 99T but over all accuracy seems a bit better then your 4/4 seat. keep the progress coming, its great to watch!
__________________
Friends dont let friends buy die-casts... "If it can't run 24hrs., it aint sh!t...." -me   
|
|

|

|
|
09-28-2005, 05:32 AM
|
#17 | |
|
AF Enthusiast
Thread starter
Join Date: Aug 2005
Location: where "sky grey" is a colour
Posts: 822
Thanks: 3
Thanked 32 Times in 29 Posts
|
O.k. here finally comes an update. It's not that i haven't been working on the model.....it just wouldn't have shown in pictures really:-)
As i mentioned in my last post i thinned down the whole cowling. This took about 15 hours of careful work alone. It's so thin now, the surfaces are flexible and can be pushed in. That's of course not the goal but may give you an idea. I then scratchbuilt the inserts on the sides of the cowling. I put the kit piece ( early season big hole ) for comparison. 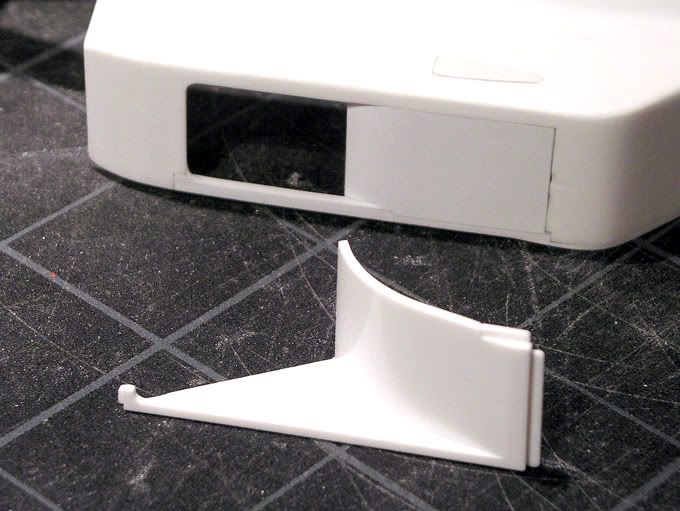 On the inside it looks like this: 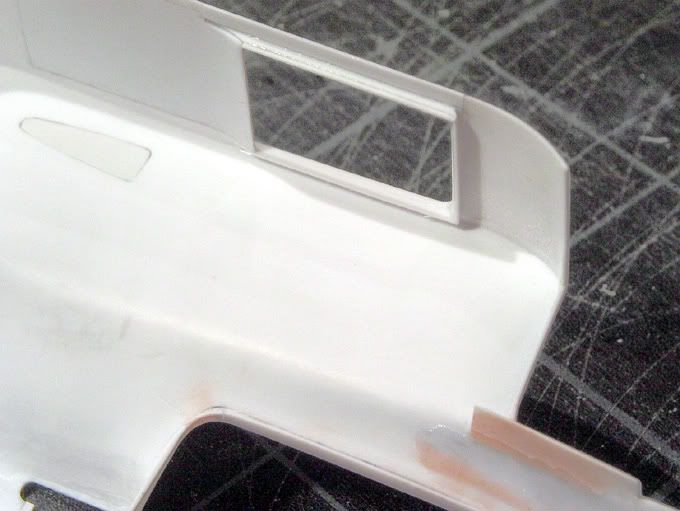 There will follow another piece that leads towards the radiator. That's a seperate component on the real car and for easier painting and decaling i decided to do it the same on the model. This is a view of the thinned rear end of the cowling. It's actually quite tricky to take pictures of this white plastic stuff under the light conditions i have in the evenings when i work on the model:-( 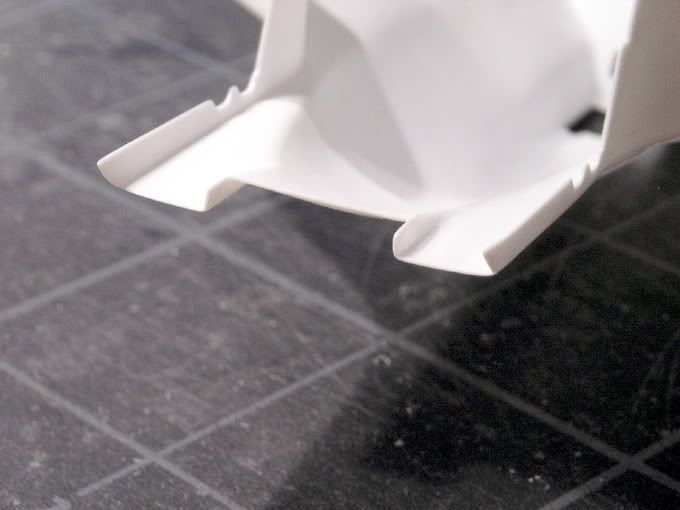 I then added a plastic strip to the lower edge of the cowling to match the modified undertray. 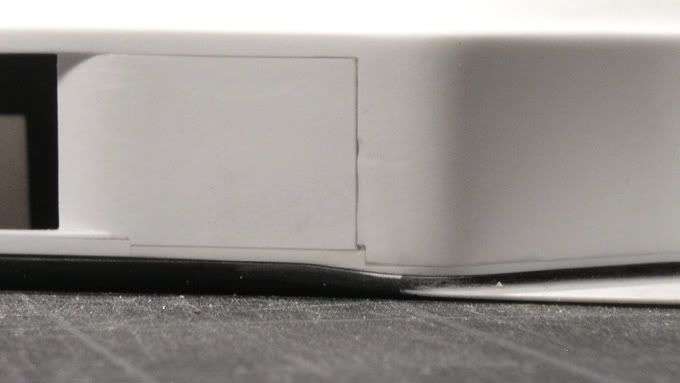 At this point i went on to fit cowling and undertray. Originally i wanted to keep the cowling in one pice as long as possible but it turned out that didn't work too well so i cut the nose piece off along the molded shutline. 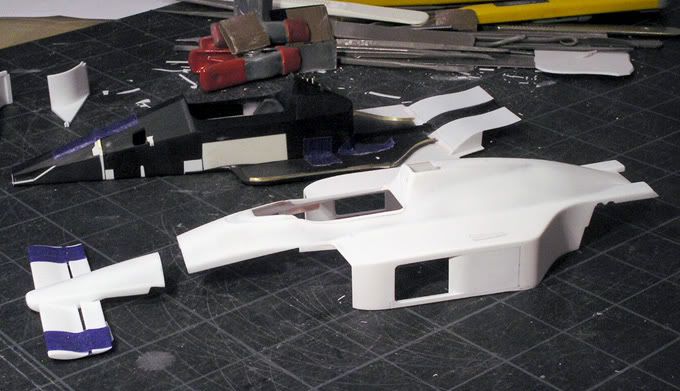 On both pieces i added flange walls... 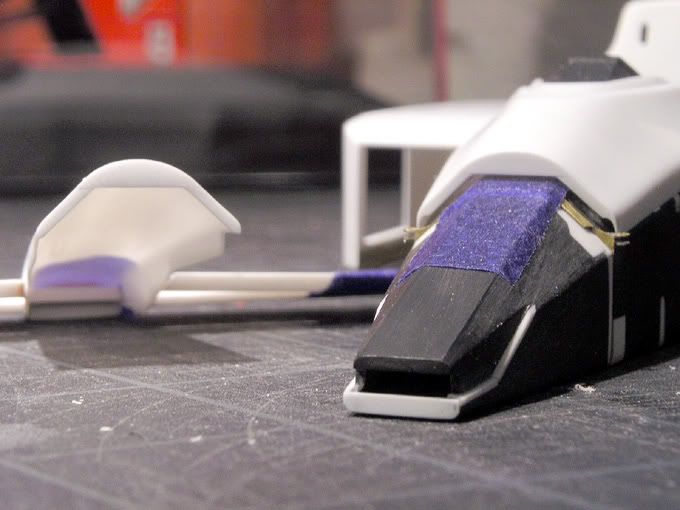 ...and then worked on the underside of the nosebit and made it fit nicely to the monocoque. I put the blue tape to protect the wing bits from bending or breaking off. 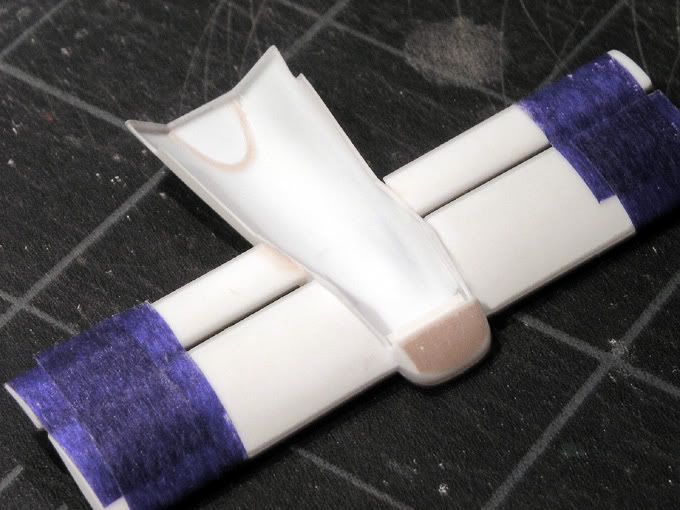 Now when the pieces of monocoque and cowling are put together there's only a thin gap that should be even smaller once the pieces are CF'd and painted (...hopefully:-) 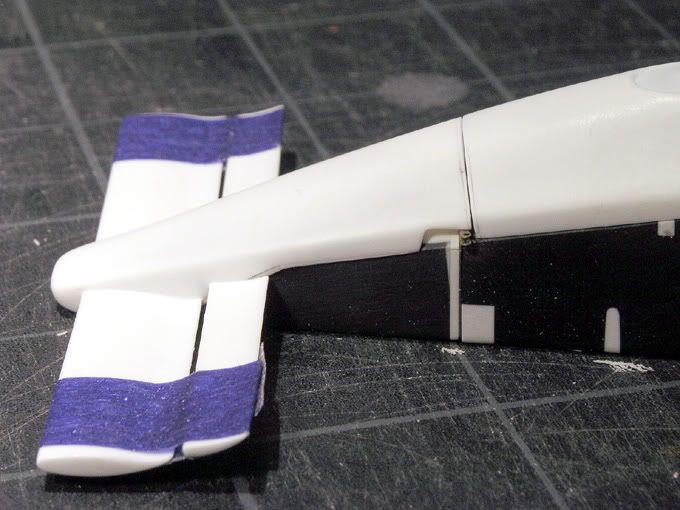 The cowling unfortunately has a bit of tension and doesn't slide on and stay perfectly where i want it to, so i will later add some pins where the real car has it's fasteners on the sidepods to make it fit tighter. While doing all this test fitting i realized there was another problem around the cockpit. The opening in the cowling was wider then the one in the monocoque. 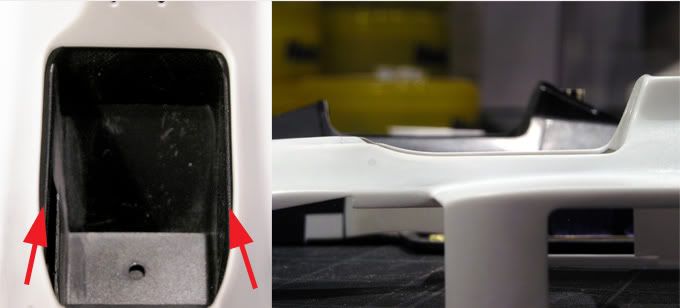 Since it was pretty low in the sideview as well i decided to add about 1mm and also new inner walls to change that. 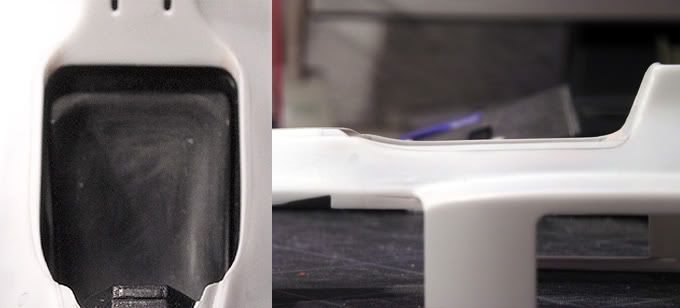 This is only one place of many where the proportions of the kit don't exactly match the real car but changing everything would be a bit too much and actually if you don't have the reference pictures for comparison nobody will notice:-) So much for now! |
|
|
|
|
|
09-28-2005, 05:55 AM
|
#18 | |
|
AF Enthusiast

Join Date: Dec 2003
Location: Zagreb
Posts: 2,176
Thanks: 4
Thanked 23 Times in 22 Posts

|
Re: Eighties Contest Entry: 1988 McLaren MP4/4 (and Introduction)
So much work, if I didn't know I would have said that it was Revell kit since it needs so much improvement
 , just kidding, I love when someone takes so much care about the details, great and throughout work on this one. , just kidding, I love when someone takes so much care about the details, great and throughout work on this one. |
|
|
|
|
|
09-30-2005, 12:12 PM
|
#19 | |
|
AF Fanatic

Join Date: Dec 2004
Location: Up the creek with no paddle
Posts: 5,888
Thanks: 7
Thanked 16 Times in 15 Posts
|
Re: Eighties Contest Entry: 1988 McLaren MP4/4 (and Introduction)
amazing build to watch and admire!
Your attention (and devotion  ) to detail is as awsome as your skill ) to detail is as awsome as your skill 
__________________
Guideline for happy modeling: Practice on scrap. Always try something new. Less is more. "I have a plan so cunning, you could put a tail on it and call it a weasel" - Edmund Blackadder |
|
|
|
|
|
09-30-2005, 04:40 PM
|
#20 | |
|
AF Enthusiast

Join Date: May 2003
Location: Sunshine Coast, AUSTRALIA
Posts: 2,215
Thanks: 16
Thanked 8 Times in 8 Posts
|
Re: Eighties Contest Entry: 1988 McLaren MP4/4 (and Introduction)
fantastic detail work! I can't wait to see more progress!
__________________
Rob 
|
|
|
|
|
|
09-30-2005, 05:20 PM
|
#21 | |
|
AF Enthusiast
 
Join Date: Aug 2004
Location: Örebro
Posts: 500
Thanks: 0
Thanked 0 Times in 0 Posts

|
Re: Eighties Contest Entry: 1988 McLaren MP4/4 (and Introduction)
Man you must have nerves of steel! Keep the updates coming!!
__________________
 
|
|
|
|
|
|
10-04-2005, 03:11 AM
|
#22 | |
|
AF Enthusiast
Thread starter
Join Date: Aug 2005
Location: where "sky grey" is a colour
Posts: 822
Thanks: 3
Thanked 32 Times in 29 Posts
|
Thanks for the comments guys:-) So far my nerves actually haven't been tried on this one. As i said i kind of know now where trouble most probably will strike from building the MP4/8 ( which isn't finished yet ) and others like a Lotus 25 that has stalled after it's 3rd set of scratchbuilt exhaust pipes that still don't work ( dohhhhh!!).
After a weekend with some good modeling time though here comes another update: First up a reference picture of the cowling frontend i forgot in my last post: 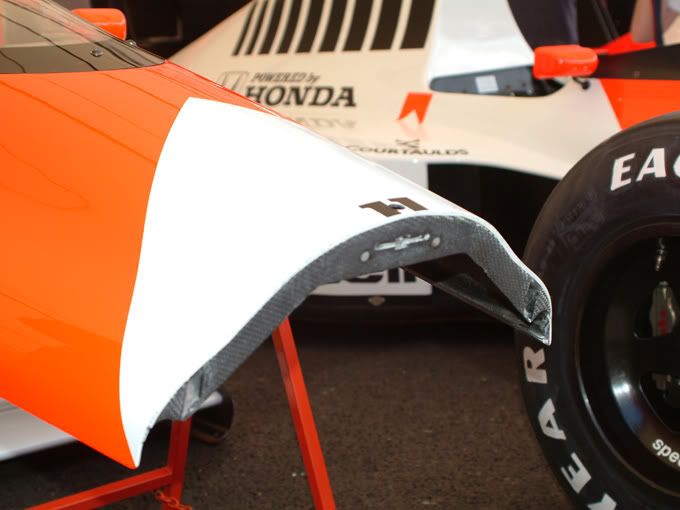 I carried on with the inside of the cowling and added some surface details ( i.e. dodgy CF layup ). Here's a picture of the real one: 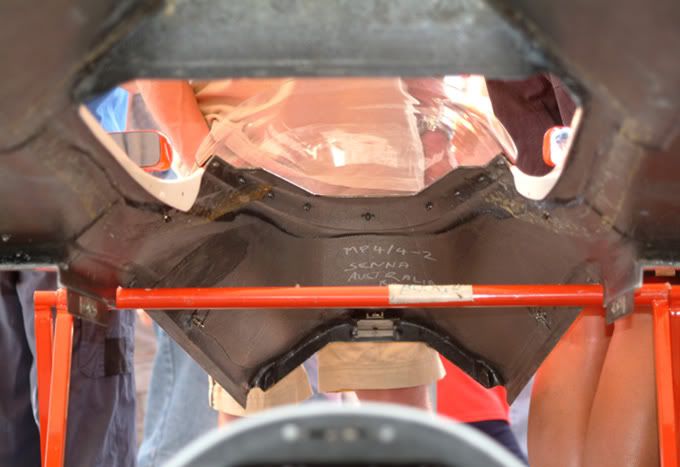 ...and this is the model. I added a piece of 0.2mm plastic sheet in the front and some polyester putty. It does make me feel quite stupid to first sand those surfaces nice and smooth and then mess them up again....but that's the way it goes:-) 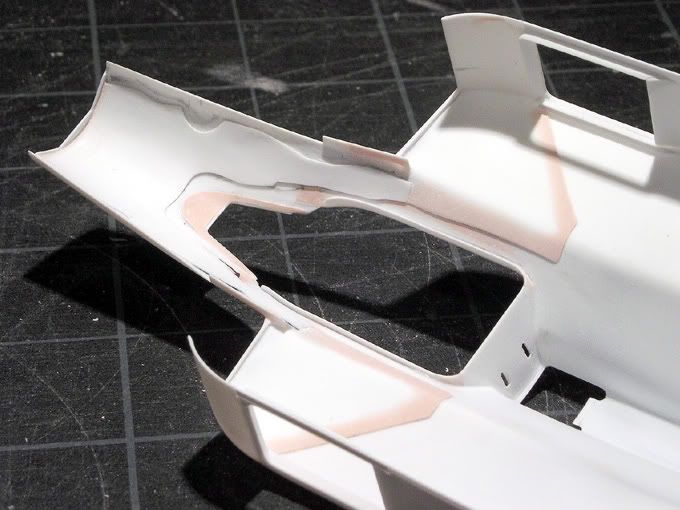 In the rear part of the cowling i added those two pieces made from 0.8mm plastic sheet. 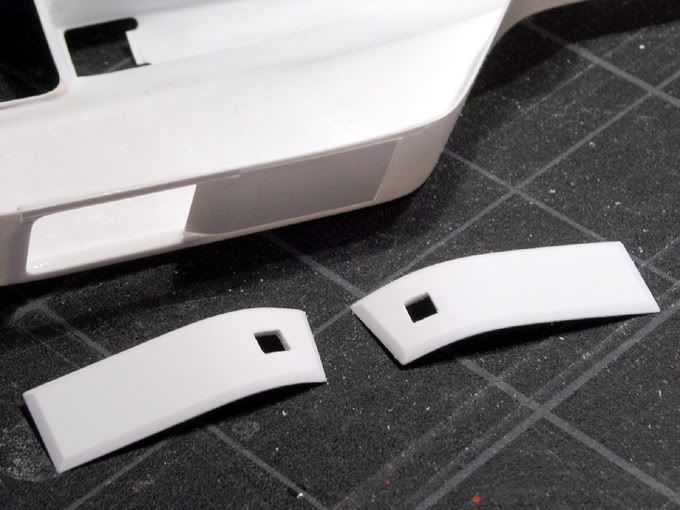 They seem to be heat shields and will later be covered with chrome foil. I forgot the picture where they are mounted but here is one of the real car:  The cowling is now ready for some primer but first i'll build some more bits. First up were the sidepods. After cutting off the kit pieces in the beginning i scratchbuilt them from various thickness plastic sheets. I do two pieces per side as on the real car. The real one on the right hand side: 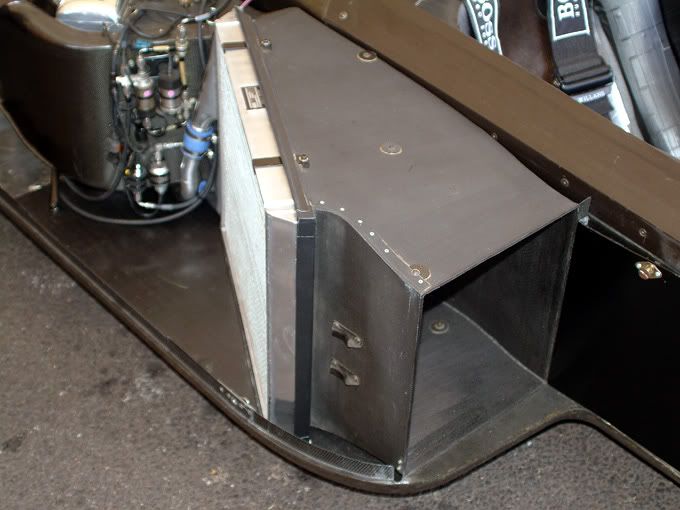 ...and the built up piece with the top and bottom bits copied for the left hand side: 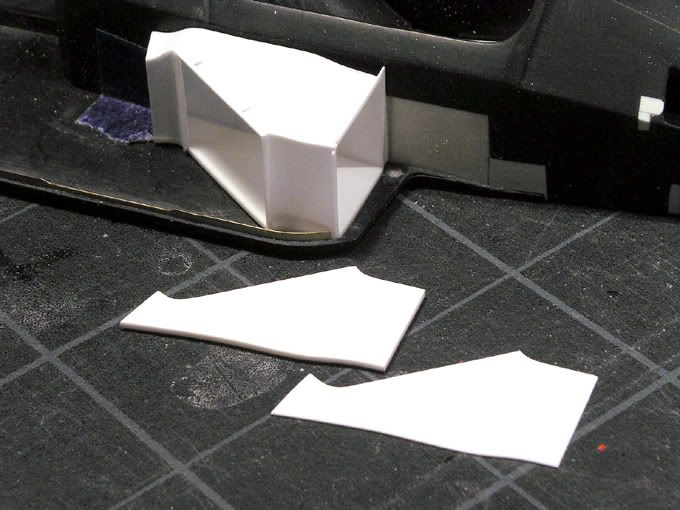 Now this is the major difference between the early season MP4/4 as it comes in the kit and the late season version i'm building. Instead of the periscope airducts sticking out of the cowling the turbos are fed internally. The turbo intercoolers are smaller and the intakes run around them on both sides of the car so the sidepods are different here: 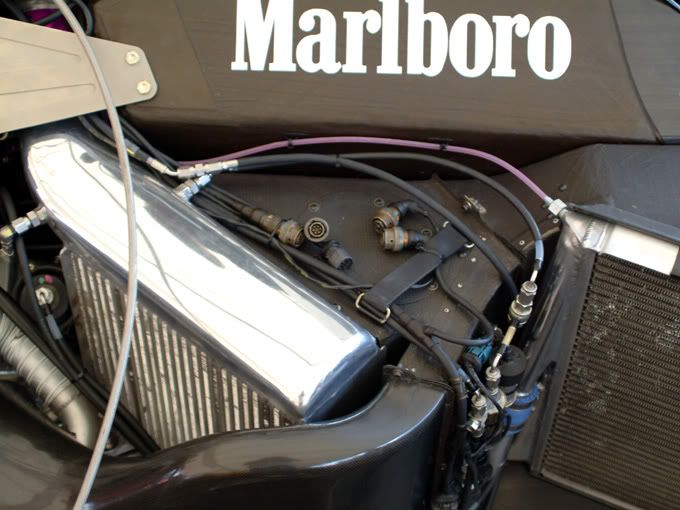 This is a picture during buildup: 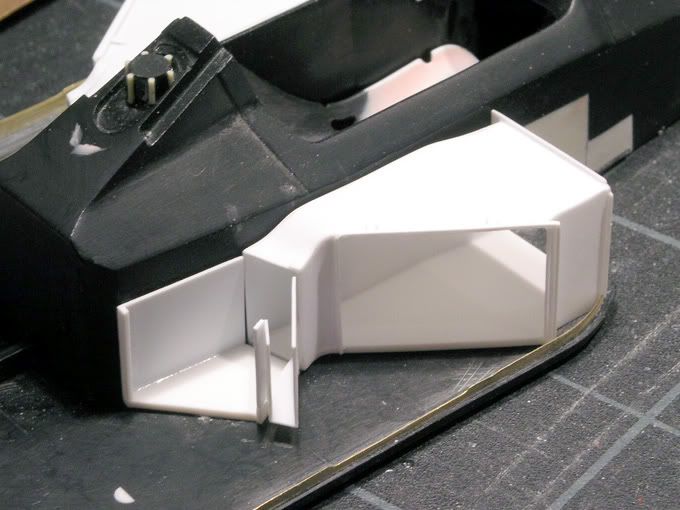 And this is the finished bits with some tiny flanges: 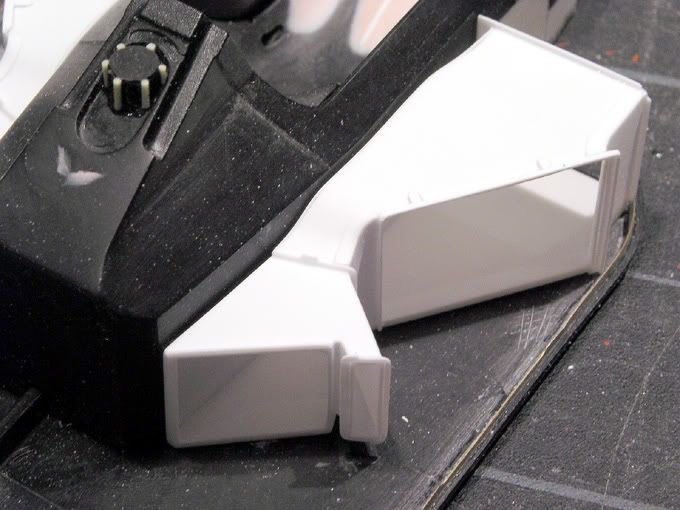 Finally an overall view with all sidepods done. 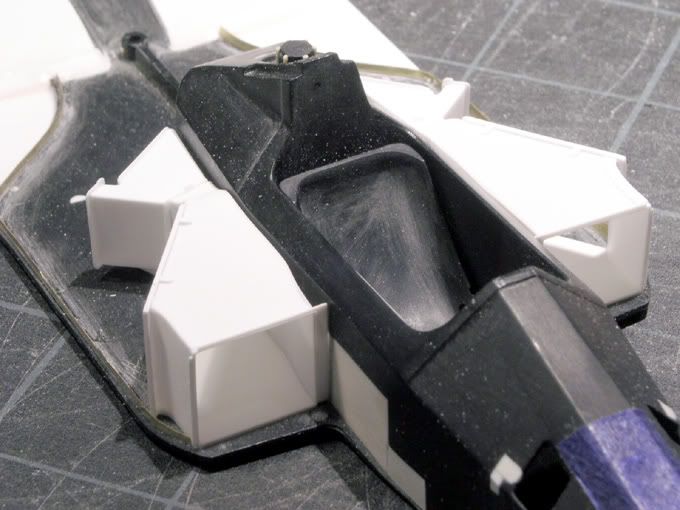 They took longer to make than i first expected....but in fact that happens most of the time :-) Next up in this area i have to build the radiators and connect them to the engine but there's more to do on the monocoque first! Cheers |
|
|
|
|
|
10-04-2005, 03:25 AM
|
#23 | ||
|
AF Fanatic
Join Date: Dec 2004
Location: Up the creek with no paddle
Posts: 5,888
Thanks: 7
Thanked 16 Times in 15 Posts
|
Re: Eighties Contest Entry: 1988 McLaren MP4/4 (and Introduction)
  Quote:
I'd still be doing them in 3006 LOL BRAVO
__________________
Guideline for happy modeling: Practice on scrap. Always try something new. Less is more. "I have a plan so cunning, you could put a tail on it and call it a weasel" - Edmund Blackadder |
||
|
|
|
|
10-04-2005, 04:07 AM
|
#24 | |
|
AF Enthusiast
Join Date: Dec 2003
Location: Zagreb
Posts: 2,176
Thanks: 4
Thanked 23 Times in 22 Posts
|
Re: Eighties Contest Entry: 1988 McLaren MP4/4 (and Introduction)
It is getting better and better, stunningly clean scratch work!
|
|
|
|
|
|
10-04-2005, 06:31 AM
|
#25 | |
|
AF Enthusiast

Join Date: Oct 2004
Location: x
Posts: 1,135
Thanks: 17
Thanked 49 Times in 46 Posts
|
Awesome
|
|
|
|
|
|
10-04-2005, 04:14 PM
|
#26 | |
|
AF Enthusiast
Join Date: May 2003
Location: Sunshine Coast, AUSTRALIA
Posts: 2,215
Thanks: 16
Thanked 8 Times in 8 Posts
|
Re: Eighties Contest Entry: 1988 McLaren MP4/4 (and Introduction)
Another fantastic update! I am amazed again at the scale accuracy you are achieving! Excellent work!!
__________________
Rob
|
|
|
|
|
|
10-04-2005, 04:19 PM
|
#27 | |
|
AF Regular

Join Date: Dec 2003
Location: Stockholm
Posts: 427
Thanks: 0
Thanked 0 Times in 0 Posts
|
Re: Eighties Contest Entry: 1988 McLaren MP4/4 (and Introduction)
Some nice styrene sculpting there !
__________________
Latest progress: Ferrari F40 LM Fujimi 1/16 and Porsche 959 Fujimi 1/16 Finished: 1940 Ford pickup and Lotus Super Twelve 
|
|
|
|
|
|
10-04-2005, 08:50 PM
|
#28 | |
|
AF Enthusiast
 
Join Date: Jun 2004
Location: Naperville, Illinois
Posts: 1,065
Thanks: 0
Thanked 0 Times in 0 Posts
|
Re: Eighties Contest Entry: 1988 McLaren MP4/4 (and Introduction)
welcome to AF! it looks great so far!
__________________

|
|
|
|
|
|
10-05-2005, 12:10 AM
|
#29 | |
|
AutoWeek Magazine Vendor
 Join Date: Jul 2003
Location: Budapest
Posts: 652
Thanks: 0
Thanked 0 Times in 0 Posts
|
This is really nice work. It is good to see people who are aware of details.
I plan to build the F189 do you have any idea where to find such nice reference photos? |
|
|
|
|
|
10-12-2005, 05:12 AM
|
#30 | |
|
AF Enthusiast

Join Date: Feb 2003
Location: Antwerp
Posts: 674
Thanks: 0
Thanked 0 Times in 0 Posts
|
I have TONS of respect for you, man! Tons of respect!
Increadible work! I will follow this thread very closely. And probably build my MP4/4 again using your tips and techniques as well... |
|
|
|
|
|
|
POST REPLY TO THIS THREAD |
 |
|
|


