|
|
|

|
|
| Search | Car Forums | Gallery | Articles | Helper | AF 350Z | IgorSushko.com | Corporate |
|
| Latest | 0 Rplys |
|
|||||||
| WIP - Motorsports Post topics for any "Work In Process" motorsports vehicles in this sub-forum. |
 |
 Show Printable Version | Show Printable Version |  Email this Page | Email this Page |  Subscribe to this Thread
|
|
|
Thread Tools |
 08-05-2008, 11:51 AM
|
#1 | |
|
AF Enthusiast
Join Date: Aug 2005
Location: where "sky grey" is a colour
Posts: 822
Thanks: 3
Thanked 32 Times in 29 Posts
|
Audi R8C LeMans 1999 Provence Moulage 1:43
Hi everybody
Heres a new build report from me. I should rather be working on my little Tameo Lotus 72 after a long time without any serious modeling ( due to other things I had to do ), but while it was sitting around untouched the old paint problem reoccurred :-( I decided I was fed up with that and finally throw my resin chassis away and use the metal one. That means though I had to order some new decals and Im waiting for them now. Anyway, just when I decided to restart it all once more, my latest ebay-prey arrived from England. Its the 1:43 scale Provence Moulage kit of the Audi R8C. In 1999 Audi tackled the Le Mans 24h for the first time. They entered two R8R open top cars that were built up in Ingolstadt and two R8C coupes built by RTN in England to find out which concept was the better option. Unfortunately the decided to carry on with the open cars. Unfortunately for me because I much rather like closed prototypes, but success at Le Mans showed Audi had a point :-) The development of the R8C wasnt a complete waste though, because RTN carried on from there and developed the LeMans Bentleys, whose last evolution won LeMans outright in 2003 ( well because Audi had to let them :-) The kit looked quite nice and not like too much work so I had to give it a go. 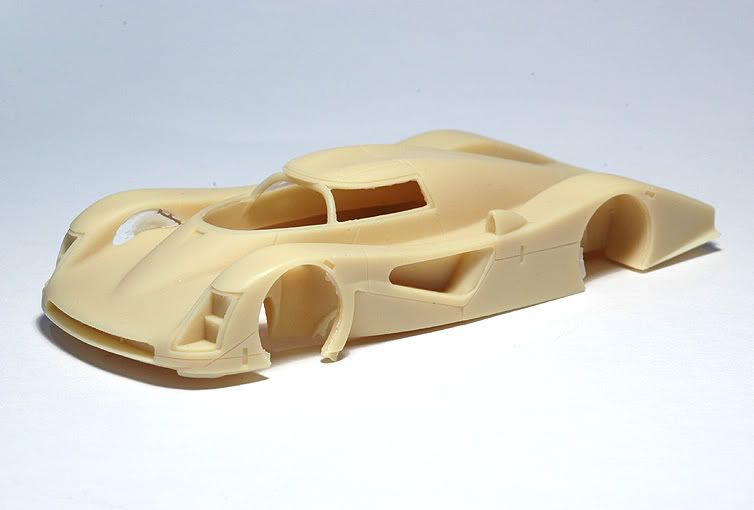 Unlike the BBR 911 GT1 I built before it looked like there were no major corrections to do and I could focus on adding some nice details. BBR did kits of both the R8C and R8R as well but I dont really wanna know what they look like out of the box. The R8C is increasingly hard to find ( more or less only ebay ) and more popular than the R8R it seems. I have that one too and got it for a whopping 8 :-) There are not too many reference pictures of the R8C around, but I was able to take a few at Goodwood last year. Right before leaving I found out there was one on static display in the Audi pavillion and before they could kick me out I took some pictures I will add to the build report. Since its only a curbside 1:43 they should be enough. 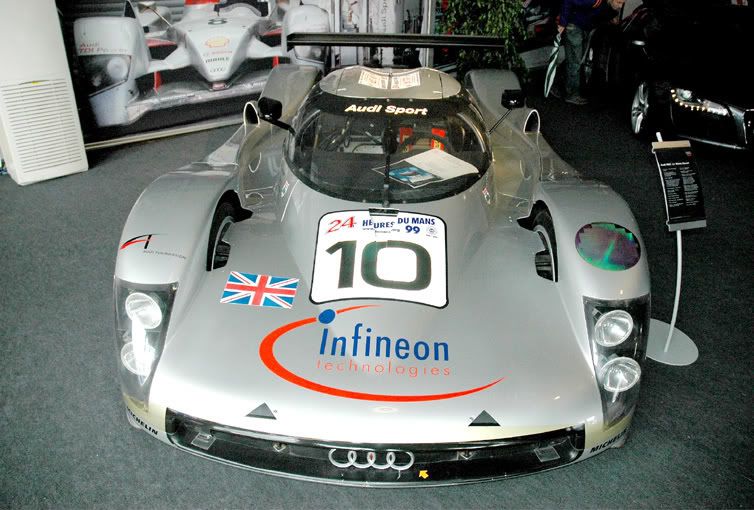 The Provence Moulage kit was a positive surprise. The resin body was crisp with very fine graphics, looked quite symmetric and properly shaped. 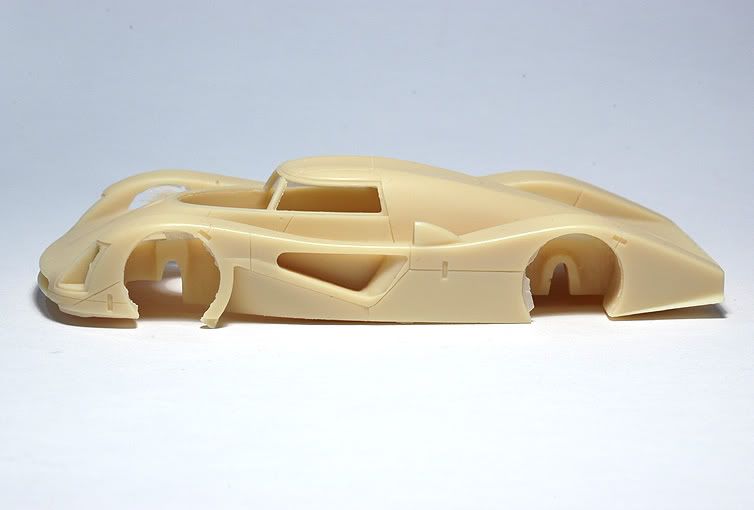 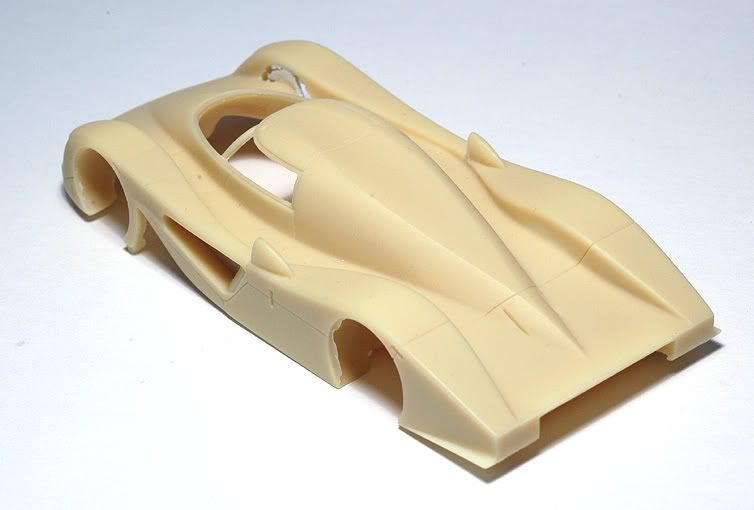 Along with that you get the usual bits like turned aluminium wheels and rubber tyres, rear wing, a seat and no less than 4 (!?) mirrors none of which really has the right shape :-) 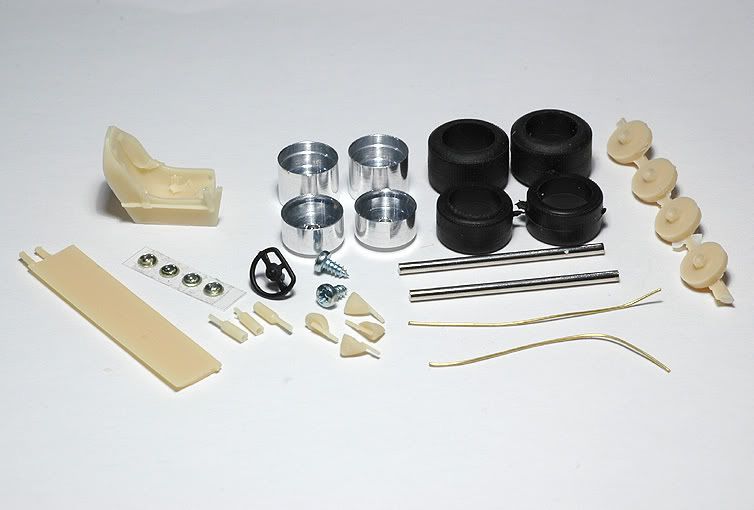 Interior with ground plate: 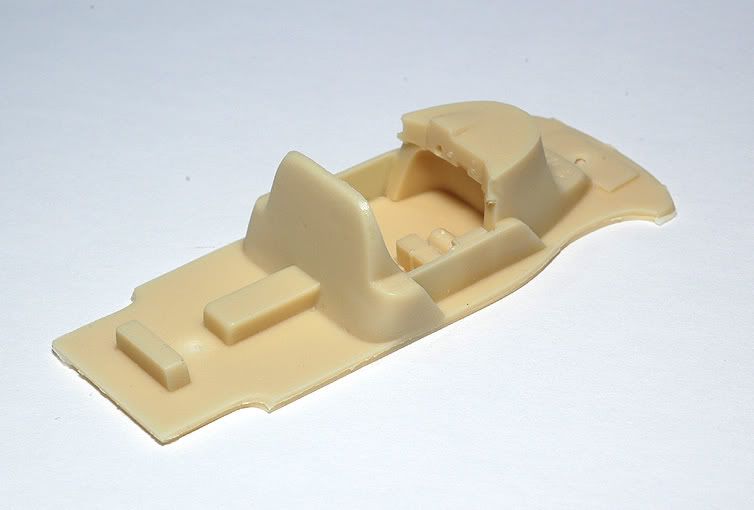 Vacform clear piece for windows and headlight covers A PE fret with the usual bits like diffuser, wing endplates and detail stuff: 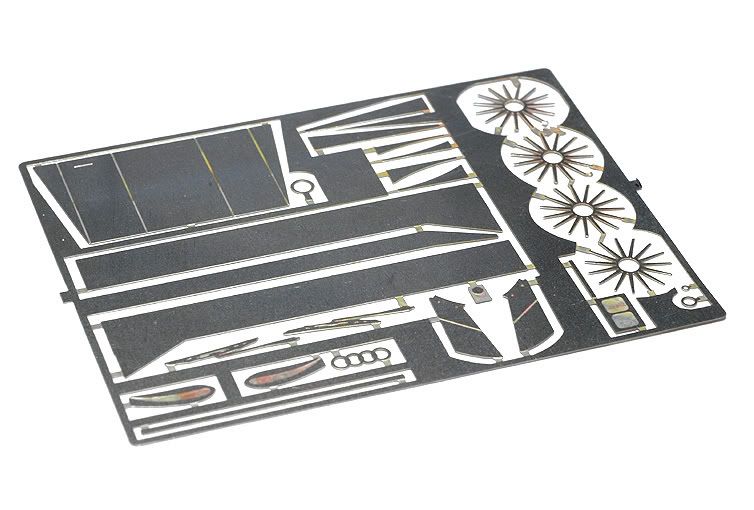 The decals ( the livery is not too wild ): 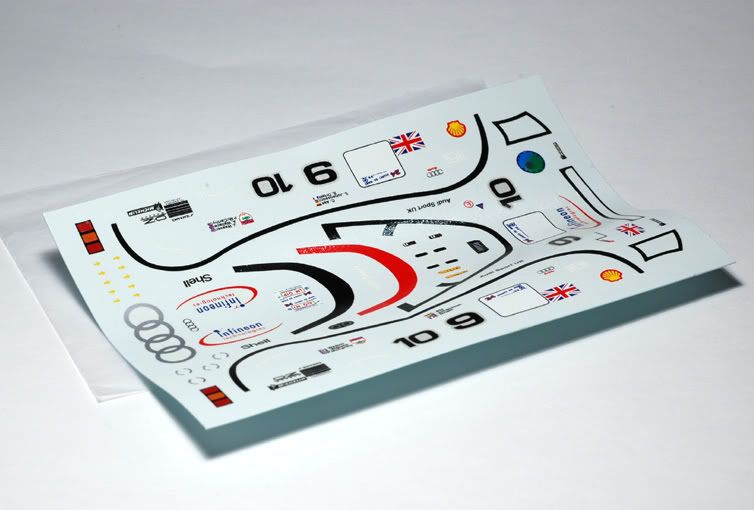 And the instructions. They are typically for these PM kits a coloured A4 copy with pictures of the built kits with some notes and a few very small pictures of the real thing. You should know what youre up to with one of these kits :-) 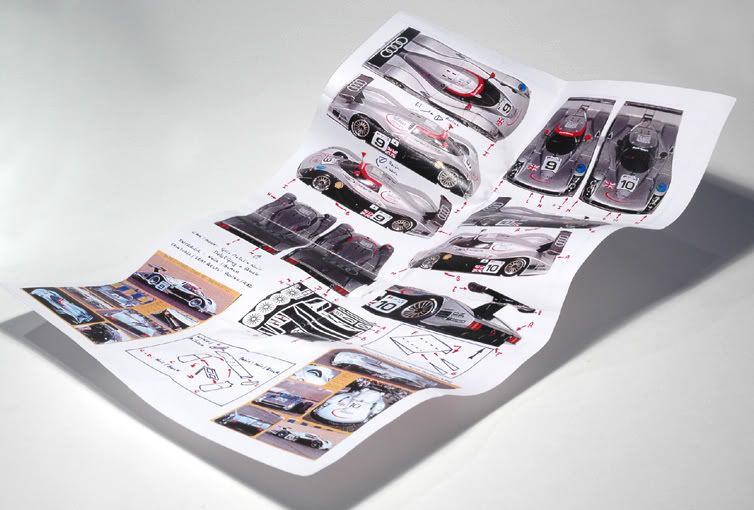 The funny thing is, that both built cars on that sheet have the rear wings mounted facing downwards to the rear. That would make for some interesting driving in reality :-) I will do the No10 car, that was driven by Perry McCarthy ( and misters Wallace and Weaver ) who also famously was the first ( black ) Stig on Top Gear. Id also highly recommend to read his biography Flat Out Flat broke ( Formula 1 the hard way ) which is hilarious reading! I have already made some progress with this build and will soon post some pictures of that. Hopes are high this wont be another endless build :-) Thanks for looking! |
|

|

|
|
08-05-2008, 12:25 PM
|
#2 | |
|
AF Vendor-TBT's Owner
 
Join Date: Jul 2008
Location: Calgary
Posts: 940
Thanks: 0
Thanked 1 Time in 1 Post
|
Re: Audi R8C LeMans 1999 Provence Moulage 1:43
It looks to be an interesting build! I'll be watching.
|
|
|
|
|
|
08-05-2008, 12:27 PM
|
#3 | |
|
AF Enthusiast

Join Date: Feb 2003
Location: F1...
Posts: 1,410
Thanks: 3
Thanked 3 Times in 3 Posts
|
Re: Audi R8C LeMans 1999 Provence Moulage 1:43
here we go again, Masterpiece in the works
 opcorn: opcorn: |
|
|
|
|
|
08-05-2008, 02:31 PM
|
#4 | ||
|
AF Fanatic

Join Date: Dec 2004
Location: Up the creek with no paddle
Posts: 5,888
Thanks: 7
Thanked 16 Times in 15 Posts
|
Re: Audi R8C LeMans 1999 Provence Moulage 1:43
Quote:
 I love it when he says "shouldn't be too much work, just a quickie"...and then re-works the whole kit! Modeling porn -yay! 
__________________
Guideline for happy modeling: Practice on scrap. Always try something new. Less is more. "I have a plan so cunning, you could put a tail on it and call it a weasel" - Edmund Blackadder |
||
|
|
|
|
08-09-2008, 07:56 AM
|
#5 | |
|
AF Enthusiast
Thread starter
Join Date: Aug 2005
Location: where "sky grey" is a colour
Posts: 822
Thanks: 3
Thanked 32 Times in 29 Posts
|
Audi R8C LeMans 1999 Provence Moulage 1:43
Hi there
Here we go with some actual building progress. Naturally I first worked on the body. As I mentioned before it was quite nice over all and I had to address only two major issues. First up heres a picture of the primered body after this first batch of mods i made: 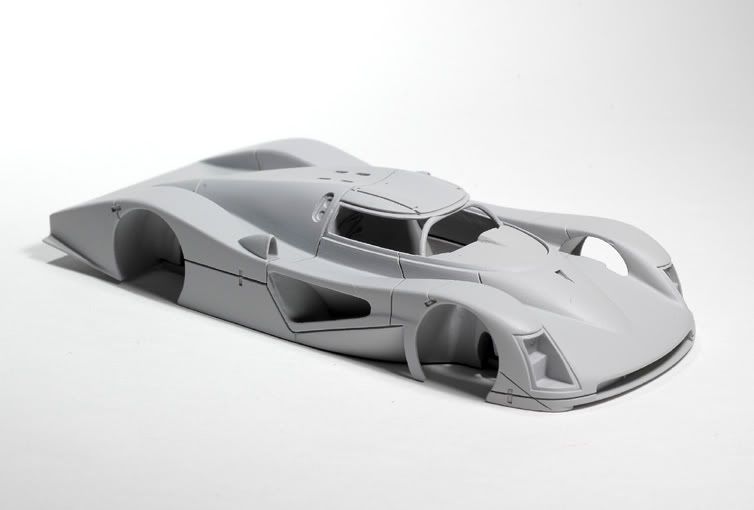 No1 were the side pods or rather the radiator ducts in them. The holes were only about half as deep as necessary ( casting issue Id say ) and there was only space for half a radiator each. To make things even easier the kit comes without any radiators :-). I carved away all the material from the insides, then built up the holes with sheet plastic and refilled the back sides with polyester putty. Heres a close up: 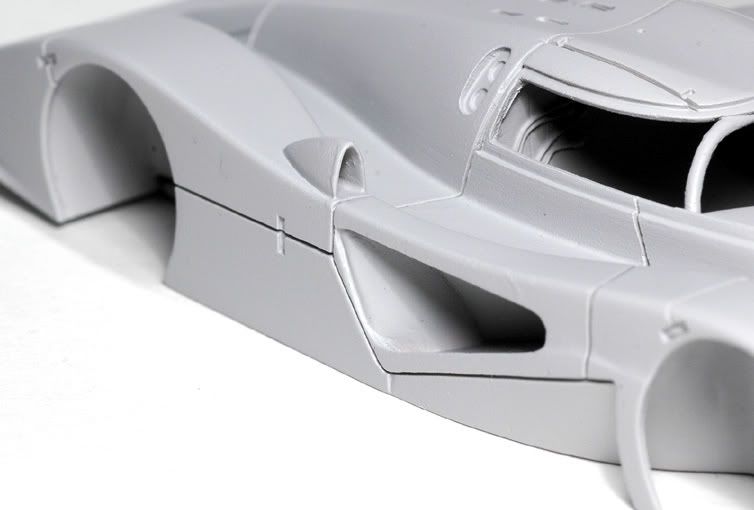 I also deepened and thinned the walls of the turbo ducts on top of the side pods. The other issue was the opening for the windows ( or DLO as the car guys say :-). It was too narrow ( not high enough ). I lowered the lower edge by 0,8mm on the mill. That was helped by the fact that this edge runs horizontally. 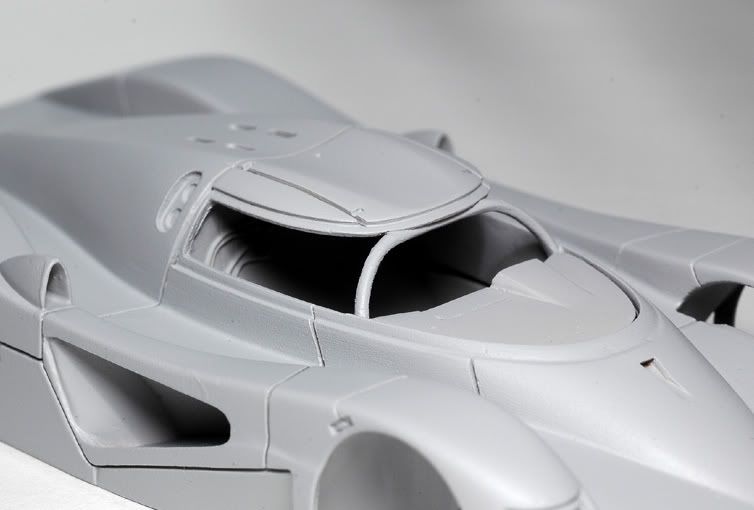 Because of that I also had to move the NACA-duct on the nose forward, but it was too small anyway. Here its still not right but will be fixed. I also thinned out the roll hoop because it hardly left enough space to look out of the car :-) At the rear end the kit provides decals for the lights .. Couldnt leave it like that. I lowered the surface for some extra bits to be added and also thinned out the wall thickness of the bodyworks trailing edge. 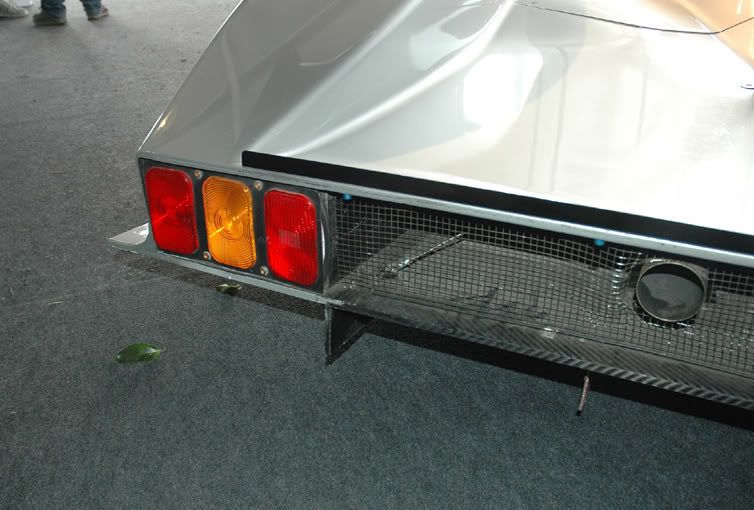 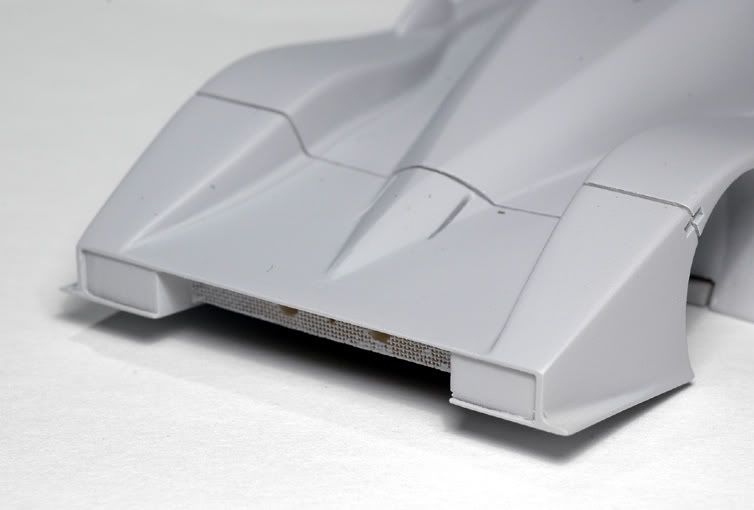 In the roof i milled these venting holes. The kit also provides stickers for these ..tststs. 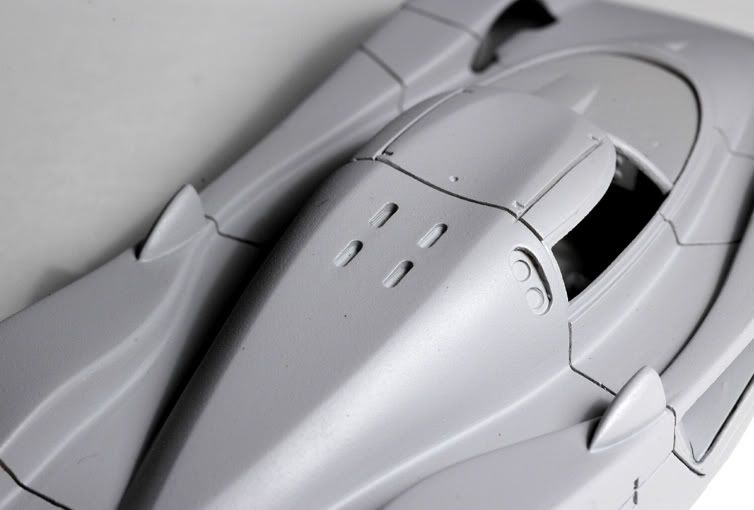 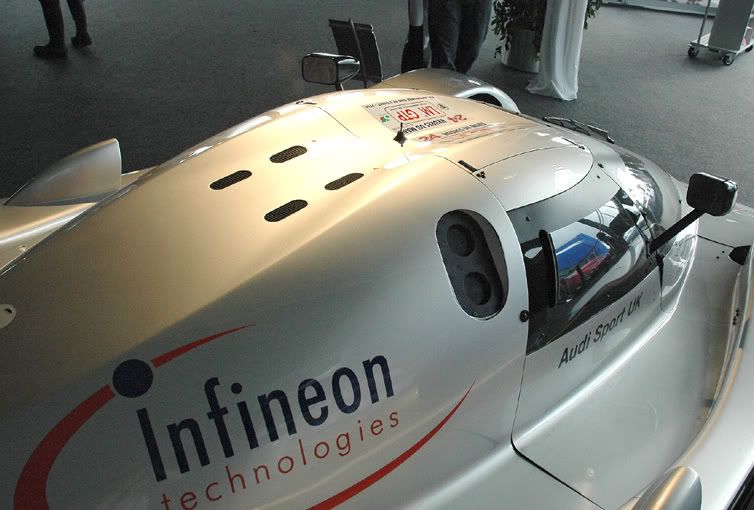 Then I rescribed and deepened all the shutlines. I was afraid they would disappear with all the layers of paint to come. I also deepened the headlight housings. This one here looks a bit crooked but that will be fixed. 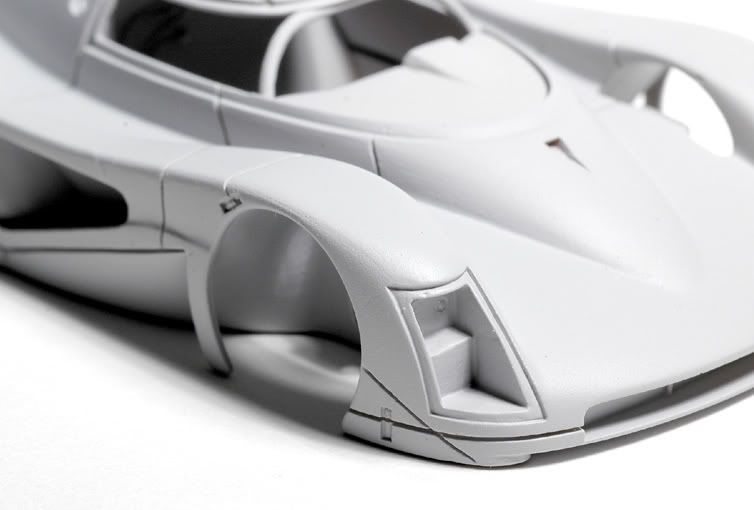 Finally I thinned out those fins behind the front wheels. The had to be more massive for casting again and I sanded them thin from the back side. Heres a picture of the diffuser after priming ( soldered from kit PE bits ) and those two planks that go under the sills as the ground plate in the open area behind the front wheels. 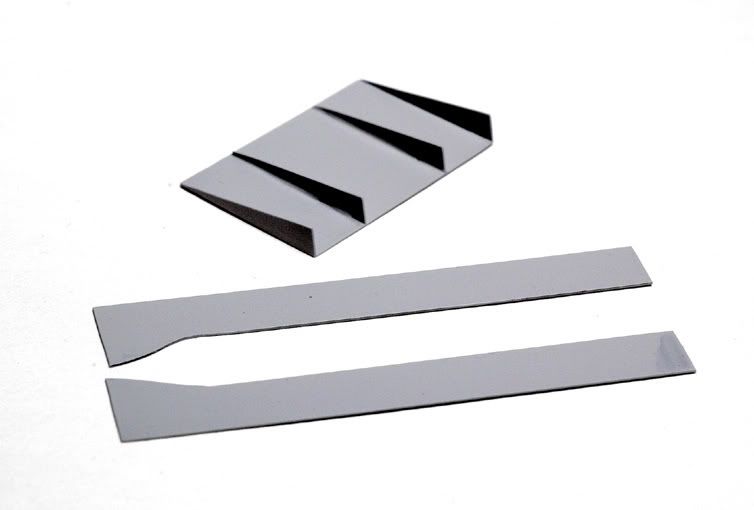 Thats it for now. More filing and sanding to do and other details to come. I didnt photograph every single little step this time but I think you get the picture :-) Thanks for looking! |
|
|
|
|
|
08-09-2008, 08:08 AM
|
#6 | ||
|
AF Fanatic
Join Date: Dec 2004
Location: Up the creek with no paddle
Posts: 5,888
Thanks: 7
Thanked 16 Times in 15 Posts
|
Re: Audi R8C LeMans 1999 Provence Moulage 1:43
Very nice prep work.
Essential too, I would say. I can't think why they went the decal route for those roof vents!?!? yuck!  Quote:
(I wanna be a car guy too!   ) )
__________________
Guideline for happy modeling: Practice on scrap. Always try something new. Less is more. "I have a plan so cunning, you could put a tail on it and call it a weasel" - Edmund Blackadder |
||
|
|
|
|
08-09-2008, 08:33 AM
|
#7 | |
|
AF Enthusiast
Thread starter
Join Date: Aug 2005
Location: where "sky grey" is a colour
Posts: 822
Thanks: 3
Thanked 32 Times in 29 Posts
|
Re: Audi R8C LeMans 1999 Provence Moulage 1:43
It's the Day Light Opening....
Yes....i laughed too when i heard it first... :-) |
|
|
|
|
|
08-09-2008, 08:56 AM
|
#8 | ||
|
AF Fanatic
Join Date: Dec 2004
Location: Up the creek with no paddle
Posts: 5,888
Thanks: 7
Thanked 16 Times in 15 Posts
|
Re: Audi R8C LeMans 1999 Provence Moulage 1:43
Quote:
and are the headlights NTIs (Night Time Illuminators)?
__________________
Guideline for happy modeling: Practice on scrap. Always try something new. Less is more. "I have a plan so cunning, you could put a tail on it and call it a weasel" - Edmund Blackadder |
||
|
|
|
|
08-11-2008, 04:46 AM
|
#9 | |
|
AF Enthusiast

Join Date: Dec 2003
Location: Zagreb
Posts: 2,176
Thanks: 4
Thanked 23 Times in 22 Posts

|
Re: Audi R8C LeMans 1999 Provence Moulage 1:43
Huh, that is what I call determination. What do you use for panels? Which scriber?
|
|
|
|
|
|
08-18-2008, 05:31 PM
|
#10 | |
|
AF Enthusiast
Thread starter
Join Date: Aug 2005
Location: where "sky grey" is a colour
Posts: 822
Thanks: 3
Thanked 32 Times in 29 Posts
|
Re: Audi R8C LeMans 1999 Provence Moulage 1:43
For today i have a very brief "1-picture-update" for you guys.
There was room for improvement in the "PE-area" of this kit so i made a bunch of additional parts to soup the details up a bit ( or two...:-) 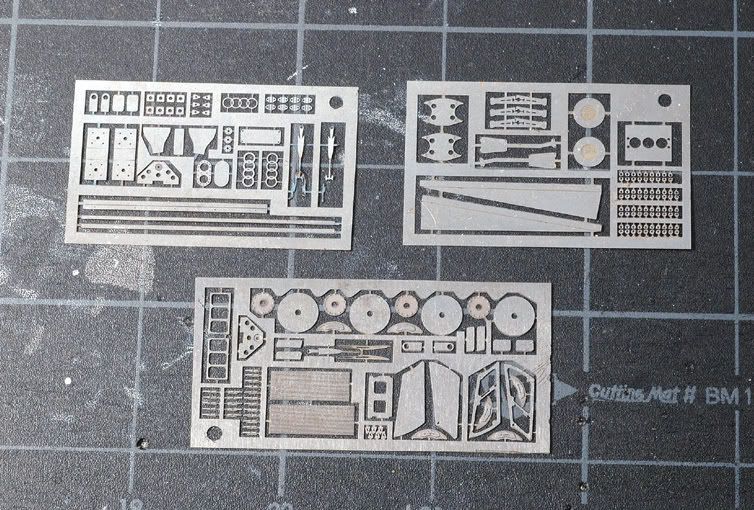 There is for example a better detailed rear wing support, some coolers, brake discs and calipers and not to forget a less fat Audi logo. You'll see what they all are once i mount them i think:-) Its often a lot of work to get them done but once I have the parts in my hand and can put them on the model they make me smile The top right sprue is wrong in the picture. Those are parts for a 1:24 Bentley, but i didn't notice before it was too late to take a new one... So that's it for today. Sjelic....i use various things for scribing, like the proverbial backside of a No.11 blade, SRC scribers, files and sand paper. I can't get it done with just one tool. Cheers! |
|
|
|
|
|
08-19-2008, 03:34 AM
|
#11 | ||
|
AF Enthusiast
Join Date: Dec 2003
Location: Zagreb
Posts: 2,176
Thanks: 4
Thanked 23 Times in 22 Posts
|
Re: Audi R8C LeMans 1999 Provence Moulage 1:43
Quote:
Great PE sets btw. |
||
|
|
|
|
08-19-2008, 06:55 AM
|
#12 | |
|
AF Enthusiast

Join Date: May 2003
Location: Sunshine Coast, AUSTRALIA
Posts: 2,215
Thanks: 16
Thanked 8 Times in 8 Posts
|
Re: Audi R8C LeMans 1999 Provence Moulage 1:43
Uh....Can you do me a favour and list all the kits you'll be building next so I don't pick the same kit? I'm afraid you'll make me look bad!
This is simply superb!
__________________
Rob 
|
|
|
|
|
|
08-19-2008, 04:43 PM
|
#13 | |
|
AF Enthusiast
Thread starter
Join Date: Aug 2005
Location: where "sky grey" is a colour
Posts: 822
Thanks: 3
Thanked 32 Times in 29 Posts
|
Re: Audi R8C LeMans 1999 Provence Moulage 1:43
Well Rob i think youre one of those people who really dont need any such list! Besides
.it changes on a nearly daily basis:-) If I can stay away from starting new stuff Ill be busy for the rest of the year with this Audi, the Tameo Lotus 72 and possibly the MP4/4.
During that time you can without a doubt easily build a whole pile of excellent models :-) Anyway what are you building right now? Did I miss it? Since Im at it heres a bit more building progress. One weak point of all these 1:43 modern GT/LMP kits are the wheels. Borranis and the likes are well suited for the PE/turned aluminium rim pieces the manufacturers use but O.Z. rims just dont work! Here are the originals for comparison: 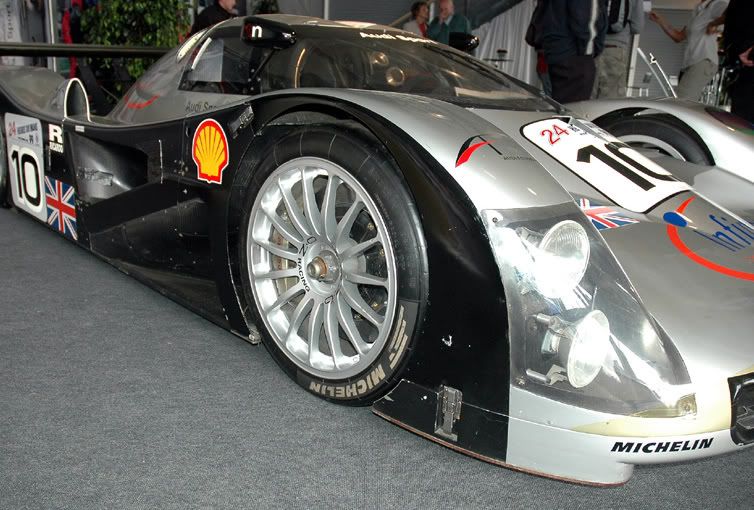 If you see those etched stars on the kit sprue they just dont have the right thickness. They might make a good fan or mixer though :-) I was thinking for a while how to make proper parts and the lathe and mill were nearly up an running when i discovered an easier solution cast the spokes off a friends Minichamps diecast! 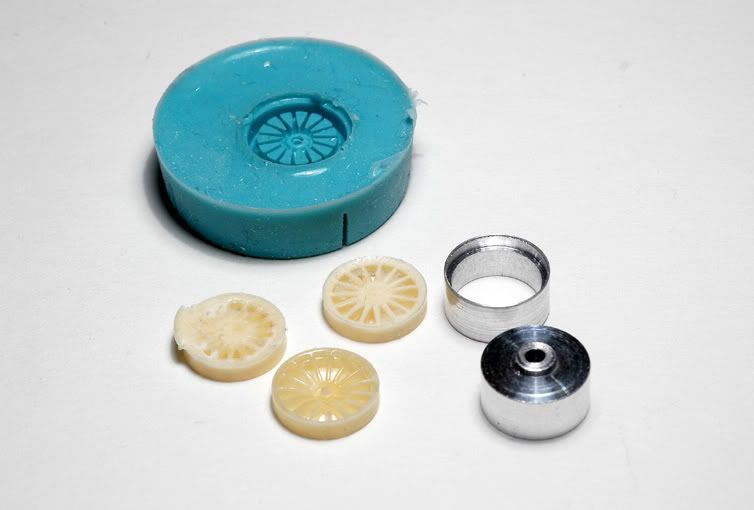 Now you could say .why not just stick those on the model!? But they werent that nice. The brake discs were unpaintably connected with the rims and besides there were no brake callipers . The kit rims and brake discs ( blobs actually ) werent impressive either and the front rims had yet another problem ( apart from being too narrow for the rubbers ). Like in all those kits they were massive aluminium at the back with a small hole for the axle. Normally thats fine because you dont see that area but the R8C is one of a few cars that has open front wheelarches towards the cars centreline, hence you see the back of the wheels ( see picture at the beginning of this update ). So I turned new aluminium rings for the fronts and opend the kit ones for the rear wheels. They could have stayed but I decided to use the same system for mounting all the wheels to not make things too complicated. The cast Minichamps-spokes were too thick so I chucked them on the motor tool and thinned them from the back with files and sand paper. This is how the parts then looked: 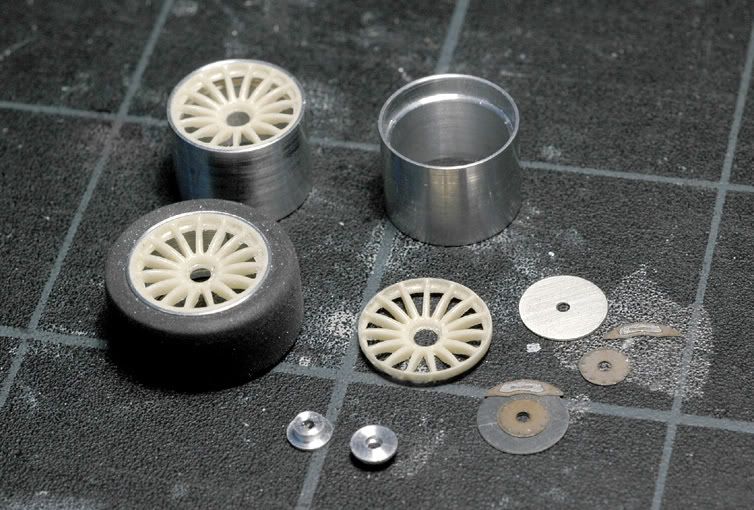 The little aluminium things are for the wheel centres and you can see the etched brake discs and callipers after cleaning and ready for paint. I put he pieces together with CA glue, primed them, sanded them, painted ZERO gloss black, sanded, painted Alclad Aluminium, added O.Z. decals and covered them with 2K-clear and now they look like this 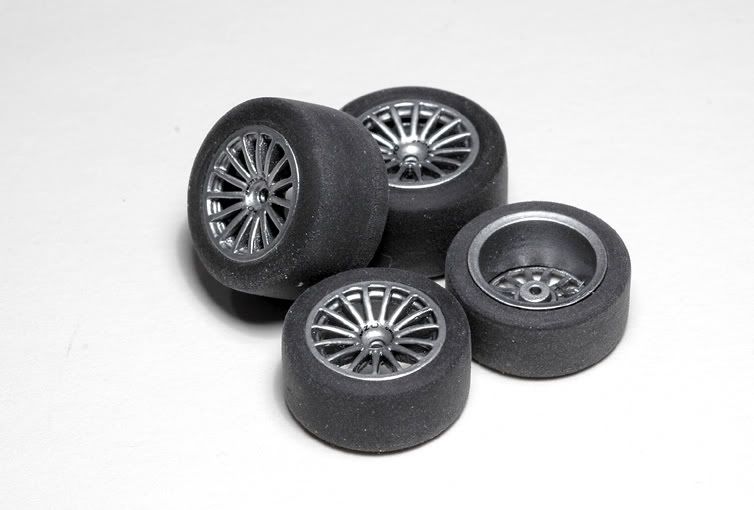 The tyres were stripped off a funny fine tread using the motor tool and sandpaper. Later on they will get Michelin decals and some clear on the sidewalls. The rims are not perfect. The spokes are not all really centred and they have some dents and blemishes here and there. I could easily have spent another bunch of hours fiddling with them but I decided theyre o.k. for this model. If I really get bored Ill give them another try on another kit :-) They do have a proper volume which was my goal and theyll need it because in the end theyll actually carry the weight of the model. I hope they dont bend over time! So far for now. CU for more! |
|
|
|
|
|
08-19-2008, 06:47 PM
|
#14 | |
|
AF Enthusiast

Join Date: Oct 2005
Location: Monza
Posts: 1,150
Thanks: 21
Thanked 56 Times in 38 Posts
|
Re: Audi R8C LeMans 1999 Provence Moulage 1:43
Oh Jay, I love your approach to the kits !!! And now, with the correct wheels (fantastic) will be a killer for sure
 Robi |
|
|
|
|
|
08-20-2008, 12:17 AM
|
#15 | |
|
AF Enthusiast

Join Date: Dec 2004
Location: Germany
Posts: 3,431
Thanks: 28
Thanked 79 Times in 73 Posts
|
Re: Audi R8C LeMans 1999 Provence Moulage 1:43
Good start, jaykay!
I always loved this car and look forward for your progress
__________________
Micha       
|
|
|
|
|
|
|
POST REPLY TO THIS THREAD |
 |
|
|

