|
|
|

|
|
| Search | Car Forums | Gallery | Articles | Helper | AF 350Z | IgorSushko.com | Corporate |
|
| Latest | 0 Rplys |
|
|||||||
| WIP - Motorsports Post topics for any "Work In Process" motorsports vehicles in this sub-forum. |
 |
 Show Printable Version | Show Printable Version |  Email this Page | Email this Page |  Subscribe to this Thread
|
|
|
Thread Tools |
 06-10-2023, 12:16 PM
|
#1 | |
|
AF Enthusiast
Join Date: Mar 2009
Location: Madrid
Posts: 649
Thanks: 109
Thanked 68 Times in 67 Posts
|
Porsche 911 SC 1984 Rally Valeo (1/24)
Comenzamos un nuevo proyecto: Porsche 911 SC RS de la marca Nunu a 1/24 la cual, voy a abrirle las puertas y el capo delantero, y todo será funcional!
We start a new project: Porsche 911 SC RS of the brand Nunu to 1/24 which, I will open the doors and the front bonnet, and everything will be functional! http://blog.maquetea.com/wp-content/...rs-768x768.jpg Y la idea es hacer el coche con el que Beny Fernandez corrió en el Rally Valeo de 1984, el cual presencié en vivo. Este es el coche de una prueba realizada para alguna revista: And the idea is to make the car with which Beny Fernandez raced in the 1984 Valeo Rally, which I witnessed live. This is the car from a test run for some magazine: http://blog.maquetea.com/wp-content/...ny-768x404.jpg Y qué tenemos de extras para este proyecto: And what extras do we have for this project? Las llantas y neumáticos que ha hecho KMP para éste coche. The wheels and tyres made by KMP for this car. El transkit de la propia Nunu Nunus own transkit http://blog.maquetea.com/wp-content/...11Beny01-2.jpg El conjunto de fotograbados que amablemente me proporcionó Scalelab24 (Gracias!!) The set of photoetched parts kindly provided by Scalelab24 (Thank you!!!) http://blog.maquetea.com/wp-content/...11Beny01-3.jpg El conjunto de calcas de este coche que inluye varios rallyes de ese año, que felizmente hizo Mario Vallina para Printlab de Spotmodel The decals set of this car including several rallies of that year, happily made by Mario Vallina for Spotmodel Printlab. http://blog.maquetea.com/wp-content/...11Beny01-1.jpg También usaré el conjunto de faros auxiliares que ha producido Ignacio Bas para este coche: I will also use the auxiliary headlight set that Ignacio Bas has produced for this car: http://blog.maquetea.com/wp-content/...1Beny01-61.jpg http://blog.maquetea.com/wp-content/...1Beny01-62.jpg Deciros que si bien usaré parte de la hoja de calcas original, tendré que trabajar un poco las franjas laterales puesto que el kit no reproduce las exactas del coche de Beny, ya que se en la parte trasera, se mantienen con igual grosor. Recortando las calcas originales adecuadamente, podremos reproducir el coche original. Este dato lo tengo que agradecer a Juan Manuel de Diseño Clandestino, que amáblemente me lo comunicó. I will use part of the original decal sheet, but I will have to work a little on the side stripes as the kit does not reproduce the exact ones from Benys car, as they are kept with the same thickness at the rear. Cutting the original decals properly, we will be able to reproduce the original car. I have to thank Juan Manuel from Diseño Clandestino for this information, who kindly communicated it to me. http://blog.maquetea.com/wp-content/...-4-768x432.jpg Y empezamos con la carrocería. En las siguiente fotos vemos como vienen los extremos de la carrocería, que habrá que pegar pero haré algo antes de pegar el delantero!! And we start with the bodywork. In the following pictures we can see how the ends of the body come, which will have to be glued but Ill do something before gluing the front! http://blog.maquetea.com/wp-content/...11Beny01-7.jpg http://blog.maquetea.com/wp-content/...11Beny01-6.jpg Un paso muy necesario en todos los proyectos: un ensamblaje inicial para ver como encaja lo más importante: A very necessary step in all projects: an initial assembly to see how the most important things fit together: http://blog.maquetea.com/wp-content/...1Beny01-12.jpg http://blog.maquetea.com/wp-content/...1Beny01-13.jpg http://blog.maquetea.com/wp-content/...11Beny01-9.jpg Empezamos a trabajar la carrocería, marcando las lineas de panel del capó delantero con el panelador de DSPIAE de 0,2 mm. We started to work on the bodywork, marking the front bonnet panel lines with the 0.2 mm DSPIAE panelling tool. http://blog.maquetea.com/wp-content/...14-768x432.jpg El siguiente paso es recortar el capó con la sierra de Tamiya, pero solo hasta la mitad para que mantenga la posición al pegar el faldón de lantero, que pagaremos solo por los extermos, ya que la parte delantera del mismo tiene que separarse: The next step is to cut out the bonnet with the Tamiya saw, but only halfway so that it will hold its position when gluing the lantern skirt, which we will pay only for the outer edges, as the front part of the bonnet has to be separated: http://blog.maquetea.com/wp-content/...1Beny01-15.jpg http://blog.maquetea.com/wp-content/...1Beny01-18.jpg http://blog.maquetea.com/wp-content/...1Beny01-22.jpg Una vez pegado, seguimos con el resto de los paneles hasta que se separa, dejando el hueco listo para rellenar, siendo posible el abrirlo y cerrarlo cuando esté terminado. Decir que el frente del capó que tiene los dos pivotes desaparecerá: Once glued, we continue with the rest of the panels until it is separated, leaving the gap ready to be filled, being possible to open and close it when it is finished. The front of the bonnet with the two pivots will disappear: http://blog.maquetea.com/wp-content/...1Beny01-24.jpg http://blog.maquetea.com/wp-content/...1Beny01-25.jpg http://blog.maquetea.com/wp-content/...1Beny01-27.jpg Y vamos con las puertas. De igual manera, usaremos el marcador de paneles de DSPIAE y la sierra de Tamiya, y como guía para los pilares centrales, uso cinta de la que se usaba para marcar de la empresa Dymo, que corto y pego en su posición para hacer el paso de la cuchilla más preciso, siendo el resultado el que veis en la segunad fotografia: And lets move on to the doors. In the same way, we will use the DSPIAE panel marker and the Tamiya saw, and as a guide for the central pillars, I use Dymo marking tape, which I cut and paste in its position to make the blade pass more precise, the result being the one you see in the second picture: http://blog.maquetea.com/wp-content/...1Beny01-28.jpg http://blog.maquetea.com/wp-content/...1Beny01-29.jpg Y el resultado final será como el que muestro ahora: And the end result will look like the one I show now: http://blog.maquetea.com/wp-content/...1Beny01-33.jpg http://blog.maquetea.com/wp-content/...1Beny01-34.jpg http://blog.maquetea.com/wp-content/...1Beny01-30.jpg Una vez tengo las puertas abiertas, continuamos con el capó delantero. Vamos a hacer el reborde donde reposa cuando está cerrado. Primero cortamos una lámima de 0,2mm de grosor, y la ponemos por debajo de la carrocería, para que se pueda pintar el contorno por la parte superior, siguiento el borde: Once I have the doors open, we continue with the front bonnet. We are going to make the ridge where it rests when it is closed. First we cut a 0.2mm thick sheet, and put it under the body, so that the outline can be painted on the top, following the edge: http://blog.maquetea.com/wp-content/...1Beny01-41.jpg http://blog.maquetea.com/wp-content/...1Beny01-40.jpg Una vez pintado, le hacemos una segunda linea a unos 2 mm de la anterior, que será donde cortemos Once painted, we make a second line about 2 mm away from the previous one, which will be where we will cut http://blog.maquetea.com/wp-content/...42-768x432.jpg Lo fijamos en la carrocería y comprobamos que el capó se mantiene en su posición sobre el plástico cortado: We attach it to the body and check that the bonnet remains in position on the cut plastic: http://blog.maquetea.com/wp-content/...1Beny01-43.jpg http://blog.maquetea.com/wp-content/...1Beny01-46.jpg Revisando como queda ese marco en la parte inferior del parabrisas, vemos que tiene olgura. Eso es porque el coche realtiene en medio la entrada de aire característica del 911, con un filtro. By checking how the frame at the bottom of the windscreen looks, we can see that it has a gap. Thats because the car retains the characteristic 911 air intake in the middle, with a filter. http://blog.maquetea.com/wp-content/...44-768x432.jpg Por tanto, hay que hacer unas piezas en los extremos, que irán separando el marco desde los extremos hasta su parte interior. Therefore, it is necessary to make some pieces at the ends, which will separate the frame from the ends to the inside. http://blog.maquetea.com/wp-content/...1Beny01-49.jpg http://blog.maquetea.com/wp-content/...1Beny01-50.jpg http://blog.maquetea.com/wp-content/...1Beny01-54.jpg Después pegamos todo y vemos que el capó asienta bien: Then we glue everything together and see that the bonnet sits well: http://blog.maquetea.com/wp-content/...55-768x432.jpg Ahora, tenemos que pensar en las bisagras del capó. Con lámina de diskete, recorto dos bisagras para hacer unas pruebas con imanes. Las dos escuadras pequeñas irán debajo de la parte delantera del parabrisas. Y con cinta adhesiva de doble cara, las sujeto para pegar los imanes con cianocrilato: Now, we have to think about the bonnet hinges. I cut out two hinges with diskete film to make some tests with magnets. The two small brackets will go under the front of the windscreen. And with double-sided adhesive tape, I attach them to stick the magnets with cyanoacrylate: http://blog.maquetea.com/wp-content/...1Beny01-57.jpg http://blog.maquetea.com/wp-content/...1Beny01-58.jpg Y con esa misma cinta adhesiva, llas fijo en su lugar para ver como funcionan, siendo el resulta muy bueno!. Ya más adelante, afinaré este mecanismo. And with the same adhesive tape, I fix them in place to see how they work, and the result is very good! Later on, I will fine-tune this mechanism. http://blog.maquetea.com/wp-content/...1Beny01-59.jpg http://blog.maquetea.com/wp-content/...1Beny01-60.jpg Podeis verlo en este video: You can see it in this video: https://youtu.be/VsMPlipwxPU Otro proceso que he hecho es afinar la pared decla carrocería, en la parte delantera de las puertas. Hay que reducir el grosor para que la puerta cuando se abra, tenga el máximo de holgura. Vemos la aprte izquierda ya afinada, y la derecha sin haberse trabajado: Another process I have done is to thin the body wall at the front of the doors. The thickness has to be reduced so that the door, when it opens, has the maximum clearance. We can see the left side already tuned, and the right side without having been worked on: http://blog.maquetea.com/wp-content/...1Beny01-63.jpg http://blog.maquetea.com/wp-content/...1Beny01-64.jpg Más cortes!! Ahora es el turno de los cristales laterales. Usamos la misma cinta de Dymo para que haga de linea de corte. More cuts! Now its the turn of the side windows. We use the same Dymo tape to act as a cutting line. http://blog.maquetea.com/wp-content/...67-768x432.jpg Y lo mismo con los paneles interiores de las puertas, las cortamos con los mismos instrumentos: And the same with the interior door panels, we cut them with the same tools: http://blog.maquetea.com/wp-content/...39-768x432.jpg Mucho queda todavía por hacer, pero el proyecto me anima!! Grac ias por ver y comentar!! There is still a lot to do, but the project encourages me! Thanks for watching and commenting! |
|

|

|
|
06-12-2023, 01:32 AM
|
#2 | |
|
AF Regular
Join Date: Feb 2005
Location: Kaatsheuvel
Posts: 221
Thanks: 26
Thanked 46 Times in 41 Posts
|
Re: Porsche 911 SC 1984 Rally Valeo (1/24)
Hi Jesus. Nice start of a new build. Could you maybe put your images between [img][/img] tags? Then they show instantly on the forum.
|
|
|
|
|
|
06-12-2023, 02:45 AM
|
#3 | ||
|
AF Enthusiast
Thread starter
Join Date: Mar 2009
Location: Madrid
Posts: 649
Thanks: 109
Thanked 68 Times in 67 Posts
|
Re: Porsche 911 SC 1984 Rally Valeo (1/24)
Quote:
Regarding the way to add the pcitures, I did it in this way because if I add them as images with [IMG][/IMG] tags, they don't appear. Check my las post added in Completed projects: https://www.automotiveforums.com/vbu....php?t=1159081 |
||
|
|
|
|
06-13-2023, 08:59 AM
|
#4 | |
|
AF Regular
Join Date: Feb 2005
Location: Kaatsheuvel
Posts: 221
Thanks: 26
Thanked 46 Times in 41 Posts
|
Re: Porsche 911 SC 1984 Rally Valeo (1/24)
Ahh yes.. I remember we have seem that issue before. Strange, but better to have links, than no pictures at all
 |
|
|
|
|
|
06-19-2023, 01:28 AM
|
#5 | ||
|
AF Enthusiast
Thread starter
Join Date: Mar 2009
Location: Madrid
Posts: 649
Thanks: 109
Thanked 68 Times in 67 Posts
|
Re: Porsche 911 SC 1984 Rally Valeo (1/24)
Quote:
|
||
|
|
|
|
06-26-2023, 03:48 AM
|
#6 | |
|
AF Enthusiast
Thread starter
Join Date: Mar 2009
Location: Madrid
Posts: 649
Thanks: 109
Thanked 68 Times in 67 Posts
|
Re: Porsche 911 SC 1984 Rally Valeo (1/24)
Continuamos con este Porsche, en concreto con todo el tema de las puertas, tanto con sus bisagras como con su adaptación en la cuna y en la carrocería. Y lo primero que hacemos es rebajar el borde de las puertas. Para ello pinto todo el borde con rotulador rojo, para así, ver lo que me queda rebajar cuando estoy con el minitaladro. Aquí os muestro como decrece el ancho en la parte derecha del borde de la puerta, estando el izquierdo sin tocar. Este frebaje dará más realidad a las puertas y permitirá que se muevan mejor por donde están las bisagras.
We continue with this Porsche, specifically with the whole issue of the doors, both with their hinges and their adaptation in the cradle and the body. And the first thing we do is to lower the edge of the doors. To do this I paint the entire edge with red marker, so I can see what I have left to lower when Im with the mini drill. Here I show you how the width decreases on the right side of the door edge, being the left one untouched. This will give more reality to the doors and will allow them to move better where the hinges are. http://blog.maquetea.com/wp-content/...-3-768x432.jpg Y hablando de bisagras, aquí las teneís. Realizadas con tubo en el que inserto un alambre de 0,4 mm para que gire. Este alambre lo doblo de la forma que veis en las fotos dejaando el tubo exterior en el lado de la puerta, para que al abrirse la puerta, su extremo delantero se meta haca el interior de la carrocería, en los huecos que el alambre le permite. Los extermos del alambre, los metemos en una barra de plastico en sendos agujeros y que fijamos a la carrocería. Probamos como funciona, fijando la bisagra a la puerta con bluetack. And speaking of hinges, here you have them. Made with a tube in which I insert a 0.4 mm wire to rotate. This wire I bend it in the way that you see in the photos leaving the outer tube on the side of the door, so that when the door opens, its front end gets inside the body, in the holes that the wire allows. The extermos of the wire, we put them in a plastic bar in two holes and that we fix to the bodywork. We test how it works, fixing the hinge to the door with bluetack. http://blog.maquetea.com/wp-content/...1Beny02-13.jpg http://blog.maquetea.com/wp-content/...1Beny02-15.jpg http://blog.maquetea.com/wp-content/...1Beny02-12.jpg Y así se ve la carrocería con las puertas abiertas: And this is what the bodywork looks like with the doors open: http://blog.maquetea.com/wp-content/...11Beny02-5.jpg http://blog.maquetea.com/wp-content/...11Beny02-6.jpg http://blog.maquetea.com/wp-content/...1Beny02-10.jpg Una vez que hemos comproado su fucionamiento, las fijamos en la carrocería con cinta de enmascarar, y pegamos la bisagra a la puerta, con cianocrilato mezclado con polvos de talco, para hacer el pegamento más consistente, siendo éste el resultado: Once we have checked their operation, we fix them to the bodywork with masking tape, and glue the hinge to the door, with cyanoacrylate mixed with talcum powder, to make the glue more consistent, and this is the result: http://blog.maquetea.com/wp-content/...1Beny02-28.jpg http://blog.maquetea.com/wp-content/...1Beny02-27.jpg Y ya nos ponemos a completar la carrocería y la cuna del cockpit de acuerdo a las fotografias reales y dentro de lo que el kit nos deja. Y lo primero es rellenar el hueco de la carrocería. Ponemos cinta de enmascarar, pintamos el hueco con un lapiz, recortamos y pegamos. También, hemos colocado el reborde por todo el marco d ela puerta donde irá la tira de goma que hará estanco el habitáculo cuando la puerta esté cerrada. And now we start to complete the bodywork and the cockpit cradle according to the real pictures and within what the kit leaves us. And the first thing is to fill the hole in the bodywork. We put masking tape, paint the hole with a pencil, cut and paste. Also, we have placed the flange around the door frame where the rubber strip that will make the cabin watertight when the door is closed. http://blog.maquetea.com/wp-content/...1Beny02-20.jpg http://blog.maquetea.com/wp-content/...11Beny02-2.jpg http://blog.maquetea.com/wp-content/...1Beny02-21.jpg En la siguiente foto, vemos la parte correspondiente a la parte baja y delantera de la puerta, con los trozos de plastico que han rellenado los huecos que se ven al recortar la puerta de la carrocería. In the following photo, we see the part corresponding to the lower and front part of the door, with the pieces of plastic that have filled the holes that are seen when trimming the door of the body. http://blog.maquetea.com/wp-content/...23-768x432.jpg Y la cuna también a tenido que ser recortada para tener el panel interior de las puertas que tendremos que adaptar. Si veis, el apnel lateral se ah recortado por delante dejando los pivotes donde se sujetará el salpicadero. Decir, que ya están pegados a la cuna. And the cradle also had to be trimmed to have the inner panel of the doors that we will have to adapt. If you see, the side apnel ah ah cut in front leaving the pivots where the dashboard will be attached. To say that they are already glued to the cradle. http://blog.maquetea.com/wp-content/...16-768x432.jpg Y al cortar, hay que adaptar y rellenar los huecos. Empezamos por los laterales horizontales de las puertas. Después seguimos con esas piezas casi verticales, que tienen la forma interior del pilar B, y que van pintadas de negro. Esto lo podía haber pegado a la carrocería pero al ser negro, lo añado a la cuan, y se quedará junto al pilar B cuando lo pongamos dentro d ela carrocería. También vemos como va colocado el salpicadero, sujeto con bluetack. And when cutting, it is necessary to adapt and fill the gaps. We start with the horizontal sides of the doors. Then we continue with those almost vertical pieces, which have the inner shape of the B-pillar, and are painted black. This could have been glued to the body but being black, I add it to the quan, and will stay next to the B-pillar when we put it inside the body. We also see how the dashboard is placed, attached with bluetack. http://blog.maquetea.com/wp-content/...1Beny02-29.jpg http://blog.maquetea.com/wp-content/...1Beny02-30.jpg Y para terminar hoy, una foto del arco de seguridad, ya pegado a falta de detallar. And to finish today, a photo of the safety arch, already glued and still to be detailed. http://blog.maquetea.com/wp-content/...11Beny02-1.jpg La siguiente fase será el detallado del capó antes de meterme con la masilla para afinar todo lo realizado hasta ahora. Gracias por ver y comentar!! The next phase will be the detailing of the hood before I get into the putty to fine tune everything done so far. Thanks for watching and commenting! |
|
|
|
|
|
07-14-2023, 07:13 AM
|
#7 | |
|
AF Enthusiast
Thread starter
Join Date: Mar 2009
Location: Madrid
Posts: 649
Thanks: 109
Thanked 68 Times in 67 Posts
|
Re: Porsche 911 SC 1984 Rally Valeo (1/24)
Continuamos con el Porsche, modificando las partes que se ven ahora después de cortar, en este caso, las puertas. En las siguientes fotos, podéis ver las piezas de plástico que he puesto en el interior de la carrocería, donde va encajada la puerta. Falta enmasillar y afinar con lija.
We continue with the Porsche, modifying the parts that are seen now after cutting, in this case, the doors. In the following photos, you can see the plastic pieces that I have put inside the body, where the door is fitted. Need to putty and refine with sandpaper. 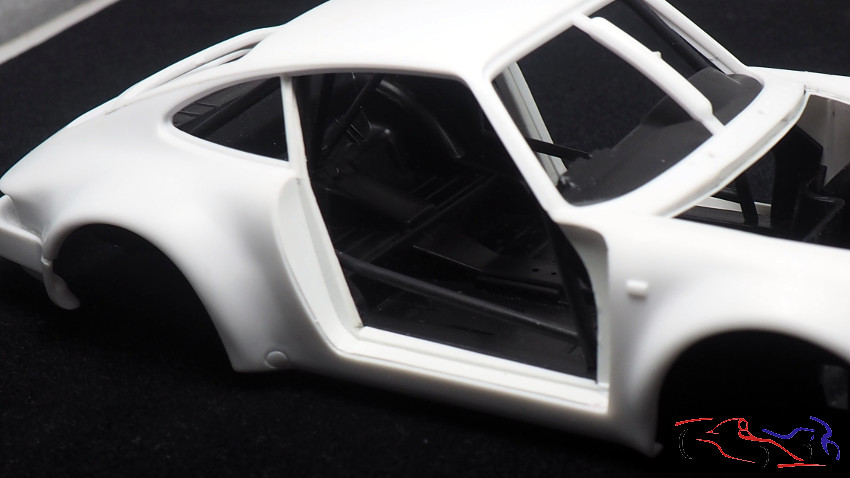 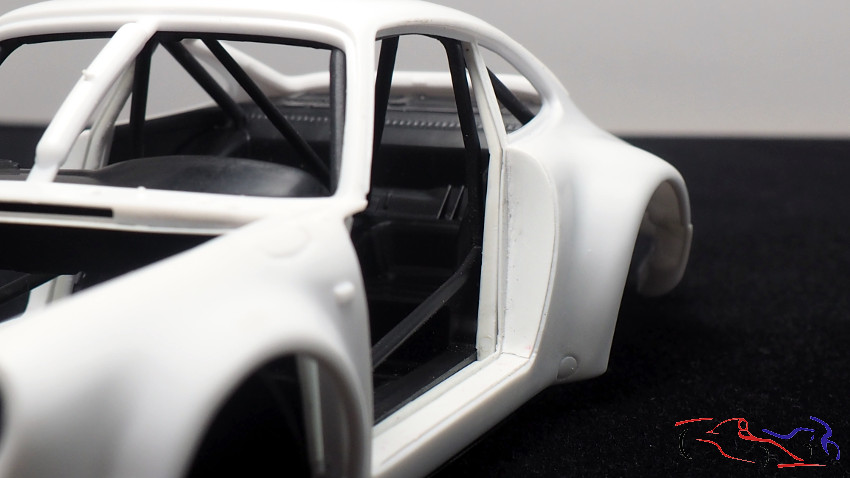 http://blog.maquetea.com/wp-content/...11Beny03-1.jpg Y de igual forma, lo hacemos con el capó delantero. La idea es pegar todo al chasis para que la carrocería entre y salga sin problema. Y lo primero que hacemos es colocar una pieza plana en el fondo, calzada para que sea lo más horizontal posible: And in the same way, we do it with the front hood. The idea is to glue everything to the chassis so that the body can go in and out without a problem. And the first thing we do is place a flat piece on the bottom, wedged to make it as horizontal as possible: 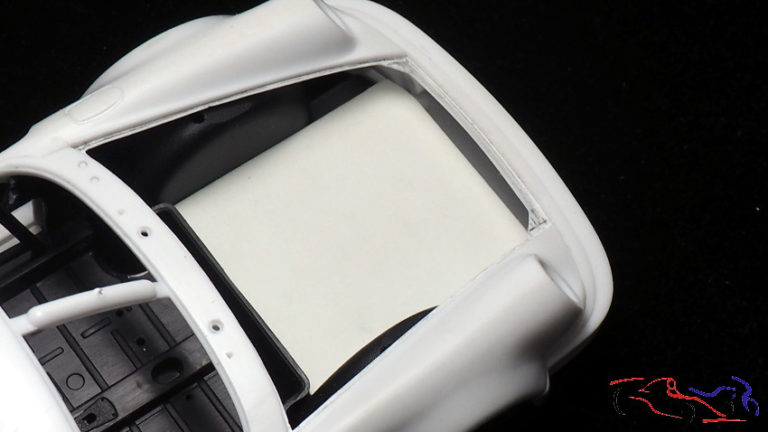 En ese punto, empezamos a hacer la cuna del capó, subiendo las paredes. Ponemos cinta de enmascarar y pintamos la forma. Lo pasamos al plantico, recortamos y pegamos. Ya tenemos el frente y un lateral: At that point, we started making the hood cradle, going up the walls. We put masking tape and paint the shape. We pass it to the plant, cut and paste. We already have the front and a side: 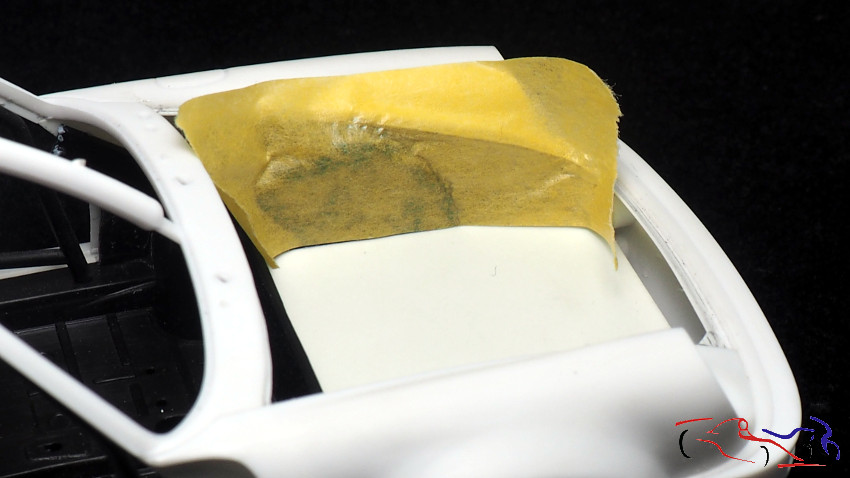 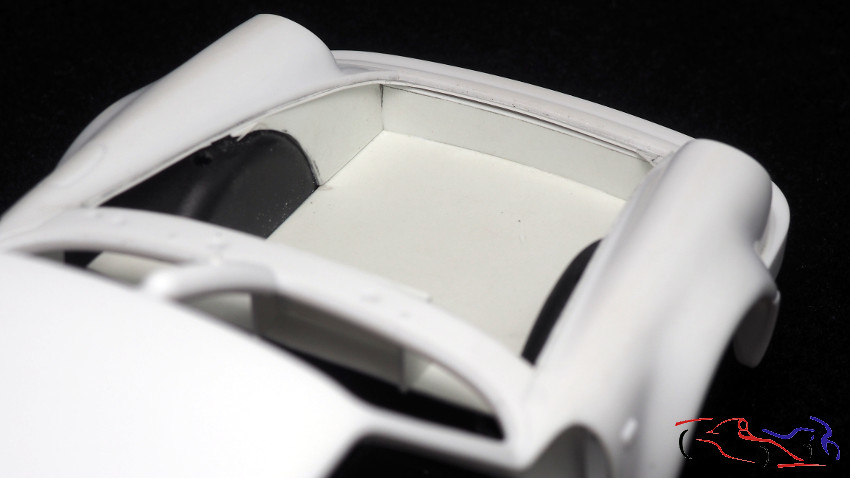 Para seguir con el lateral, planifico la parte del cortafuegos entre el cockpit y el capó. Subo un escalón que hay en el chasis, y le doy esa forma vertical con los laterles más hundidos para que se puedan poner las bisagras, que por cierto, he modificado (más adelante veréis las nuevas!): To continue with the side, I plan the part of the firewall between the cockpit and the hood. I go up a step that is in the chassis, and I give it that vertical shape with the sides more sunken so that the hinges can be placed, which by the way, I have modified (later you will see the new ones!): 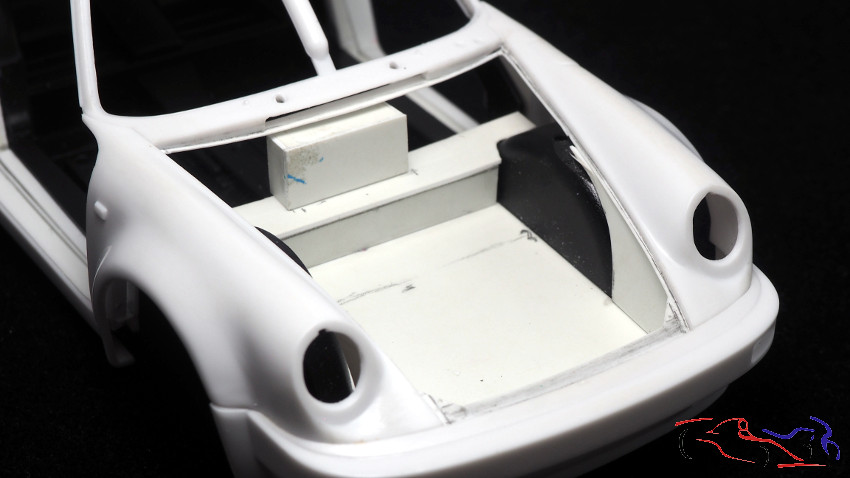 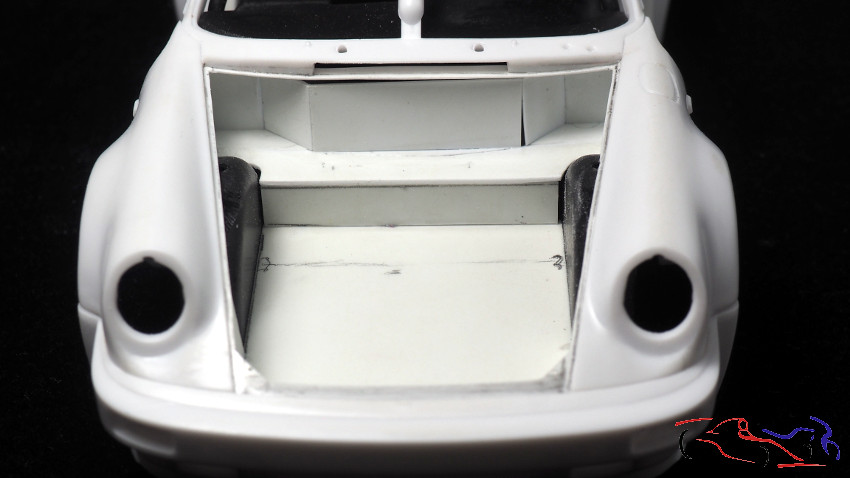 Para la parte tarsera del panel lateral, procedo de la misma manera: cinta de enmascarar, pinto el contorno, recorto y pego: For the back of the side panel, I process in the same way: masking tape, paint the outline, cut and paste: 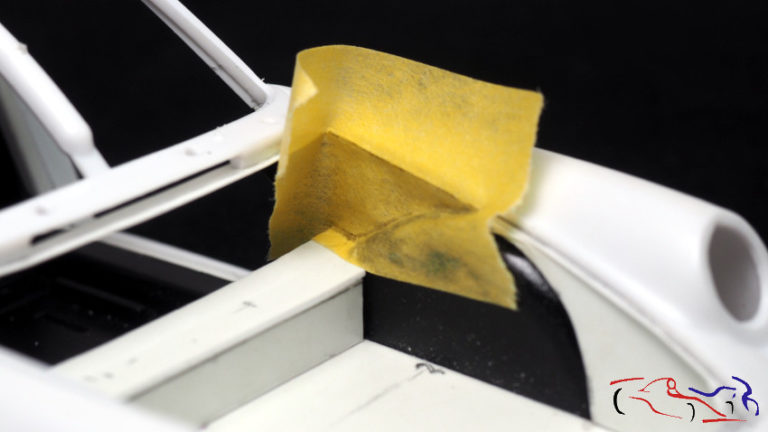 Y aquí, ya tenemos la cuna hecha del capó, a falta de enmasillar y lijar: And here, we already have the cradle made of the hood, in the absence of caulking and sanding: 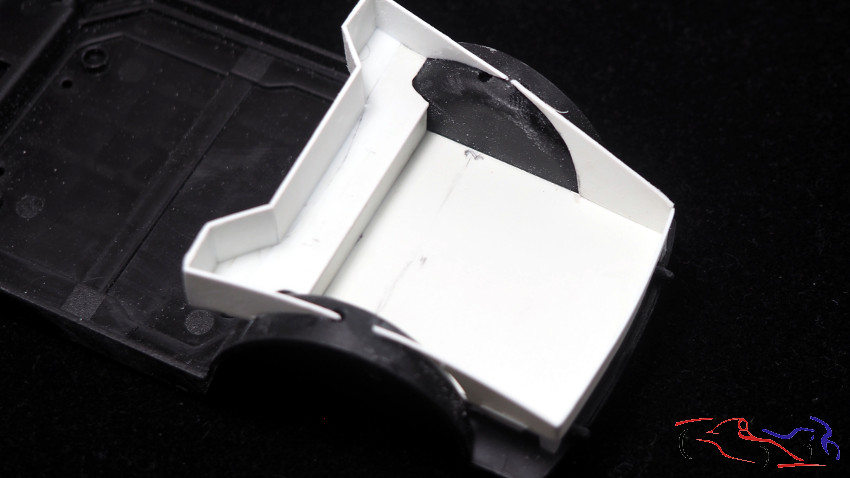 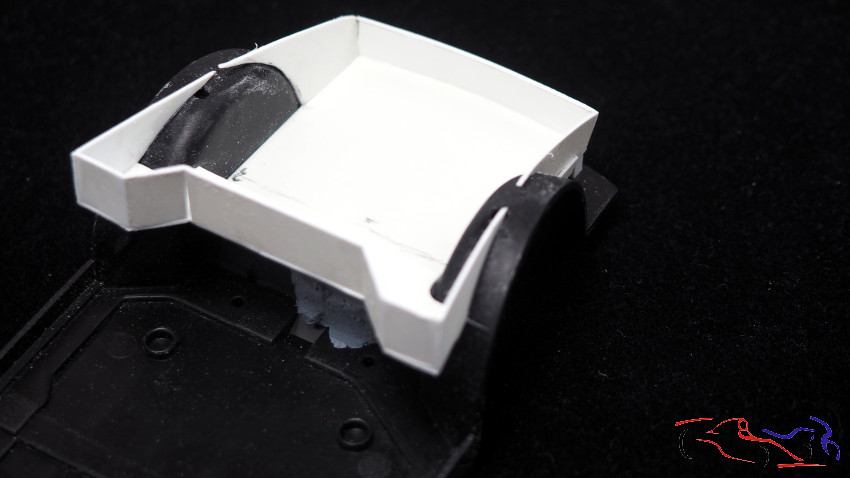 Antes hablé de las bisagras, que las tenía hechas con imanes, pero no dejaba un cierre muy limpio y fino. Por lo que decido hacerlas ocn reondo y tubo de cobre, tal y como aparecen en la siguiente fotografía. Pero tampoco resultó porque la bisagra erá muy frágil y se podía salir de ambos tubos: Before I talked about the hinges, which were made with magnets, but they did not leave a very clean and fine closure. So I decide to make them round and with a copper tube, as they appear in the following photograph. But it didnt work either because the hinge was very fragile and could come out of both tubes: 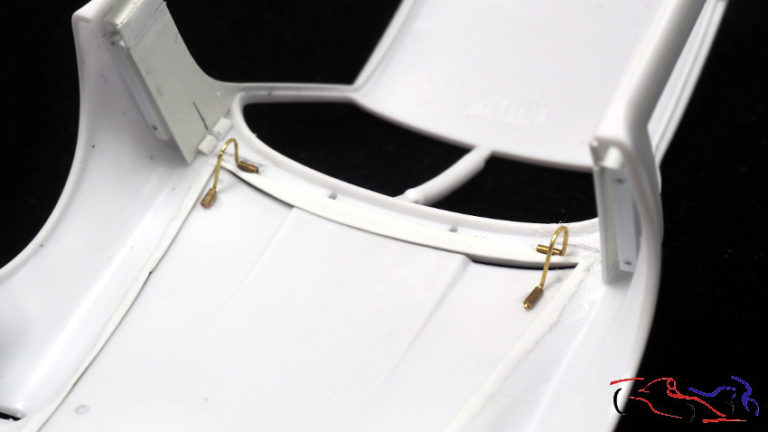 Por lo que decido hacer la base d ela carrocería en forma de T para que su giro sea más exacto. A su vez, lo hago unos rebajes en la carrocería para lo que me ayudo de una tira que tengo de la máquinas Dymo, pera rotular, y de cinta adhesiva de doble cara para soldar los tubos, Decir que la bisagra está hecha con redondo de latón de 0,4mm, que gira sobre tubo con 0,4mm de interior: So I decide to make the base of the body in the form of a T so that its rotation is more exact. At the same time, I make some recesses in the body for which I use a strip that I have from the Dymo machines, to label it, and double-sided adhesive tape to weld the tubes. Say that the hinge is made with round 0.4mm brass, which rotates on a tube with 0.4mm interior: 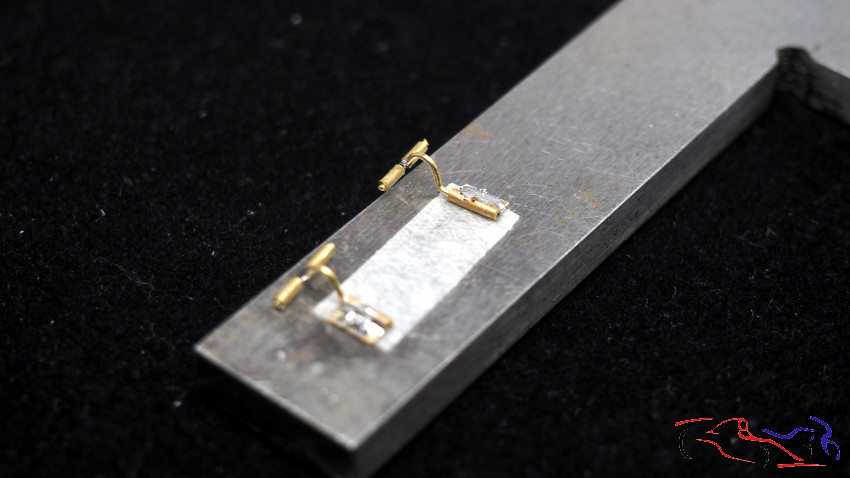 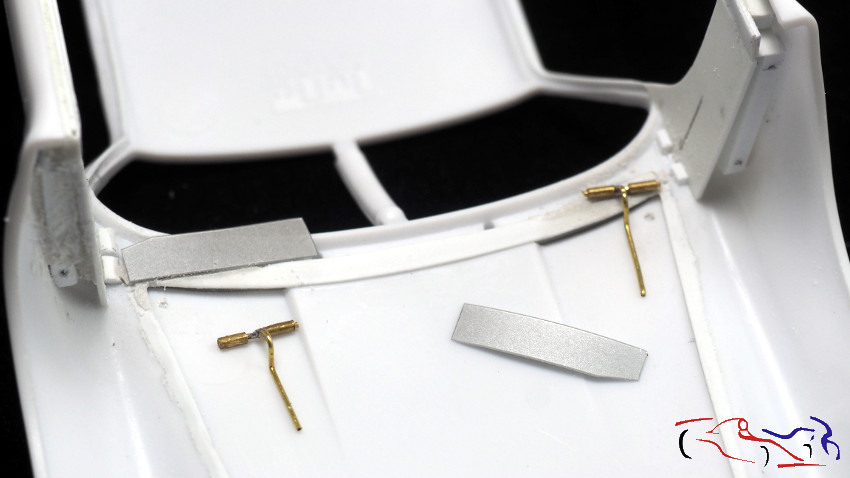 Y aquí ya las tenemos pegadas. La parte del capó, al ser un tubo, se puede sacar y meter cuando se quiera: And here we already have them glued. The hood part, being a tube, can be removed and inserted whenever you want: 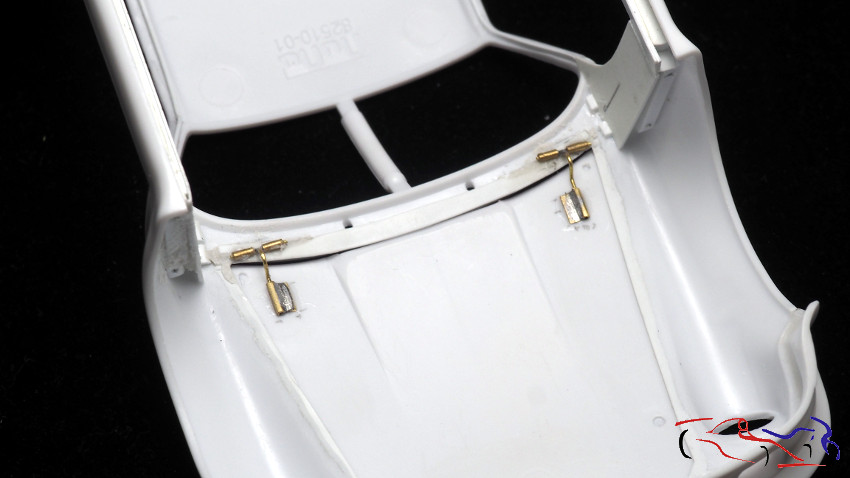 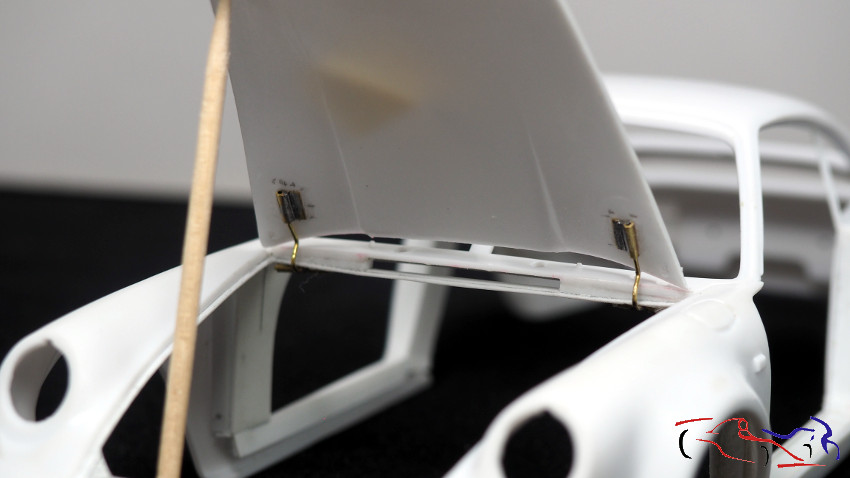 Pero no quedaba bien fijo, por lo que puse unos imanes en la carrocería y en acpó, para que su cierre fuera perfecto y así fue!! But it didnt fit well, so I put some magnets on the body and on the acpó, so that it closed perfectly and thats how it was!! 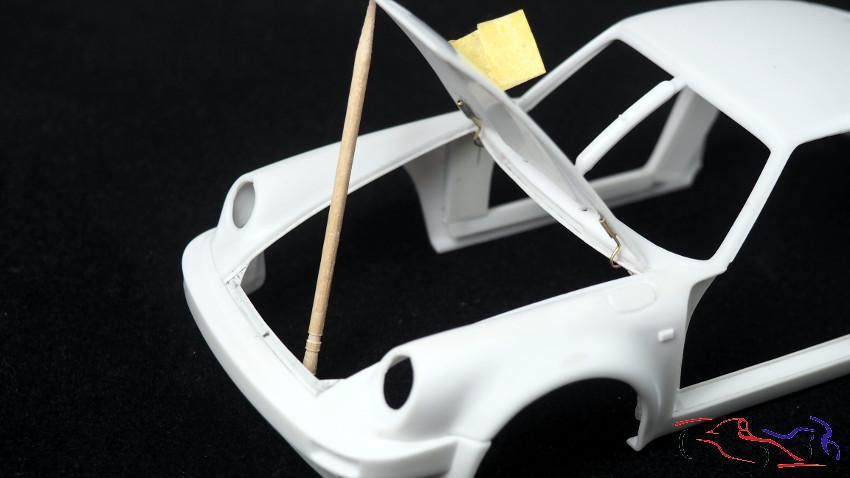 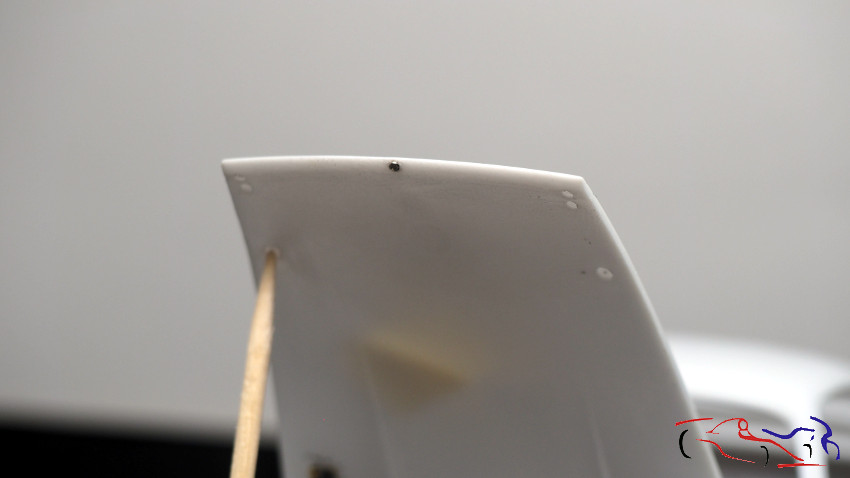 Ahora nos vamos a los pasos de rueda. Como en el chasis van rectos, si pongo una trozo de plastico a lo largo del chasis y lo pego a la carrocería, ya solo tendré que rellenar ese hueco con masilla epoxy. Aquí veis los añadidos en la parte tarsera, en los que he pintado el borde de rojo para diferenciarlos: Now we go to the wheel arches. Since they are straight on the chassis, if I put a piece of plastic along the chassis and stick it to the body, I will only have to fill that hole with epoxy putty. Here you can see the additions on the back, in which I have painted the border in red to differentiate them: 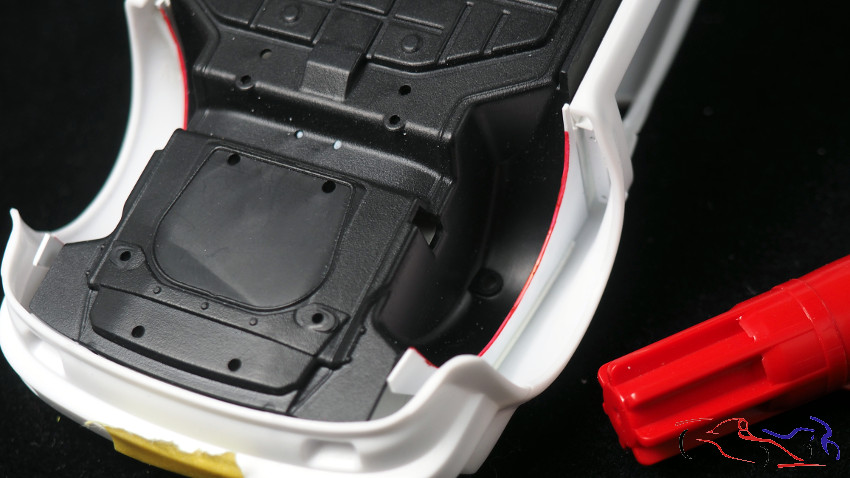 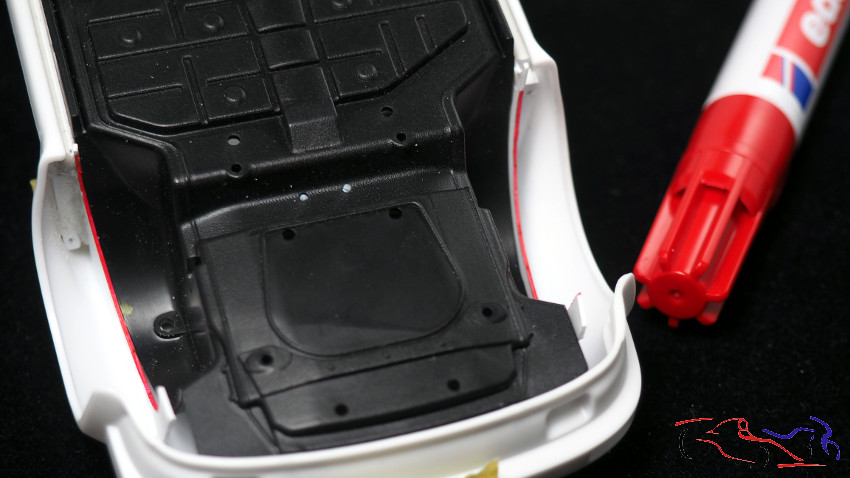 Si quitamos el chasis, vemosel tamaño de los añadidos: If we remove the chassis, we see the size of the additions: 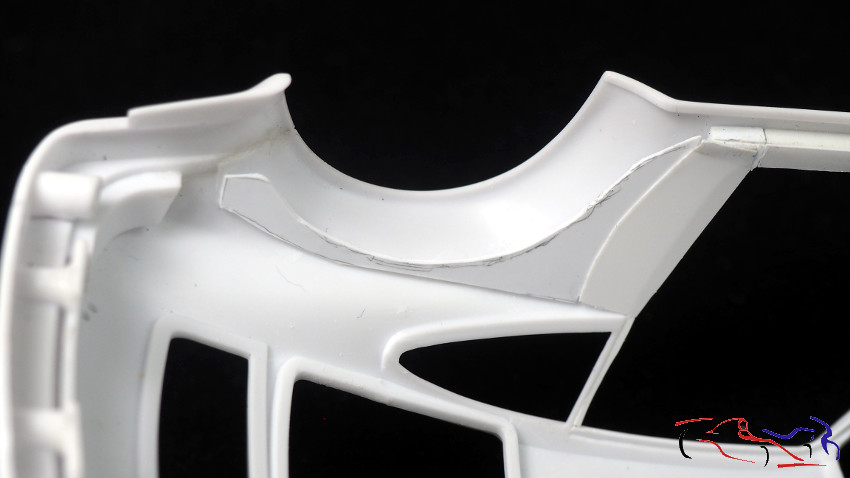 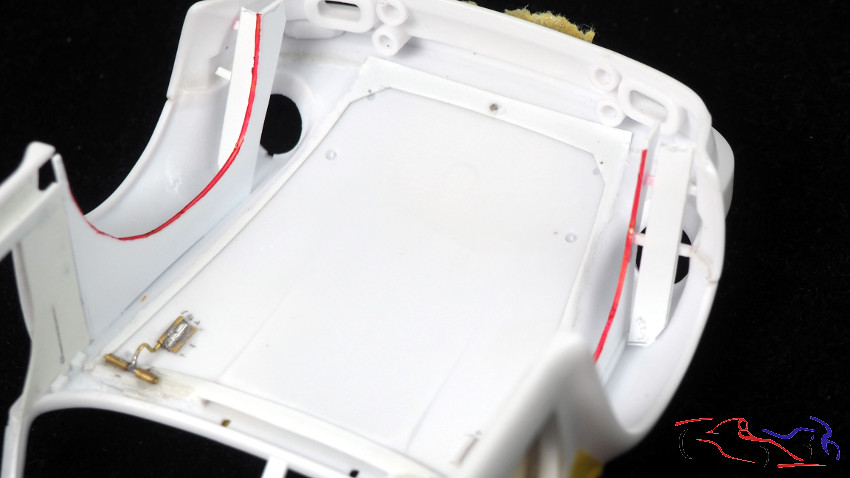 Y no que da más que poner la masilla epoxy, que manejo mojádome un poco los dedos con agua. And not that it gives more than putting the epoxy putty, which I handle by wetting my fingers a little with water. 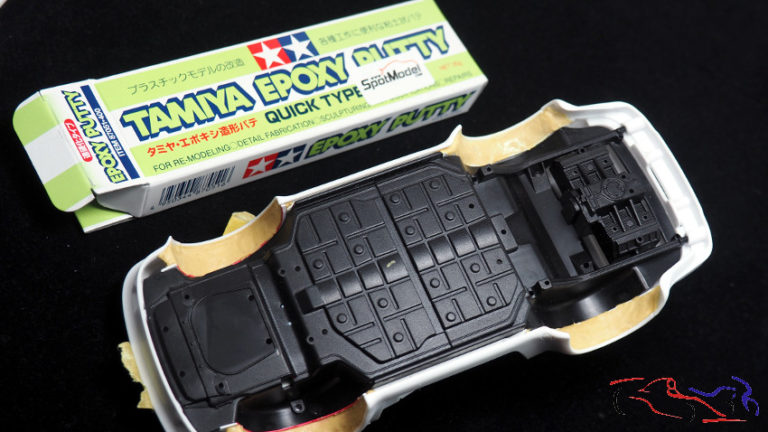 Aquí los veis ya lijados, y no los voy a dar un acabado perfecto ay que esas fonas, no estaban muy perfectas! Here you can see them already sanded, and Im not going to give them a perfect finish, oh, those shapes werent very perfect! 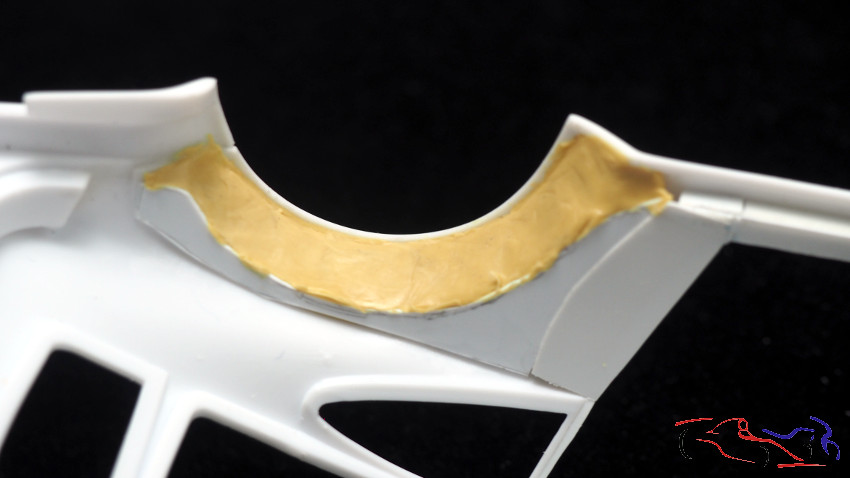 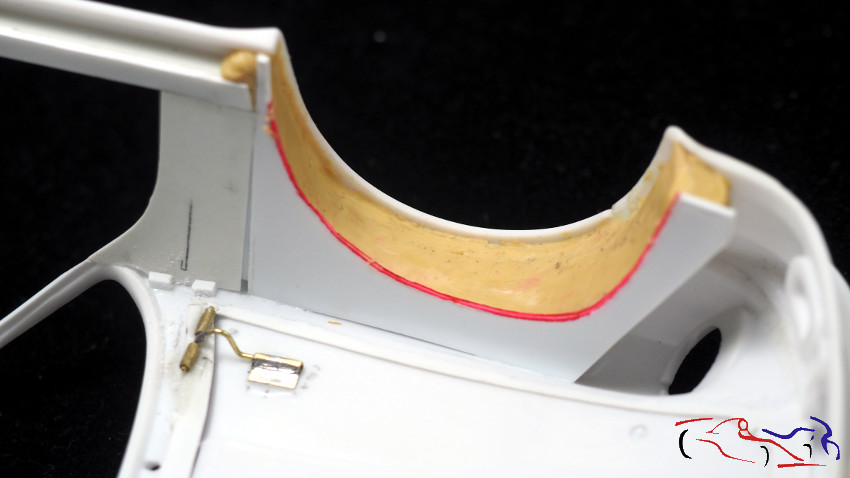 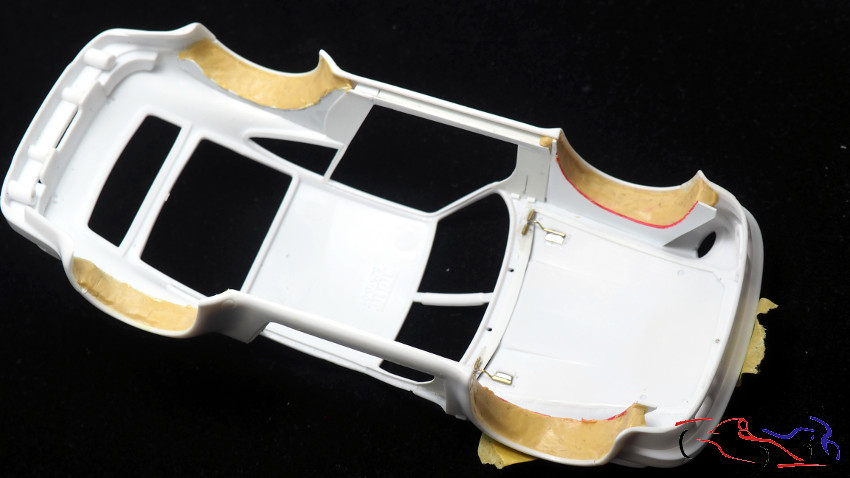 Solo queda ir rellenado la cuna del capó con las diferentes piezas que ahi seencuantran, como son las fijaciones de la barra estabilizadora: It only remains to fill the cradle of the hood with the different pieces that are found there, such as the stabilizer bar fixings: 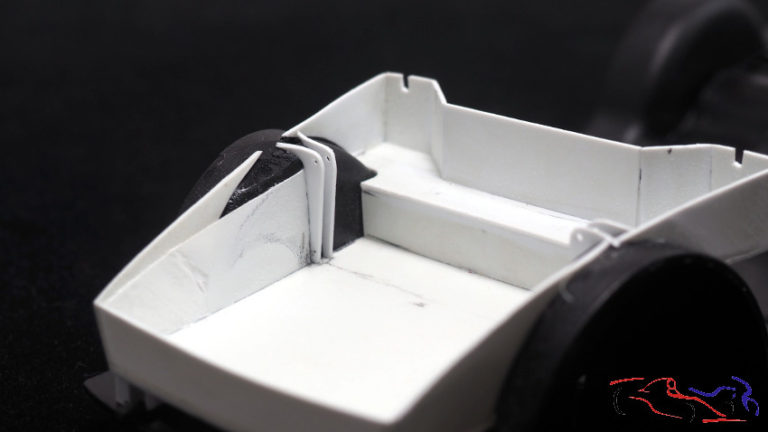 Lo siguiente es enmasillar, lijar, limpiar e imprimar! Gracias por ver y comentar!! Next is to putty, sand, clean and prime! Thanks for viewing and commenting!! |
|
|
|
|
|
07-31-2023, 03:07 AM
|
#8 | |
|
AF Regular
Join Date: Feb 2005
Location: Kaatsheuvel
Posts: 221
Thanks: 26
Thanked 46 Times in 41 Posts
|
Re: Porsche 911 SC 1984 Rally Valeo (1/24)
Hmmm I missed your previous update. But it is looking good. Last update probably needs some photo's fixed, but from the text I can see you spend a lot of time getting all right and fitting
|
|
|
|
|
|
07-31-2023, 12:58 PM
|
#9 | |
|
AF Regular
Join Date: Aug 2011
Location: Torino
Posts: 390
Thanks: 175
Thanked 62 Times in 58 Posts
|
Re: Porsche 911 SC 1984 Rally Valeo (1/24)
Looking really good Jesus! Great ideas and tips from you as usual!
 |
|
|
|
|
|
09-06-2023, 02:38 AM
|
#10 | ||
|
AF Enthusiast
Thread starter
Join Date: Mar 2009
Location: Madrid
Posts: 649
Thanks: 109
Thanked 68 Times in 67 Posts
|
Re: Porsche 911 SC 1984 Rally Valeo (1/24)
Quote:
|
||
|
|
|
|
09-06-2023, 02:39 AM
|
#11 | |
|
AF Enthusiast
Thread starter
Join Date: Mar 2009
Location: Madrid
Posts: 649
Thanks: 109
Thanked 68 Times in 67 Posts
|
Re: Porsche 911 SC 1984 Rally Valeo (1/24)
Continuamos con el 911 después del periodo veraniego. Y empezamos por los pasos de rueda. Este es el aspecto que tenían después de alisar la masilla:
We continue with the 911 after the summer period. And we start with the wheel arches. This is how they looked after smoothing the putty: 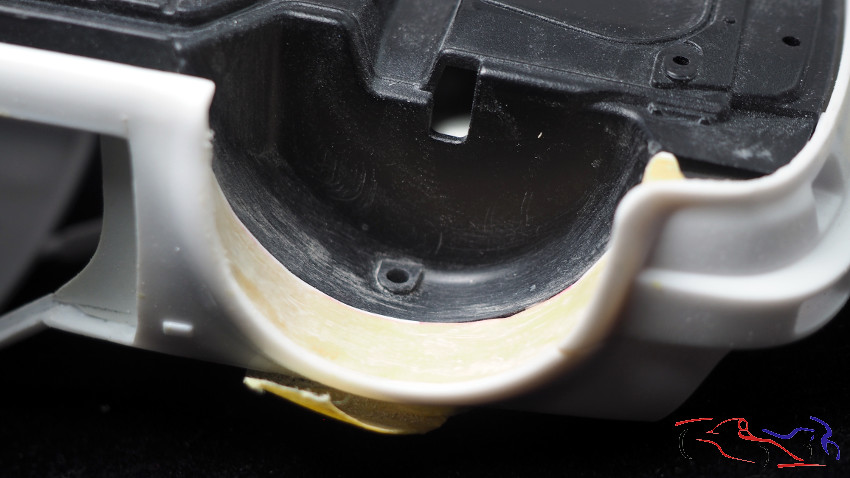 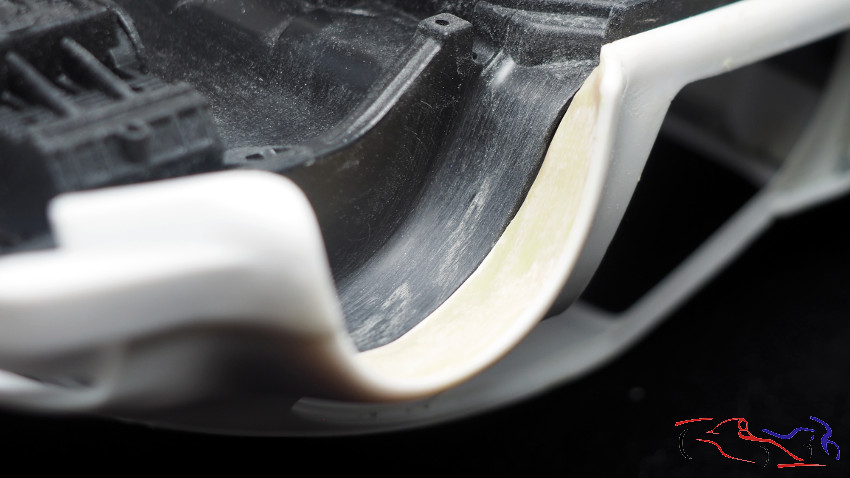 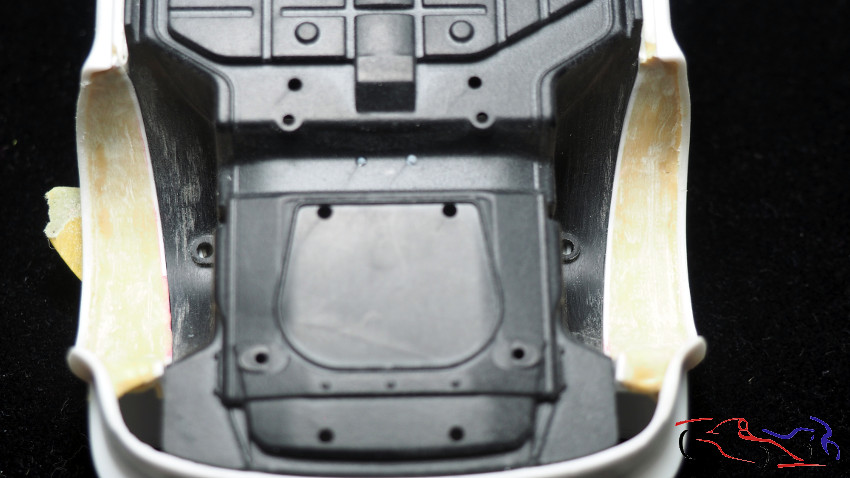 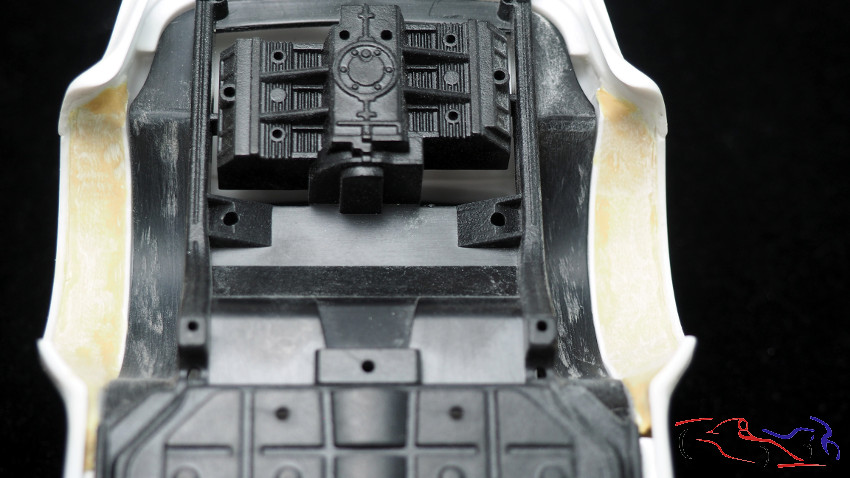 Y aquí los veis una vez que la imprimación ha sido aplicada: And here you see them once the primer has been applied:  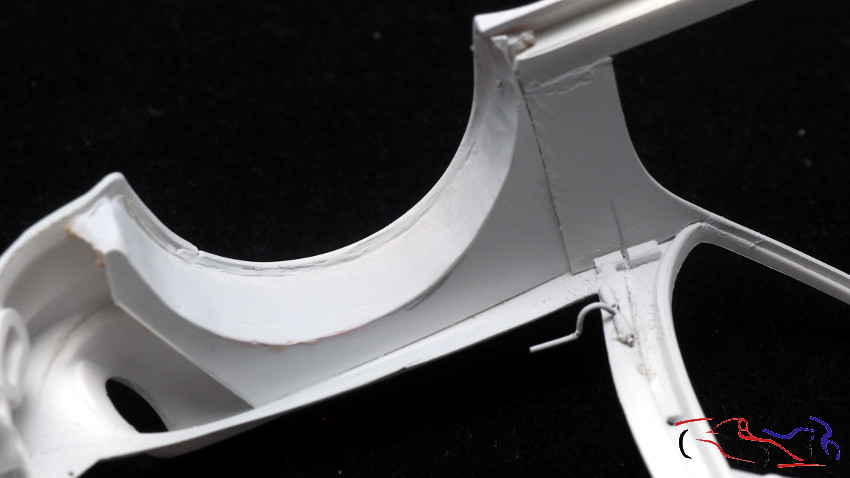 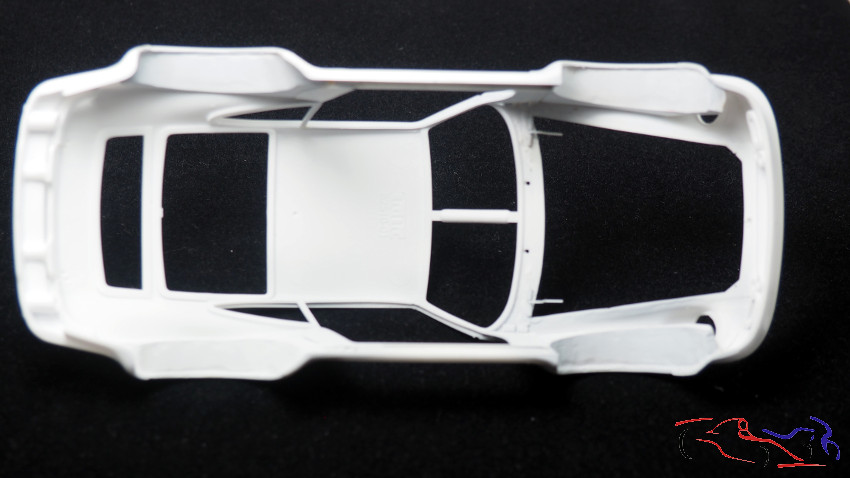 Pasamos al habitáculo. He aplicado masilla polyester a las uniones Lets move on to the passenger compartment. I have applied polyester putty to the joints 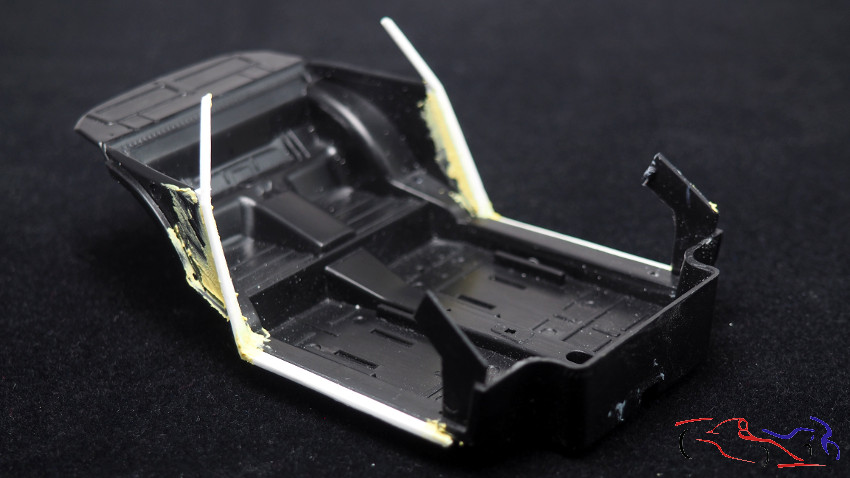 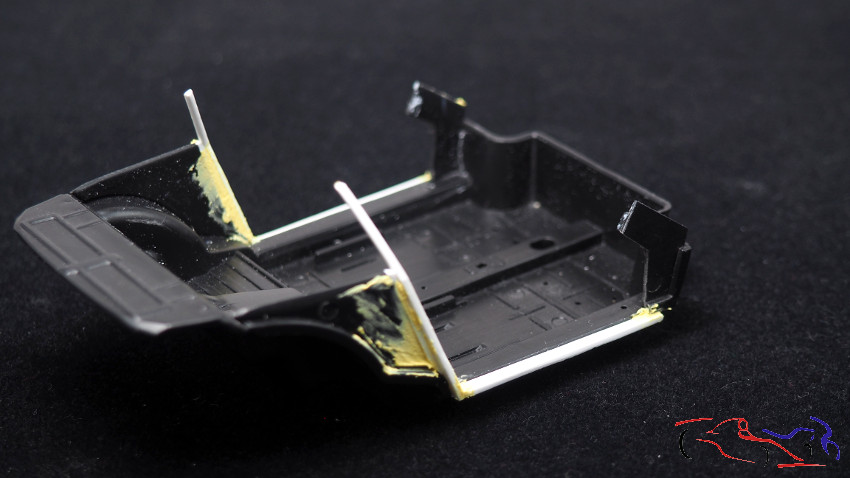 Y una vez lijada, la imprimo y pinto con LP de tamiya en Negro Semimate: And once sanded, I print it and paint it with tamiya LP in Semi Matt Black: 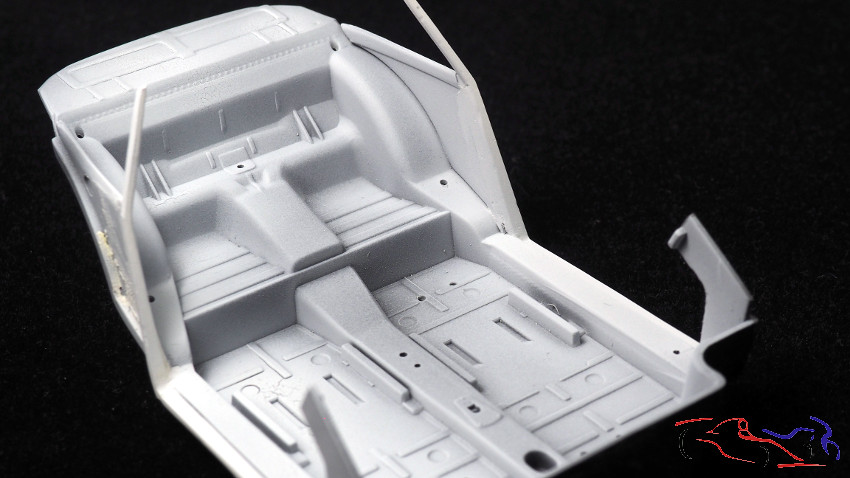 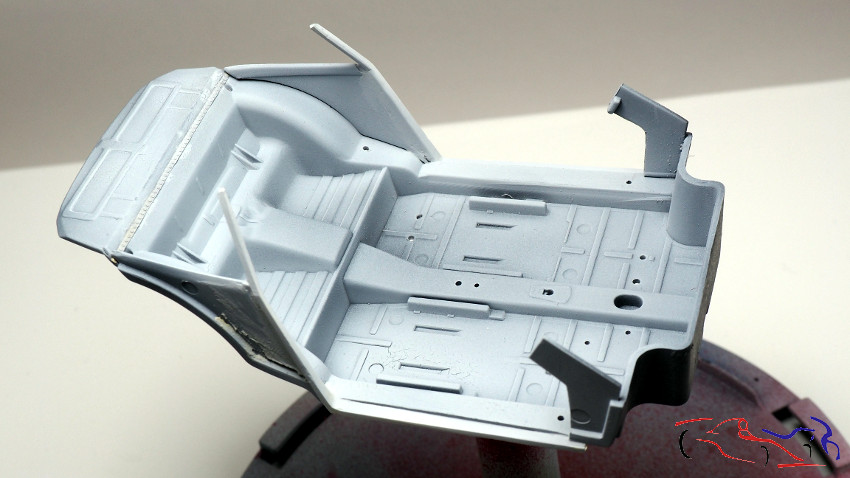 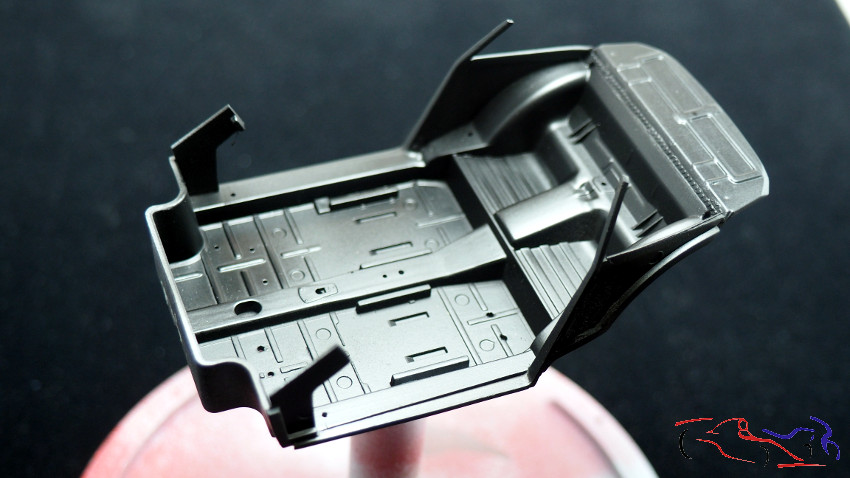 Ahora e sel turno del interior del capó delantero. Aplicamos masilla de polyester, lijamos e imprimamos: Now it is the turn of the interior of the front hood. We applied polyester putty, sanded and primed: 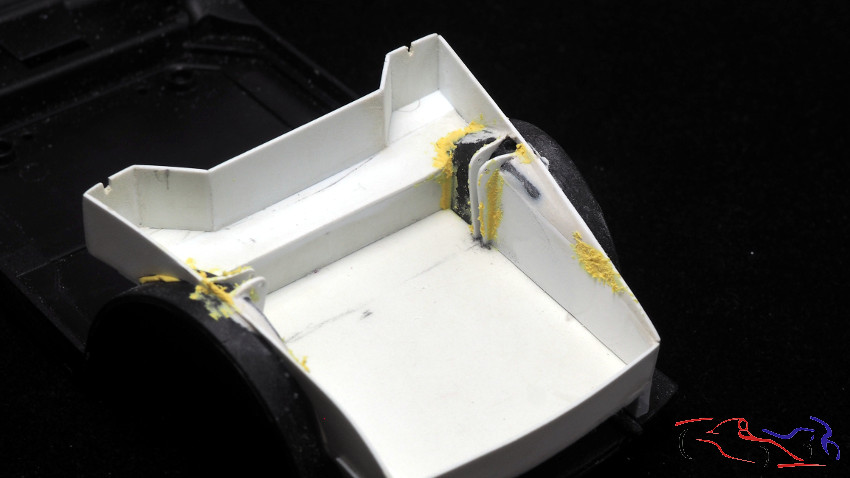 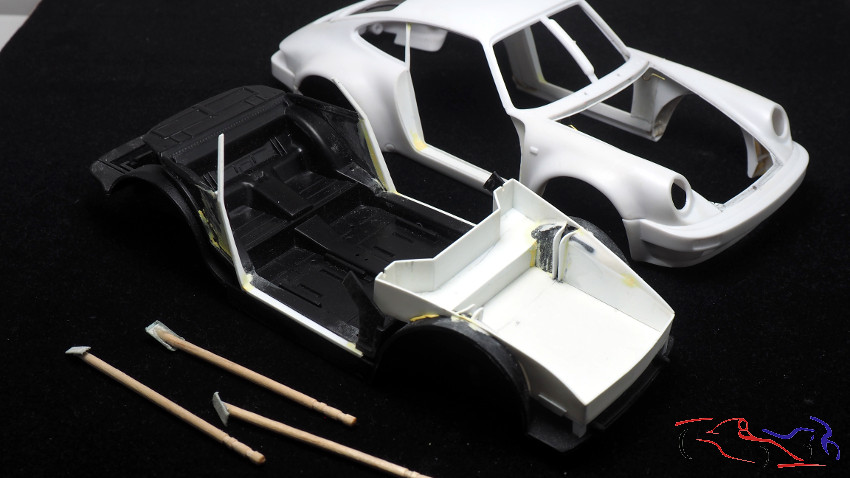 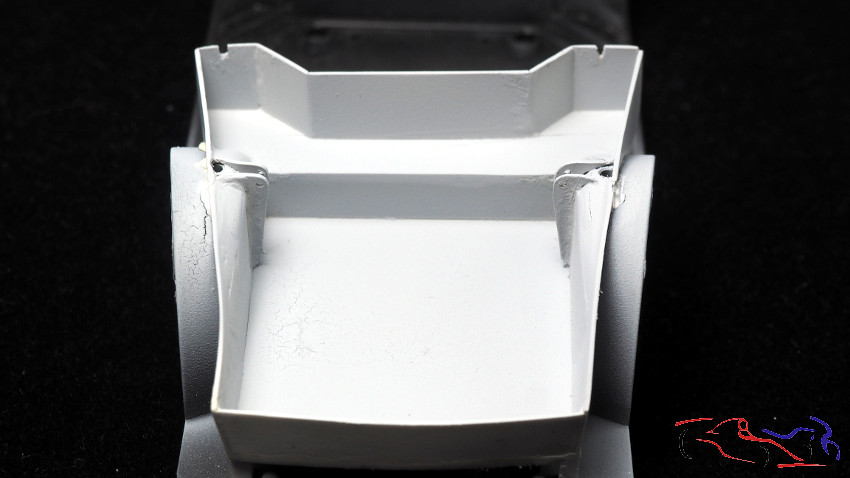 En la siguiente foto, vemos como quedan las distintas piezas superpuestas dentro del capó. Más adelante os enseñaré dichas piezas: In the following photo, we can see how the different pieces are superimposed inside the hood. Later I will show you these pieces: 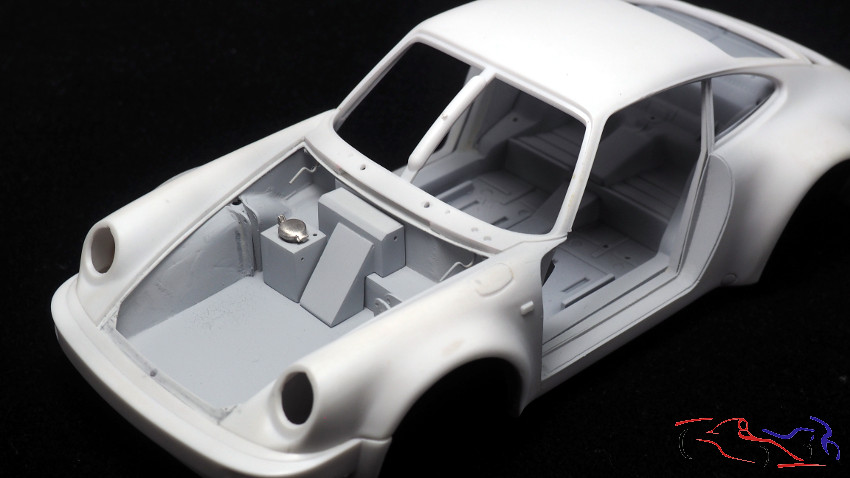 Y ya que hablamos del capó, camos a ver el inerior de la tapa. Lo primero fue crear una base realizada sobre Evergreen, pieza realizada a partir de la hoja de enmascarar que pinte sobre dicha pieza. Una vez recortada, la pegué y le añadí otras piezas más pequeñas que harán el armazón de dicha pieza. Falta imprimar para ver las imperfecciones: And since we are talking about the hood, lets see the inside of the lid. The first thing was to create a base made on Evergreen, a piece made from the masking sheet that I painted on this piece. Once cut out, I glued it and added other smaller pieces that will make the frame of the piece. It remains to be primed to see the imperfections: 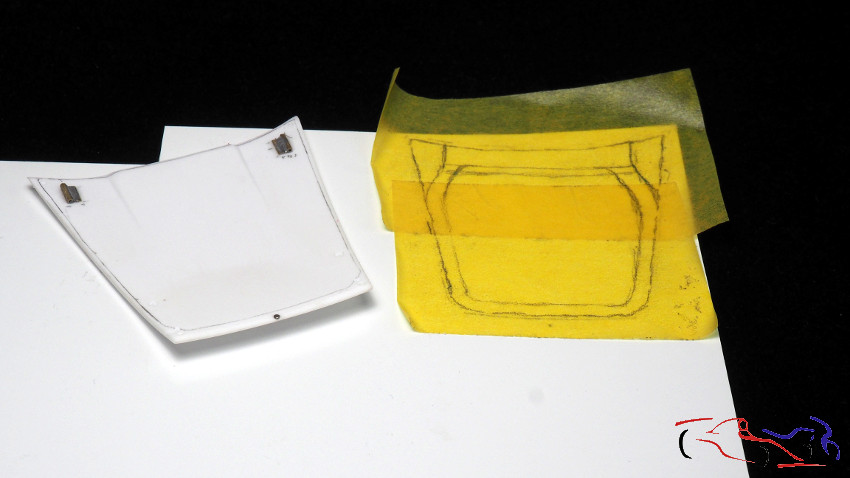 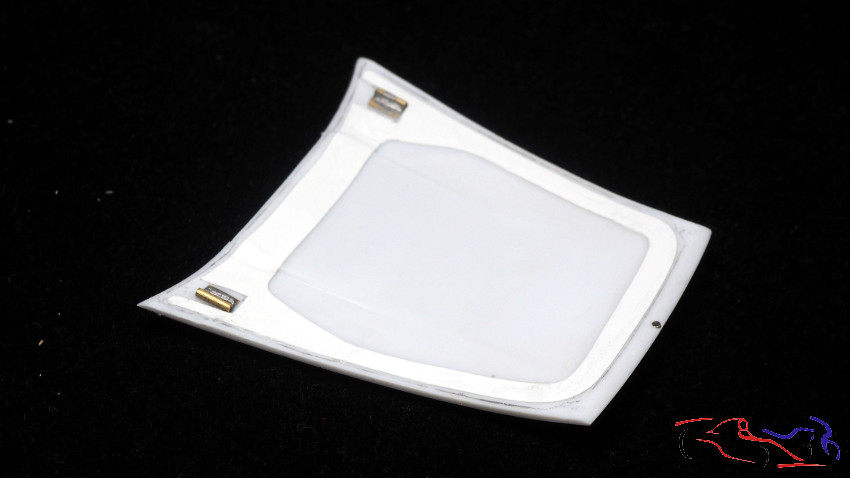  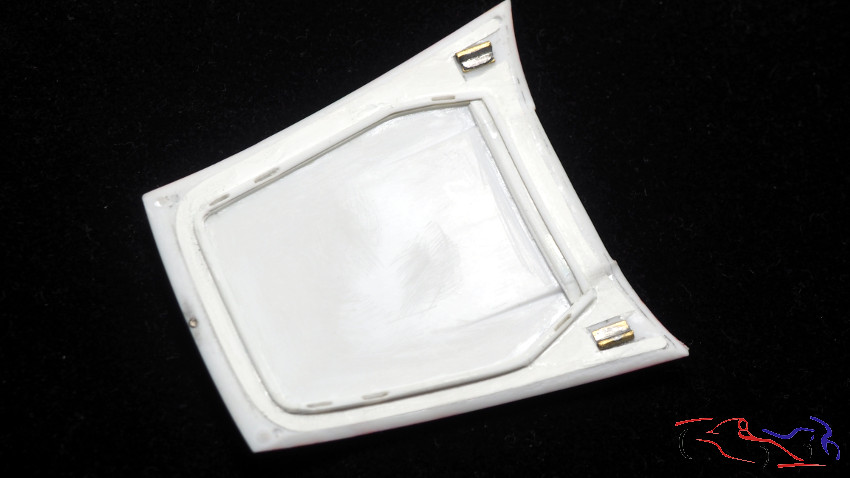 En cuanto a la parte interior de las puertas, se han enmasillado e imprimado: As for the inside of the doors, they have been caulked and primed: 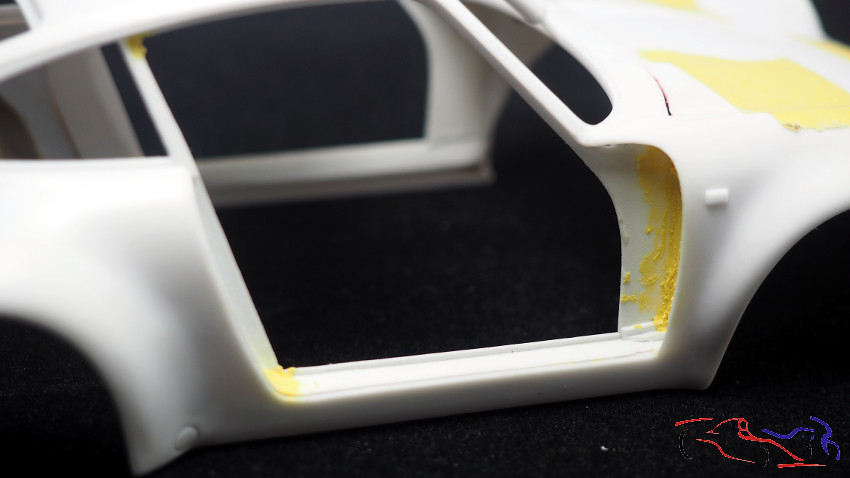 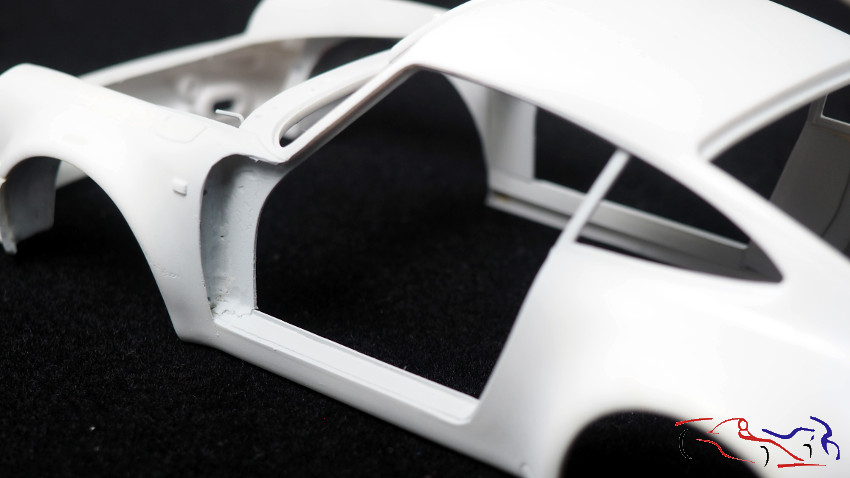 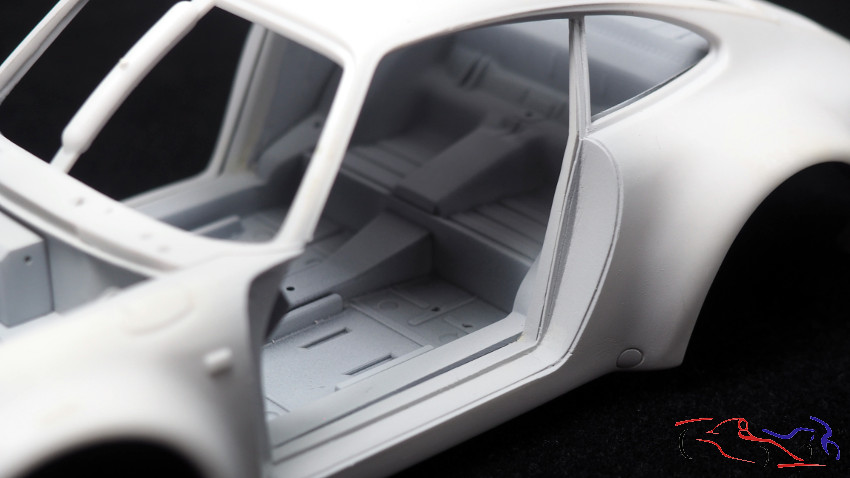 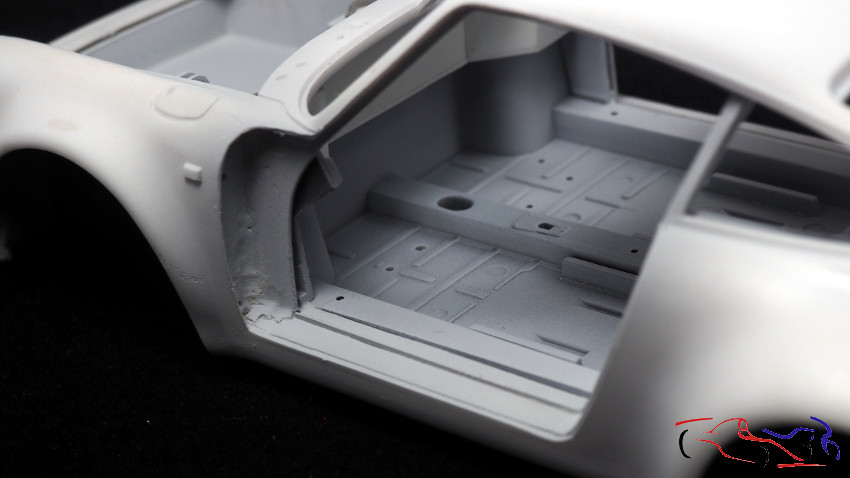 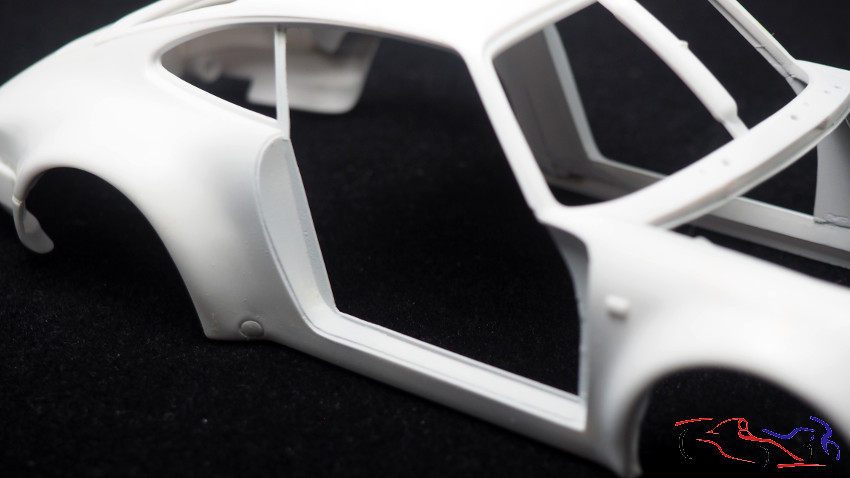 En este punto, solo queda hacer el guarnecido de las puertas, incluyendo unos imanes para que se queden bien cerradas. Pero antes, hay que añadir un poco plástico a la puerta del conductor porque lo corté por error: At this point, the only thing left to do is to make the door trim, including some magnets so that the doors stay firmly closed. But first, I have to add some plastic to the drivers door because I cut it by mistake: 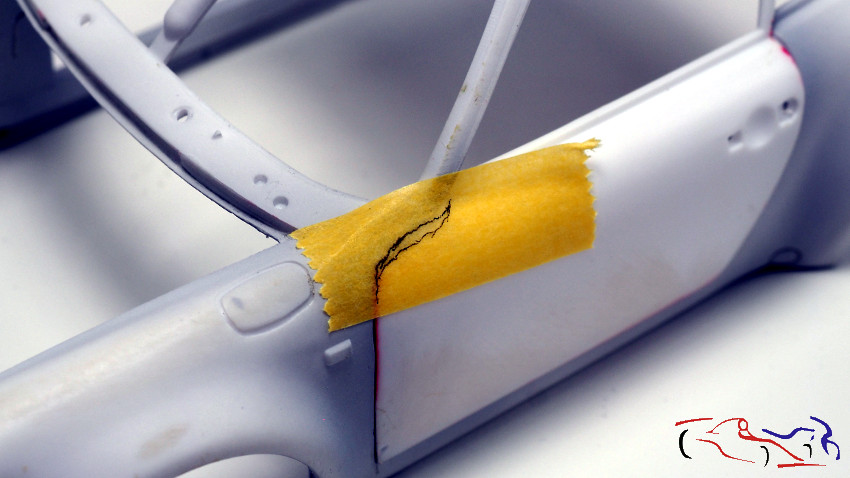 Y ahora más piezas de KMP que han sido imprimadas y pintadas: los discos de freno y las llantas y sus neumáticos. Las llantas fueron pintadas con blanco LP de Tamiya, y los neumáticos con Rubber tyre de Zero: And now more KMP parts that have been primed and painted: the brake discs and the rims and their tires. The rims were painted with LP white from Tamiya, and the tires with Rubber tyre from Zero: 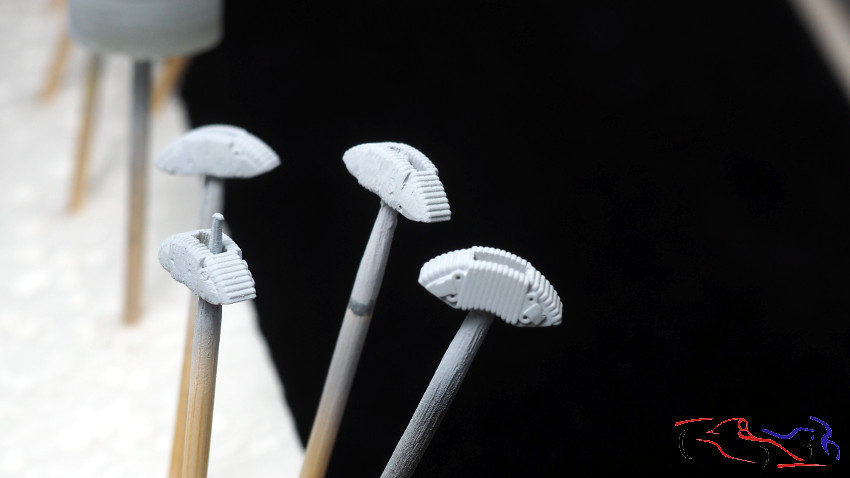 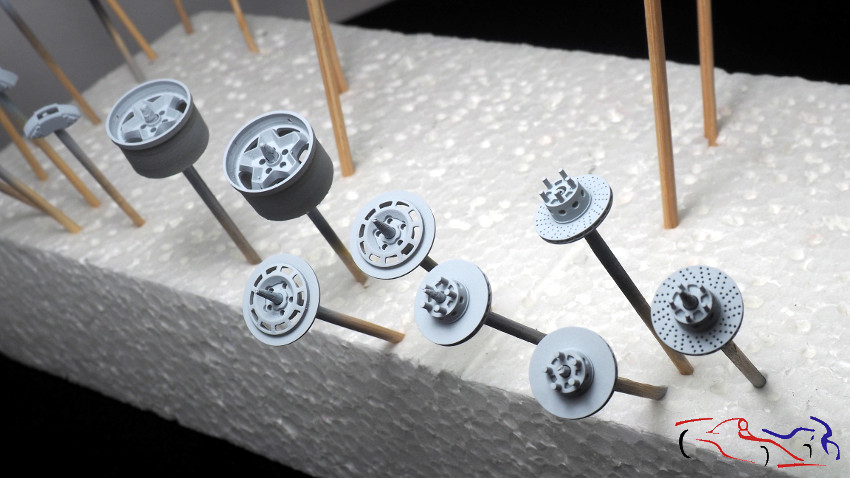 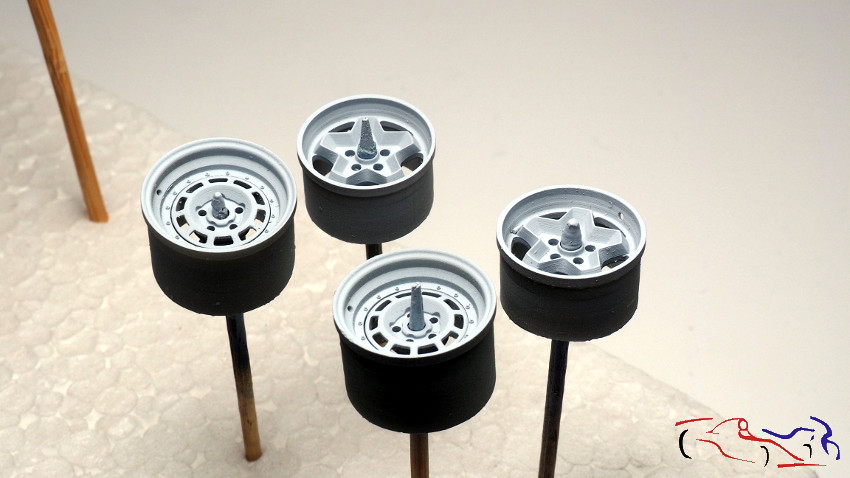 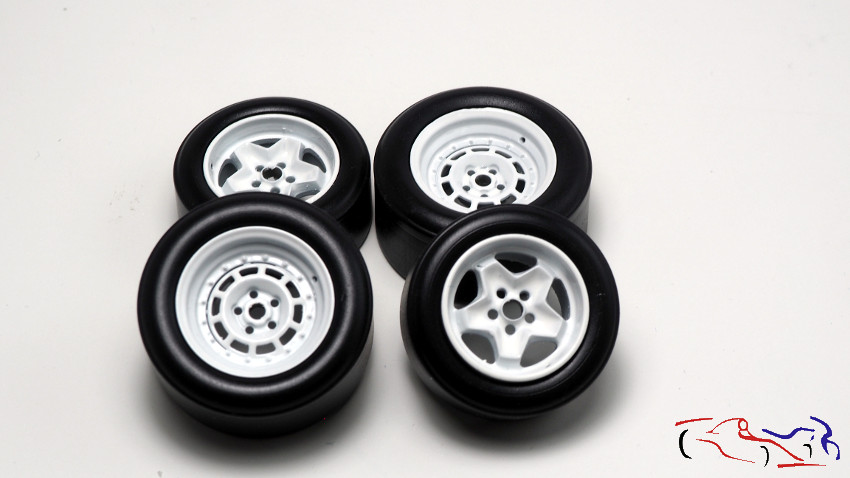 Más piezas imprimadas y pintadas con negro satinado LP de Tamiya. La segunda foto contiene el TK de faros auxiliares de Ignacio BAS JAM: More parts primed and painted with Tamiya LP satin black. The second photo contains the TK auxiliary headlights by Ignacio BAS JAM: 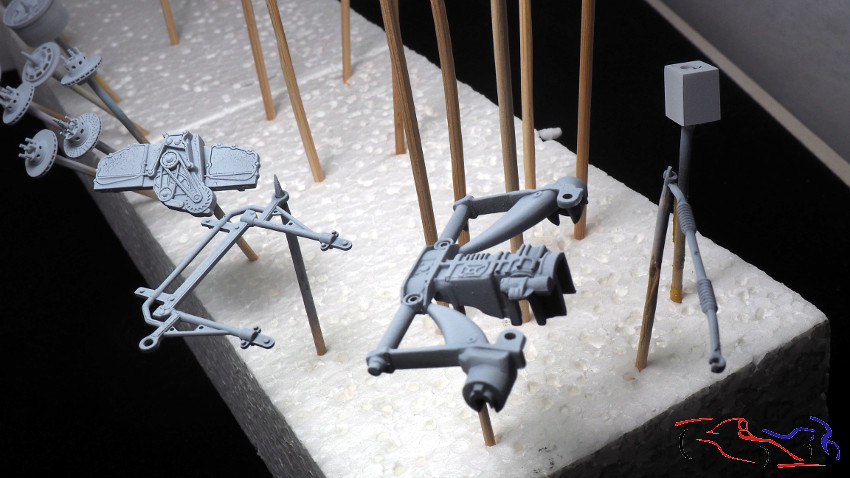 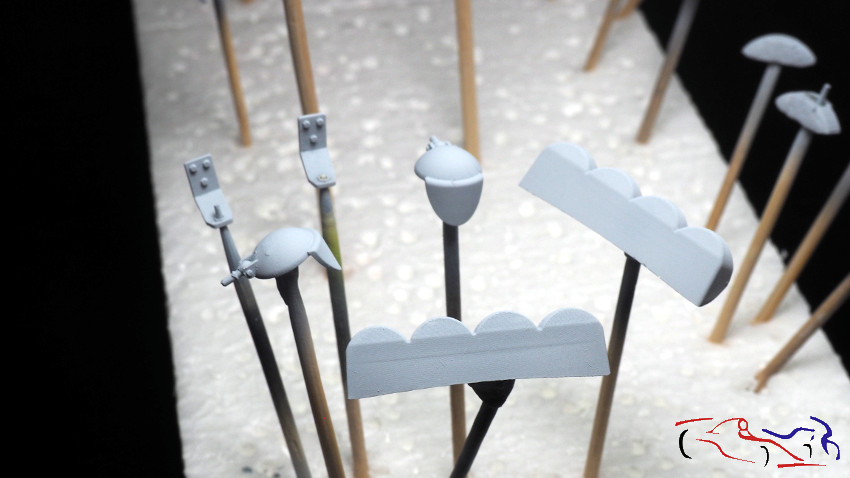 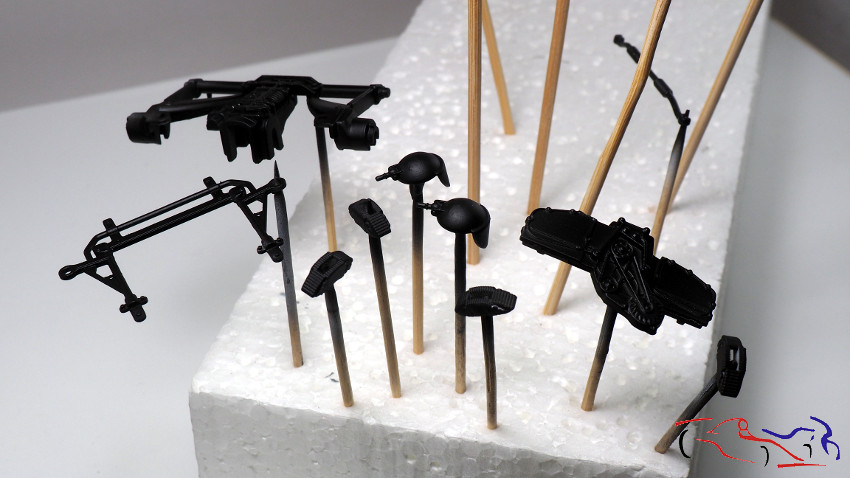 Más piezas de otro TK, esta vez de Scalelab24: More parts from another TK, this time from Scalelab24: 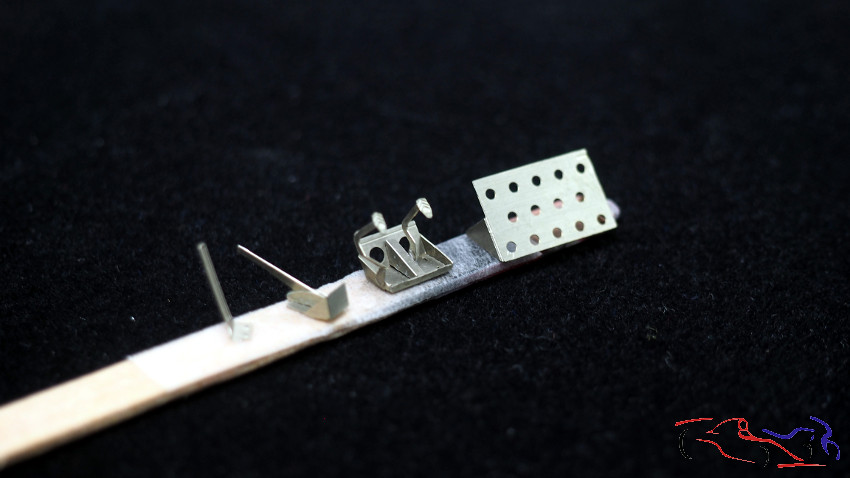 Ahora continuamos por los cambios realizados en los amortiguadores, de la misma manera que mi amigo Mario Vallina hizo en el suyo: Now we continue with the changes made in the shock absorbers, in the same way that my friend Mario Vallina did in his: 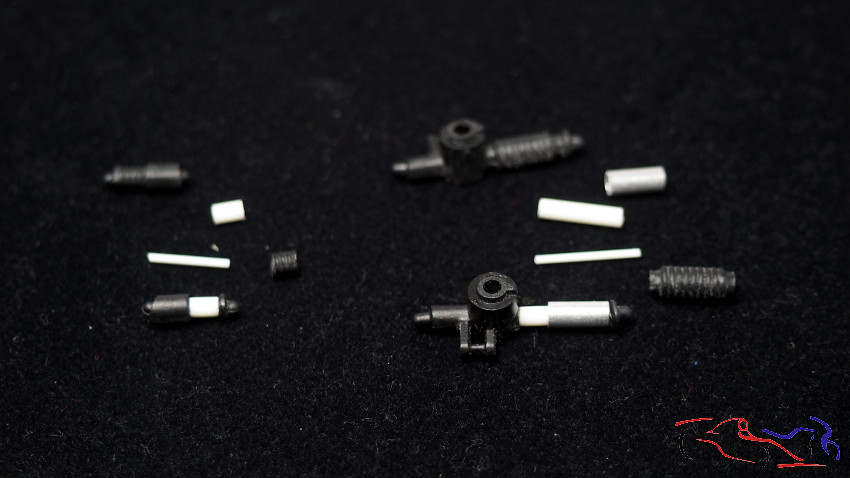 Y para terminar, el chasis imprimado, y pintado con blanco LP de Tamiya And finally, the chassis primed and painted with Tamiya LP white. 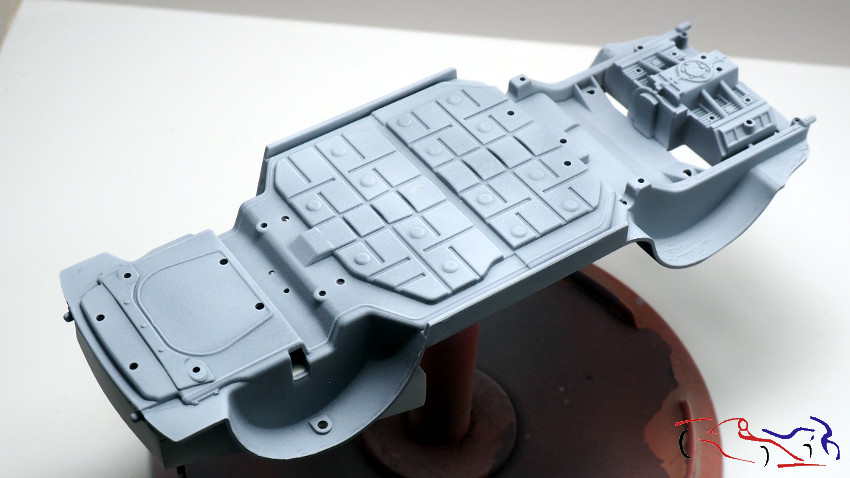 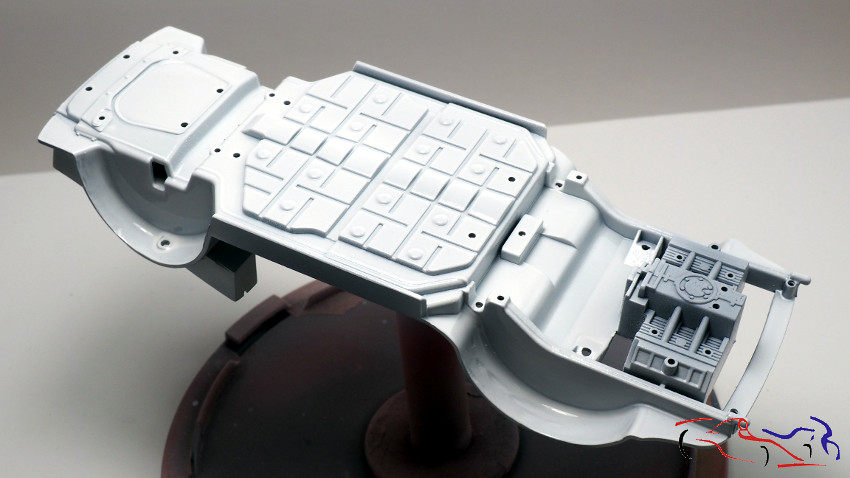 Gracias por ver y comentar!! Thanks for watching and commenting! |
|
|
|
|
|
10-23-2023, 08:20 AM
|
#12 | |
|
AF Enthusiast
Thread starter
Join Date: Mar 2009
Location: Madrid
Posts: 649
Thanks: 109
Thanked 68 Times in 67 Posts
|
Re: Porsche 911 SC 1984 Rally Valeo (1/24)
Mas novedades en este proyecto con avances por todos los frentes: motor, habitáculo, capó, carrocería
En la parte trasera, el coche tiene una rejilla por donde el kit viene hueco, y en vez de taparlo, iba a recrear lo que hay, que parece un ventilador de entrada de aire dirijido a las trompetas de admisión. Lo dejé a falta de lijar y detallar un poco. Le he puesto unos aros en la parte del ventilador y una tira de plástico horizontal alo largo de todo el contorno, ya que la parte superior es una taba, que se encaja. Aquí os dejo la pieza, como queda situada en el coche, como se ve, y finalmente, la pieza ya pintada:
More news in this project with advances on all fronts: engine, passenger compartment, bonnet, bodywork At the rear, the car has a grille where the kit comes hollow, and instead of covering it, I was going to recreate what is there, which looks like an air intake fan directed to the intake trumpets. I left the piece in my previous post to be sanded and detailed a bit. I put some rings on the fan part and a horizontal plastic strip along the entire contour, since the upper part is a slab, which fits into it. Here you can see the piece, as it is located in the car, as seen, and finally, the piece already painted: 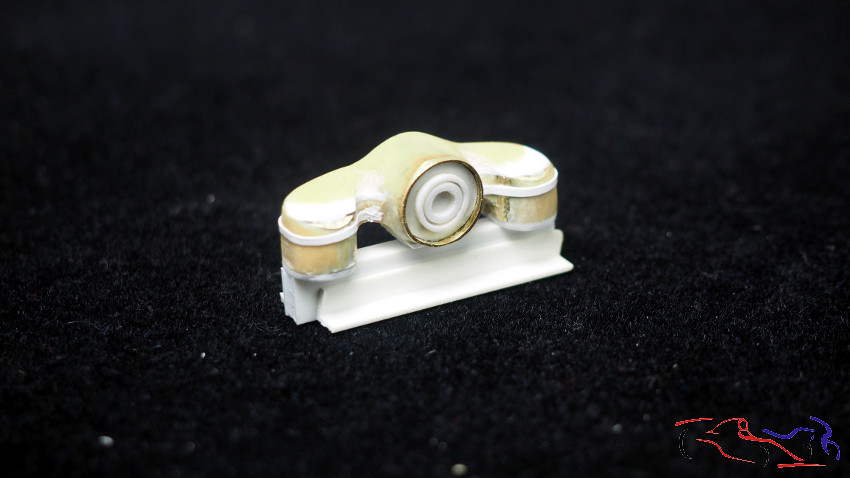 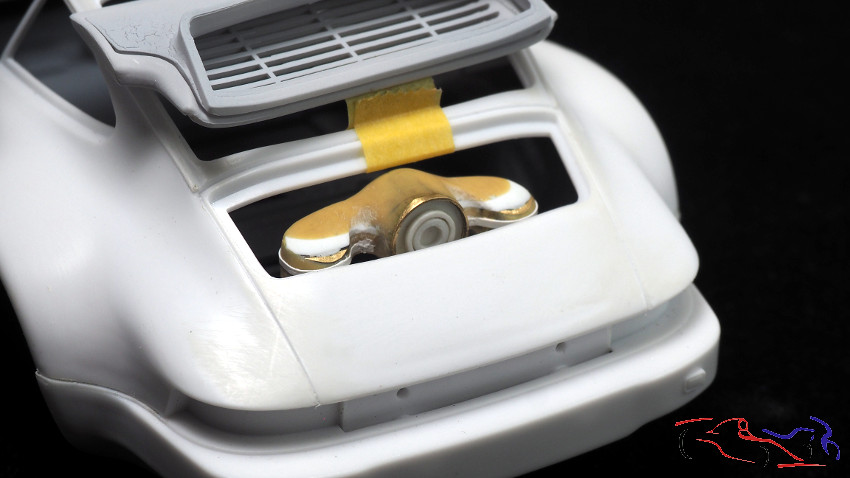 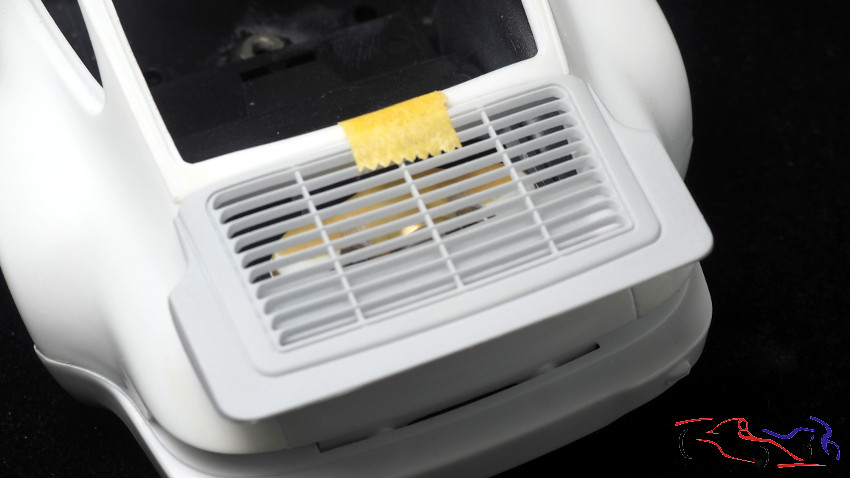 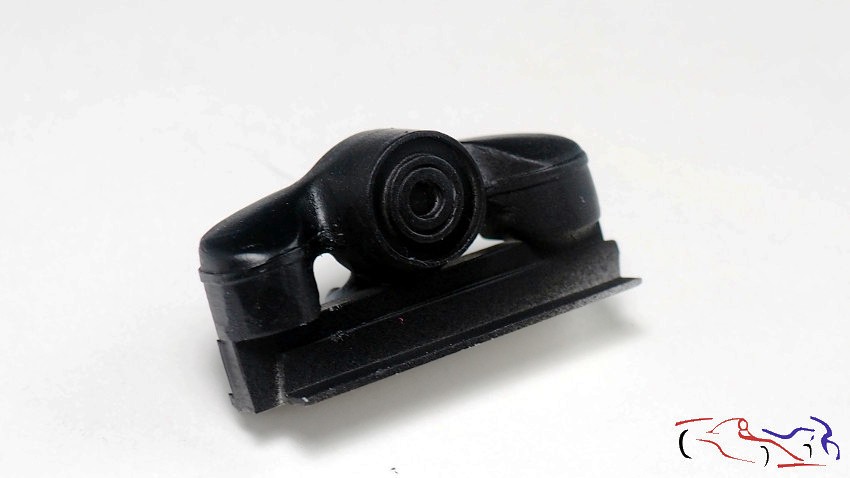 Junto a esta pieza, también pinté varias piezas más del habitáculo como el salpicadero, volante, cambio de marchas, retrovisor (prestado del Lancia Stratos que es muy similar) y extintor, que va en rojo de DS Colors (las piezas negras están pintadas con Negro semi mate de Tamiya LP). Como véis, el salpicadero está listo para trabajarlo!! Along with this piece, I also painted several other parts of the cockpit such as the dashboard, steering wheel, gearshift, rearview mirror (borrowed from the Lancia Stratos which is very similar) and fire extinguisher, which is in red from DS Colors (the black parts are painted with semi-matt black from Tamiya LP). As you can see, the dashboard is ready to work on! 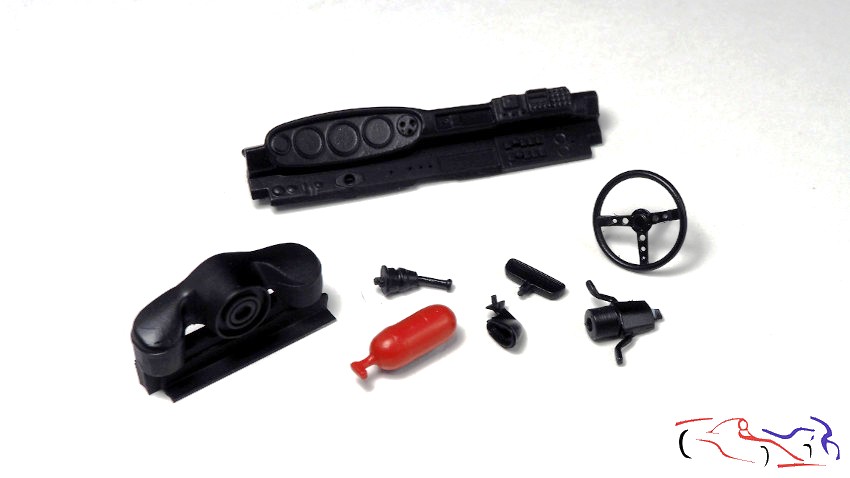  También he puesto los cinturones a los asientos, que vienen en los fotograbados de Scalelab24. Estos irán fijados con tuercas de resina al chasis. I have also put the belts to the seats, which come in the Scalelab24 photoetched parts. These will be fixed with resin nuts to the chassis. 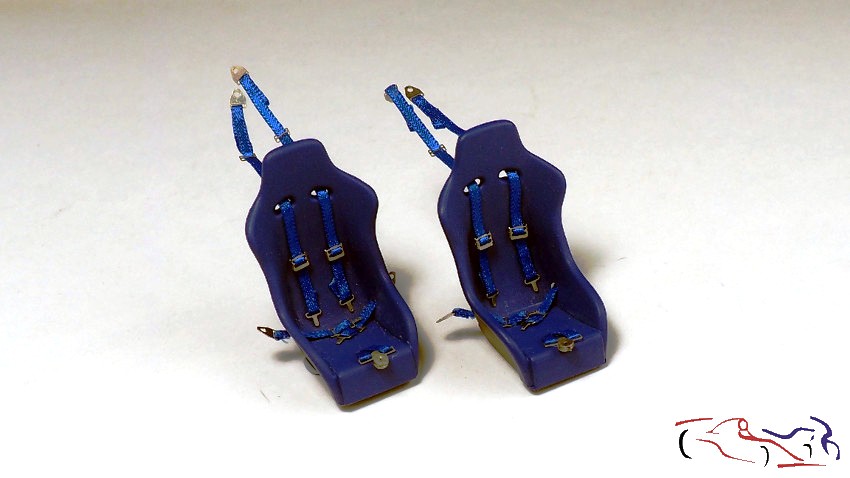 Y también, antes de pasar a la carrocería, diversas piezas del capó, todas realizadas desde cero a scratch, estando entre ellas un depósito con sus tubos, la barra estabilizadora delantera con dos botes de líquido, y cables que van por el interior del capó. Y todas llevan sus tubos/cables. And also, before moving on to the bodywork, various parts of the bonnet, all made from scratch, including a tank with its tubes, the front anti-roll bar with two cans of liquid, and cables that go inside the bonnet. And all of them have their tubes/cables. 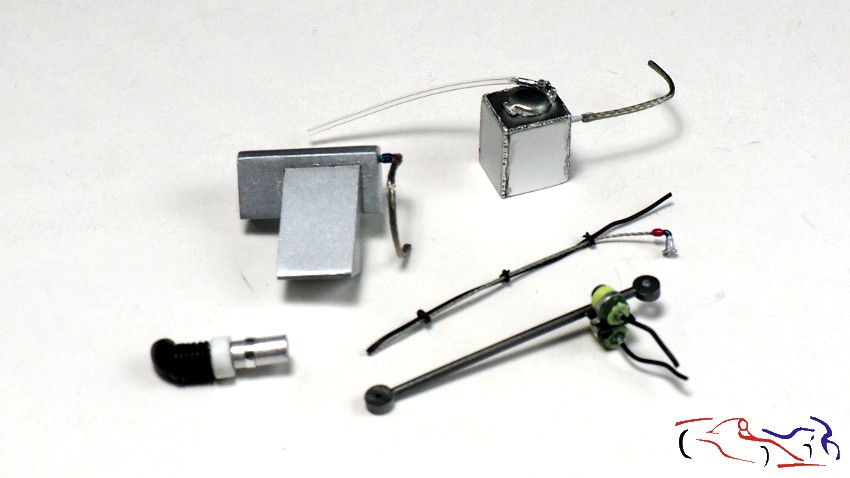 Y ahora pasamos a la carrocería. Lo primero, y depsués de lijar toda la carrocería, la imprimamos con Tamiya directamente del spray. Sigue siendo muy buena imprimación!! And now we move on to the bodywork. First of all, and after sanding the whole bodywork, we primed it with Tamiya directly from the spray. Its still a very good primer! 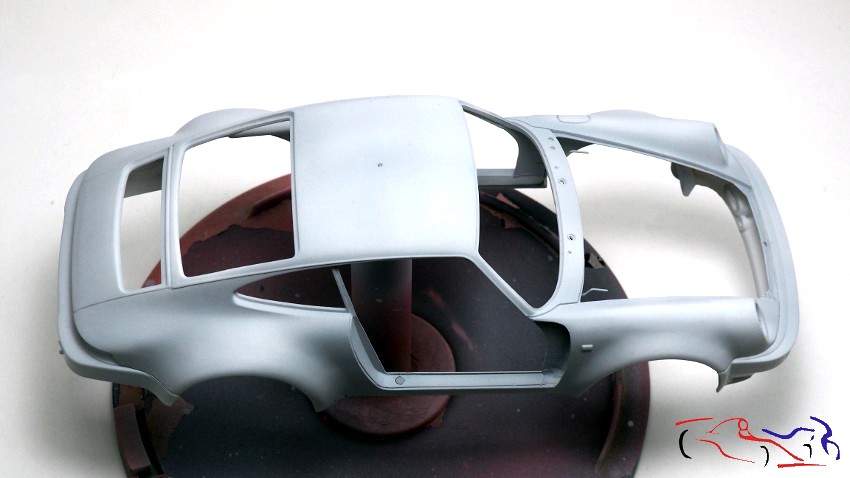 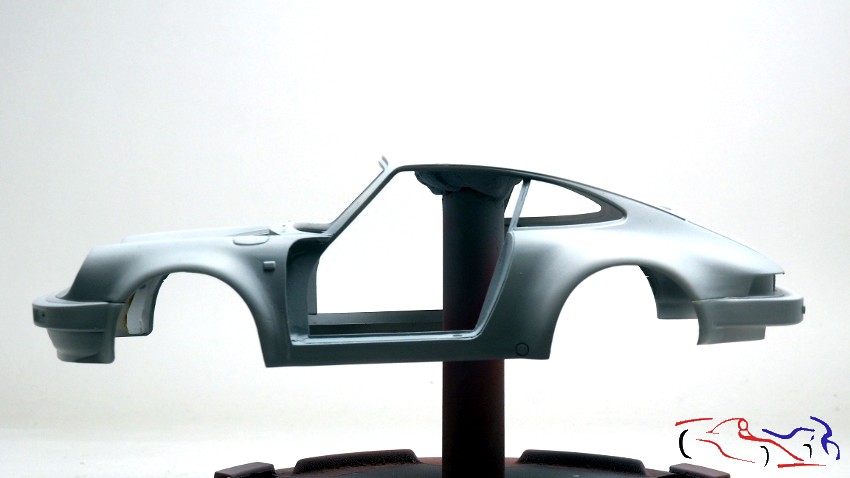 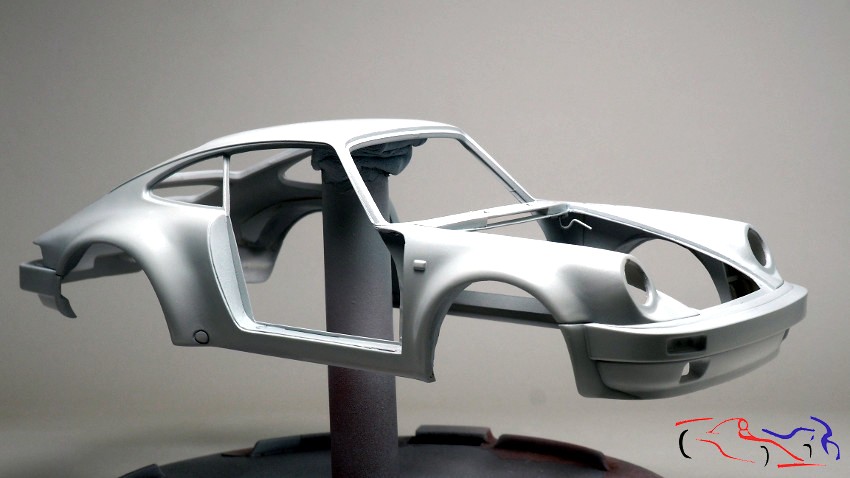 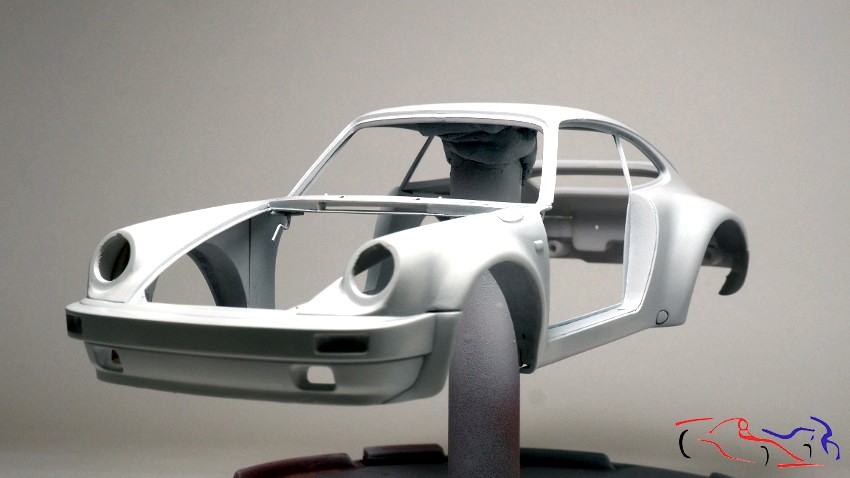 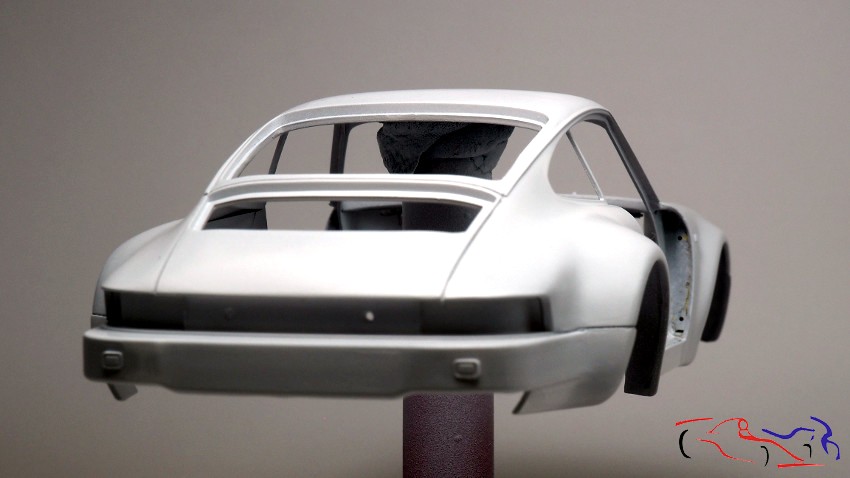 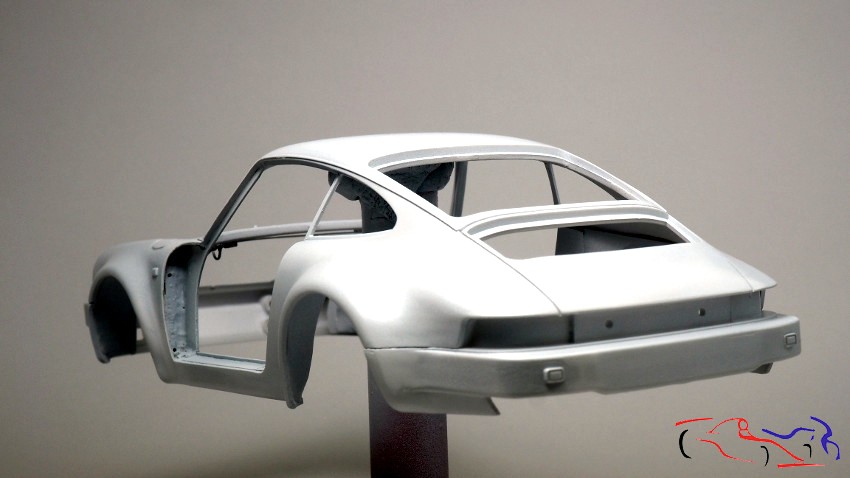 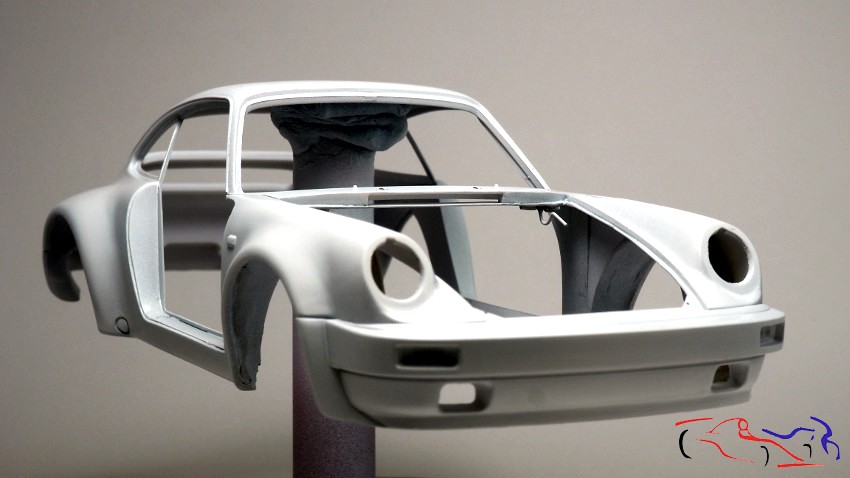 Una vez seca, volvemos a lijar con grano 3000, y pintamos con blanco de DS Colors: Once dry, we sand again with 3000 grit sandpaper and paint with DS Colors white: 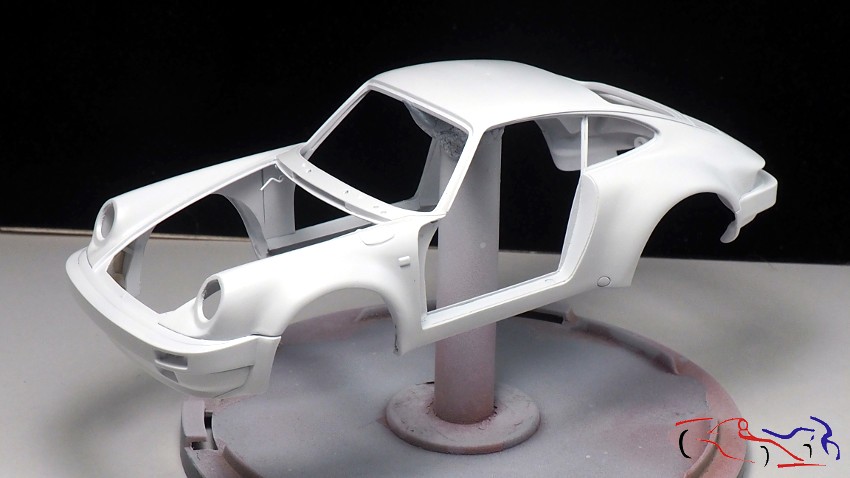 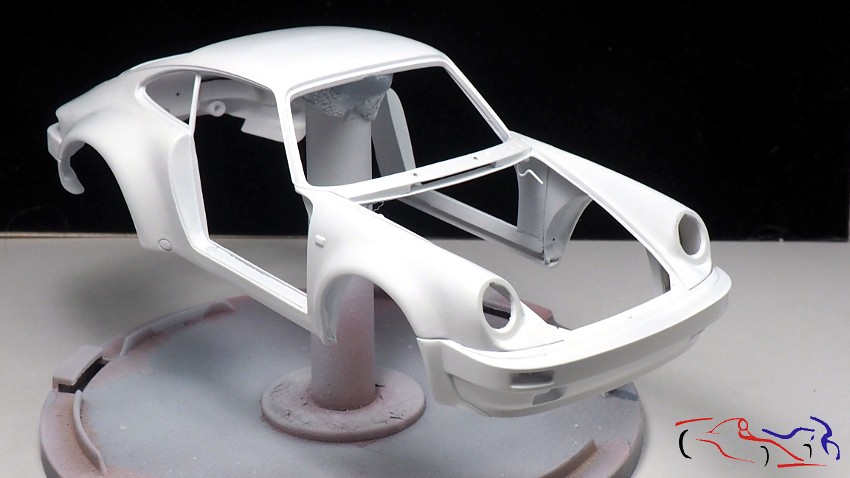 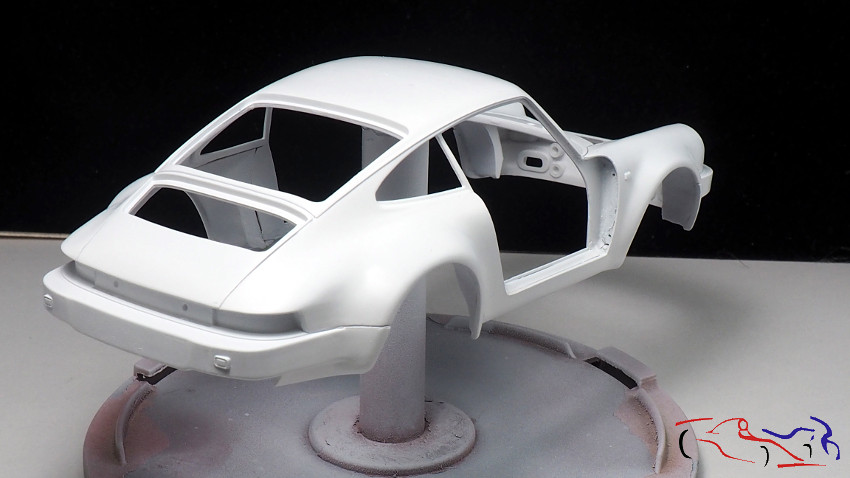 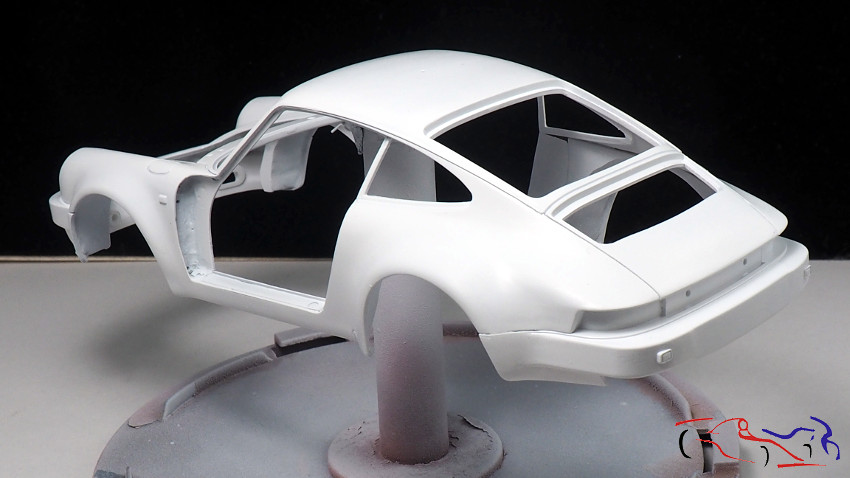 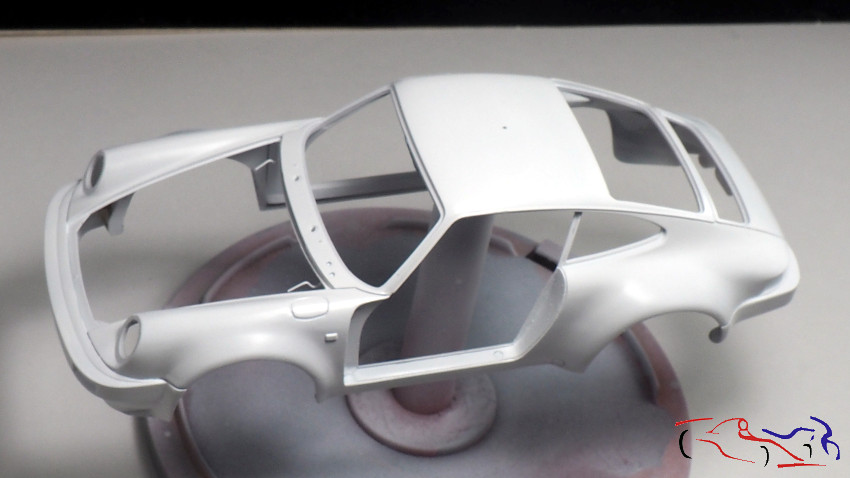 Por supuesto, al mismo tiempo, he imprimado y pintado el resto de piezas que he separado de la carrocería. Con las puertas, tuve que lijar una vez después de imprimar, para reparar algunos desperfectos. Después hubo una segunda imprimación y finalmente la pintura blanca. Of course, at the same time, I primed and painted the rest of the parts that I separated from the body. With the doors, I had to sand once after priming, to repair some damage. Then there was a second primer and finally the white paint. 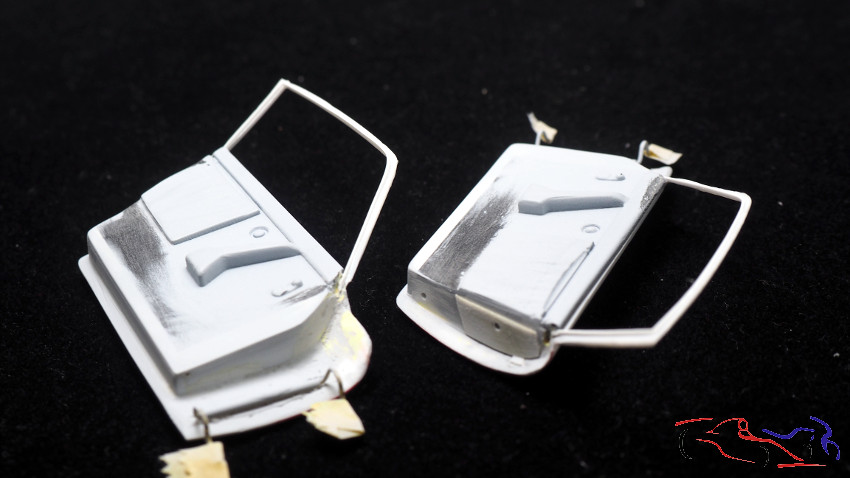 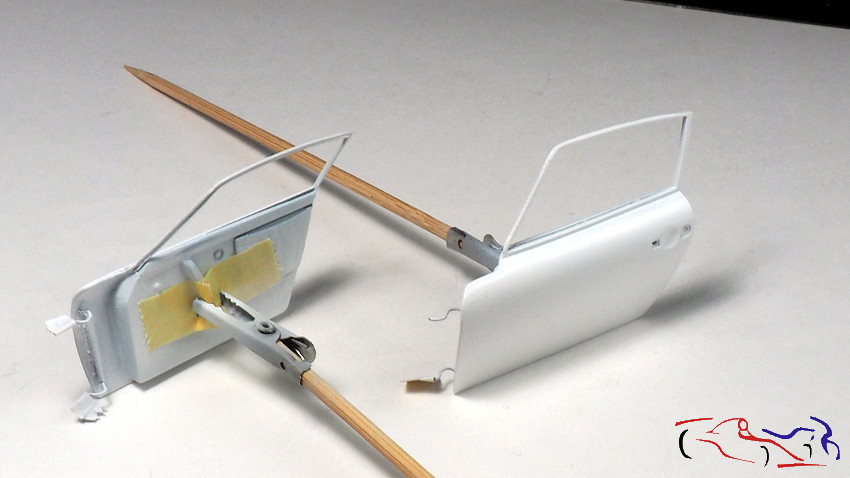 Otras piezas preparadas: el capó y los faros auxiliares . Other prepared parts: bonnet and auxiliary headlamps . 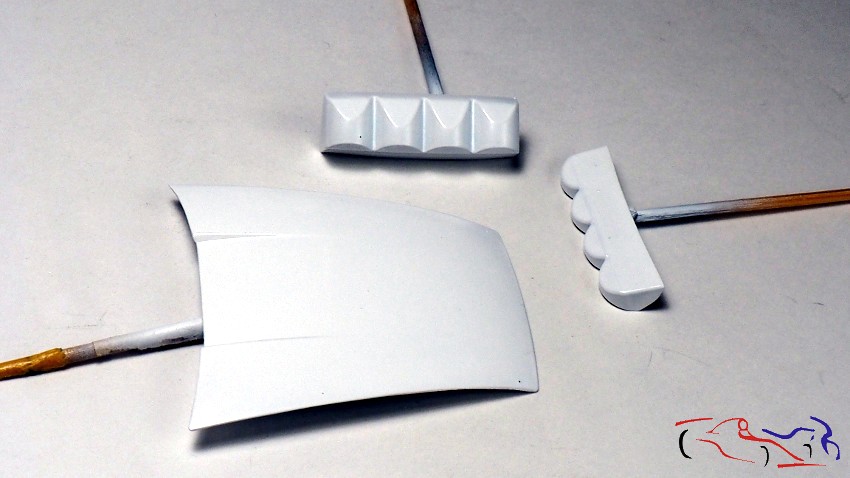 y el alerón trasero, que ya enmascaré y pinté de negro mate LP and the rear spoiler, which I have already masked off and painted matt black LP 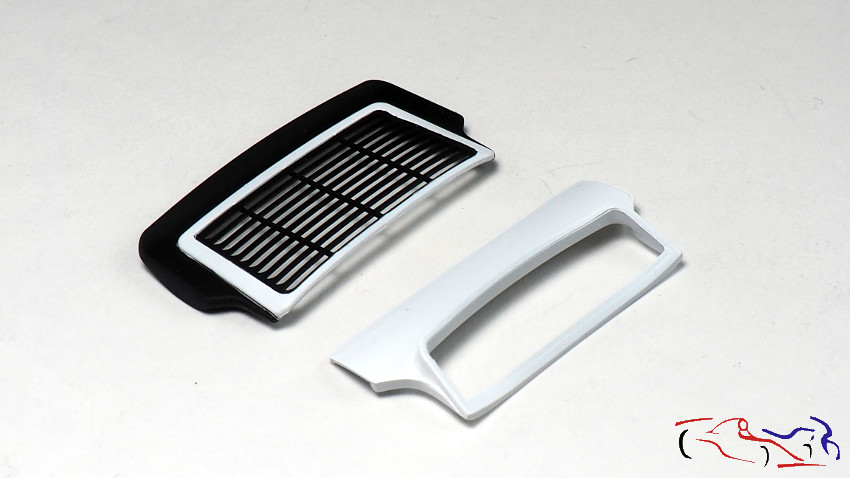 Continuamos trabajando con este kit, con tres frentes: habitáculo, chasis con capó y los bajos, y carrocería, estando esta lista para enmascarar y pintar el azul Rothmans. Gracias por ver y comentar!! We continue working with this kit, with three fronts: passenger compartment, chassis with bonnet and underbody, and bodywork, ready to be masked and painted in Rothmans blue. Thanks for watching and commenting! |
|
|
|
|
|
11-11-2023, 10:03 AM
|
#13 | |
|
AF Regular
Join Date: Aug 2011
Location: Torino
Posts: 390
Thanks: 175
Thanked 62 Times in 58 Posts
|
Re: Porsche 911 SC 1984 Rally Valeo (1/24)
Looks absolutely stunning Jesus! Great work from you again!
|
|
|
|
|
|
11-13-2023, 03:46 AM
|
#14 | ||
|
AF Enthusiast
Thread starter
Join Date: Mar 2009
Location: Madrid
Posts: 649
Thanks: 109
Thanked 68 Times in 67 Posts
|
Re: Porsche 911 SC 1984 Rally Valeo (1/24)
Quote:
|
||
|
|
|
|
01-05-2024, 04:25 AM
|
#15 | |
|
AF Enthusiast
Thread starter
Join Date: Mar 2009
Location: Madrid
Posts: 649
Thanks: 109
Thanked 68 Times in 67 Posts
|
Re: Porsche 911 SC 1984 Rally Valeo (1/24)
Hi to all. Due to the problems in some cases to see my pictures, I will not continue this project here. Please check my blog if you want to follow this process.
Apologies! http://blog.maquetea.com/ |
|
|
|
|
|
|
POST REPLY TO THIS THREAD |
 |
|
|


