|
|
|

|
|
| Search | Car Forums | Gallery | Articles | Helper | AF 350Z | IgorSushko.com | Corporate |
|
| Latest | 0 Rplys |
|
|||||||
| WIP - Street Post topics for any "Works In Progress" street vehicles projects in this sub-forum. |
 |
 Show Printable Version | Show Printable Version |  Email this Page | Email this Page |  Subscribe to this Thread
|
|
|
Thread Tools |
 03-05-2002, 07:36 PM
|
#1 | |
|
AF Fanatic

Join Date: Feb 2002
Posts: 2,622
Thanks: 0
Thanked 0 Times in 0 Posts
|
Ferrari Mythos Build (with pics!)
Ok ok, I know snowboarder already did one, what can I say, I follow in his foosteps.. :right:
My Tamiya Ferrari Mythos kit, been working on it for about a month off and on. So far I got the body painted with Model Master's Italian Red spray paint, and am done the engine. The paint on the body suffers from orange peel though  I will be using Micromarks polishing kit on the body, I'll post progress pics!! I will be using Micromarks polishing kit on the body, I'll post progress pics!! Here are some pics: Body shot  'Nother shot o the body  Shot of the engine  Here's what I'm talking about when I saw texture (WARNING BIG BIG BIG!!!) http://mywebpages.comcast.net/kaiyao1/Picture 014.jpg |
|

|

|
|
03-07-2002, 06:32 AM
|
#2 | |
|
AF Fanatic
Thread starter
Join Date: Feb 2002
Posts: 2,622
Thanks: 0
Thanked 0 Times in 0 Posts
|
Hit a bit of a roadblockInstructions say for my rims to be painted like this: 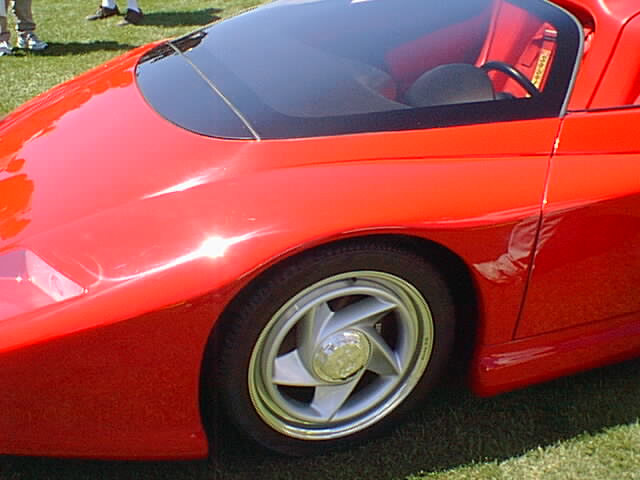 a two-tone color of chrome and silver. The main part of the rim needs to be painted silver, and the outer rim is chrome.  My biggest problem is now is masking the rims, I need to make perfect circles on all four or it'll look all messed up, and it needs to look the same for each rim What do you think I should do??  |
|
|
|
|
|
03-07-2002, 03:40 PM
|
#4 | |
|
AF Fanatic
Thread starter
Join Date: Feb 2002
Posts: 2,622
Thanks: 0
Thanked 0 Times in 0 Posts
|
nope
can't even fit a dime around it |
|
|
|
|
|
03-07-2002, 04:20 PM
|
#5 | |
|
Ferrari Guy
 
Join Date: Jun 2001
Location: nowhere
Posts: 3,404
Thanks: 0
Thanked 0 Times in 0 Posts
|
lookin fantastic so far! i just left the rims chrome. i thought it sorta cheapened the look by doing two tone wheels, but thats just me. do what you gotta do man.
__________________
The contents of this post may be fictitious. |
|
|
|
|
|
03-09-2002, 11:47 AM
|
#6 | |
|
AF Fanatic
Thread starter
Join Date: Feb 2002
Posts: 2,622
Thanks: 0
Thanked 0 Times in 0 Posts
|
>_< haven't been able to work on the Mythos in a while, been pretty busy
 the rims are easier to mask than they look, upon closer inspection, I dunno if I'll make them silver or not, I'll decide when everything else is done snowboarder, did you tint the windshield like the instructions said? |
|
|
|
|
|
03-09-2002, 12:33 PM
|
#7 | |
|
AF Enthusiast
 
Join Date: Jan 2002
Posts: 1,074
Thanks: 0
Thanked 0 Times in 0 Posts

|
Sorry for getting the thread OT , but snowboarder do you know you have my friend's M5 in the signature? The one in the middle is on polish plates , its a guy that i know myself , he's from Sosnowiec in Poland...
|
|
|
|
|
|
03-09-2002, 02:24 PM
|
#8 | |
|
"P-Man"
 
Join Date: Mar 2001
Location: Manawatu
Posts: 15,179
Thanks: 0
Thanked 3 Times in 3 Posts
|
Looking good so far......let us know how you get on with the wheels and how you done them
__________________
Current Build.....1/12 Scale Camaro......Almost finished!!!    View All My Models Here. |
|
|
|
|
|
03-10-2002, 08:15 PM
|
#9 | |
|
AF Fanatic
Thread starter
Join Date: Feb 2002
Posts: 2,622
Thanks: 0
Thanked 0 Times in 0 Posts
|
These are times that test modeler's patience...
Today I went over the entire Mythos body with the 3200 grit pad. It's a 2x2 inch flexible pad. Well, I knew beforehand to watch out for sharp edges and raised areas, but I didn't know that with just one or two passes from the sanding cloth that the paint would be removed. The entire body is sanded to a smooth, flat pink-salmon red, but some sharp edges have taken an abuse from the cloth. I gotta respray those areas sometime in the future.. Here are some pics. First one is with the flash, rest are without.     |
|
|
|
|
|
03-10-2002, 08:21 PM
|
#10 | |
|
Horizontally Opposed
Join Date: Mar 2001
Location: Las Vegas, Nevada
Posts: 16,856
Thanks: 0
Thanked 11 Times in 9 Posts

|
Are you using spray cans? If so, go outside and spray some of your red paint into a film container lid or something equally disposable, and brush it on over the sanded-thru spots. The paint will be thin, but if you can get it to cover with color evenly, you can polish it back smooth...
|
|
|
|
|
|
03-10-2002, 08:42 PM
|
#11 | ||
|
AF Fanatic
Thread starter
Join Date: Feb 2002
Posts: 2,622
Thanks: 0
Thanked 0 Times in 0 Posts
|
Quote:
My original plan was to get the Model Masters Brush-on Italian Red and using an airbrush to brush it on. Brush-painting from the jar gives you a different shade of color, even though it is technically the same paint, as I found out when trying to do touchup work on my Subaru WRX... I was thinking that when airbrushed the color would be lighter, closer to the spray can. |
||
|
|
|
|
03-10-2002, 11:02 PM
|
#12 | ||
|
Ferrari Guy
Join Date: Jun 2001
Location: nowhere
Posts: 3,404
Thanks: 0
Thanked 0 Times in 0 Posts
|
all i did with the window was paint the black around the outside
Quote:
__________________
The contents of this post may be fictitious. |
||
|
|
|
|
03-11-2002, 03:43 AM
|
#13 | ||
|
AF Enthusiast
Join Date: Jan 2002
Posts: 1,074
Thanks: 0
Thanked 0 Times in 0 Posts
|
Quote:
|
||
|
|
|
|
03-11-2002, 04:18 PM
|
#14 | |
|
Ferrari Guy
Join Date: Jun 2001
Location: nowhere
Posts: 3,404
Thanks: 0
Thanked 0 Times in 0 Posts
|
is there any way you could talk to gustav and get my account activated, he hasn't responded to any of my emails
back on topic, how many coats have you got on now, it looks great. too bad that the color its molded in is a crappy shade of red.
__________________
The contents of this post may be fictitious. |
|
|
|
|
|
03-15-2002, 07:51 PM
|
#15 | |
|
AF Fanatic
Thread starter
Join Date: Feb 2002
Posts: 2,622
Thanks: 0
Thanked 0 Times in 0 Posts
|
Hmm not so happy
Since I'm waiting for some touchup paint on the main body to cure I went ahead and took the engine cover through the entire polishing process of the Micromark kit. The instructions said that by 6000 grit you should see some of the shine returning, but when I reached 12000 grit the surface was still dull, and there were still plenty of sanding scracthes on the surface. Maybe I wasn't sanding long enough/hard enough, I don't know, but disappointing results. I then decided to try the Scratch Remover they included with it, this was more to my liking, it restoryed the original shiny gloss to it, but it has a bit of a haze to it, kind of like a reflection in a pool of water that's been disturbed. I also used the Polishing wax on it, this didn't seem to help that much. You can still see the scratches from the sanding Side note, the engine cover is smooth as a baby's bottom from the sanding I guess I'll try once more on the wing, and if that doesn't work then I will just spray the whole thing with Future clear coat, which seems to work for me (and is cheaper to buff with 2000 grit paper and Future than to buy a 7.50 polishing kit for each model) The scratch remover works pretty well I guess, and I'll keep the wax to buff the Future up in my future models |
|
|
|
|
| ||||||||||||||||||||||||||||||||||||||
|
POST REPLY TO THIS THREAD |
 |
|
|


