|
|
|

|
|
| Search | Car Forums | Gallery | Articles | Helper | AF 350Z | IgorSushko.com | Corporate |
|
| Latest | 0 Rplys |
|
|||||||
| Car Modeling Share your passion for car modeling here! Includes sub-forum for "in progress" and "completed" vehicles. |
 |
 Show Printable Version | Show Printable Version |  Email this Page | Email this Page |  Subscribe to this Thread
|
|
|
Thread Tools |
 08-10-2002, 06:26 PM
|
#1 | |
|
"P-Man"
 
Join Date: Mar 2001
Location: Manawatu
Posts: 15,179
Thanks: 0
Thanked 3 Times in 3 Posts

|
Another......"HOW TO" prepare a body for primming and painting
Sanding
Make sure you sand the car well...removing molding lines etc. Start with 600, then 800 then 1000 and finish off the whole car with 1200 grit paper. The mold lines are very small raised lines that usually run along the side of the roof line, down each pillar, along the edge of the hood/boot and carry on down though the lights and bumpers. Once you have finished removing the molding lines and sanding the body, give it a good wash in hot soapy water, then finally wash the whole car with hot water straight from the tap....using a good soft brush to get into all parts of the body. This gets rid of all the small sanding particles left on the body Once you have done this, shake as much water off the car as you can, then using your soft brush, brush all the water off the car so it dont dry in "spots" on the body. Once you have done this, you want to keep the car as clean as possible from dust. Place the body straight into a plastic container with a lid to stop any crap getting into the box and onto the car. This is AS CLEAN as you will get it and you want to keep it like it !! See pic.... 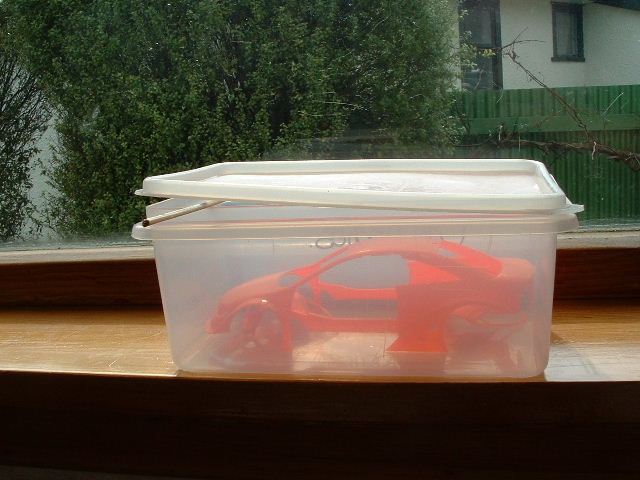 I put a tooth pick under the lid just so that it can "breath" a little as it dries. Leave the car to dry for awhile. A good day is how long i leave mine. IMO this is so important as there is so much crap floating around in the air, and it lands on your model....SO KEEP IT CLEAN !! After a day or two, take the body out ready for painting. Attach it to your painting frame and give it a final brush and a good blow. Primer Spray the primmer on. In between coats i put it straight into the microwave as this is a great DUST FREE place....this is were i think alot of people muck up as they leave it in the room to dry....but as its drying its also attracting the very small dust particles.....this is what is giving you alot of paint finishes that are "rough" looking....because the dust is being trapped under the paint. Before painting, heat the can up in hot water for 10 minutes so it flows better from the can. 2 Coats of white primer. First coat very light, the second so that it covers the model. Dont be to fussy if it still looks a bit "see-though" Leave for a week to harden the primmer. The Finish Coat 3-4 Coats of finish coat about 5-10 minutes apart....thats it...nice a simple.(keep the can warm) The first coat is a very light mist coat...the paint should only just be landing on the car. Spray at a distance of 8-10 inches moving quite quickly with the can as you spray. Do the same for the second coat The third coat you can spray a bit more heavy so it covers the model. This is done by slowing the speed that you move the spray can as you paint. The last coat is the one you want to get perfect. Spray at a new distance of 4-6 inches. You should be trying to get a mirror like smoothness to the final coat. If you are to far away it will not get enough paint and you can get a orange peel look. Too close and the paint will go on to thick and will run and may cause bubbles to appear. You may need to repeat the last step to get a better finish and coverage. Dont rush...take your time. If the paint is not covering to well in the first couple of light coats DONT try and add more paint straight away as this will cause runs in the paint. Allow it to dry and then add a couple of extra light coats to help cover. I always spray the front and rear bumpers first...then both sides along the whole length of the car body. Then the last bit i do is the bonnet/boot and roof last Dont bother sanding between coats as i dont really see the point...all you are doing is making more dust and removing half the paint you have just stick on. After you have finished the last coat...leave for 10-12 days.......rub with some compound then finish with a wax. Hope this help out Cheers PMan
__________________
Current Build.....1/12 Scale Camaro......Almost finished!!!    View All My Models Here. Last edited by primera man; 07-06-2003 at 06:18 AM. |
|

|

|
| The Following User Says Thank You to primera man For This Useful Post: |
vanien (08-14-2011)
|
|
08-10-2002, 07:19 PM
|
#2 | |
|
AF Newbie
 Join Date: Nov 2001
Location: Singapore
Posts: 96
Thanks: 0
Thanked 0 Times in 0 Posts
|
Heating spray paint
Hi P-man!
A quick one: how hot is the water to heat the spray paint can? thanks, Wong |
|
|
|
|
|
08-10-2002, 09:08 PM
|
#3 | |
|
AF Regular

Join Date: Mar 2002
Posts: 155
Thanks: 0
Thanked 0 Times in 0 Posts
|
great "how to" pman, should really help with everybodies finishes on their cars.
|
|
|
|
|
|
08-10-2002, 09:58 PM
|
#4 | ||
|
"P-Man"
Join Date: Mar 2001
Location: Manawatu
Posts: 15,179
Thanks: 0
Thanked 3 Times in 3 Posts
|
Re: Heating spray paint
Quote:
I have the water hot enough from the tap so that i can just leave my hand under it without burning myself....DONT USE BOILING WATER !!! Hot tap water should be fine.
__________________
Current Build.....1/12 Scale Camaro......Almost finished!!! View All My Models Here. |
||
|
|
|
|
08-11-2002, 12:38 AM
|
#5 | |
|
AF Newbie
Join Date: Apr 2002
Location: Ellwood City, Pennsylvania
Posts: 38
Thanks: 0
Thanked 0 Times in 0 Posts
|
Thanks for the cool guide, PMan!
 One question, though... I've heard of waiting times between new coats from five minutes all the way up to a week. Does it depend on the type of paint being used? Like, if I have a quick drying lacquer, can I wait less time (your suggested 5-10 minutes)? How much does the waiting time between coats affect the overall finish? Thanks Coug |
|
|
|
|
|
08-11-2002, 09:57 AM
|
#6 | ||
|
AF Newbie
Join Date: Nov 2001
Location: Singapore
Posts: 96
Thanks: 0
Thanked 0 Times in 0 Posts
|
Re: Re: Heating spray paint
Quote:
Thanks! I also use my fingers to test. But still getting orange peel everytime. I guess it's me :-( |
||
|
|
|
|
08-11-2002, 10:33 AM
|
#7 | |
|
AF Fanatic

Join Date: Jul 2002
Posts: 2,089
Thanks: 0
Thanked 0 Times in 0 Posts
|
:flash: thanks Pman thats really helpfull:alien: i just have one ?
 what kind of paint do you use? what kind of paint do you use? |
|
|
|
|
|
08-11-2002, 11:07 AM
|
#8 | |
|
AF Fanatic

Join Date: Jun 2002
Location: Quebec
Posts: 5,623
Thanks: 3
Thanked 17 Times in 12 Posts


|
Small alternate Howto
I would just let you know something i have done last 2 model with good result:
I don't use soapy water.. I use Thiner ! I wash the body with Thiner (from the same brand of the paint you will use) Put thiner on a cloth, and wash the body. That get off all the finger print and dust from the model, and you don't have to wait after for painting... Better ! you won't get reaction if soap still on the body when painting (I remember a guy with his Porsche GT3  ) )I wash with Thiner and go paint it. after this, I put my model in microwave for about 12 hours to keep it out of dust. after i leave it dry 24 to 48 hours on my desk (dust can be easyly removed since it's praticly dry after 12 hours in microwave) This is my personal Howto... sure Primeraman is the king, so his Howto is probably better ! but just wanted to let you know an alternate way.
__________________
 CarsModeling.com. My Scale Model Cars blog. |
|
|
|
|
|
01-27-2003, 05:49 AM
|
#9 | |
|
AF Regular

Join Date: Dec 2002
Posts: 185
Thanks: 6
Thanked 0 Times in 0 Posts
|
PMan, great how to guide!!!!!
I just want to add something that you kind of missed....... The reason you wash the body in hot sopy water, and then rinse with more hot water is ,...... this helps the plastic loose its static charge so that the dust will not stick as well. ( I just thought that if people knew the reasons for washing then they would take the extra time to do it, I hope you don't mind ) I have 2 very large plastic bins that I keep my washed parts in, I think these are as essisial as an airbrush or hobby knife! |
|
|
|
|
|
01-27-2003, 05:56 AM
|
#10 | |
|
"P-Man"
Join Date: Mar 2001
Location: Manawatu
Posts: 15,179
Thanks: 0
Thanked 3 Times in 3 Posts
|
Thankyou for the good advise on the washing
__________________
Current Build.....1/12 Scale Camaro......Almost finished!!! View All My Models Here. |
|
|
|
|
|
01-27-2003, 06:01 AM
|
#11 | ||
|
www.hiroboy.com vendor

Join Date: Oct 2002
Location: Cheltenham
Posts: 3,842
Thanks: 0
Thanked 2 Times in 2 Posts
|
Re: Another......"HOW TO" prepare a body for primming and painting
Quote:
Thanks for the guide it;s great and should help us out alot |
||
|
|
|
|
01-27-2003, 09:53 AM
|
#12 | |
|
AF Enthusiast

Join Date: Sep 2002
Posts: 567
Thanks: 0
Thanked 0 Times in 0 Posts
|
Great guide! Thank you P-Man
:flash:
__________________
Ryan If your new to the AF modeling forum please read this : AF modeling FAQ Current Project: Tamiya Porsche Boxster Special Edition |
|
|
|
|
|
01-27-2003, 12:07 PM
|
#13 | |
|
AF Enthusiast
Join Date: Aug 2002
Location: Zoutleeuw
Posts: 2,285
Thanks: 0
Thanked 0 Times in 0 Posts
|
Thanks P-Man, for sharing this with us!
|
|
|
|
|
|
01-27-2003, 03:21 PM
|
#14 | ||
|
AF Enthusiast
 
Join Date: Jan 2003
Posts: 1,162
Thanks: 0
Thanked 0 Times in 0 Posts
|
Re: Re: Another......"HOW TO" prepare a body for primming and painting
Quote:
but p man one Q, u sed sand all "molding lines"? do u just mean places where they are somt thin plastic coming out because of it being stamped?
__________________
 My Msn: Joffgreat@hotmail.com |
||
|
|
|
|
01-27-2003, 05:27 PM
|
#15 | |
|
AF Premium User
 
Join Date: Oct 2002
Location: Orlando, Florida
Posts: 558
Thanks: 1
Thanked 1 Time in 1 Post
|
Another suggestion on a dust free environment for drying in case your girlfriend/wife/mother gives you grief because "there's another damn car in the microwave again!"
One of my other hobbies is collecting/building/racing RC Cars and I have a few Mini-Z bodies. The bodies come in a clear plastic box, good for displaying them in when finished(and they're stackable too). When I set my models off to dry for the 1-2 week wait, I put them in the box up on a shelf, no dust...no bitching.  About the only things this won't work for are bigger trucks and such, just 1/24 / 1/25 scale cars and, I think (havn't tried yet) 1/12 scale motorcycles. About the only things this won't work for are bigger trucks and such, just 1/24 / 1/25 scale cars and, I think (havn't tried yet) 1/12 scale motorcycles.
__________________
Do you know how fast you were going son? No Officer, the speedometer only goes up to 85. |
|
|
|
|
| ||||||||||||||||||||||||||||||||||||||
|
POST REPLY TO THIS THREAD |
 |
|
|

 =
= 
