|
|
|

|
|
| Search | Car Forums | Gallery | Articles | Helper | AF 350Z | IgorSushko.com | Corporate |
|
| Latest | 0 Rplys |
|
|||||||
| Car Modeling Share your passion for car modeling here! Includes sub-forum for "in progress" and "completed" vehicles. |
 |
 Show Printable Version | Show Printable Version |  Email this Page | Email this Page |  Subscribe to this Thread
|
|
|
Thread Tools |
 08-13-2002, 06:26 PM
|
#1 | |
|
Car Mod guy
 
Join Date: Feb 2002
Location: Manchester
Posts: 5,180
Thanks: 6
Thanked 11 Times in 9 Posts

|
Some time ago Dan (daggerlee) asked me how to go about making one of these. Unfortunately i never got around to doing it til now - sorry Dan! Its something that i want to include in my venture as resin parts in a variety of different sizes and styles. But for the members of AF, here's how to make one. This one was put together in about an hour, no accurate measurements were taken or indepth research - just a quickie!
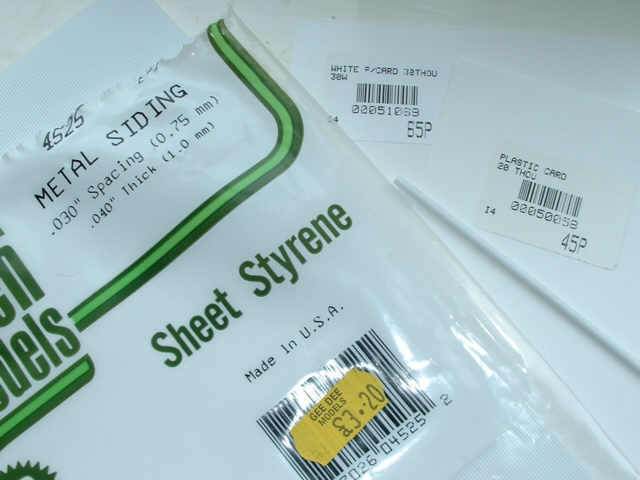
Stage one - The face of the intercooler is made from a styrene sheet available from Evergreen which has grooves in it, normally used in rail modeling. This is not thick enough on its own so two 30thou and one 20thou plain styrene sheets were sandwiched together 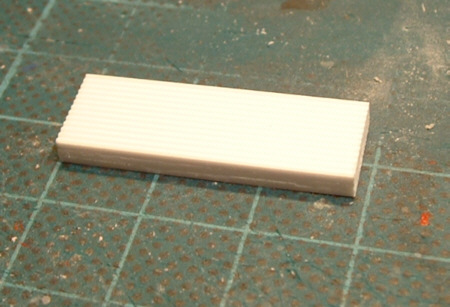 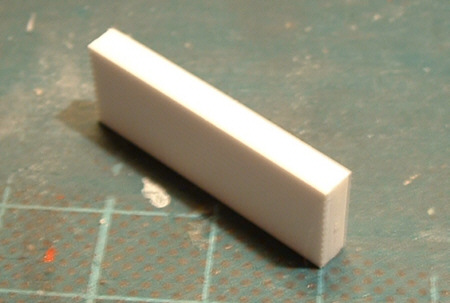 Stage two - The end pieces are made from 4 triangular shapes cut from 10thou sheet with styrene tubing inbetween. 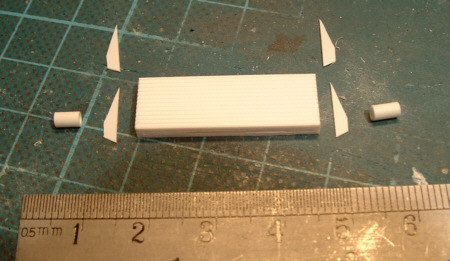  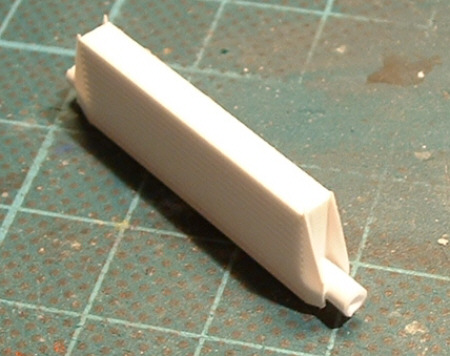 Stage three - Putty added to fill ends. 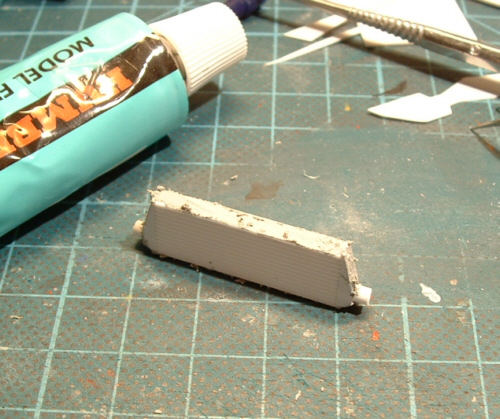 Tomorrow i will sand it and add the weld seems - stay tuned!
__________________
CHRIS... Catch me on FACEBOOK http://www.c1-models.com http://www.facebook.com/C1Models |
|

|

|
|
08-13-2002, 06:53 PM
|
#2 | |
|
AF Newbie
Join Date: Jul 2002
Posts: 7
Thanks: 0
Thanked 0 Times in 0 Posts
|
Wow this is great! Thanks a lot yo!
|
|
|
|
|
|
08-13-2002, 07:33 PM
|
#3 | |
|
AF Enthusiast
 Join Date: Jul 2002
Location: Oahu, Hawaii
Posts: 2,790
Thanks: 0
Thanked 1 Time in 1 Post

|
U guys know where I can find these materials on the internet? Nice job fly!
__________________
AF MODELING FAQ  ~ 1987 Toyota Corolla GTS Coupe Sprinter ~ "Oh what a feeling.- Toyota |
|
|
|
|
|
08-13-2002, 07:49 PM
|
#4 | ||
|
Horizontally Opposed
Join Date: Mar 2001
Location: Las Vegas, Nevada
Posts: 16,856
Thanks: 0
Thanked 11 Times in 9 Posts

|
Quote:
|
||
|
|
|
|
08-13-2002, 09:02 PM
|
#5 | ||
|
AF Fanatic

Join Date: Feb 2002
Posts: 2,622
Thanks: 0
Thanked 0 Times in 0 Posts
|
Quote:
 I was afraid I was gonna have to ask you again when I start my R32 I was afraid I was gonna have to ask you again when I start my R32  |
||
|
|
|
|
08-13-2002, 11:01 PM
|
#6 | |
|
AF Fanatic

Join Date: Jul 2002
Posts: 2,089
Thanks: 0
Thanked 0 Times in 0 Posts
|
:jump:Thanks alot fly,
 this sure does help out alot, by the way can i you please make a thread on how to make a turbo and a blow off valve:jump: that would be awsome with the intercooler:jump: this sure does help out alot, by the way can i you please make a thread on how to make a turbo and a blow off valve:jump: that would be awsome with the intercooler:jump: |
|
|
|
|
|
08-14-2002, 02:58 PM
|
#7 | |
|
Car Mod guy
Join Date: Feb 2002
Location: Manchester
Posts: 5,180
Thanks: 6
Thanked 11 Times in 9 Posts
|
DAY 2
The next stage is a bit fiddly so attempt it if your feeling adventurous. Its not really necessary anyway unless your a sucker for small detail - like me
The weld seems are made from two part epoxy putty, the 'toothpaste' kind is impractical. 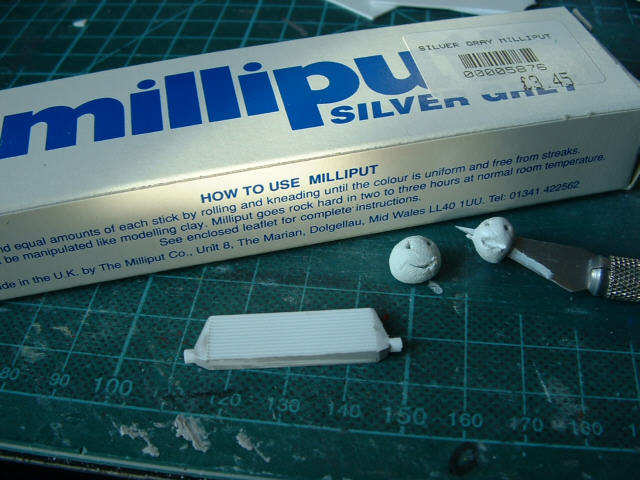 Small amounts are rolled out. 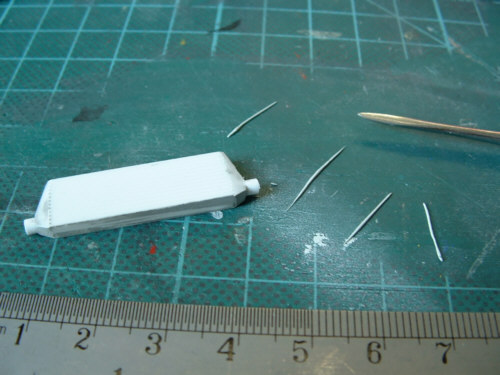 After placing in position an old large bristle brush is used to create the textur of the weld. Its simply rolled over the slither of putty. 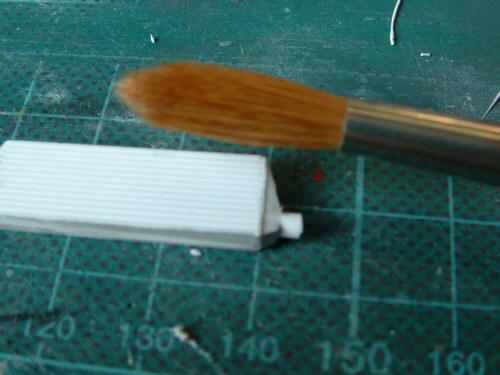 Done! - If you wanted to, you could add more around th pipe and on top but you won't see them so there is little point. 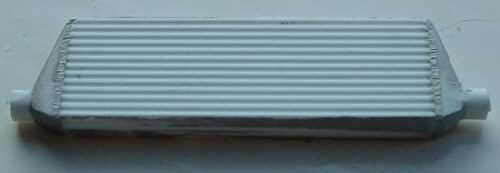  Looks pretty cool behind the s2k front, just needs a little paint.  I'll post more pics when complete and will also extend the piping.
__________________
CHRIS... Catch me on FACEBOOK http://www.c1-models.com http://www.facebook.com/C1Models |
|
|
|
|
|
08-14-2002, 03:07 PM
|
#8 | |
|
AF Enthusiast

Join Date: Nov 2001
Location: No where
Posts: 1,344
Thanks: 7
Thanked 16 Times in 5 Posts
|
Sorry if I'm alittle slow. I still don't quite understand how you make the welds. Do you crumble the putty around or have it zig zag ?
Ok, nevermind, is it lay the thin strips of putty over the weld area, then run it over with a brush for texture before it dries? |
|
|
|
|
|
08-14-2002, 04:43 PM
|
#9 | ||
|
Car Mod guy
Join Date: Feb 2002
Location: Manchester
Posts: 5,180
Thanks: 6
Thanked 11 Times in 9 Posts
|
Quote:
__________________
CHRIS... Catch me on FACEBOOK http://www.c1-models.com http://www.facebook.com/C1Models |
||
|
|
|
|
08-14-2002, 04:56 PM
|
#10 | |
|
AF Regular
Join Date: Mar 2002
Posts: 54
Thanks: 0
Thanked 0 Times in 0 Posts
|
hahaha
lol lol lol @ the smiley balls!
poor fokkers gonna die  mouahahaha! mouahahaha!oh. sorry, i didnt mean to get carried away like that! :licker:
__________________
You were born crying with people standing around you smiling. Live, and you might die smiling with people standing around you crying. |
|
|
|
|
|
08-14-2002, 05:53 PM
|
#11 | |
|
AF Enthusiast

Join Date: Dec 2001
Posts: 2,825
Thanks: 0
Thanked 0 Times in 0 Posts
|
Great how to.(this page has been added to my favourite bookmarks)
|
|
|
|
|
|
08-14-2002, 06:16 PM
|
#12 | |
|
AF Fanatic
Join Date: Jul 2002
Posts: 2,089
Thanks: 0
Thanked 0 Times in 0 Posts
|
 hey fly, hey fly,  what abou that turbo and blow off valve? what abou that turbo and blow off valve? |
|
|
|
|
|
08-14-2002, 06:35 PM
|
#13 | ||
|
Car Mod guy
Join Date: Feb 2002
Location: Manchester
Posts: 5,180
Thanks: 6
Thanked 11 Times in 9 Posts
|
Quote:
__________________
CHRIS... Catch me on FACEBOOK http://www.c1-models.com http://www.facebook.com/C1Models |
||
|
|
|
|
08-14-2002, 06:50 PM
|
#14 | ||
|
Horizontally Opposed
Join Date: Mar 2001
Location: Las Vegas, Nevada
Posts: 16,856
Thanks: 0
Thanked 11 Times in 9 Posts
|
Quote:
|
||
|
|
|
|
08-14-2002, 07:08 PM
|
#15 | |
|
AF Newbie
 Join Date: Mar 2002
Posts: 86
Thanks: 0
Thanked 0 Times in 0 Posts
|
thanks for the info! So you're using the "V-Groove Siding" sheet? Thanks!!!
|
|
|
|
|
|
08-14-2002, 08:42 PM
|
#16 | |
|
AF Regular
 
Join Date: Jun 2002
Posts: 412
Thanks: 0
Thanked 0 Times in 0 Posts
|
Fantastic job Chris, with your talents maybe you should think about going into business!!!!
 Seriously though, damn fine and very informative 'how-to...' thread! But where do you get the styrene stuff from in the U.K? The link Jay posted aren't taking any more International Customers!!!! INTERNATIONAL??? PAH WHO DO THAY THINK THEY ARE? I'M BLOODY ENGLISH NOT INTER-BLOODY-NATIONAL!!!!!!! P.S Before anyone starts telling me that as nhc are in the U.S so to them I am an international customer e.t.c e.t.c... Please note the above rantings are a joke!!!!
__________________
See my models, click on HOMEPAGE below |
|
|
|
|
|
08-14-2002, 08:56 PM
|
#17 | ||
|
Horizontally Opposed
Join Date: Mar 2001
Location: Las Vegas, Nevada
Posts: 16,856
Thanks: 0
Thanked 11 Times in 9 Posts
|
Quote:
 |
||
|
|
|
|
08-14-2002, 09:07 PM
|
#18 | |
|
AF Regular
Join Date: Jun 2002
Posts: 412
Thanks: 0
Thanked 0 Times in 0 Posts
|
EXACTLY JAY!!!!
__________________
See my models, click on HOMEPAGE below |
|
|
|
|
|
08-15-2002, 06:09 AM
|
#19 | ||||
|
Car Mod guy
Join Date: Feb 2002
Location: Manchester
Posts: 5,180
Thanks: 6
Thanked 11 Times in 9 Posts
|
Quote:
Quote:
 Quote:
__________________
CHRIS... Catch me on FACEBOOK http://www.c1-models.com http://www.facebook.com/C1Models |
||||
|
|
|
|
08-15-2002, 10:31 AM
|
#20 | |
|
AF Fanatic
Join Date: Jul 2002
Posts: 2,089
Thanks: 0
Thanked 0 Times in 0 Posts
|
:alien2: hey thanks alot fly:licker: ill be looking foward to ur next how to's:frog:
|
|
|
|
|
|
08-15-2002, 02:47 PM
|
#21 | |
|
AF Regular
Join Date: Jun 2002
Posts: 412
Thanks: 0
Thanked 0 Times in 0 Posts
|
Oh yes, I guess I'll have to pop over to Nottingham one day with a big wedge of cash to spend!!!
Thanks Chris!
__________________
See my models, click on HOMEPAGE below |
|
|
|
|
|
08-16-2002, 12:29 PM
|
#22 | |
|
AF Enthusiast

Join Date: Jun 2002
Location: St. Cloud, Minnesota
Posts: 1,081
Thanks: 0
Thanked 1 Time in 1 Post
|
Thanks for the info, maybe ill put it on my Subaru Impreza.
__________________
Just a good model of mine: 2 Fast 2 Furious SkylineSTOLEN!!! Another go at it: 2 Fast 2 Furious Skyline.. Pt. 2 |
|
|
|
|
|
08-16-2002, 05:43 PM
|
#23 | |
|
Car Mod guy
Join Date: Feb 2002
Location: Manchester
Posts: 5,180
Thanks: 6
Thanked 11 Times in 9 Posts
|
Adding pipes
The purpose of this next stage is to help hide away the empty space behind the front intake of a curbside kit. So carrying this out depends on what model your adding your intercooler to and the size of the visable area.
To make the pipes i'm using aluminium tubing which you should be able to get from good model stores. The smaller size is 1.7mm and the larger size is 2.4 which makes it about right for the 2.5 inch size tubing on the full scale items. This tubing is quite soft and easily cut through with a No11 blade. The next few pics are self explanatory but if you've sniffed too much glue and/or forgot to wear your respirator today, then i will point out that two lengths of tube are cut as desired with the smaller diameter cut slightly longer. This is so that it will form a plug to slot into the intercooler. They are then simply cut in two after inserting one into the other. 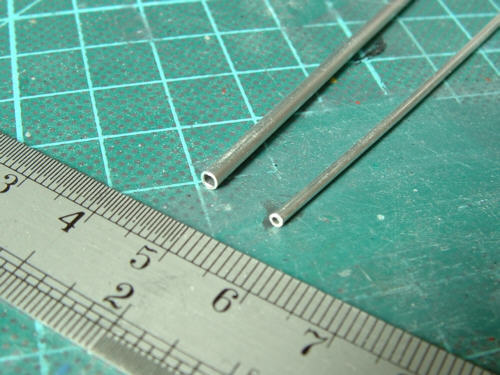  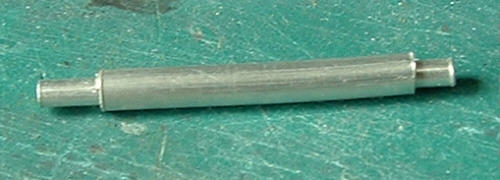 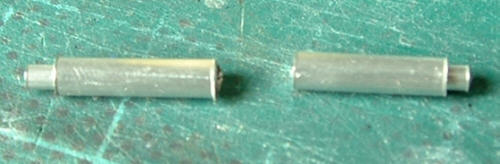 The reason for using metal is obviously for realism, the aluminium tubing can be buffed to a nice shine, so thats what i'm gonna do! I first gave the tube a light sanding with 1500 wet and dry then polished with Autoglym Paint Renovator but any polish will do. 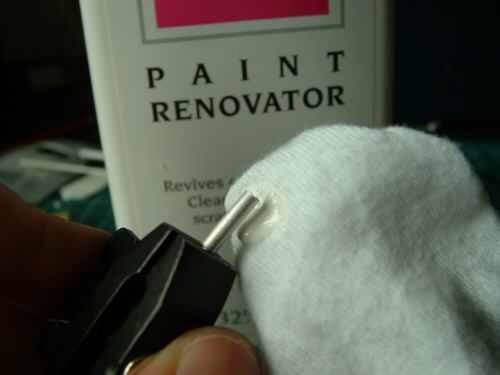 Polished tube below - 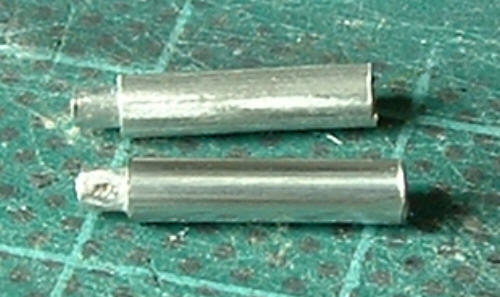 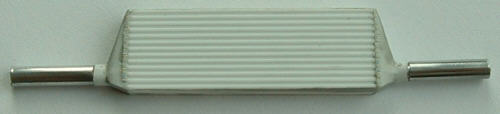 This will eventually be the intercooler's new home. With the help of some mesh infront it will disguise the fact that no engine exists now that the opening is alot bigger. 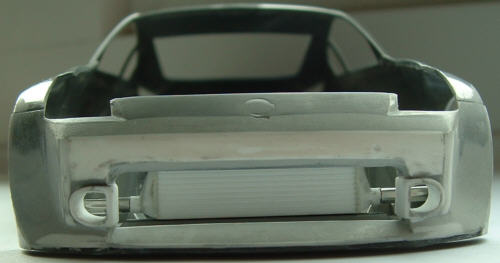 For the next stage i'll show how to add yet more detail to give it that extra realistic look, here's a sneak. 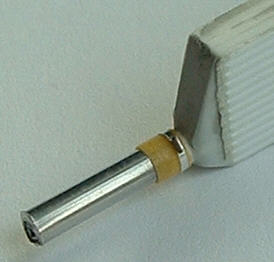 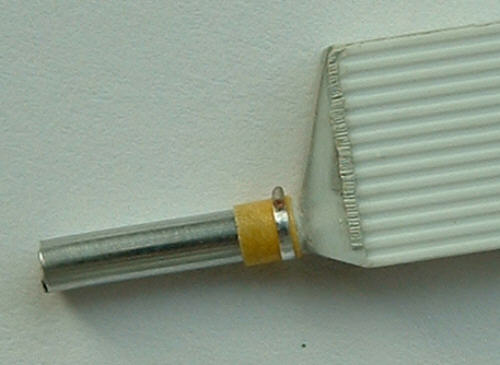
__________________
CHRIS... Catch me on FACEBOOK http://www.c1-models.com http://www.facebook.com/C1Models |
|
|
|
|
|
08-16-2002, 08:02 PM
|
#24 | |
|
AF Fanatic
Join Date: Jul 2002
Posts: 2,089
Thanks: 0
Thanked 0 Times in 0 Posts
|
 god man , you are the "MAN" its a damn good thing that you got that camera of yours, but by the way is there any set time to when we can expect the other how to-s "blow off/intercooler" god man , you are the "MAN" its a damn good thing that you got that camera of yours, but by the way is there any set time to when we can expect the other how to-s "blow off/intercooler"Rui:smoker2: |
|
|
|
|
|
08-16-2002, 08:08 PM
|
#25 | |
|
AF Enthusiast
Join Date: Nov 2001
Location: No where
Posts: 1,344
Thanks: 7
Thanked 16 Times in 5 Posts
|
Keep it coming Chris, I can't wait!
 |
|
|
|
|
|
08-16-2002, 08:34 PM
|
#26 | |
|
AF Regular

Join Date: Jul 2002
Location: Philliadelphia, Pennsylvania
Posts: 82
Thanks: 0
Thanked 0 Times in 0 Posts
|
Oh man oh man
I ran out today well drove to my local hobby and picked up the stuff you listed. They didn't have any metal siding just V-Groove so I picked that up. They also didn't have no styrene tubing so I picked up some metal tubing and whaaaa.  ...you just posted that you are using metal tubing! !! ...you just posted that you are using metal tubing! !!Umm Fly are you using Jedi Mind tricks if you are it's all good! Keep the tips comin.:licker: |
|
|
|
|
|
08-16-2002, 08:38 PM
|
#27 | |
|
AF Fanatic
Join Date: Feb 2002
Posts: 2,622
Thanks: 0
Thanked 0 Times in 0 Posts
|
Awesome!
|
|
|
|
|
|
08-17-2002, 12:50 AM
|
#28 | |
|
AF Enthusiast
Join Date: Jul 2002
Location: Oahu, Hawaii
Posts: 2,790
Thanks: 0
Thanked 1 Time in 1 Post
|
Cool!
__________________
AF MODELING FAQ ~ 1987 Toyota Corolla GTS Coupe Sprinter ~ "Oh what a feeling.- Toyota |
|
|
|
|
|
08-17-2002, 04:12 PM
|
#29 | |
|
Car Mod guy
Join Date: Feb 2002
Location: Manchester
Posts: 5,180
Thanks: 6
Thanked 11 Times in 9 Posts
|
Finishing touches
I used AlcadII Chrome to paint the intercooler, I can't recommend this stuff enough, its just brilliant!
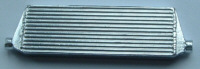  I based this loosely on the Blitz intercooler - I say loosely coz i didnt convert the measurements from the real thing, only sizing it as desired but copying the basic design - so its only fitting to have the blitz logo on it. I took the logo from thier website, resized it a few times in a photo software package and printed onto some coated paper, then chose the best size. 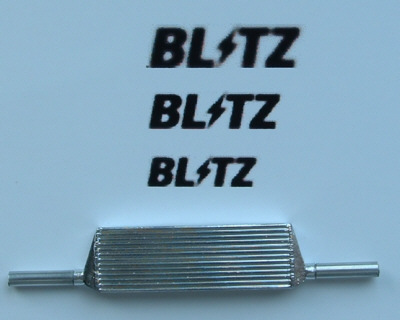 I laid masking tape over the image before cutting out the letters. This was just to add a little rigidity to the paper. I opted not to stick masking tape directly onto the part for fear of lifting off some of the Alcad and also because it might lose some of its form. The mask was made to be the same height as the part and markings were made in order to position it in the centre. Dont forget the closed parts of the B's!   I lightly airbrushed it with flat black paint, it was only give a few passes to give it a subtle look like on the real thing. It may also be worth trying Tamiya Smoke or a Dark grey for this too. 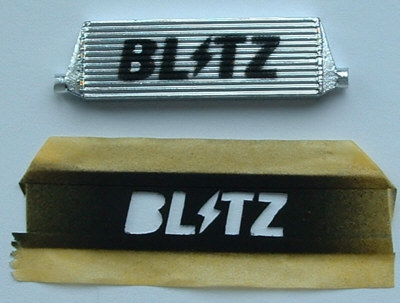 With the pipes super-glued in place i cut thin strips of tamiya masking tape to form the rubber band connectors (I'm not familiar with the correct terminology so forgive me if thats not what thery are called) which was wrapped around a couple of times. I applied thin CA to the ends to prevent them from lifting. 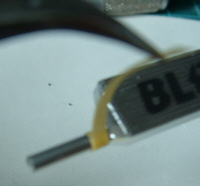 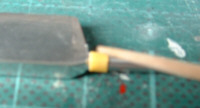 I painted the bands with a flat mid blue. At this stage i applied a heavily thinned wash of satin black into the groves and over the weld seems to bring out the detail. 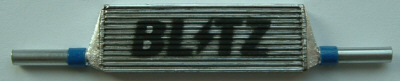 To recreate the metal bands i used thin strips of Matt Aluminium Bare Metal Foil. 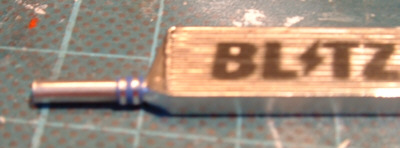 To make the fasteners i used 15amp fuse wire, glued in place with a little more thin CA.   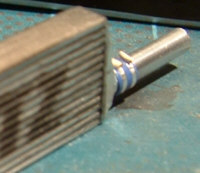 The finished product. 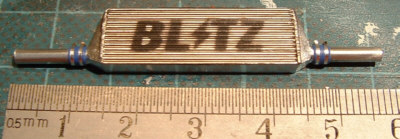 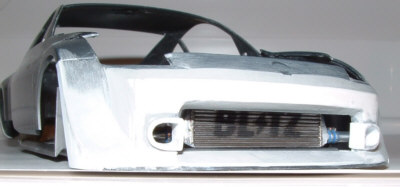 Hope you have enjoyed this and i look forward to seeing your versions added to your models.
__________________
CHRIS... Catch me on FACEBOOK http://www.c1-models.com http://www.facebook.com/C1Models |
|
|
|
|
|
08-17-2002, 04:29 PM
|
#30 | |
|
AF Fanatic
Join Date: Feb 2002
Posts: 2,622
Thanks: 0
Thanked 0 Times in 0 Posts
|
You can be sure you'll see one on my Supra and R32 models!! Thanks a bunch!! :flash:
|
|
|
|
|
|
08-17-2002, 05:19 PM
|
#31 | |
|
AF Enthusiast
Join Date: Nov 2001
Location: No where
Posts: 1,344
Thanks: 7
Thanked 16 Times in 5 Posts
|
Chris, I don't have an airbrush. What would you recommend I use to achieve the same silver/chrome finish?
|
|
|
|
|
|
08-17-2002, 06:24 PM
|
#32 | ||
|
Car Mod guy
Join Date: Feb 2002
Location: Manchester
Posts: 5,180
Thanks: 6
Thanked 11 Times in 9 Posts
|
Quote:
__________________
CHRIS... Catch me on FACEBOOK http://www.c1-models.com http://www.facebook.com/C1Models |
||
|
|
|
|
08-17-2002, 07:04 PM
|
#33 | |
|
AF Enthusiast
Join Date: Jul 2002
Location: Oahu, Hawaii
Posts: 2,790
Thanks: 0
Thanked 1 Time in 1 Post
|
Holy Crap dude!! That is just to cool and detailed!!!! That's going on my civic!
__________________
AF MODELING FAQ ~ 1987 Toyota Corolla GTS Coupe Sprinter ~ "Oh what a feeling.- Toyota |
|
|
|
|
|
08-17-2002, 07:45 PM
|
#34 | |
|
AF Enthusiast
Join Date: Dec 2001
Posts: 2,825
Thanks: 0
Thanked 0 Times in 0 Posts
|
Thanx for all the info fly.
|
|
|
|
|
|
08-17-2002, 07:49 PM
|
#35 | |
|
AF Fanatic
Join Date: Feb 2002
Posts: 2,622
Thanks: 0
Thanked 0 Times in 0 Posts
|
Check out what hirofkd did on his Toyota MR2:
http://www.asahi-net.or.jp/~xr2h-fkd...w20/sw20p6.htm Sounds very interesting.. |
|
|
|
|
|
08-17-2002, 08:11 PM
|
#36 | |
|
"P-Man"

Join Date: Mar 2001
Location: Manawatu
Posts: 15,179
Thanks: 0
Thanked 3 Times in 3 Posts
|
I've been reading this thread each day with much intrest, and i have to say it has been a fantastic thread. Well done on a great write up
__________________
Current Build.....1/12 Scale Camaro......Almost finished!!!    View All My Models Here. |
|
|
|
|
|
08-18-2002, 05:32 AM
|
#37 | |
|
Car Mod guy
Join Date: Feb 2002
Location: Manchester
Posts: 5,180
Thanks: 6
Thanked 11 Times in 9 Posts
|
Thanks for the comments people, always a pleasure to help anyone improve their models.
__________________
CHRIS... Catch me on FACEBOOK http://www.c1-models.com http://www.facebook.com/C1Models |
|
|
|
|
|
08-18-2002, 03:01 PM
|
#38 | |
|
AF Moderator

Join Date: Jun 2002
Location: Cincinnati, Ohio
Posts: 12,565
Thanks: 363
Thanked 47 Times in 43 Posts
|
Thanks! The intercooler I'm making has a BLITZ decal on it. This thread has been very helpful
I had started on one but was unsure exactly how to finish it to look convincing. Again, thanks!
__________________
http://public.fotki.com/tonioseven/ |
|
|
|
|
|
08-18-2002, 04:24 PM
|
#39 | |
|
AF Enthusiast
Join Date: Jul 2002
Location: Oahu, Hawaii
Posts: 2,790
Thanks: 0
Thanked 1 Time in 1 Post
|
You guys know where hirofkd got those emblems?
__________________
AF MODELING FAQ ~ 1987 Toyota Corolla GTS Coupe Sprinter ~ "Oh what a feeling.- Toyota |
|
|
|
|
|
08-19-2002, 08:54 PM
|
#40 | |
|
AF Newbie
Join Date: Aug 2002
Posts: 1
Thanks: 0
Thanked 0 Times in 0 Posts
|
I am new and I have a question about that puddy you used for the welds fly. Where do I get that? what is the brand? does it just air-dry?
|
|
|
|
|
| ||||||||||||||||||||||||||||||||||||||
|
POST REPLY TO THIS THREAD |
 |
|
|


 =
= 

