|
|
|

|
|
| Search | Car Forums | Gallery | Articles | Helper | AF 350Z | IgorSushko.com | Corporate |
|
| Latest | 0 Rplys |
|
|||||||
| Car Modeling Share your passion for car modeling here! Includes sub-forum for "in progress" and "completed" vehicles. |
 |
 Show Printable Version | Show Printable Version |  Email this Page | Email this Page |  Subscribe to this Thread
|
|
|
Thread Tools |
 09-09-2002, 01:10 PM
|
#1 | |
|
Car Mod guy
 
Join Date: Feb 2002
Location: Manchester
Posts: 5,180
Thanks: 6
Thanked 11 Times in 9 Posts

|
Improving the Aoshima C-West RX-7
I've been doing little bits to this for the past 3 days, I'm getting a little side tracked (again!) from my Scaleautostyle stuff so don't expect there to be a regular report on this build.
However I'm going to show you what I've done so far coz i know a couple of you have this kit and i hope that you may find this useful. My plan was to do this straight out of the box as a bit of a breather from all the customizing, but it seems i can't help myself!!! The bodykit looks good enough o-of-b but it does look a little chunky and can be improved upon. There are a few fitment issues, which make it more like an AMT kit and these need a little work. So, first up are the sides. As you see in the pic, it sticks out a little and doesn't look at all realistic, Bri G mentioned he was going to sand down his but i'm opting for a different approach which is how most of my transkits will fit. I've tacked the side in position with tape making sure to align the sill with the door panel line.  With it now securely in position I scribed the edges onto the car.  This piece was then removed.  In order to fit the bodykit sides now, I constructed a lip which will glue to the inside of the model. This was made from 3 layers of 10thou plastic card, the first layer deepens the sides slightly, the second is for the lower part of the door to stick to and the third provides a fastening for the top half. This is quite hard to explain, but what this achieves is a more realistic fit of the bodykit in relation to the lines of the car and pushes out the top half of the sides slightly more than the bottom half.  The result is alot more pleasing i think!   The next issue here is that the sides are actually not long enough to cover the middle of the car. To improve this i added two layers of 10thou card to either side of the bodykit i.e twice on each side piece. By using 10thou and not 20 it will conform the curves better and not lose shape. This is a before and after pic.   The headlights fit very poorly as seen in first pic. Here they are dry fitted to see what areas need filing. 10thou card was placed at selected areas, trimmed when dry then filed to allow a better fit as seen in 3rd pic    Thats all for now!
__________________
CHRIS... Catch me on FACEBOOK http://www.c1-models.com http://www.facebook.com/C1Models |
|

|

|
|
09-09-2002, 01:41 PM
|
#2 | |
|
AF Enthusiast

Join Date: Mar 2002
Posts: 2,466
Thanks: 33
Thanked 21 Times in 20 Posts
|
i just purchased that kit and im gonna do that. i dint know that car was that Fckd up
thanks for the tip |
|
|
|
|
|
09-09-2002, 02:08 PM
|
#3 | |
|
Banned

Join Date: Jul 2002
Location: perugia
Posts: 187
Thanks: 0
Thanked 0 Times in 0 Posts
|
y
How did you remove the under-door for place the side skirts
|
|
|
|
|
|
09-09-2002, 02:51 PM
|
#4 | |||
|
Car Mod guy
Join Date: Feb 2002
Location: Manchester
Posts: 5,180
Thanks: 6
Thanked 11 Times in 9 Posts
|
Re: y
Quote:
Quote:
 edit by jay: change to permanent URL
__________________
CHRIS... Catch me on FACEBOOK http://www.c1-models.com http://www.facebook.com/C1Models Last edited by Jay!; 09-09-2002 at 03:46 PM. |
|||
|
|
|
|
09-09-2002, 03:29 PM
|
#5 | |
|
AF Enthusiast
Join Date: Jun 2002
Posts: 546
Thanks: 0
Thanked 0 Times in 0 Posts
|
gee, I wonder if I came up with the lip idea.......like on the s2000 hood.
looks alot better, Primera man should have done that on his silvia. it look very nice the way you did it. any news on when you willbe selling parts? |
|
|
|
|
|
09-10-2002, 12:12 AM
|
#6 | |
|
AF Regular
Join Date: Jun 2002
Posts: 350
Thanks: 1
Thanked 0 Times in 0 Posts
|
great idea on the side skirts. If you don't mind, I'm going to drop the sanding idea since it's taking way too long to do and use your idea instead
 Those headlights are definitely a pain but I'm going to worry about the side skirts first. Thanks for the great idea chris! I might do this with my veilside s15 too. so any idea on how do the hood? very similar to your mugen s2000 hood I think. Those headlights are definitely a pain but I'm going to worry about the side skirts first. Thanks for the great idea chris! I might do this with my veilside s15 too. so any idea on how do the hood? very similar to your mugen s2000 hood I think.  |
|
|
|
|
|
09-10-2002, 02:54 AM
|
#7 | ||
|
Car Mod guy
Join Date: Feb 2002
Location: Manchester
Posts: 5,180
Thanks: 6
Thanked 11 Times in 9 Posts
|
Re: nice job chris!
Quote:
For the hood I may add the louvres and make casts of the hood to include amongst my parts. I'm having trouble finding good pics - large pics - they all seem to be too small. BTW I'm opting to leave the rear bumper alone coz I feel its not too bad and sanding this piece will probably amount to more problems.
__________________
CHRIS... Catch me on FACEBOOK http://www.c1-models.com http://www.facebook.com/C1Models |
||
|
|
|
|
09-10-2002, 12:41 PM
|
#8 | |
|
Car Mod guy
Join Date: Feb 2002
Location: Manchester
Posts: 5,180
Thanks: 6
Thanked 11 Times in 9 Posts
|
I couldn't help myself from doing a little more to this so here's an update.
Headlight lens - The first pic is a dry fit as they are, look pretty appaling don't they? There isn't much give for the lens to be sanded so i've opted to sit the headlights lower down. The second pic shows yet more 10thou card added to the underside of the hood, where the tab on the headlights is to be glued. This is one layer, I added 2 in the end. The final result looks alot more pleasing in the third pic even though the headlights are not 100% accurate by sitting a little lower, but i guess that can't be helped. These will eventually look great with the help of some CF decal.   
__________________
CHRIS... Catch me on FACEBOOK http://www.c1-models.com http://www.facebook.com/C1Models |
|
|
|
|
|
09-10-2002, 12:51 PM
|
#9 | |
|
AF Enthusiast

Join Date: Apr 2002
Posts: 729
Thanks: 0
Thanked 1 Time in 1 Post
|
great job! you have a great eye for detail. i would have built it as is and called it a day (or a few weeks at least).
|
|
|
|
|
|
09-10-2002, 05:22 PM
|
#10 | |
|
Car Mod guy
Join Date: Feb 2002
Location: Manchester
Posts: 5,180
Thanks: 6
Thanked 11 Times in 9 Posts
|
So it continues...
Fuel cap - I think the pics explain everything here; just a simple template from masking tape used to scribe the area to be removed from the rear piece. Not much to point out except that the cut out for the fuel cap on the real thing, has a slightly bigger diameter so some careful filing is in order. 
__________________
CHRIS... Catch me on FACEBOOK http://www.c1-models.com http://www.facebook.com/C1Models |
|
|
|
|
|
09-10-2002, 05:37 PM
|
#11 | |
|
"P-Man"

Join Date: Mar 2001
Location: Manawatu
Posts: 15,179
Thanks: 0
Thanked 3 Times in 3 Posts

|
Very impressed by your work here Chris. You have done a really woderful job on the whole kit so far
__________________
Current Build.....1/12 Scale Camaro......Almost finished!!!    View All My Models Here. |
|
|
|
|
|
09-12-2002, 10:54 AM
|
#12 | |
|
Car Mod guy
Join Date: Feb 2002
Location: Manchester
Posts: 5,180
Thanks: 6
Thanked 11 Times in 9 Posts
|
Onto the front section - Not a good fit at all around the headlights (pic1), I did start to sand this flush but promptly stopped as I could see the shape would end up not at all right. Instead i've gone for the putty alternative. First of all I added a thin strip of 10thou sheet to the edge where it meets the main bodywork (pic2). The reason for this is to maintain a crisp edge - something you cant achieve by slapping putty straight on there. Once you have built up a small amount of putty to this edge you can sand flush when dry (pic3). It still need a little tidying up, but i'll deal with that later.
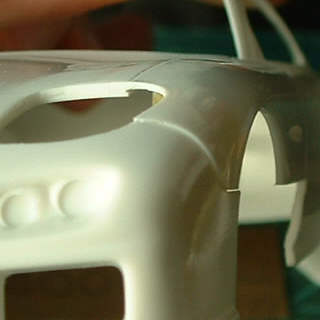   The body as it is at the moment with all pieces dry fitted. 
__________________
CHRIS... Catch me on FACEBOOK http://www.c1-models.com http://www.facebook.com/C1Models |
|
|
|
|
|
09-12-2002, 11:41 AM
|
#13 | |
|
AF Regular
Join Date: Sep 2002
Posts: 94
Thanks: 0
Thanked 0 Times in 0 Posts
|
lookin' good, quality stuff
|
|
|
|
|
|
09-12-2002, 08:03 PM
|
#14 | |
|
AF Enthusiast
 
Join Date: May 2002
Location: LYON
Posts: 588
Thanks: 0
Thanked 0 Times in 0 Posts
|
Your progress model car.....
Hi,
this is the best way to have a great model.... I do like you to install some kit of cars..... It's really nice to see your job.......This is the best way.......it's hard and it take a long time but you are write............ Laurent
__________________
2 205 GTI 1900 1988/1992  
|
|
|
|
|
|
09-12-2002, 08:37 PM
|
#15 | |
|
AF Enthusiast
Join Date: Apr 2002
Posts: 579
Thanks: 0
Thanked 0 Times in 0 Posts
|
 your work never ceases to amaze me. you have a good eye, and keen sense of detail. keep up the good work. your work never ceases to amaze me. you have a good eye, and keen sense of detail. keep up the good work.
__________________
Current Project: Fujimi Toyota Altezza RS200 bye bye handles, moldings, rain gutters, license plate holders View some pics of it here http://www.automotiveforums.com/vbulletin/t72123.html  
|
|
|
|
|
|
|
POST REPLY TO THIS THREAD |
 |
|
|

