|
|
| Search | Car Forums | Gallery | Articles | Helper | Air Dried Fresh Beef Dog Food | IgorSushko.com | Corporate |
|
|||||||
| WIP - Motorsports Post topics for any "Work In Process" motorsports vehicles in this sub-forum. |
 |
 Show Printable Version | Show Printable Version |  Subscribe to this Thread
|
|
|
Thread Tools |
|
#76
 10-14-2020, 10:23 AM
|
||||
|
||||
|
Re: Lancia Delta S4 Marlboro Beemax 1/24
Continuamos con el Lancia Delta S4, que al final de este post, dejamos el chasis listo para acomenter la carrocería en el siguiente paso. Pero empezamos por los asientos que los dejamos pintados meses atrás. Les colocamos las calcas de Alen y Kivimaki, ya que esta unidad les perteneció, con lo que llevaban los mismos asientos. Las calcas están puestas sobre el liquido de Tameo, el super fuerte. Después les apliqué un capa fina de barniz mate de Ammo-MIG.
We continue with the Lancia Delta S4, which at the end of this post, we leave the chassis ready to attack the body in the next steps. But we start with the seats that we left painted months ago. We put the decals of Alen and Kivimaki on them, since this unit belonged to them, so they had the same seats. The decals are placed on the liquid of Tameo, the super strong. Ive then applied a thin coat of Ammo-MIG Matte Varnish to them. 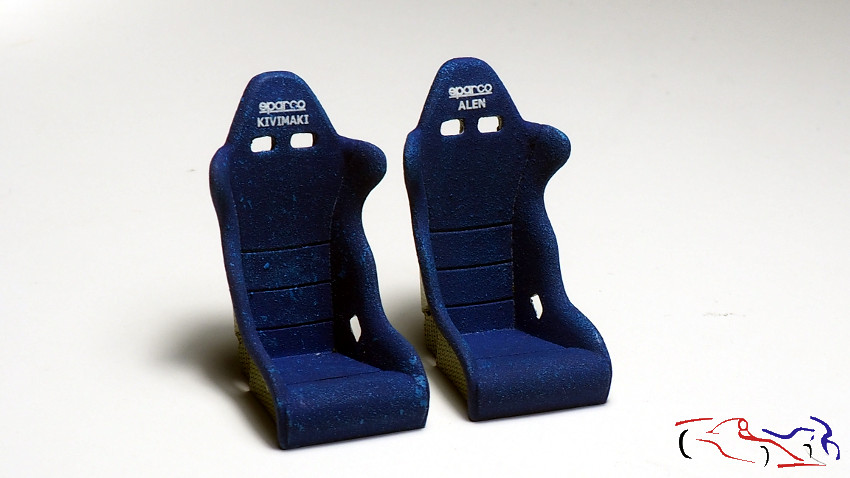 Y ahora, es el turno de los cinturones, usando el juego de ebillas que venian en el TK de HD. Con paciencia y pegando con ciano. Los pondré an los asientos cuando coloque éstos en el cockpit, puesto que van fijados con tornillos al cortafuegos trasero. And now, it is the turn of the belts, using the set of them that came in the HD TK, with patience and hitting with cyano. I will put them on the seats when I put them in the cockpit, since they are bolted to the rear firewall. 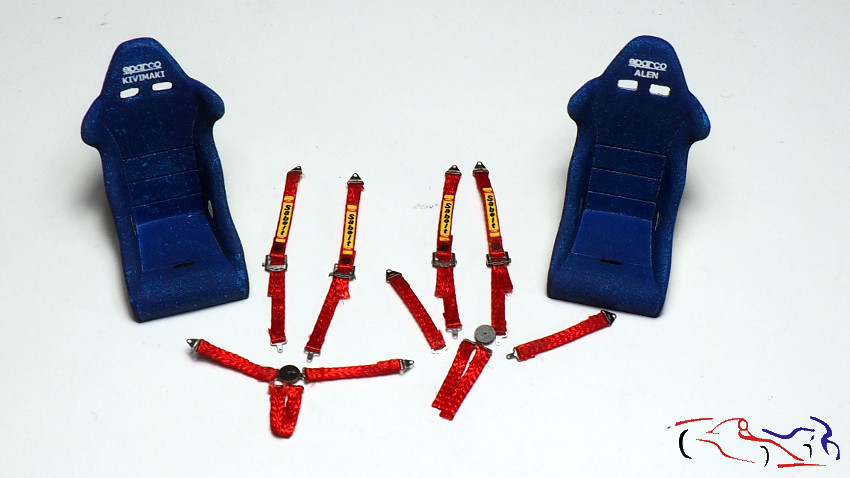 Pasamos a los discos de freno. Como los fotograbados estaban muy relucientes, los froté con una lija dando circulos, y después les di un lavado en negro mate diluido. También les puse los cables del freno realizados con estaño de 3mm. We move on to the brakes. Since the etchings were very shiny, I rubbed them in circles with sandpaper and then washed them in diluted matte black. I also put the brake cables made with 3mm tin. 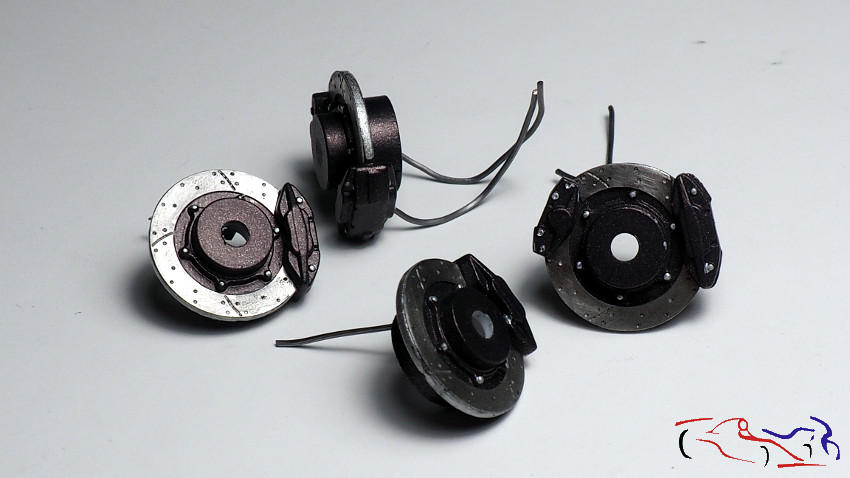 Siguiente paso son las ruedas, y como decidí ensuciar un poco el interior del coche, unas ruedas totalmente limpias no encajaban con el resto, aunque la carrocería irá limpia. Por tanto, primer paso era proteger las ruedas, y lo hice con el barniz mate de AMMO-MIG. Next step are the wheels, and since I decided to get the inside of the car a little dirty, some totally clean wheels didnt fit with the rest, although the bodywork will be clean. Therefore, the first step for doing it was to protect the wheels, and I did it with AMMO-MIG matt varnish. 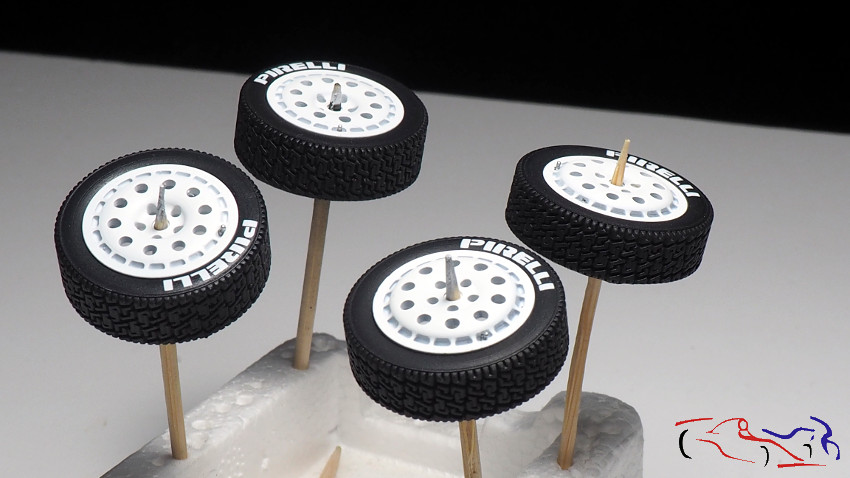 Para ensuciarlas, utilicé el producto Depósitos de polvo y suciedad de AK. Se aplica con pincel sin miedo, y una vez se ha aplicado, se pasa un trapo de tela limpio por la superfcie hasta que se elimina lo que tu deseas. De este modo, la rueda izquierda es la original limpia, la del medio con el producto aplicado, y la derecha, la rueda finalizada. To get them dirty, I used AKs Dust and dirt deposits product. It is applied with a brush without fear, and once it has been applied, a clean cloth is passed over the surface until you want is removed. Thus, the left wheel is the original clean one, the middle one with the product applied, and the right wheel is the finished wheel.  Aquí vemos las cuatro terminadas, y como se ve, el ensuciado es muy sutil, y suficiente para mostrar que las ruedas se han usado. Here we see all four finished, and as it looks, the fouling is very subtle, and enough to show that the wheels have been used. 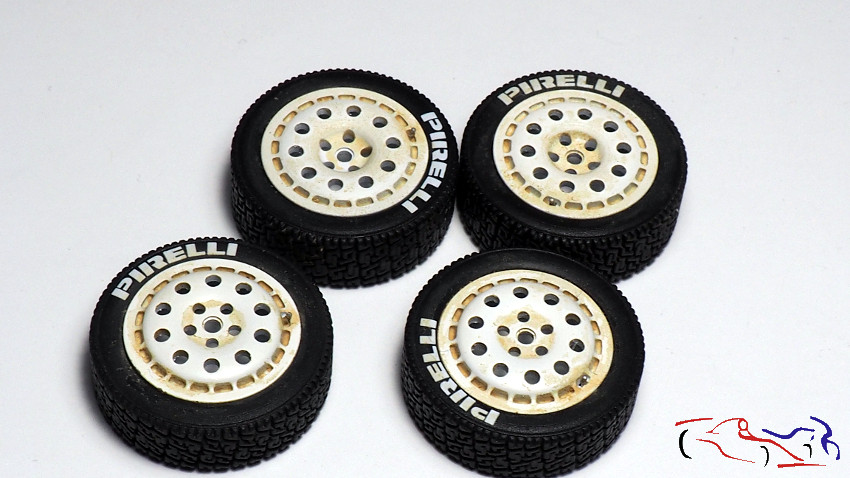 Ahora solo nos queda gastar el neumático, es decir gastar la calca de Pirelli. Para ello, con una plantilla que proteja la llanta, aplicamos negro mate XF1 diluido, sobre todo en el borde del neumático, siendo este el resultado. Ruedas listas para colocar!! Now we only have to wear the tire, i mean wear the Pirelli decal. To do this, with a template that protects the rim, we apply diluted XF1 matte black, especially on the edge of the tire, this being the result. Wheels ready to fit !! 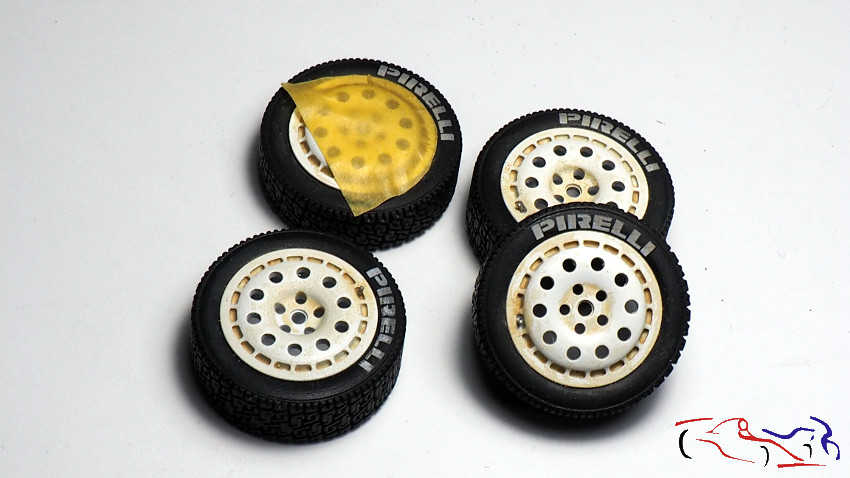 Más piezas. En este caso es un tubo de desagüe del depósito de aceite del lado izquierdo. Está hecho con tubo termotractil, con un alambre de estaño por dentro, y un alambre fino enrollado por fuera. Está imprimado y pintado con el color naranja de Gulf. Una vez seco, se va quitando al pintura del alambre exterior con una lija fina de grano 1000. Como se ve en la imagen, la parte izquierda de la pieza está sin lijar, y en la derecha ya se le ha eliminado la pintura. More pieces. In this case, it is a drain pipe from the oil tank on the left side. It is made of heat-bending tube, with a tin wire inside, and a fine wire wound on the outside. It is primed and painted in Gulf Orange. Once dry, the paint is removed from the outer wire with a fine sandpaper of 1000 grit. As you can see in the image, the left part of the piece is not sanded, and the paint has already been removed on the right. 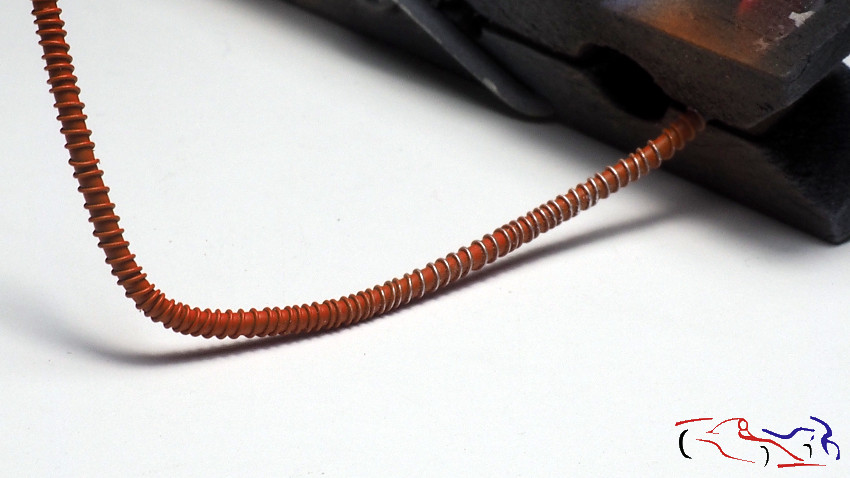 Y aquí lo vemos en su posición final. La parte inferior va tapada con la carrocería. And here we see it in its final position. The lower part is covered with the body. 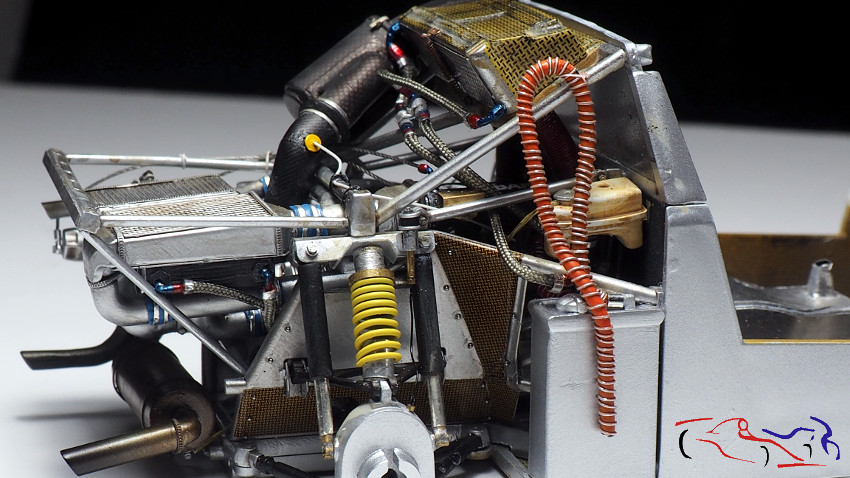 Y habéis visto alguna vez un coche de rally sin la luz del copiloto? Pues así la hacemos: alambre muy finito enrollado a una varilla de plástico And have you ever seen a rally car without the passenger light? Well, thats how we do it: very thin wire wound around a plastic rod 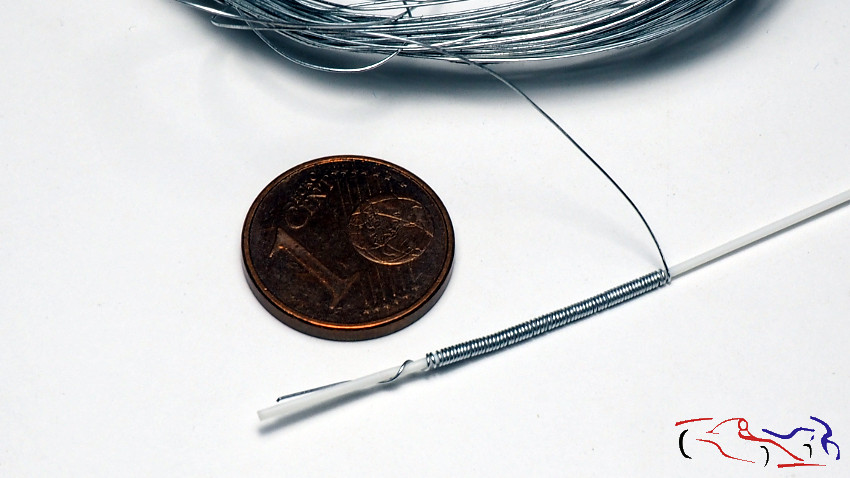 ..a la que ponemos un trozo cortado de tubo de aluminio. Debajo suyo, está la pieza que fijará la luz al arco de seguridad, tallada en plástico. A la derecha, las dos piezas que tienen en el cockpit para dejar los cascos cuando no los llevan puestos, con dos cascos a modo de ejemplo. Estas piezas las hice con el alambre que tienen algunos cables eléctricos dentro de la funda. ..to which we put a cut piece of aluminum tube. Below it is the piece that will fix the light to the safety arch, carved out of plastic. On the right, the two pieces they have in the cockpit to leave the helmets when they are not wearing them, with two helmets as an example. I made these pieces with the wire that some electrical cables have inside the sleeve. 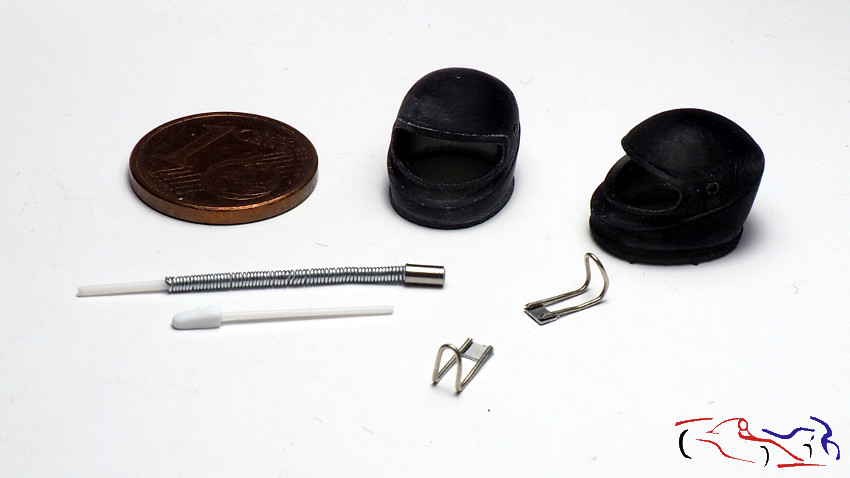 Lo siguiente, es un test para hacer las clavijas eléctricas de los coches. Se usan en los coches de rallyes para desconectar los cables que van por ejemplo a los portones, para que éstos se puedan retirar sin problema, o las conexiones d elos faros supletorios. Corté tiras de plástico, las corté y las fui pegando por partes como se ve en la foto. Al final, corto los que sobra y listo. Pero em parecieron muy grandes. Las siguientes pruebas serán con lámina de cobre, más fina!! The following is a test to make the electrical plugs of the cars. They are used in rally cars to disconnect the cables that go for example to the gates, so that they can be removed without problem, or the connections of the supplementary headlights. I cut plastic strips, I cut them and I was gluing them by parts as seen in the photo. At the end, I cut the leftovers and thats it. But they seemed very big to them. The following tests will be with copper foil, finer !! 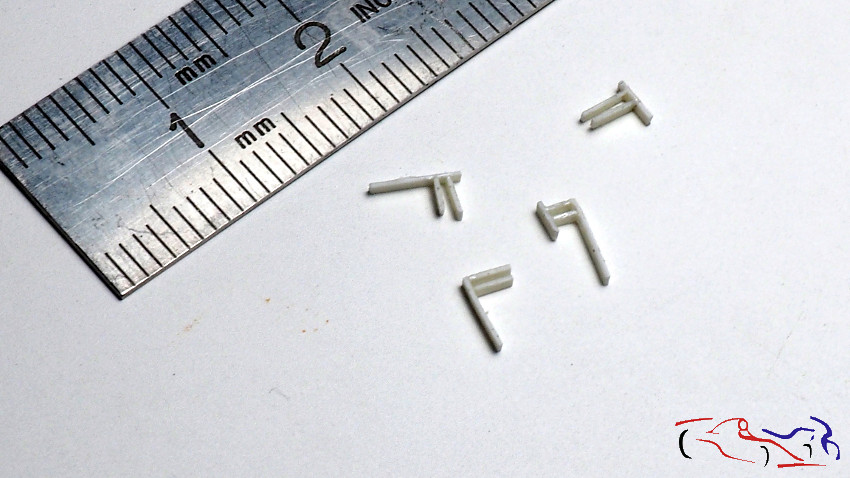 Pasamos al salpicadero. COmo véis, ya tiene los pedales de fotograbado del TK de HD, y el volante. También le puse unos cables al volante, de pelos de alambre y otros hechos de plástico estirado. We go to the dashboard. As you can see, it already has the HD TK photo-etched pedals, and the steering wheel. I also put some cables to the steering wheel, made of wire hair and others made of stretched plastic. 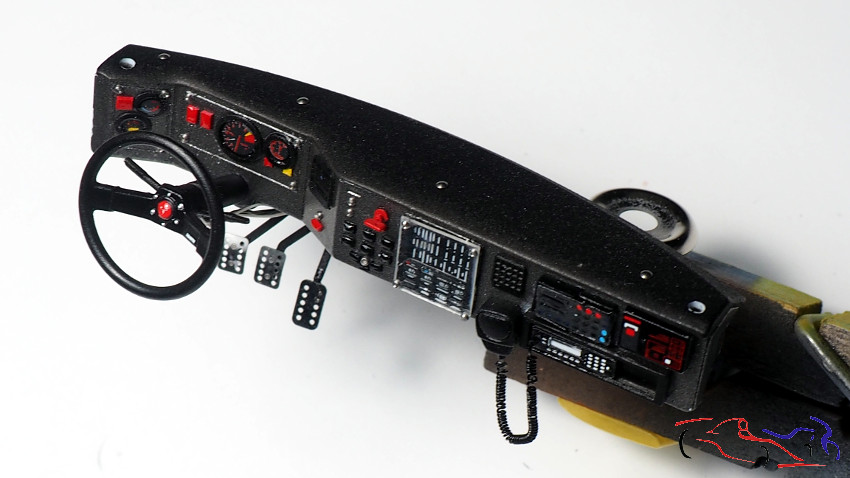 Tanto al centro del volantes como a los relojes, les apliqué resina trasparente que seca con luz UV. Both in the center of the steering wheels and the watches, I applied transparent resin that dries with UV light. 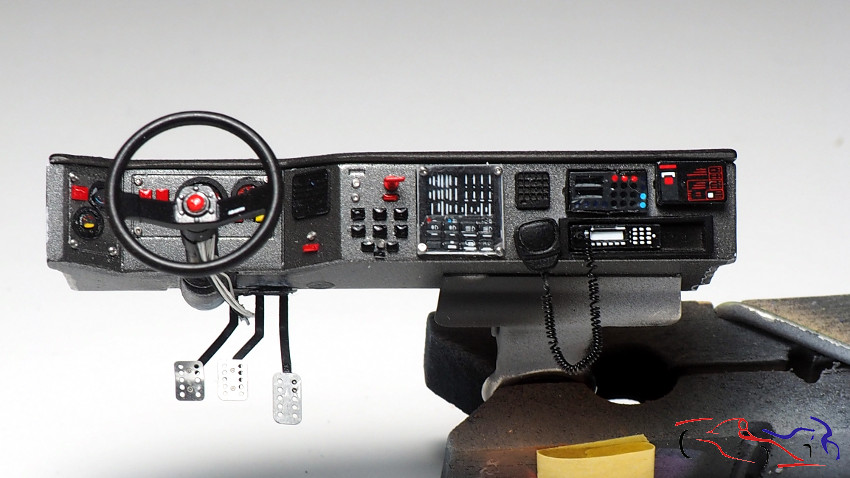 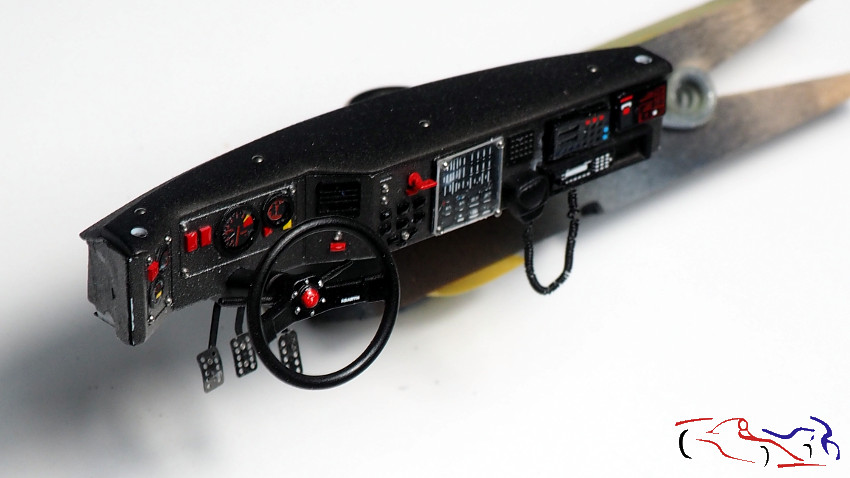 Otra pieza que hice es el disparador manual de los extintores. Este coche lo llevaba delante de la palanca de cambios. Lo hice con hojalata, dándole forma con unos alicates, y añadiendo algún tubo. Para el mecanismo, usé un alambre doblado, que en sus esquinas aplasté a modo de eje de giro. Another piece I made is the manual trigger for the fire extinguishers. This car had it in front of the gear stick. I did it with tin, shaping it with pliers, and adding some tube. For the mechanism, I used a bent wire, which I flattened at its corners as a turning axis. 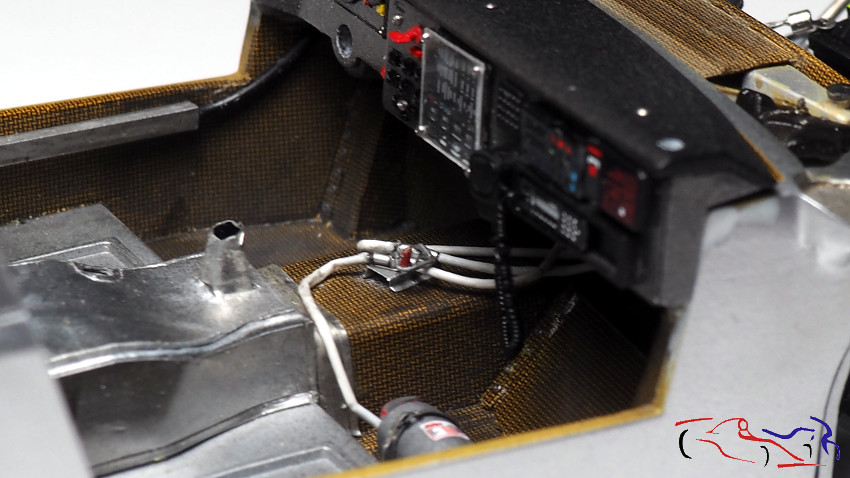 Pasamos al cortafuegos trasero. Esta parte lleva un protector tal y como le puse a la parte central por donde pasa la transmisión, y está explicado en el post nº 7 (VII) (click aquí para acceder). A modo de recordatorio, el material usado son las cápsulas de las botellas de vino. Este material lo pegamos con cola blanca a la pieza de plástico. We went to the rear firewall. This part has a protector as I put the central part through which the transmission passes, and it is explained in post nº 7 (VII) (click here to access). As a reminder, the material used is the capsules from the wine bottles. We glue this material with white glue to the plastic piece. 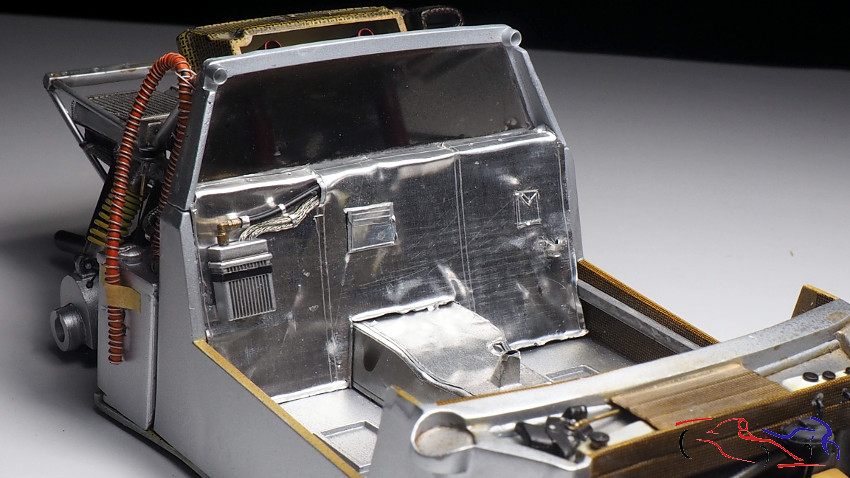 Otra pieza que se hizo en su momento y que he añadido es la que está situada detrás del asiento del copiloto, Realmente no se qué es pero lelva unos tubos por detrás de la protección. La colocamos con ciano: Another piece that was made at that time and that I have added is the one that is located behind the passenger seat, I really dont know what it is but it has some tubes behind the protection. We place it with cyano: 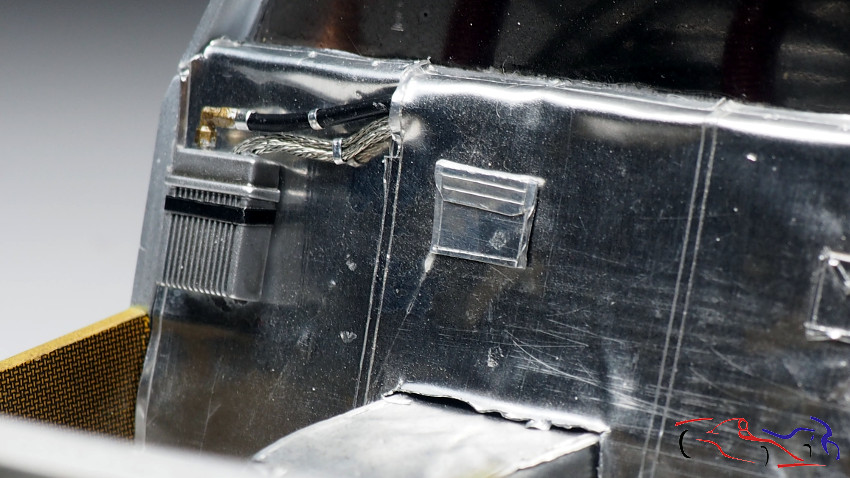 Y este es el resultado una vez pegados los asientos y sus cinturones. Estos van fijados detrás con dos tuercas y pegados al asiento con ciano. And this is the result once the seats and their belts are glued. These are fixed behind with two nuts and glued to the seat with cyano. 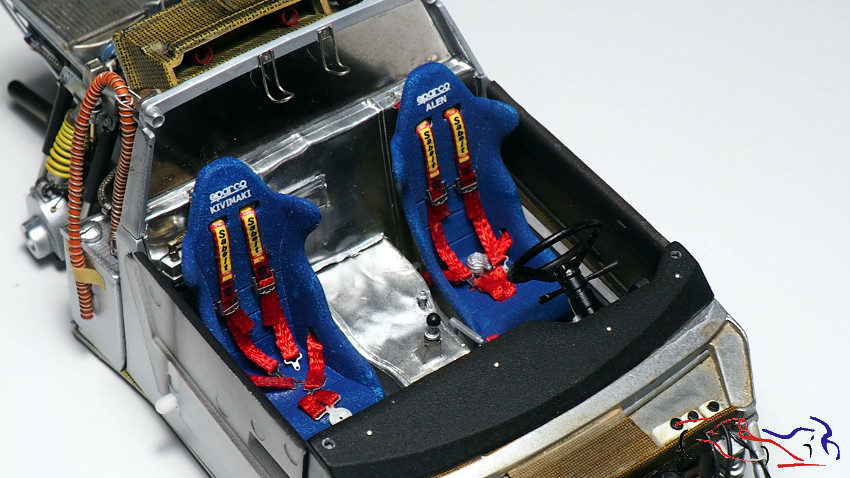 En las siguientes fotos, vemos los paneles de las puertas, una canalización por debajo de la puerta izquierda, el salpicadero, volante y sus conexiones, los pedales . In the following photos, we see the door panels, a channel under the left door, the dashboard, steering wheel and its connections, the pedals 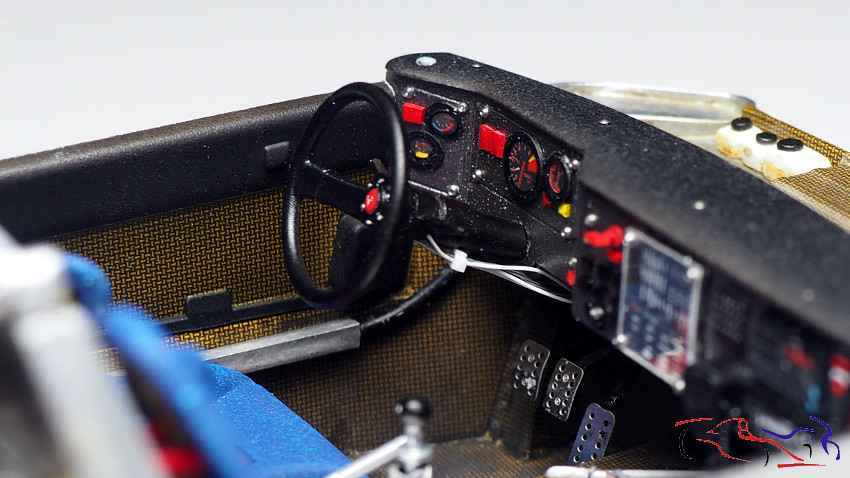 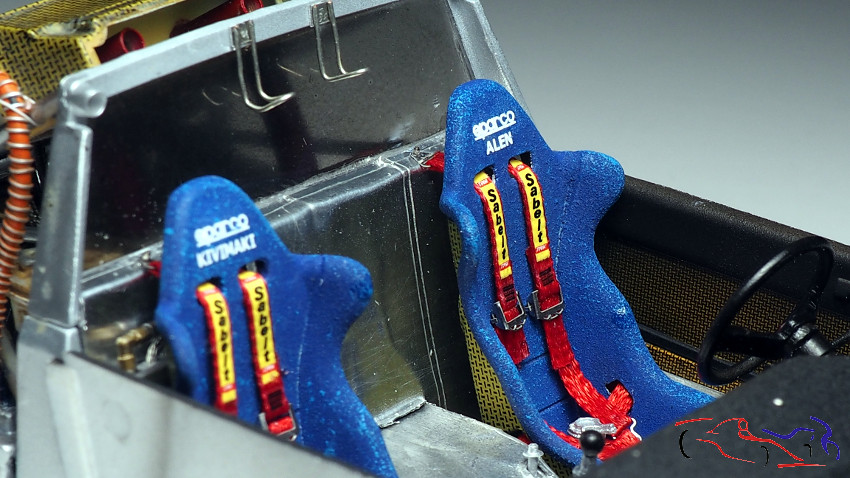 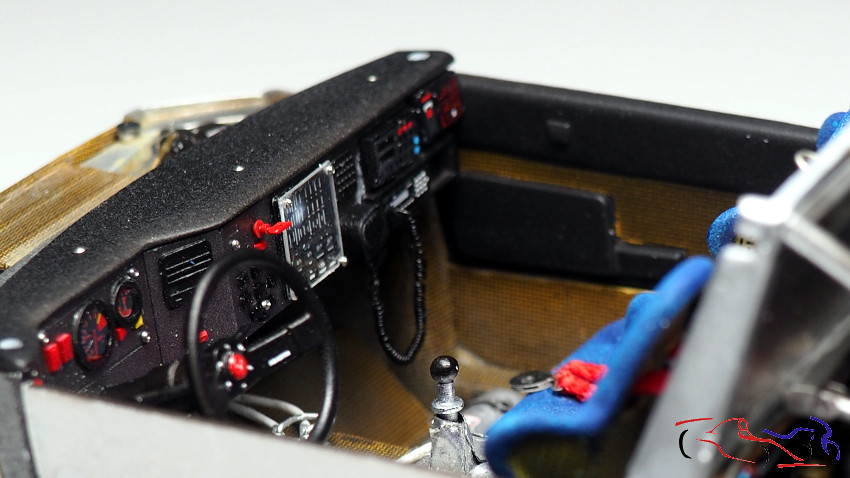 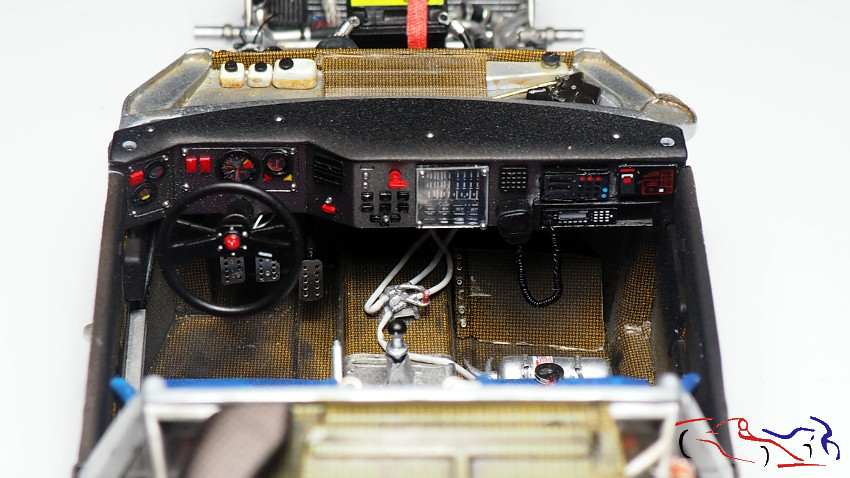 Para terminar, unas fotos del conjunto completo con las barras antivuelco y la luz del copiloto: Finally, some photos of the complete set with the roll bars and the passenger light: 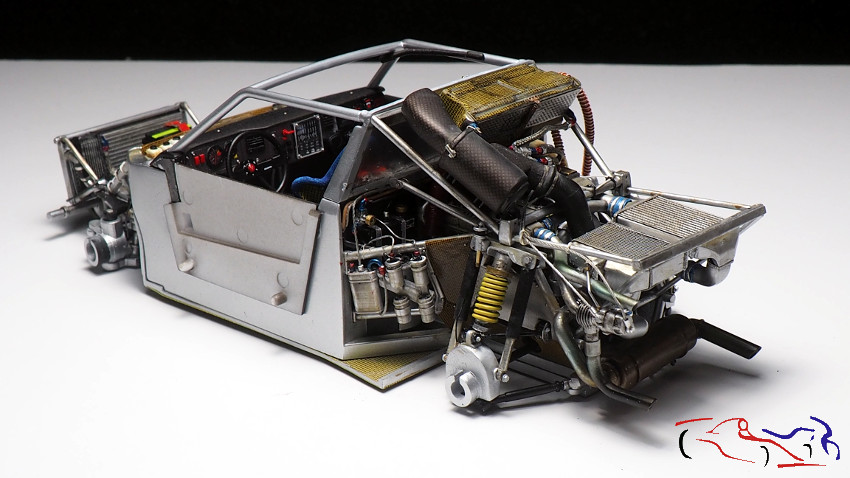 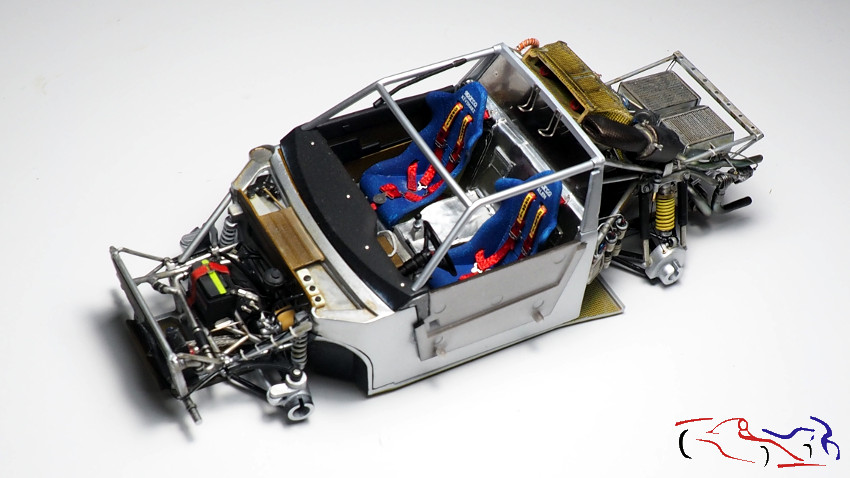 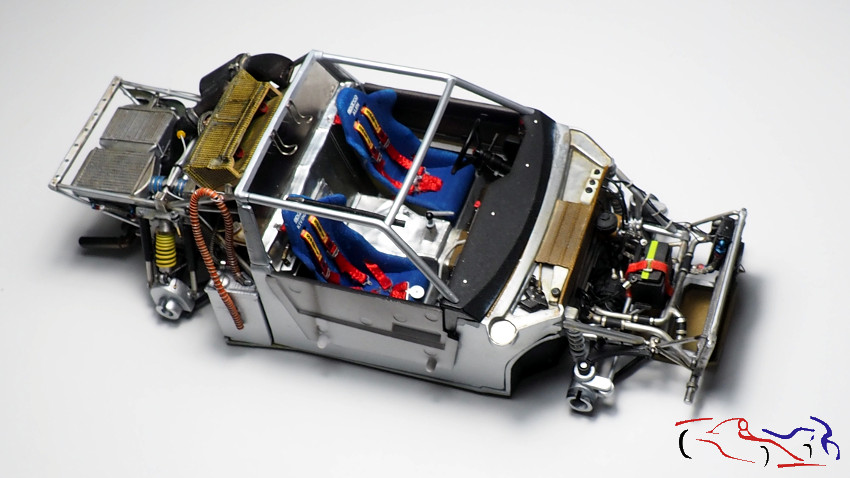 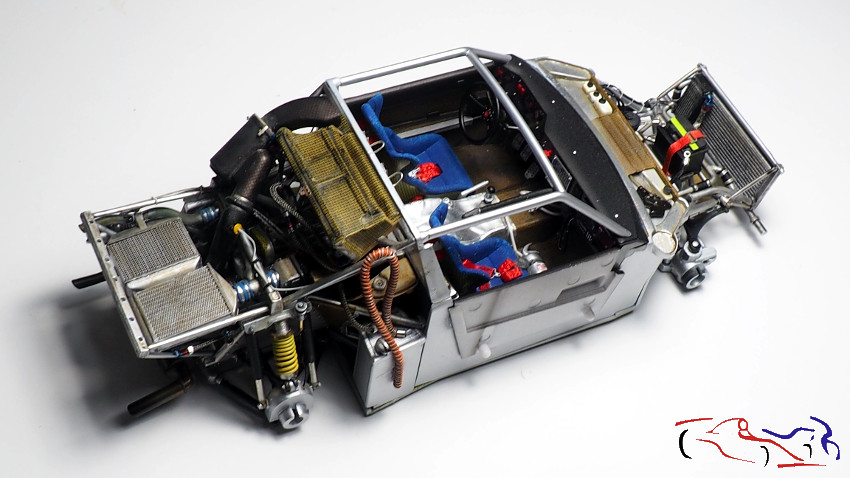 Solo faltan los conectores eléctricos del capó y del portón, para dejarlo terminado, pero ya nos volveremos a meter con la carrocería! Only the electrical connectors of the hood and the tailgate are missing, to finish it, but we will get back to the bodywork! Gracias por ver y comentar!! Thanks for viewing and commenting! 
|
|
#79
10-15-2020, 02:13 AM
|
||||
|
||||
|
Re: Lancia Delta S4 Marlboro Beemax 1/24
Quote:
|
|
#80
10-15-2020, 02:17 AM
|
||||
|
||||
|
Re: Lancia Delta S4 Marlboro Beemax 1/24
Quote:
|
|
#81
12-03-2020, 04:39 AM
|
||||
|
||||
|
Re: Lancia Delta S4 Marlboro Beemax 1/24
Dejamos el Ferrari GTC4 ya pintado, para continuar con la carrocería del Delta S4 y así poder lacar los dos a la vez. Para dicho cometido, preparamos las fijaciones de las tres partes que forman la carrocería. Primero, el capó delantero, que lleva una pieza que hace balancearlo sobre el eje inferior del radiador. Para fijarlo, ponemos la pieza sin pegar, y los situamos en el chasis. Una vez puesto, y sin moverlo, ponemos cianocrilato para que se pegue en el sitio exacto.
We leave the Ferrari GTC4 already painted, to continue with the bodywork of the Delta S4 and thus be able to lacquer both at the same time. For this purpose, we prepare the fixings of the three parts that make up the body. First, the front hood, which has a piece that balances it on the lower axis of the radiator. To fix it, we put the piece without gluing, and we place them on the chassis. Once put, and without moving it, we put cyanoacrylate so that it sticks in the exact place.  Seguimos con la parte del cockpit. Para fijarlo, tiene dos piezas por el interior de las puertas que encajan con el exterior de los paneles interiores. Pero aunque encajaban, la carrocería no llegaba a enrasarse con el chasis, por lo que rebajé ambas piezas We continue with the cockpit part. To fix it, it has two pieces on the inside of the doors that fit with the outside of the interior panels. But although they fit, the bodywork did not reach flush with the chassis, so I lowered both pieces  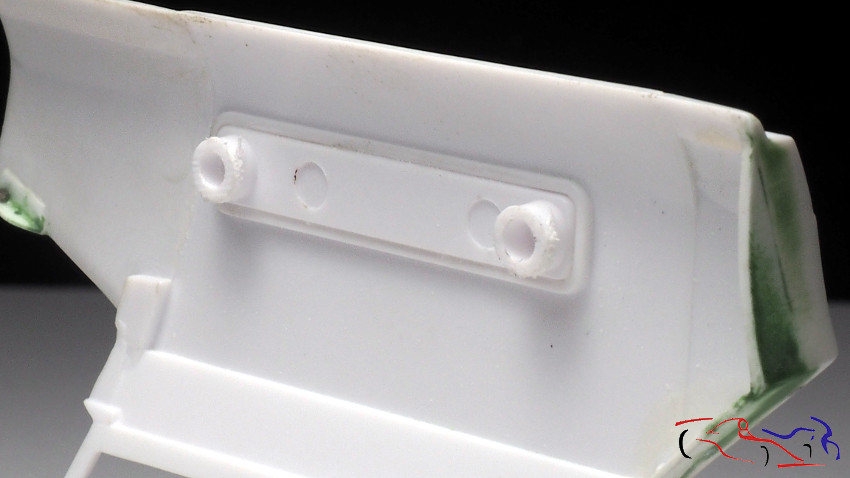 Y el resultado es el siguiente, aun sin pegar nada. He puesto también el aleron para que se vea el coche más acabado!! And the result is the following, even without glueing anything. I have also put the spoiler so that the car looks more finished !! 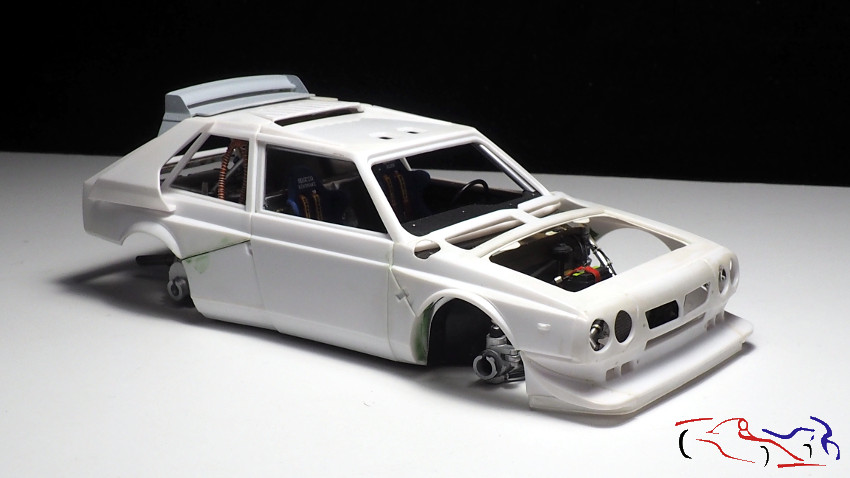 Y ahora, es el turno de las ruedas, que siempre pego con epoxy de dos componentes, porque da margen de maniobra, no es muy rápido, pero si es muy efectivo. Una vez pegadas, y aun sin secar, lo dejo en mi soporte creado para alinear las ruedas, usado antes en los F1, en 1/20 con en 1/43: And now, it is the turn of the wheels, which I always glue with two-component epoxy, because it gives room for maneuver, it is not very fast, but it is very effective. Once glued, and still without drying, I leave it on my support created to align the wheels, used before in F1 cars, in 1/20 and 1/43: 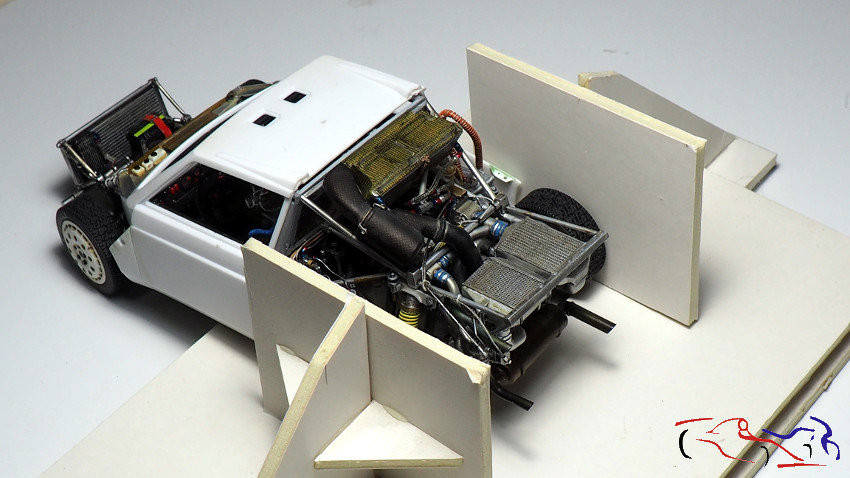 Y este es el resultado con la parte central de la carrocería sin pegar: And this is the result with the central part of the body without gluing: 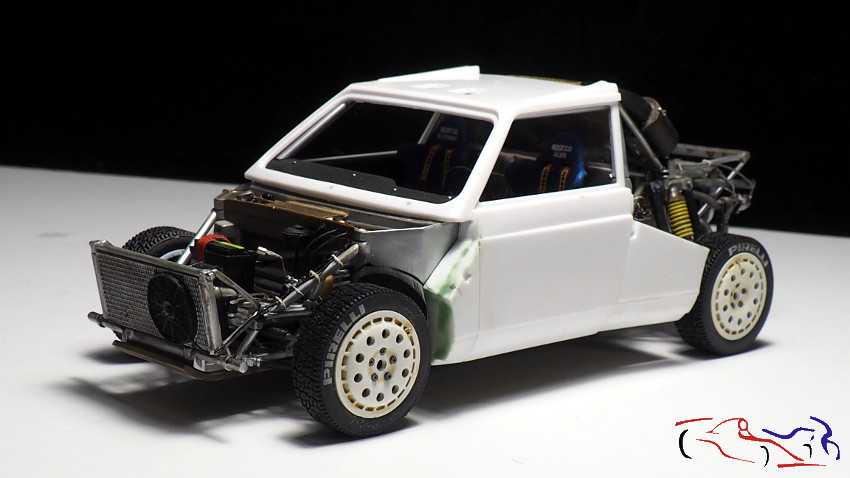 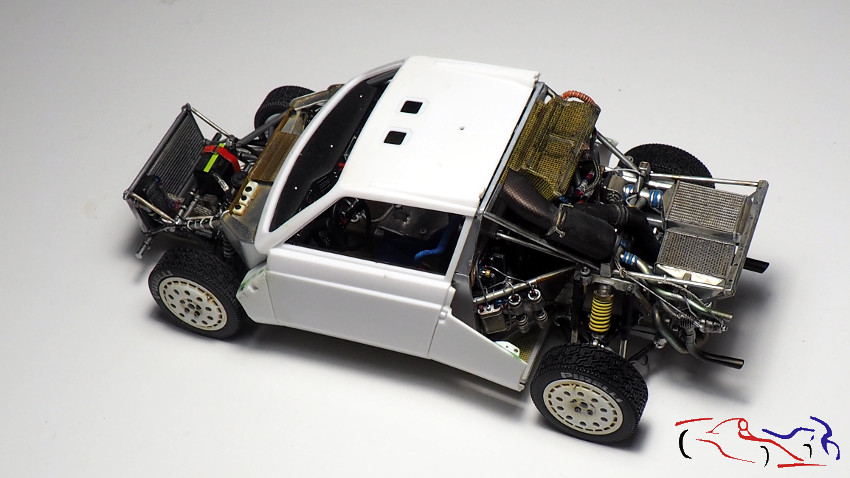 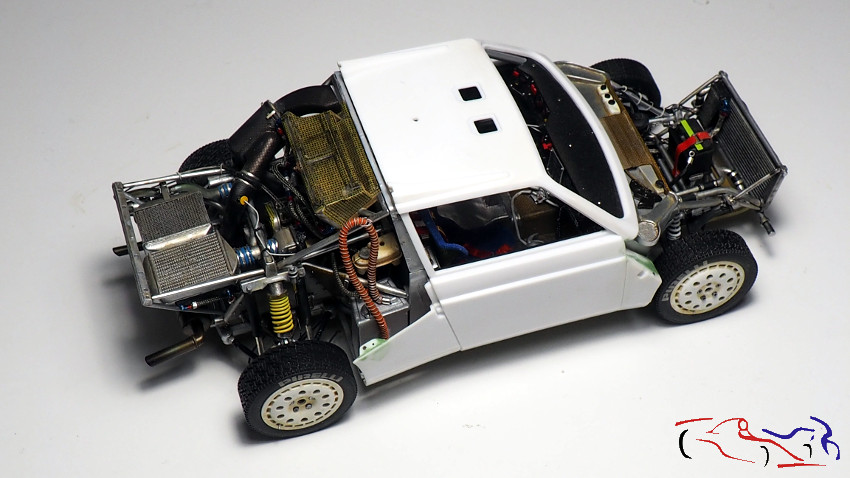  Unas piezas que al final no le voy a poner son los pasos de ruedas delanteros porque, si bien en prinicpio tenían un buen diámetro, el plástico de Actimel es muy malo para estas labores, y la parte horizontal, tenía un ángulo excesivo. Some parts that in the end I am not going to put on are the front wheel arches because, although they originally had a good diameter, Actimels plastic is very bad for these tasks, and the horizontal part had an excessive angle. 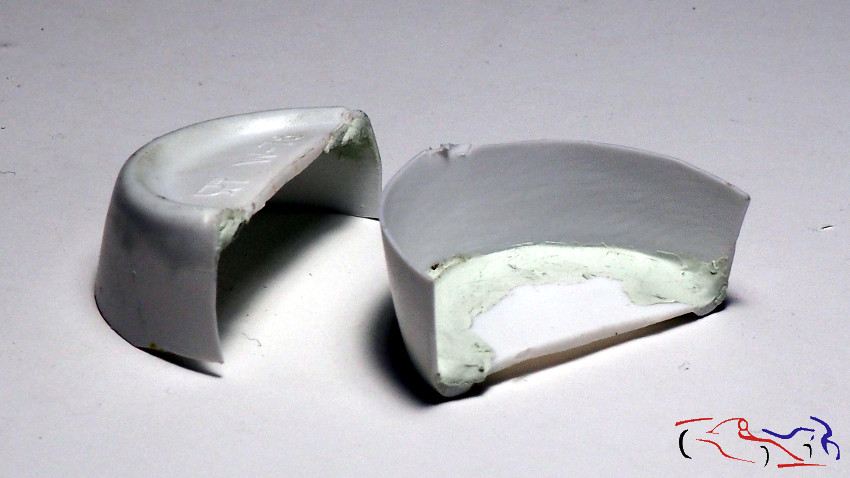 Otra pieza que me ha torturado: la trampilla del caó delantero. Como le adelgacé los bordes, las esquinas se quedaron muy frágiles y se me rompían, por lo que decidí ponerles unas bolas de masilla epoxy, para lijar cuando secase: Another piece that has tortured me: the front hood hatch. As I thinned the edges, the corners were very fragile and broke, so I decided to put some balls of epoxy putty on them, to sand when dry: 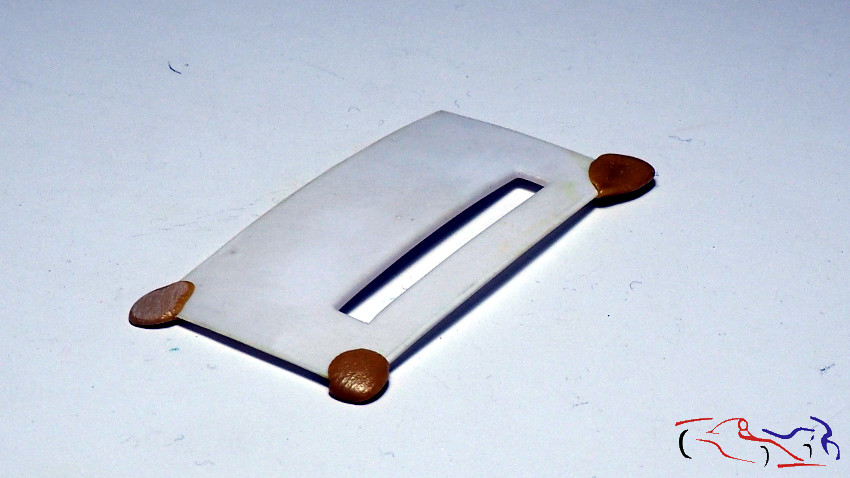 Pero además de la masilla epoxy, le puse ciano mezclado con polvos de talco, que puse en las esquinas con un palillo. Y eso es verdaderamente loq ue me solucionó porque quedó realmente duro. EL siguiente paso, era pegar la pequeña deriva que tiene esa trampilla para desviar el aire. Es un forograbado que pegué con pegamento epoxy, y presionando por los extremos con dos pinzas, dejándolo que se secara varios días. Aun así, se despegó por un lado que tuve que volver a pegar. But in addition to the epoxy putty, I put cyano mixed with talcum powder, which I put in the corners with a toothpick. And thats really what it solved it for me because it was really hard. The next step was to glue the small drift that this hatch has to divert the air. It is a picture engraving that I glued with epoxy glue, and pressing the ends with two tweezers, letting it dry for several days. Even so, it came off one side that I had to re-glue. 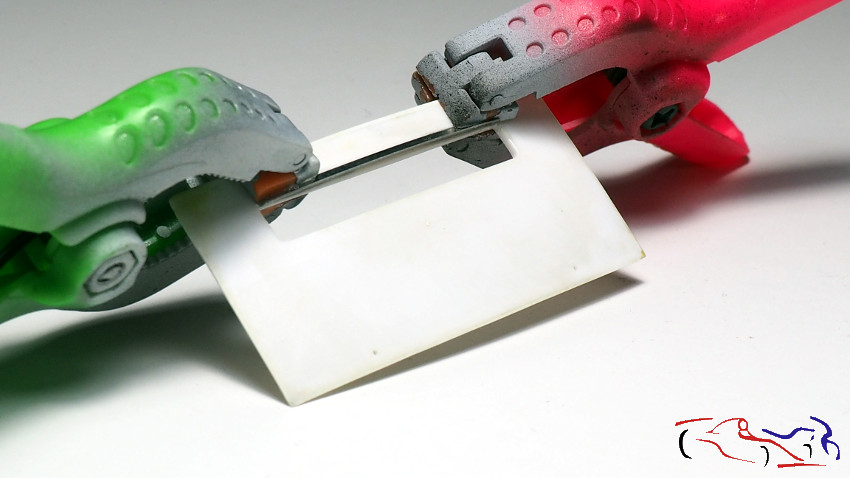 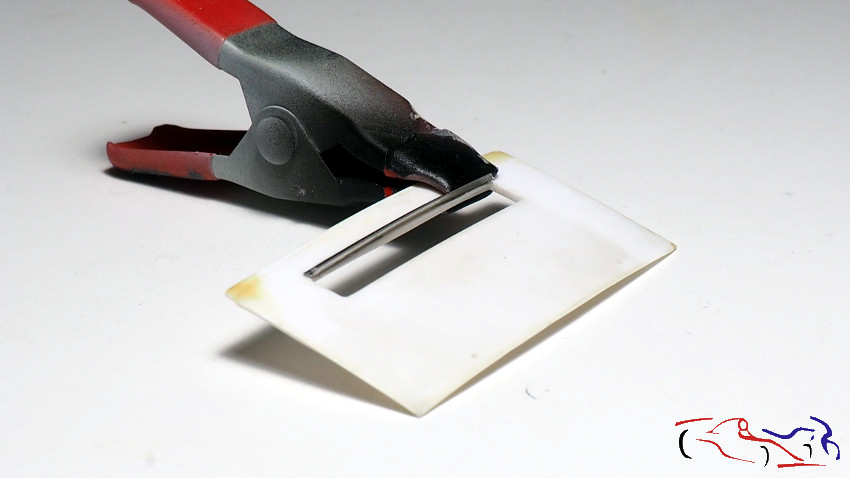 Más tareas realizadas: las conexiones eléctricas de las luces. Una vez eliminado el cromo de la parte de detrás de las luces (delanteras y traseras), lijándolo y dejando la parte del foco con el cromado de origen, corté unos trozos de Evergreen para pegar en la parte de detrás, la que va dentro de la carrocería, y donde irán los cables de las luces. Los trocitos son cúnicos en las luces traseras, como se ve en la siguiente foto, y cilíndricas en las delanteras: More tasks performed: the electrical connections of the lights. Once the chrome was removed from the back of the lights (front and rear), sanding it and leaving the part of the bulb with the original chrome, I cut some pieces of Evergreen to stick on the back, the one that goes inside the bodywork , and where the light wires will go. The bits are cone-shaped on the taillights, as you can see in the following photo, and cylindrical on the front ones: 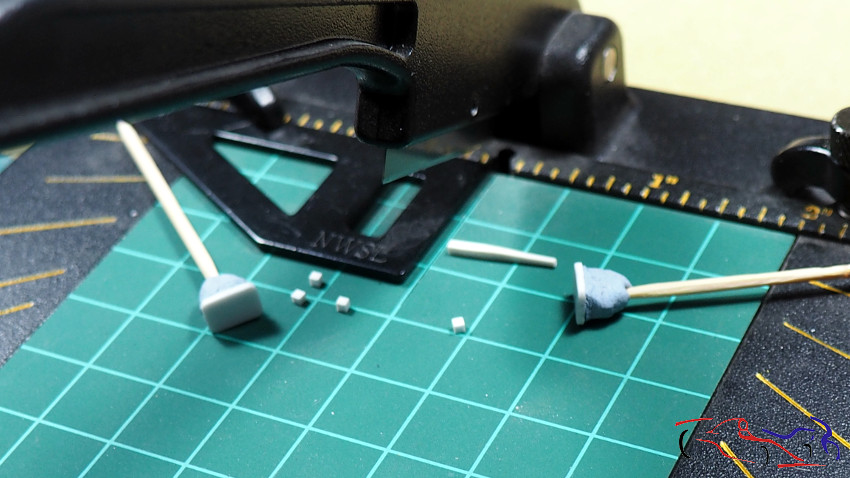 Y para pintarlas, necesitaba tapar el cromado, haciéndolo con cinta de enmascarar para las delanteras y blue tack para las tarseras: And to paint them, I needed to cover the chrome, doing it with masking tape for the front ones and blue tack for the rear ones: 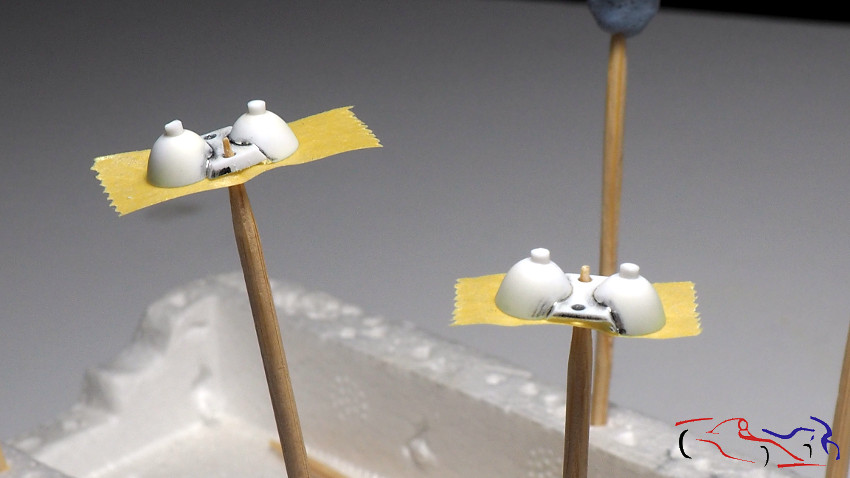 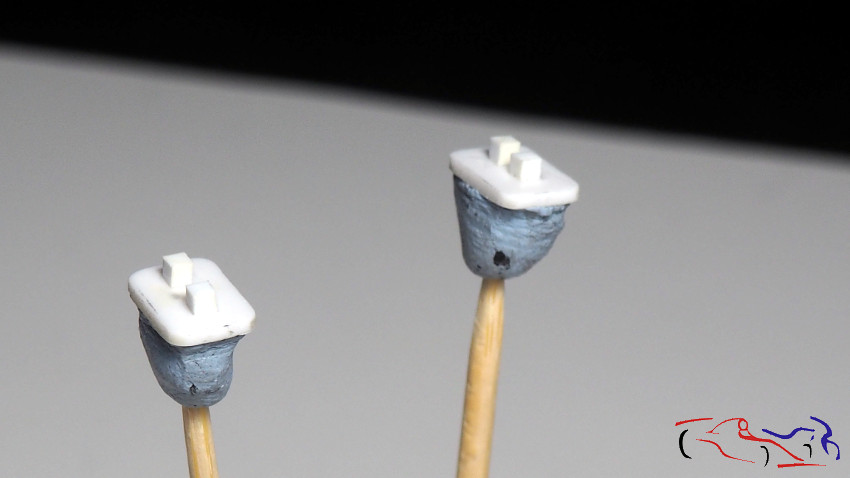 Aquí las vemos ya imprimadas con Gravity: Here we see them already primed with Gravity: 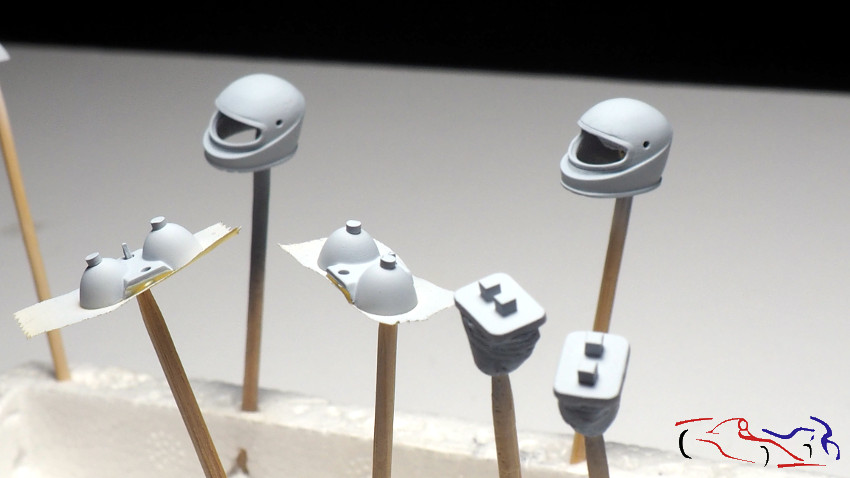 También preparamos las rejillas para su proceso de pintura, que irán en negro, blanco y rojo Marlboro: We also prepare the grilles for your painting process, which will go in black, white and Marlboro red: 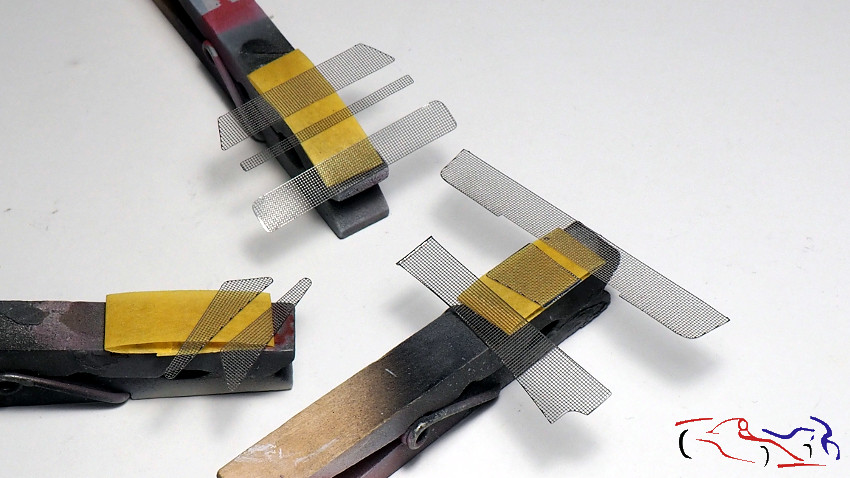 Y las imprimamos!! And we prime them!! 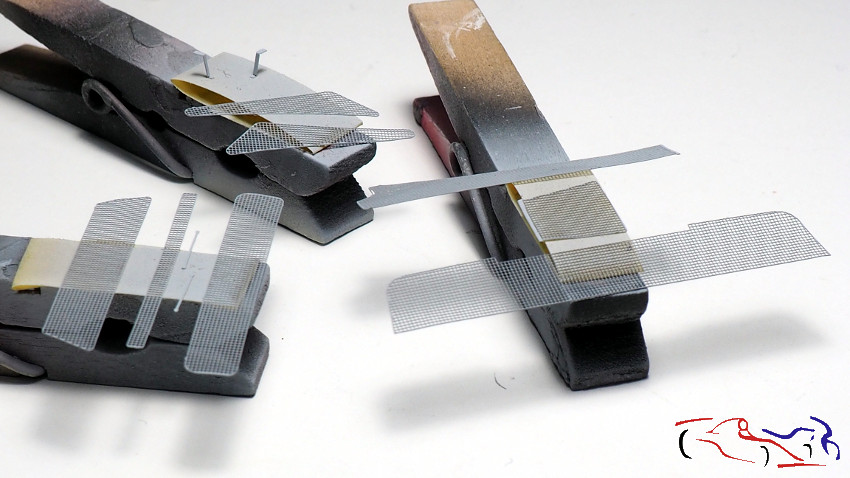 Aquí vemos el resultado de lo pintado en negro satinado X-18: los focos y las rejillas. Las dos piezas pequeñas son los dos tiradores que tienen las trampillas del techo, por donde entra aire al cockpit. Here we see the result of the X-18 satin black paint: the spotlights and the grilles. The two small pieces are the two handles that have the roof hatches, through which air enters the cockpit. 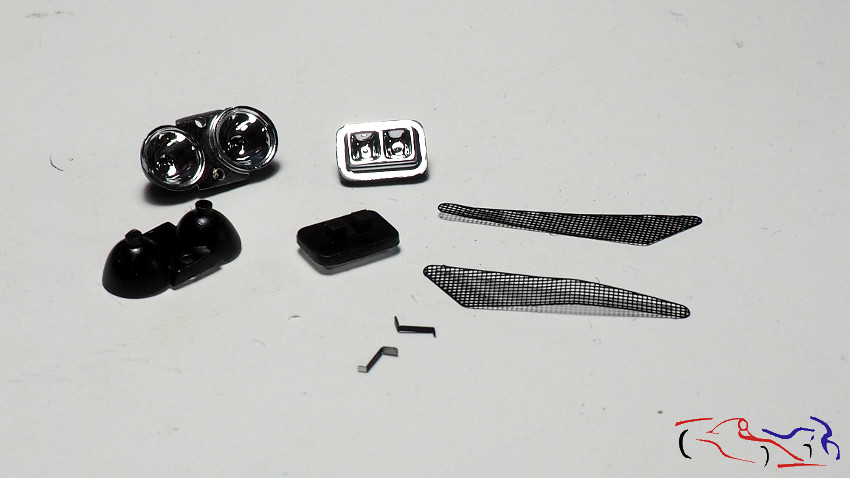 Más piezas. Estos son los 6 cierres de los portones que tiene la carrocería. Van pintados en rojo, pero solo la ebilla. El resto del fotograbado, es decir, el cable y el pasador, los tuve que enmascarar porque esos no se pintan en rojo. Aquí tienen la imprimación Gravity. Más adelante los pintaré de blanco y después de rojo, como la carrocería, y algunas rejillas. More pieces. These are the 6 closures of the doors that the body has. They are painted red, but only the buckle. I had to mask the rest of the gravure, that are the cable and the pin, because those are not painted in red. Here are with the Gravity primer. Later I will paint them white and then red, like the bodywork, and some grilles. 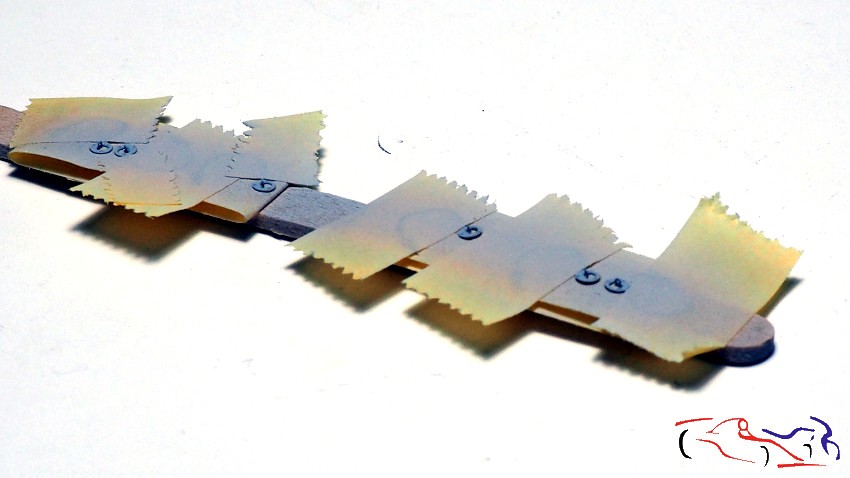 Las tomas de aire laterales y traseras. Imprimadas también con Gravity. The side and rear air intakes. Also primed with Gravity. 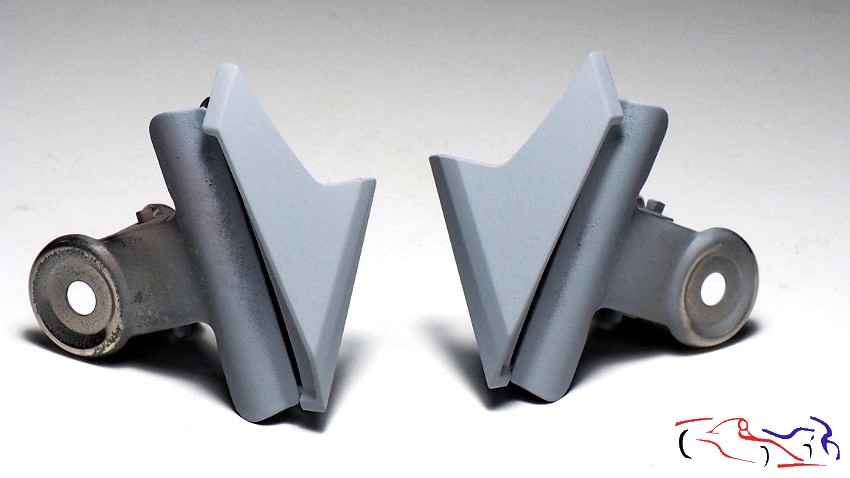 Y como no, ya están imprimados los interiores de la carroceria And of course, the interiors of the body are already primed 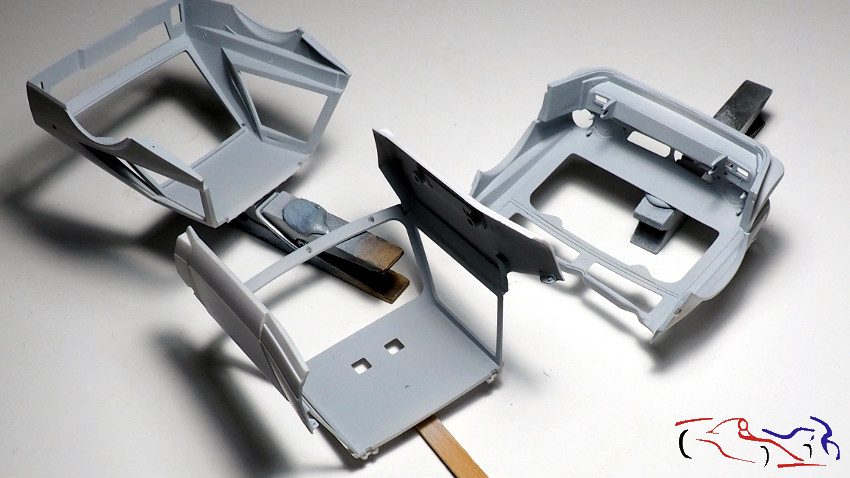 y el exterior: and the exterior: 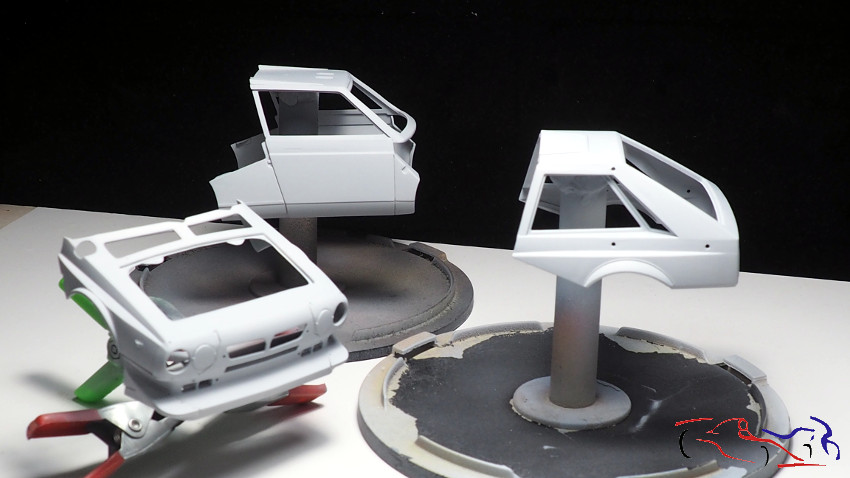 Para finalizar, los cristales ya pintados con negro semimate X-18 de Tamiya. Finally, the crystals already painted with Tamiya X-18 semi-matt black. 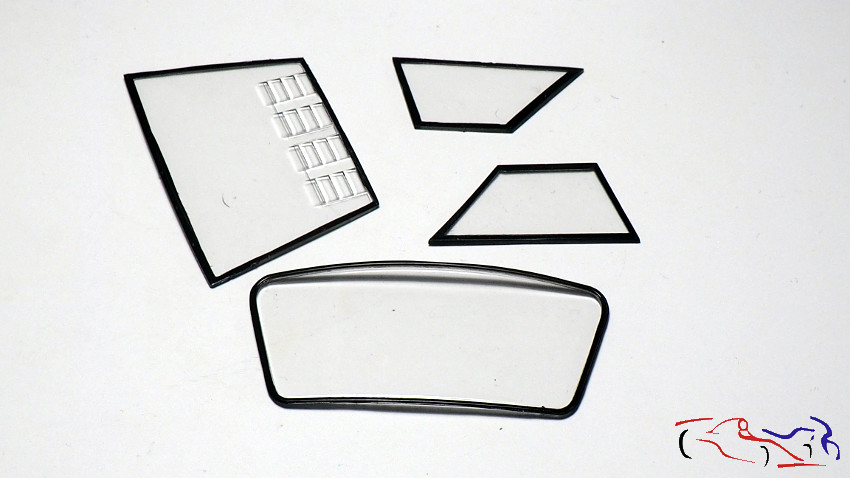 El siguiente post tendrá un poco de color!! Gracias por ver y comentar. The next post will have a bit of color !! Thanks for viewing and commenting.
|
|
#83
12-03-2020, 10:50 AM
|
||||
|
||||
|
Re: Lancia Delta S4 Marlboro Beemax 1/24
Quote:
|
|
#85
12-04-2020, 07:04 AM
|
||||
|
||||
|
Re: Lancia Delta S4 Marlboro Beemax 1/24
Quote:
|
|
#86
12-10-2020, 10:48 AM
|
||||
|
||||
|
Re: Lancia Delta S4 Marlboro Beemax 1/24
Continuamos con el Lancia Delta S4, en un punto que ya estaba queriendo llegar: la pintura de la carrocería! Y analizando el proceso, tenía que tener en cuenta que el interior también va pintado por lo que cual tendría que pintar antes? Que ocurre si pinto la carrocería exterior y después sale algo mal al pintar el interior? Que es preferible arreglar: el interior o el exterior? Cláramente, si tengo algo que arreglar, que sea en el interior, por lo que empiezo por ahí, y termino con el exterior.
We continue with the Lancia Delta S4, at a point that was already wanting to reach: the paint of the body! And analyzing the process, I had to take into account that the interior is also painted so which one would I have to paint first? What happens if I paint the exterior bodywork and then something goes wrong when painting the interior? Which is preferable to fix: the interior or the exterior? Clearly, if I have something to fix, let it be inside, so I start inside, and I will end with the outside. Empezamos por la trampilla que hay en el capo delantero, que va en color kevlar con sus nervios en negro. La siguiente secuencia de fotos, muestro su proceso: Una vez enmascarada la imprimación de la parte exterior, decido pintar todo de negro semimate de Zero.. A continuación, enmascaro los nervios con IZU de 1,5mm. Pintamos todo con color Kevlar de Zero Paint. Retiramos la máscara y sombreamos con el mismo negro semimate de Zero: We start with the hatch on the front bonnet, which is Kevlar with black nerves inside. I show you this process in the following sequence of photos: Once the primer on the outside is masked, I decide to paint everything in Zeros semi-matt black. Next, I mask the nerves with 1.5mm IZU. We paint everything with Kevlar color from Zero Paint. We remove the mask and shade with the same semi-matte black as Zero: 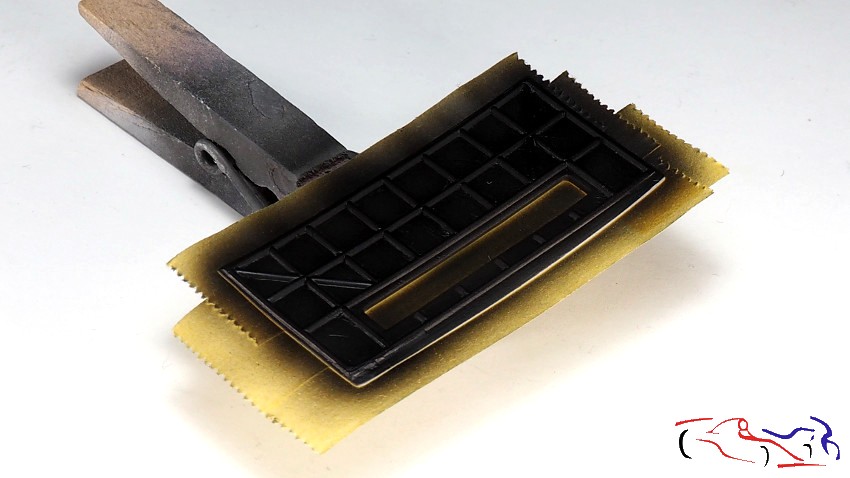 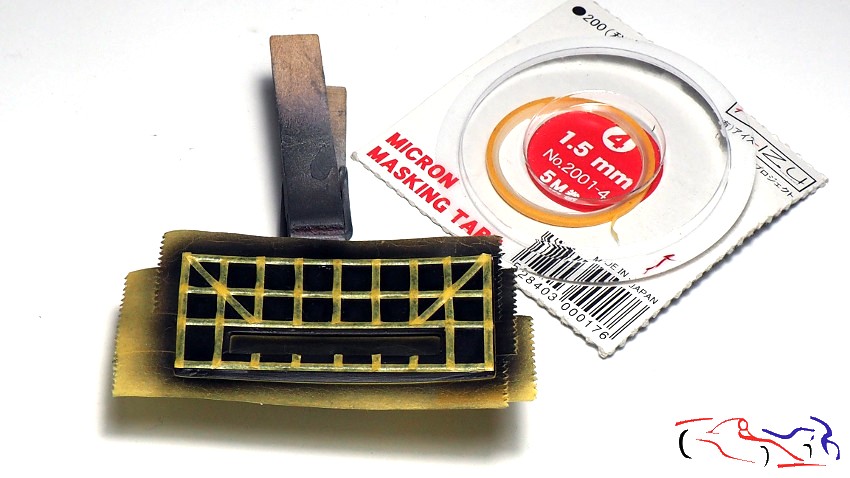 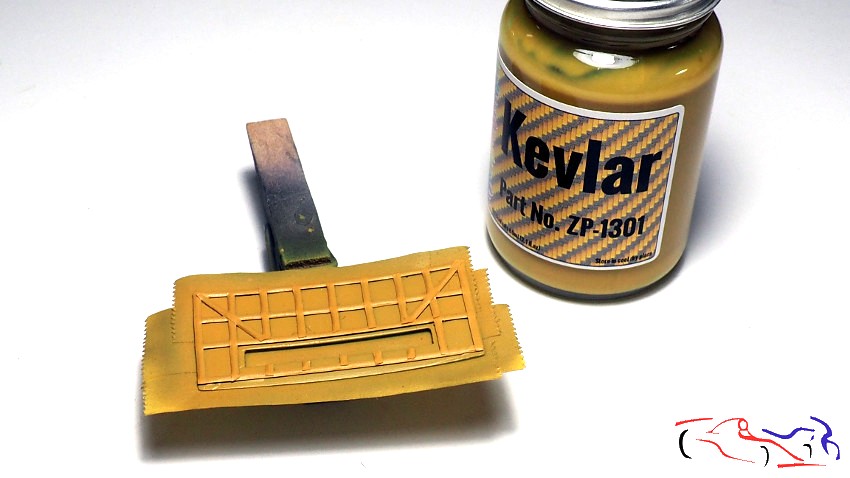 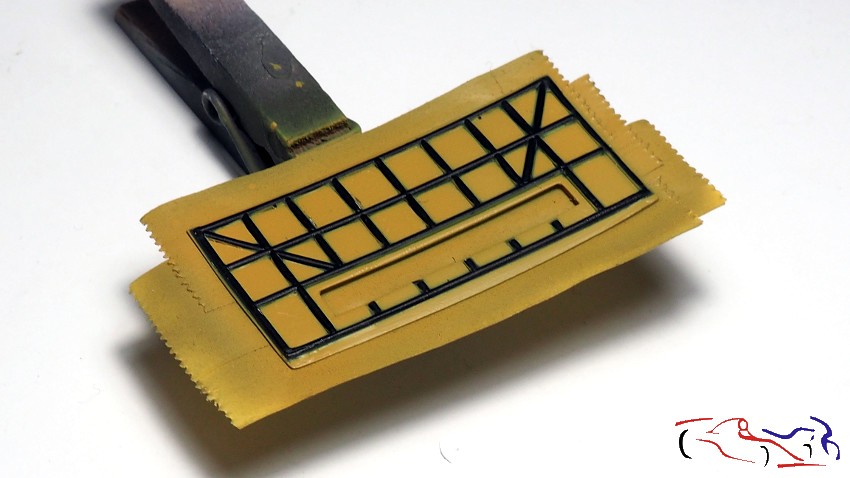 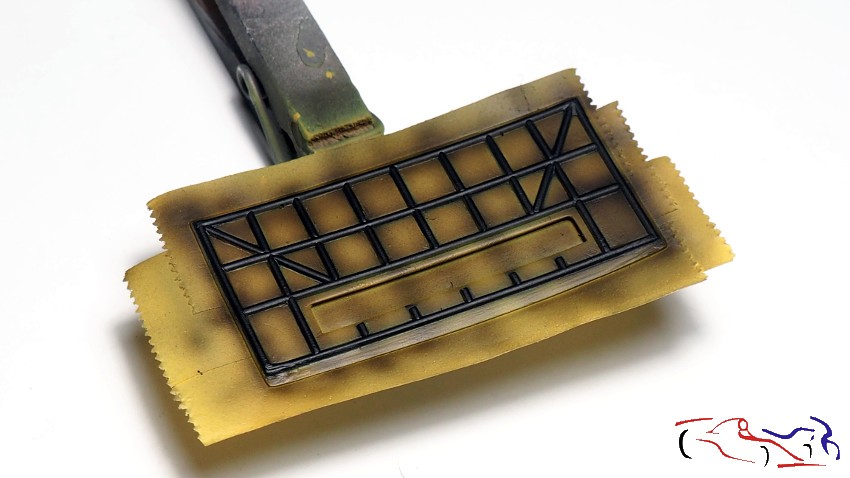 En el resto de la carrocería, hacemos solo los pasos finales, es decir, pintamos en Kevlar y sombreamos con el negro semimate de Zero, siempre muy flojo para ir cubriendo poco a poco, incidieendo el las aristas y dejando sin aplicar en el centro de los paneles: In the rest of the bodywork, we only do the two previous final steps, I mean, we paint in Kevlar first and shade with Zeros semi-matte black, always very loose to cover little by little, affecting the edges and leaving the center of the panels: 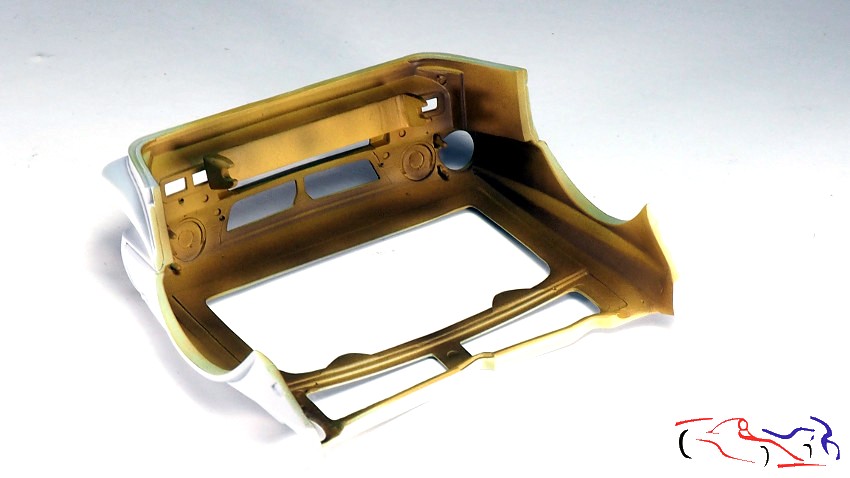  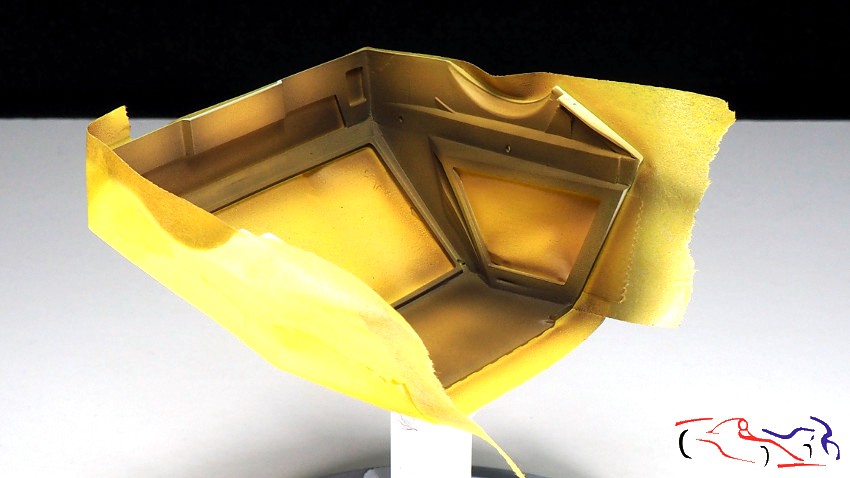 Una vez seco el interior, lo enmascaramos para pintar el exterior: Once the interior is dry, we mask it to paint the exterior: 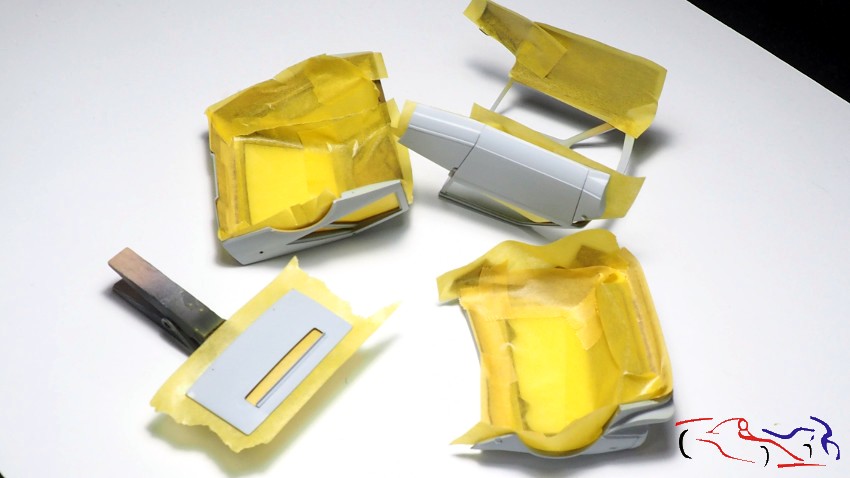 Y aquí está, con 3 manos de blanco brillante de Zero Paints: And here it is, with 3 shiny white coats from Zero Paints: 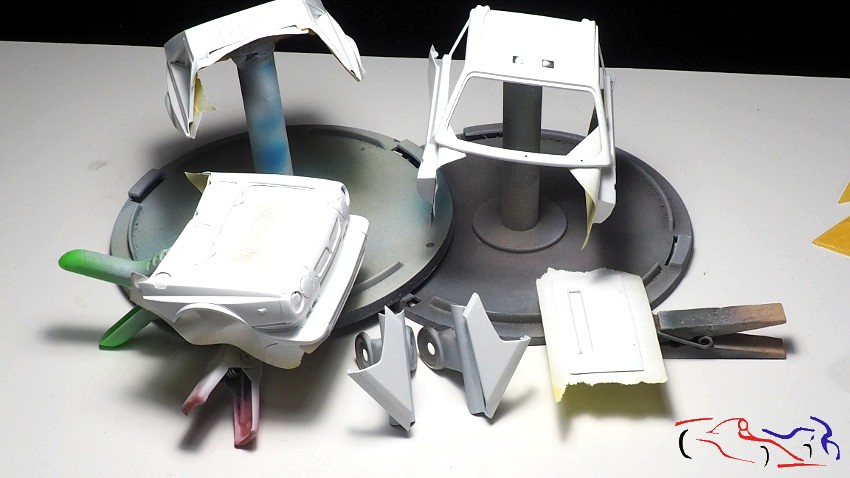 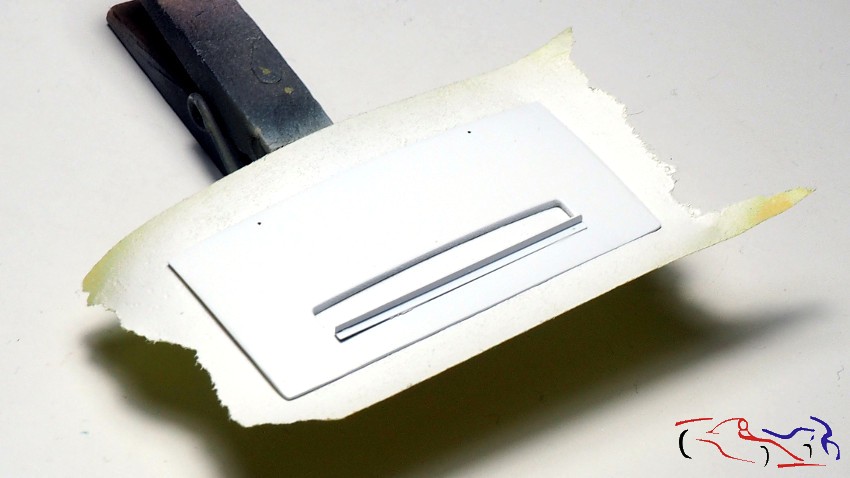 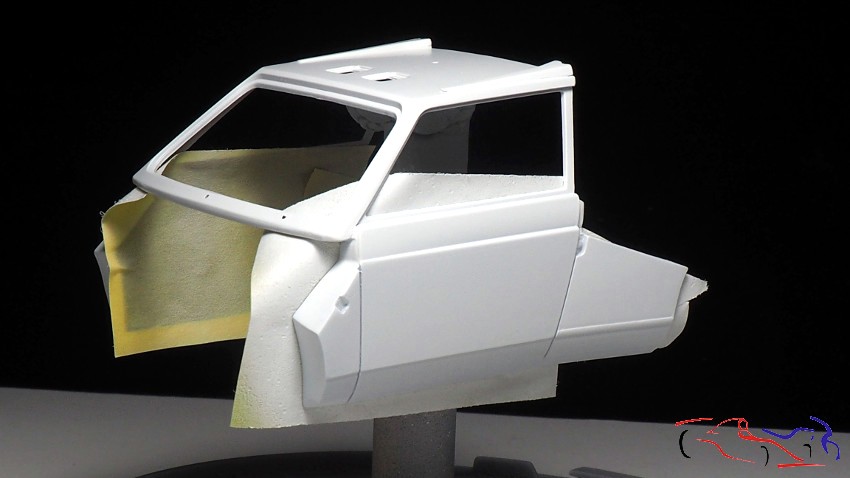 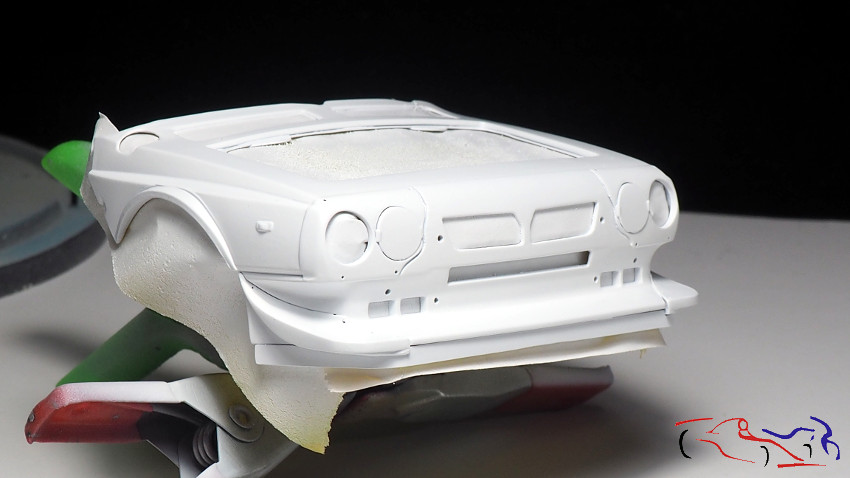 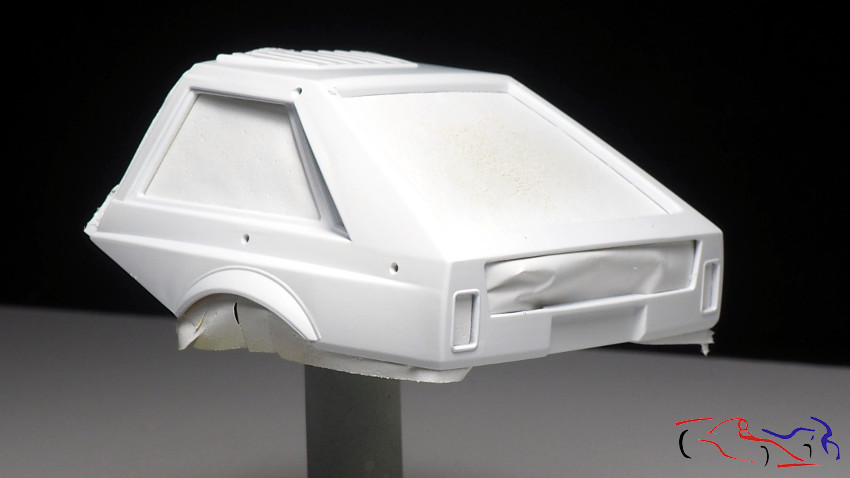 Y después del blanco, viene el enmascarado para el rojo Marlboro. Aquí tardé cerca de 3 horas porque las lineas atravesaban partes de la carrocería que se separaban y había que mantenerlas rectas. Un ejemplo, es la marca enmascarada del alerón trasero que irá de blanco, siendo el resto rojo: And after the white, it comes the masked for the Marlboro red. Here it took me about 3 hours because the lines were going through parts of the body that were separated and they had to be kept straight. An example is the masked mark on the rear wing that will be white, being the rest red:  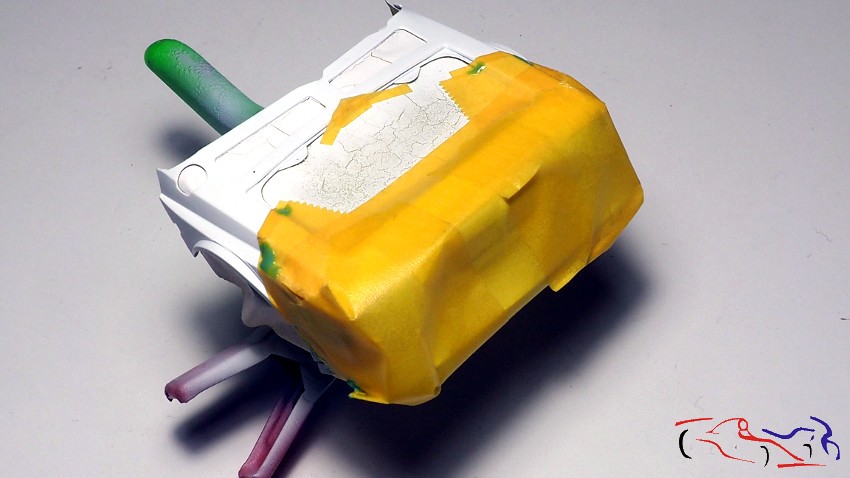 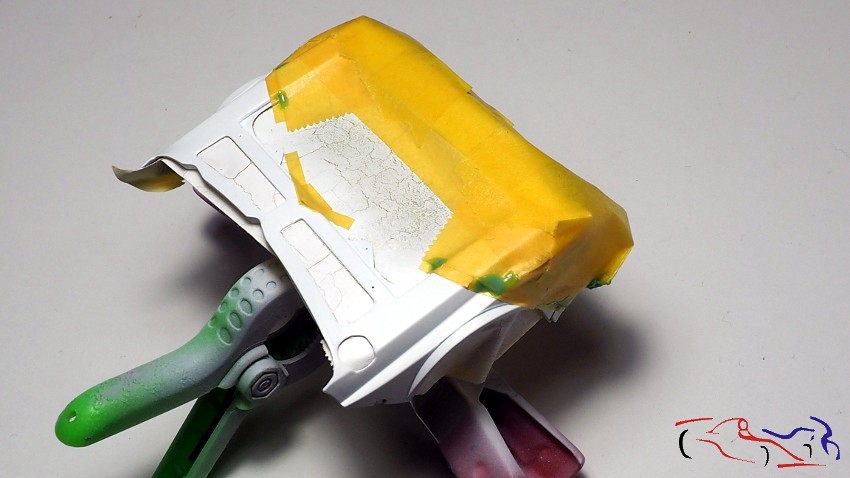 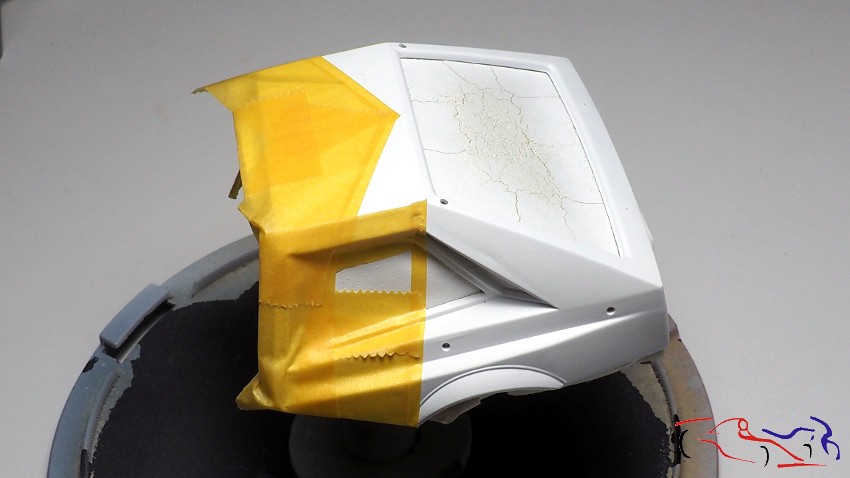 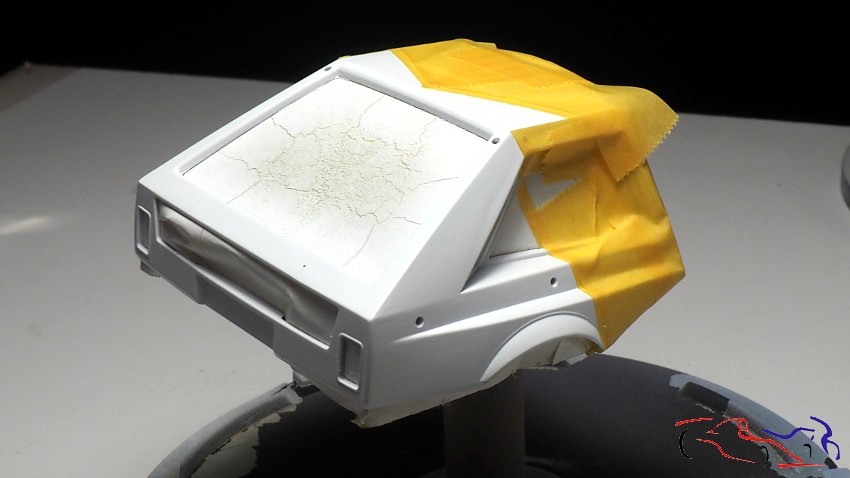 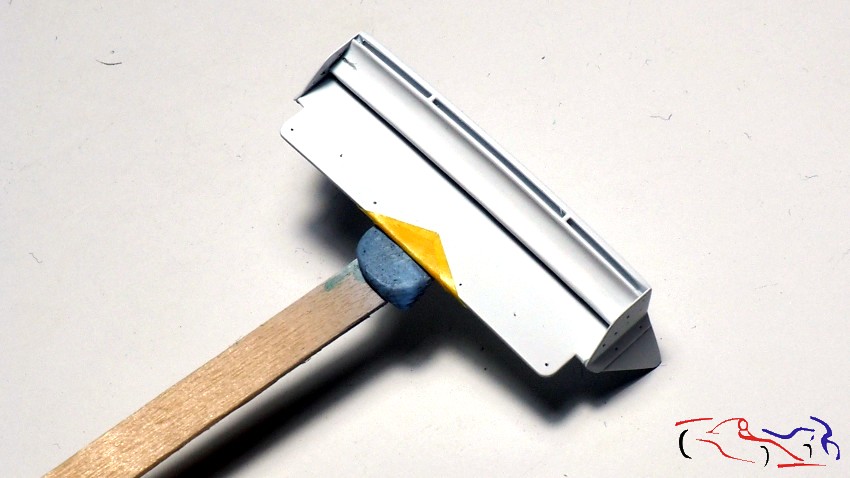 Solo deciros, que en esta pieza, en vez de enmascarar con cinta, le puse líquido para enmascarar Vallejo por su forma tan complicada: Just tell you that in this piece, instead of masking with tape, I put liquid to mask Vallejo because of its complicated shape: 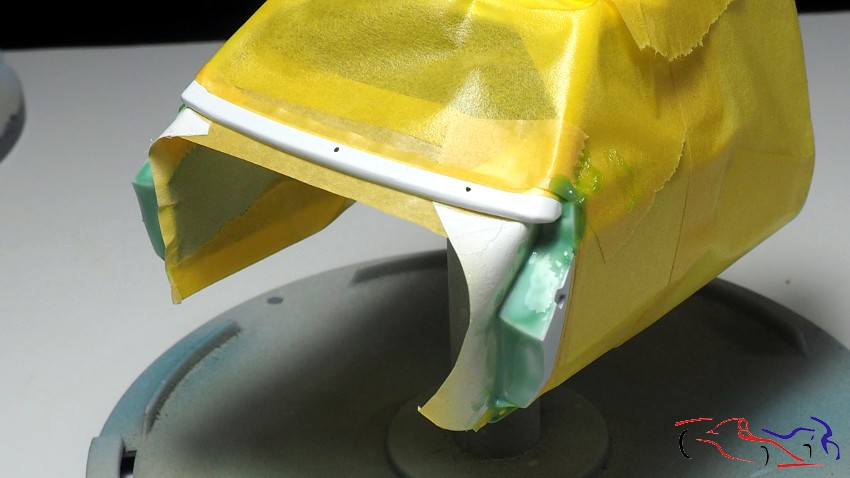 Y vamos a por la pintura. Ya está todo enmascarado y con ganas de usar el Rojo Marlboro de Gravity-Spain. Les he dado a todas las piezas 3 manos de pintura, desde una primera capa muy ligera hasta la tercera en que cubría ya todo. Entre cada mano, he dejado esperar el tiempo en que pintaba el resto de las piezas, entre 5 y 10 minutos. Y la variación entre capas, la podéis ver en esta secuencia, realizada en las tomas de aire laterales: And lets go for the paint. Everything is already masked and wanting to use the Marlboro Red from Gravity-Spain. I have given 3 coats of paint to all the pieces, from a very light first coat to the third one in which it was already covered everything. Between each coat, I have allowed the time in which I painted the rest of the pieces to wait, between 5 and 10 minutes. And you can see the variation between layers in this sequence, done in the side air intakes: 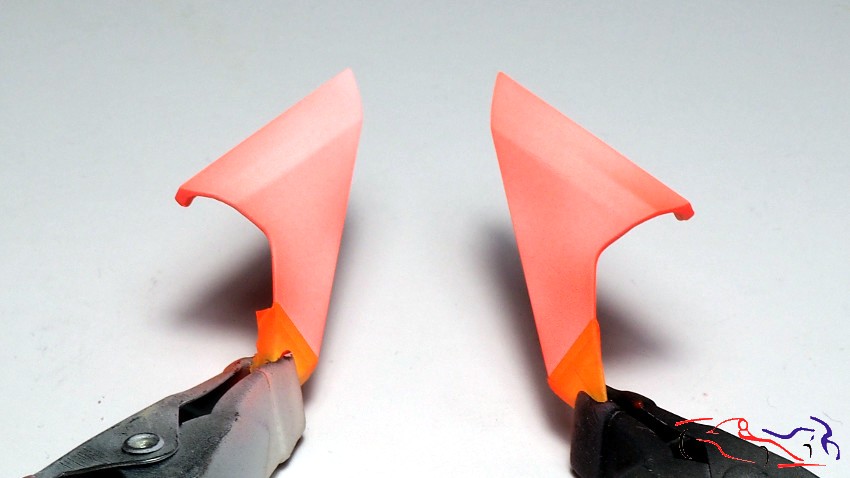 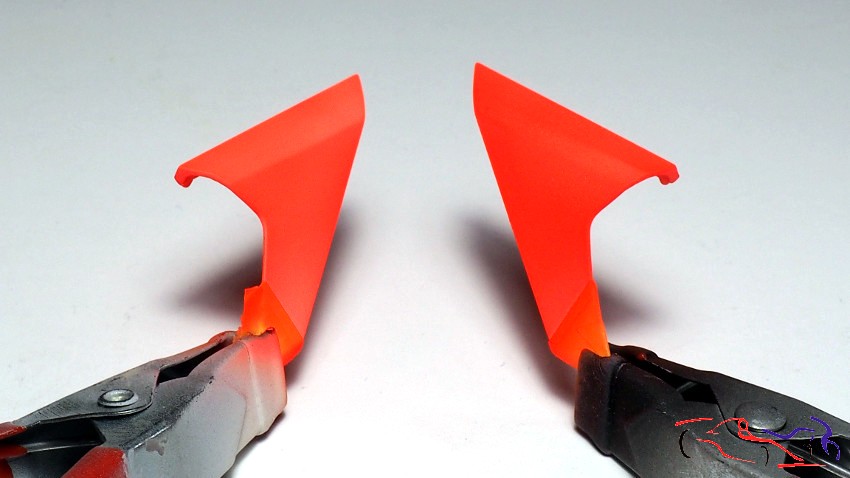 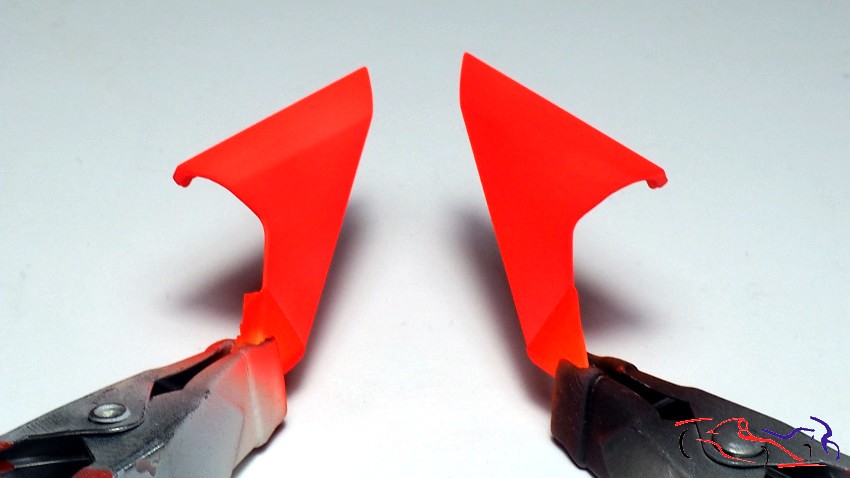 A continuación os muestro las piezas pintadas: trampilla delantera del capó, alerón y fotograbados. Next, I show you the painted parts: front hood hatch, spoiler and photo-etched parts. 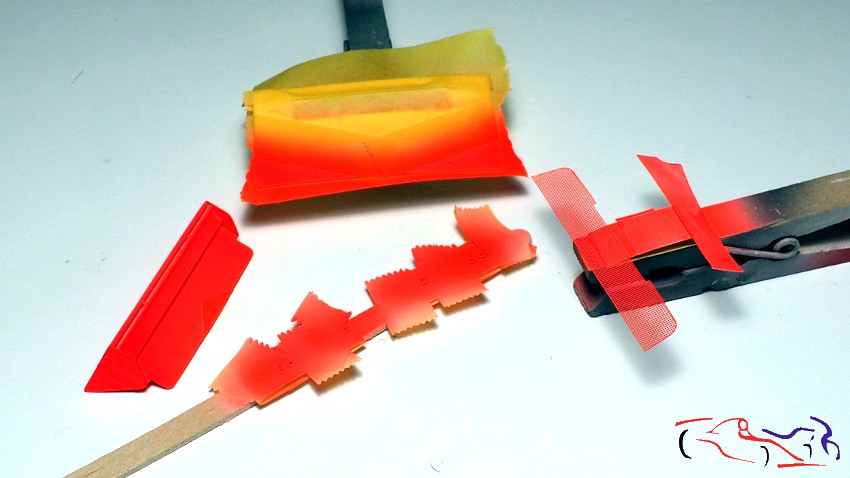 Y las tres piezas que componen la carrocería: And the three parts that make up the body: 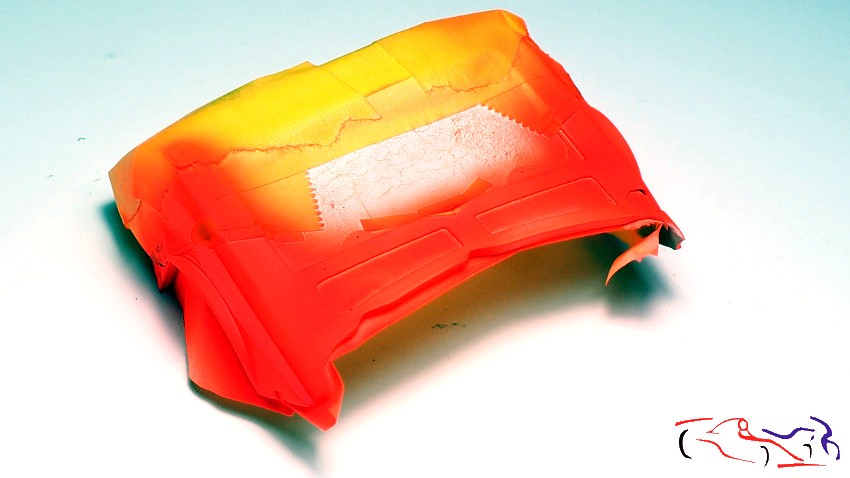 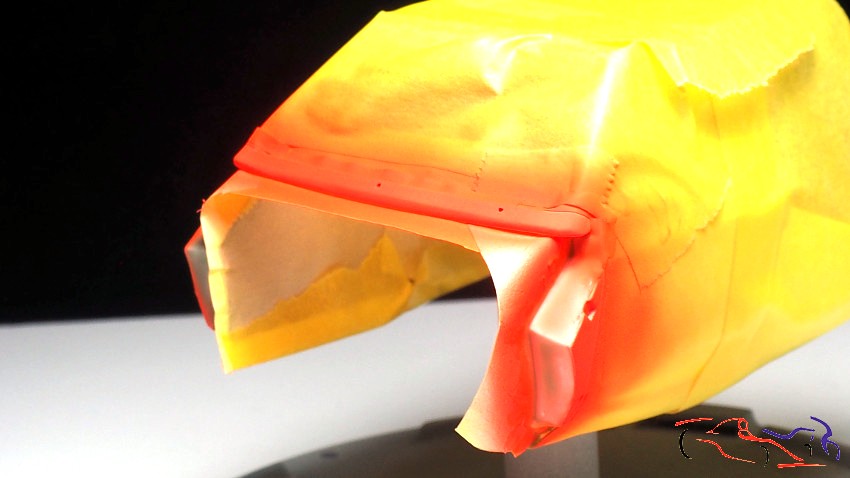 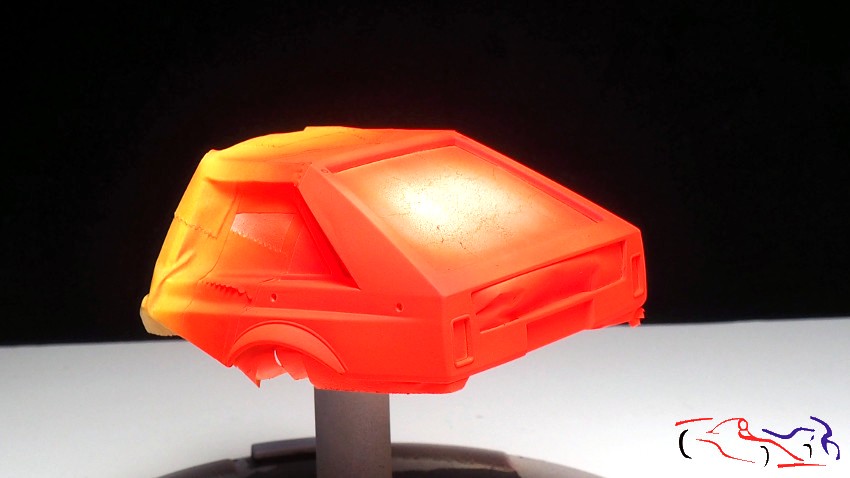 Una vez seco, con mucha impaciencia, eliminé el enmascarado siendo éste es el resultado, con las piezas superpuestas: un resultado del que estoy muy contento!! Once dry, with great impatience, I eliminated the masking, this being the result, with the overlapping pieces: a result that I am very happy with !! 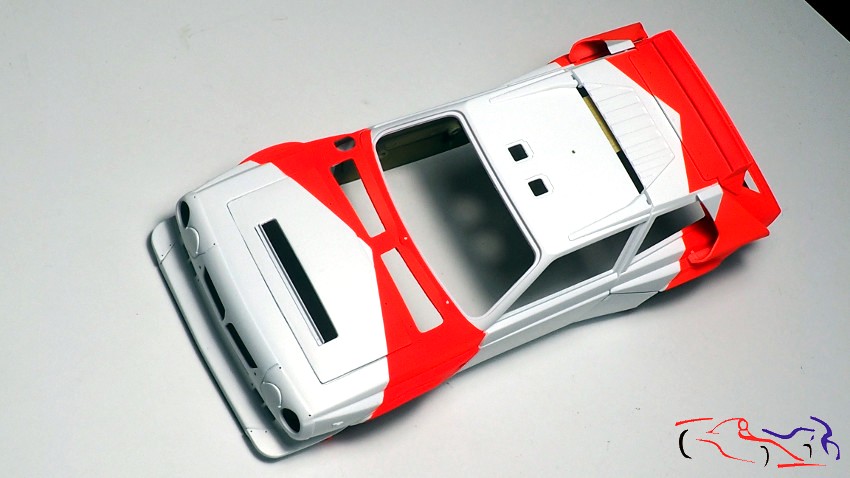 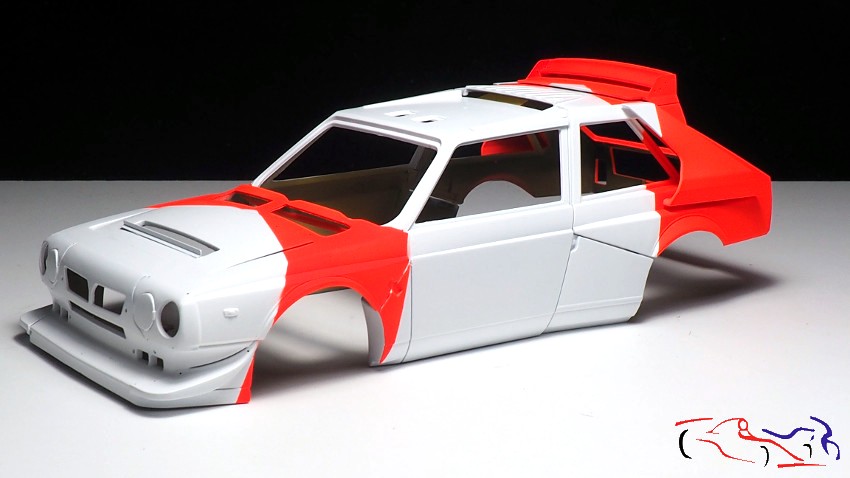 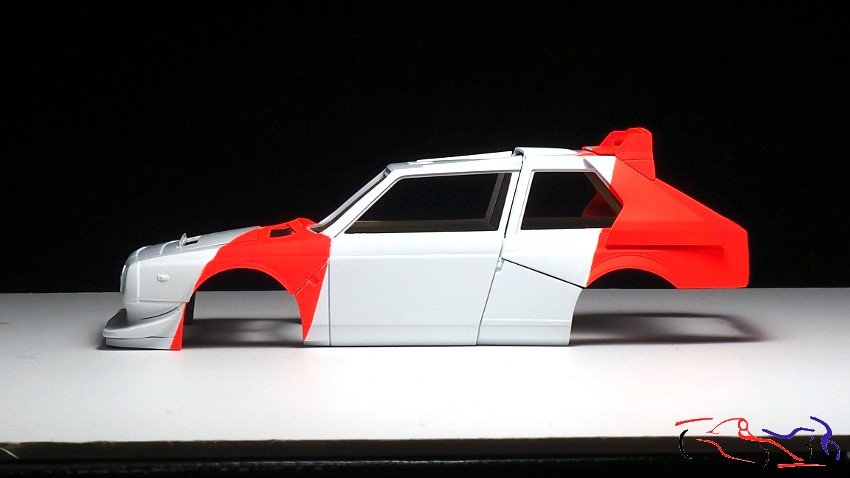 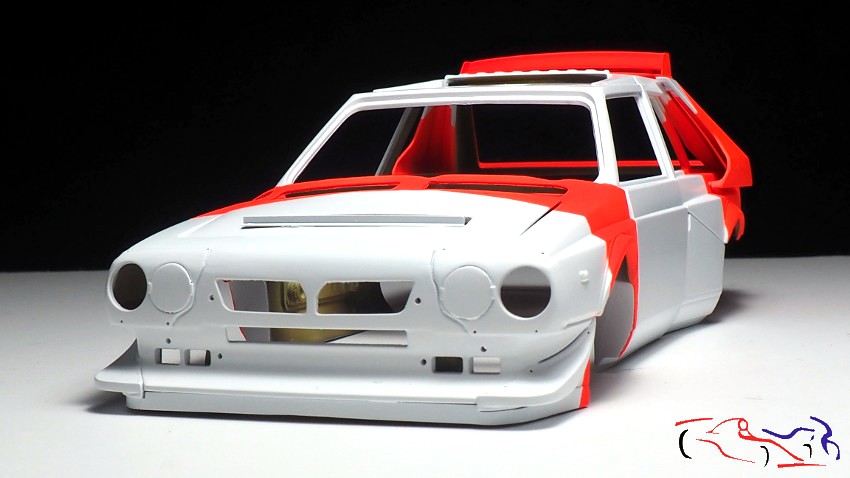 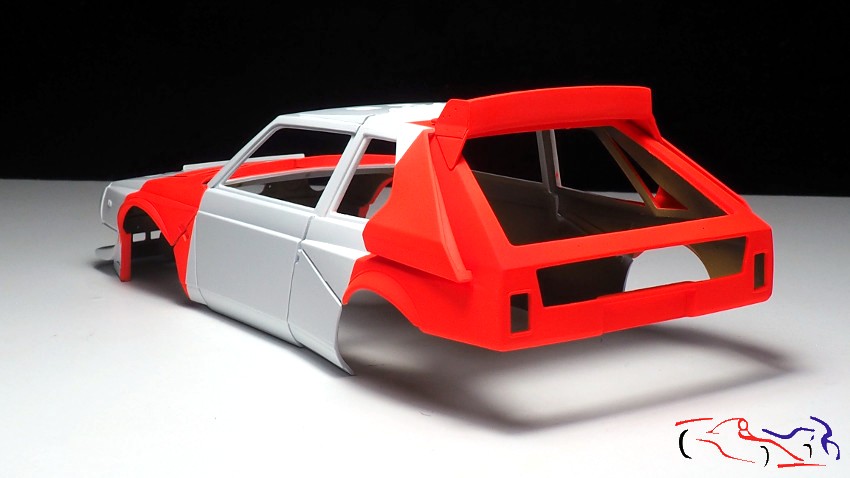 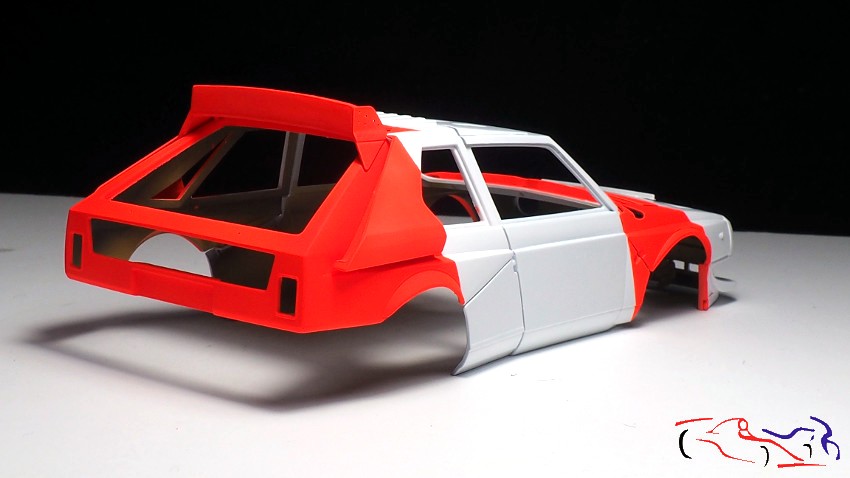 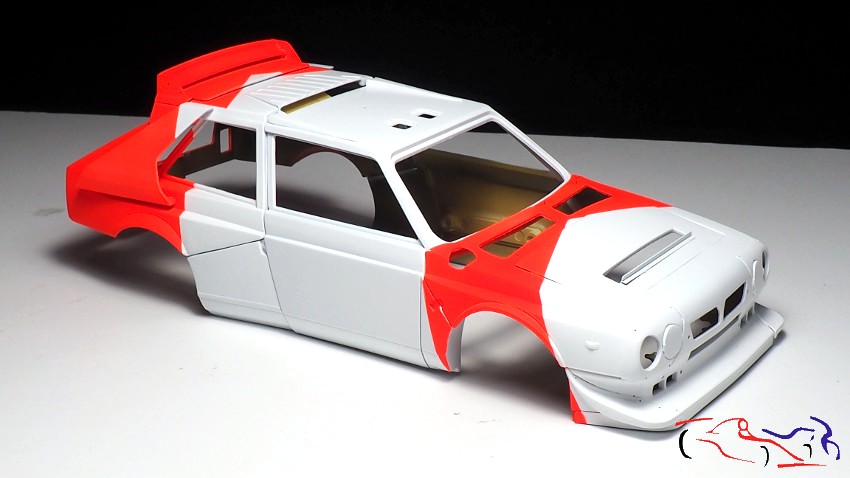 Ahora es turno de pintar los dos logos de Marlboro de las puertas, barnizar, poner calcas y lacar! Pero todo eso en el próximo post!. Gracias por ver y comentar! Now its time to paint the two Marlboro logos on the doors, varnish, put decals and lacquer! But all that in the next post! Thanks for viewing and commenting!
|
|
#88
12-11-2020, 02:30 AM
|
||||
|
||||
|
Re: Lancia Delta S4 Marlboro Beemax 1/24
Quote:
|
|
#89
12-13-2020, 02:34 AM
|
||||
|
||||
|
Re: Lancia Delta S4 Marlboro Beemax 1/24
This build looks so very realistic, a pleasure to follow. Keep on the good work.
__________________
my English is not perfect but hopefully be readable
|
|
#90
12-13-2020, 05:30 AM
|
||||
|
||||
|
Re: Lancia Delta S4 Marlboro Beemax 1/24
Quote:
|
|
|
POST REPLY TO THIS THREAD |
 |
|
|


