|
|
| Search | Car Forums | Gallery | Articles | Helper | Air Dried Fresh Beef Dog Food | IgorSushko.com | Corporate |
|
|||||||
| WIP - Motorsports Post topics for any "Work In Process" motorsports vehicles in this sub-forum. |
 |
 Show Printable Version | Show Printable Version |  Subscribe to this Thread
|
|
|
Thread Tools |
|
#61
 06-09-2003, 02:52 PM
|
|||
|
|||
|
I wondered what had happened to this model
 Everything looks fantastic Mikko, it's coming together really well. Can we have some close up shots on the interior, please  Please tell me you're going to paint the wheel lug nuts I look forward to your next update.
__________________

|
|
#62
06-09-2003, 03:10 PM
|
||||
|
||||
|
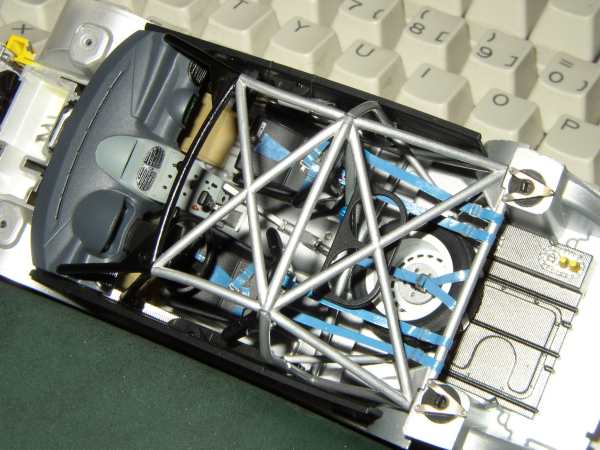
Here's two interior pics. Not the finest hour of close up photography, but they'll show some details anyhow. That rollcage blocks view quite effectively no matter where I tried to photograph..
  Nothing dramatic has happened to the model then (good or bad  ). Progress just slowed down due to a small lack of interest, but I think the model should be ready by the end of the month. ). Progress just slowed down due to a small lack of interest, but I think the model should be ready by the end of the month.And yes, I'm going to paint those wheel nuts  The wheels are going to get OZ-decals too. The wheels are going to get OZ-decals too.-Mikko
|
|
#65
06-10-2003, 02:31 PM
|
||||
|
||||
|
Today I added the screens to front bumper. Like I said earlier, I couldn't find a S27 etched set for '99 Pug, so I made the screen from the net supplied by Tamiya. I made the five support strips to it from black graphic tape. I think it looks quite nice after all, so it's not absolutely necessary to buy an etched set to detail this kit nicely.
You can also see that I had to made some cuts to the red decal to make it conform around the front of the bonnet. Unfortunately these cuts are quite visible  But they're less visible than the decal wrinkles would have been. But they're less visible than the decal wrinkles would have been. -Mikko
|
|
#68
06-11-2003, 02:07 AM
|
||||
|
||||
|
whatchu talkin 'bout willis? i would not have notice some cuts in the DECALS if you had not mentioned it.. that is one bad ass model. love the work.. i like it
 
|
|
#70
06-12-2003, 09:21 PM
|
||||
|
||||
|
Looking good Mikko.
Only part I don't love is the shape of the light covers on the front bumper. Can't wait to see it all finished.
|
|
#71
06-13-2003, 12:01 PM
|
||||
|
||||
|
Yes, those lightcovers somehow went completely wrong
I don't know what I was thinking, I just eyeballed them and wrong they went. I should have been more careful... The fault shows more clearly with the finished paint, it didn't look that bad when the primer was on.I don't know if it's just my luck, but the rear wings seems to fit a bit poorly. I had to shave and sand its lower parts to make it fit. Now I have to finish the wheels and make the mudflaps and then it's almost ready. Does anyone know where to get good mudflap material? I've used surplus bits from Hasegawa kits but now I'm almost running out of the material (unless I steal it from unbuilt kits in my stash). -Mikko
|
|
#72
06-18-2003, 08:50 AM
|
||||
|
||||
|
I made the shields inside the wheelarches from overhead projector transparents painted in Tamiya desert yellow. They block the view nicely and light wont show through to the interior anymore.
 I also decaled, clear coated and weathered the wheels.  -Mikko
|
|
#74
06-18-2003, 12:46 PM
|
||||
|
||||
|
Is it possible that we could get all the photos of the finished project in one post so we all can see the true magnificence of this master piece. Does any body smell that...................................the shit being shoveled.
J/k GREAT WORK MAN, TIME WELL SPENT !
__________________

|
|
#75
06-18-2003, 05:39 PM
|
||||
|
||||
|
Good idea with the plastic sheet in the wheelarches.
Did you have to glue them down or will they hold in there themselves?You must be getting close to finished now - can't wait to see the final shots. Nice big high resolution ones please 
|
|
|
POST REPLY TO THIS THREAD |
 |
|
|


