|
|
| Search | Car Forums | Gallery | Articles | Helper | Air Dried Beef Dog Food | IgorSushko.com | Corporate |
|
|||||||
| WIP - Motorsports Post topics for any "Work In Process" motorsports vehicles in this sub-forum. |
 |
 Show Printable Version | Show Printable Version |  Subscribe to this Thread
|
|
|
Thread Tools |
|
#61
 12-05-2007, 02:14 AM
|
||||
|
||||
|
Re: LeMans Porsche 911GT1 '98 BBR 1:43
Terrific job Jay!
I have a quick question, do you find enamels better then acrylic ones for that texture on the seat and dash? 
|
|
#62
12-05-2007, 01:13 PM
|
||||
|
||||
|
Re: LeMans Porsche 911GT1 '98 BBR 1:43
Really great work looks excellent. Is that 1/24 scale SMS CF because I didn't think they made that pattern in 1/43?
__________________
Regards, Dave
|
|
#63
12-06-2007, 12:44 PM
|
||||
|
||||
|
Re: LeMans Porsche 911GT1 '98 BBR 1:43
JK,
brilliant just brilliant. The thing is this is 1/43rd, I'll be happy if my 1/24th looks as good. Great effect on the spray for the seats and dashboard too. Top job all round mate!
__________________
Sean _______________________________ http://www.scalereproductions.co.uk _______________________________ WIP: Ferrari F40
|
|
#64
12-08-2007, 07:44 AM
|
|||
|
|||
|
Re: LeMans Porsche 911GT1 '98 BBR 1:43
@sjelic: I don't know. I have only tried enamels because i don't work with acrylics. You'd have to try.... The paint should be quite "thick" and the faster it dries the better. I shoot the paint with a lot of pressure from about 30cm away and in many thin "layers" so it can already dry a bit while flying towards the piece. That's how it eventually starts to build up this rough surface.
@davesans: Yes that's a 1/24 pattern. SMS makes it in 1/43 as well ( No1443 ) but that was too fine to be visible in the cockpit afterwards. To be honest it can hardly be seen like this too....only if you look closely and with some light but that's what i want....new things to find when you get a bit closer that don't pop out from half a meter away :-) O.k. then, here comes another update....the last one in fact as this model is heading towards the finish line! Before finally mounting the interior I had to finish the glass pieces. I had been delaying that for a good reason because I knew it was going to be tricky. Doing the final test fitting and shaping the edges with sand paper wasnt a problem, but then came polishing. All the compounds I tried didnt really work to the desired effect on the material I used so I ended up sanding and polishing them with the whole range of Micromesh cloths and finally waxing them with Tamiya modelling wax. The result isnt perfect but good enough. Here you see the finished windscreen compared to the side window after a go with 3200 grit.. 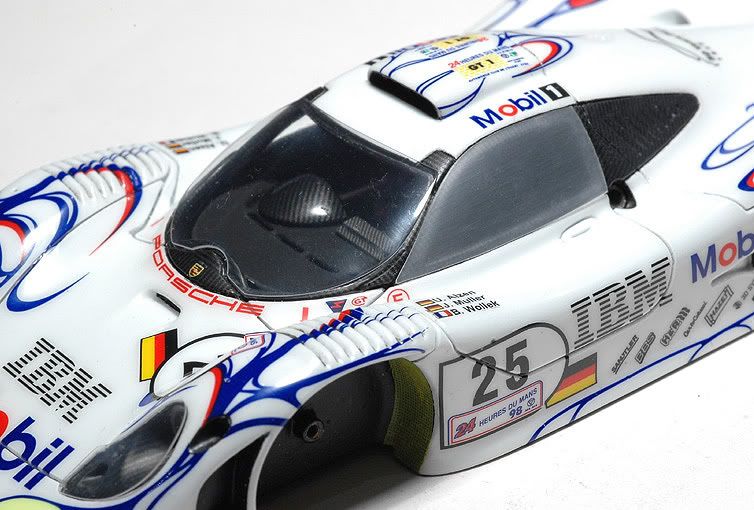 In front of the dark interior the scratches and imperfections dont show a lot. I have since found a thin polycarbonate material in a shop that I will order when I have to do glass pieces the next time. That might work better. Then came the really tricky part though: fixing the finished pieces on the model without messing them up! First was the windscreen. It wasnt sitting flush at the sides so I fixed it there through 0.3mm holes with tiny brass rivets. That made it sit nicely in the other areas as well so the other silver dots are just drops of silver paint applied with a flattened needle tip. At the top I added some epoxy glue that is hidden from the sun visor decal. 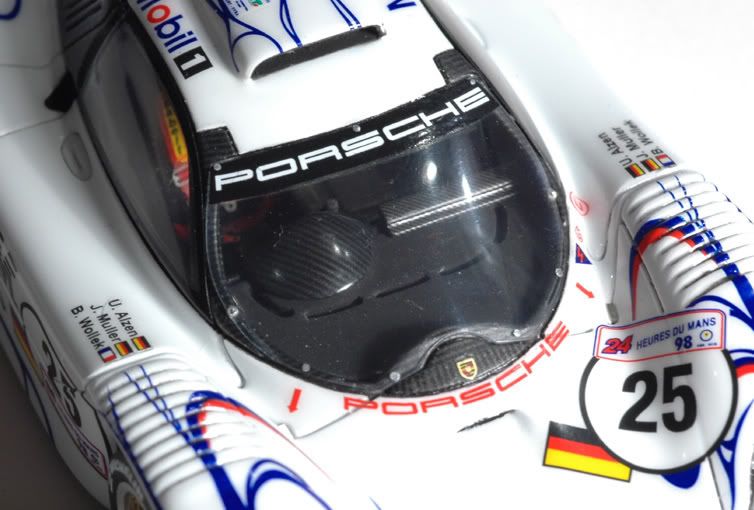 On the side windows I painted the black frame that the real ones have from the inside and fixed the pieces with tiny drops of superglue behind that black paint. That had potential for disaster but worked fine. That done I fixed the interior inside the body shell with epoxy glue and after mounting the rear end details also the floor with diffuser. Then it was time to mount the wheels. After painting the insides and non visible outsides of my turned aluminium rims black I mounted the tyres that I sanded lightly and cleaned up with alcohol. Then I put the decals on using the Tameo decal liquid again ( this time more carefully :-). You just have to put the decal in place, add the softener with a brush and then not touch it anymore because it works in seconds and makes the decals completely soft until it dries and sticks to the rubber. Afterwards I painted the sidewalls of the tyres with a thin layer of matt clear enamel again to make the edges of the glossy decal invisible. In the next picture you see the wheels with centres and brake discs mounted on the car. 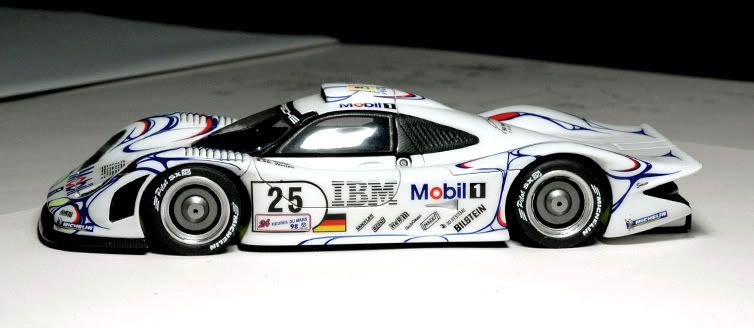 Now find the difference to this picture yes, brake callipers are installed. 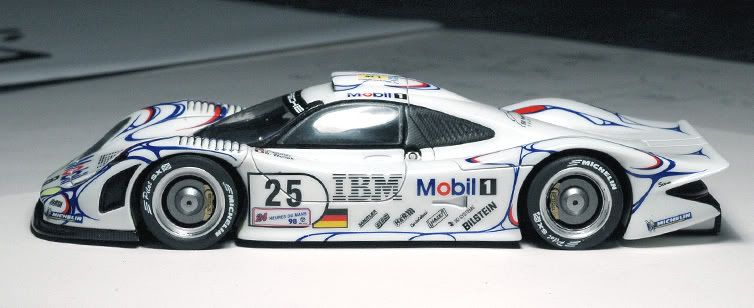 Then I mounted the spokes that were sprayed Alclad pale gold and I turned some centre lock wheel nuts from aluminium. The kit offers photoetched hex nuts but these would have been wrong. I airbrushed them transparent red and blue ( right side ) 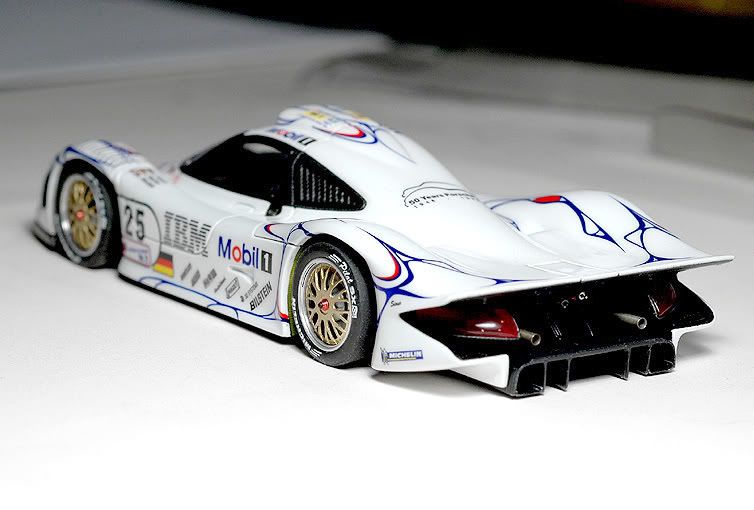 In this picture you can also see the installed rear end details, including the exhaust pipes made from brass rods. I chemically covered them with tin to get them silver. The coverage was uneven but that was o.k. in this case as it automatically gives a heat stained look. Staying at the rear end I mounted the upper wing supports with epoxy glue after they were painted, decaled and clear coated. In this picture theres a diagonal strut missing that will be added later. 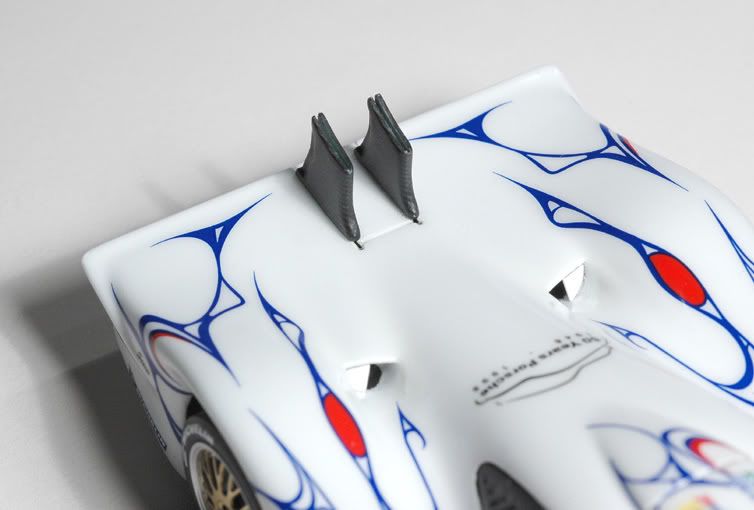 The rear wing was painted black and then CF'd. In the kit came a decal with CF pattern and Porsche sign that looked nice but had one big mistake: the CF pattern was diagonal whereas on the real one it runs in driving direction. So I put on the Interdecals pattern in the correct direction and then added the Porsche sign and the other logos on the wing endplates and wing underside from custom made dry transfers. 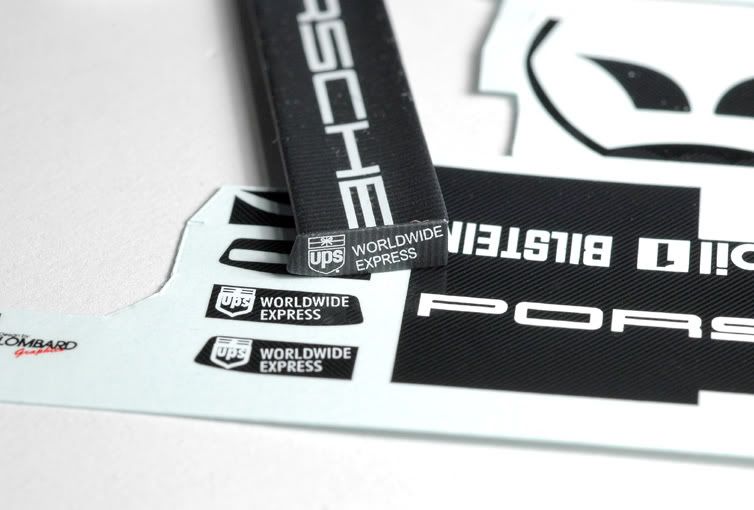 All these were not rubbed directly on the parts but on transparent decals film first, that was then put on the parts. Those small logos were very fragile and near impossible to rub on directly so I went that way. The UPS logos are now much finer printed as well. Finally all was covered again with a thin coat of matt enamel clear. At the front I then mounted the photoetched kit windscreen wiper. It was I bit flat first but after some bending and remounting the wiper differently to the arm it looks quite nice. 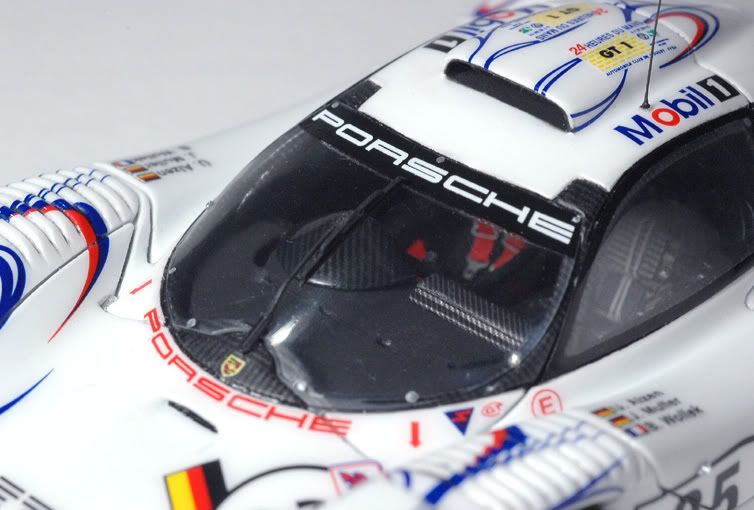 Next were the reshaped rear view mirrors. Over time they were also primed, painted white and decaled. After my changes I had to fiddle a lot with the decals but Microsol made them fit well enough again. The neon yellow patches were touched up with some enamel paint. Then they were clear coated ( but not sanded and polished :-), the polished nickel silver mirror faces that came in the kit installed and the mirrors mounted to the body with epoxy glue. 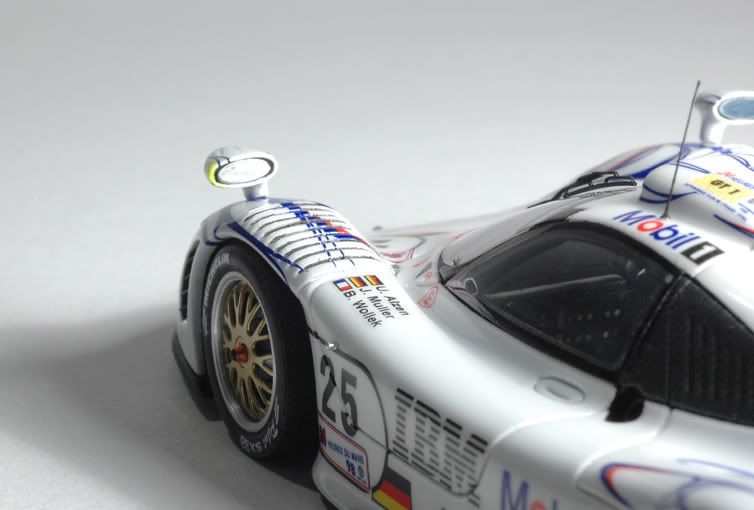 I also added tiny turned aluminium number lights on both sides and the antenna on the roof. One special remaining adventure were the front corners of the model. While mounting the cockpit glass pieces was tricky the headlight covers were real headaches. I finally gave it a try glueing them in with Future. Making the new parts that had nearly no tension to hold in place paid dividends and I fixed them adding Future with a tiny brush around the edges. The advantage of that stuff over another clear paint that would also make the pieces stick was that when I added too much ( which happened a couple of times on the left headlight ) I could just take the piece of and clean it and the painted body with a bit of Windex without harming the paintjob. 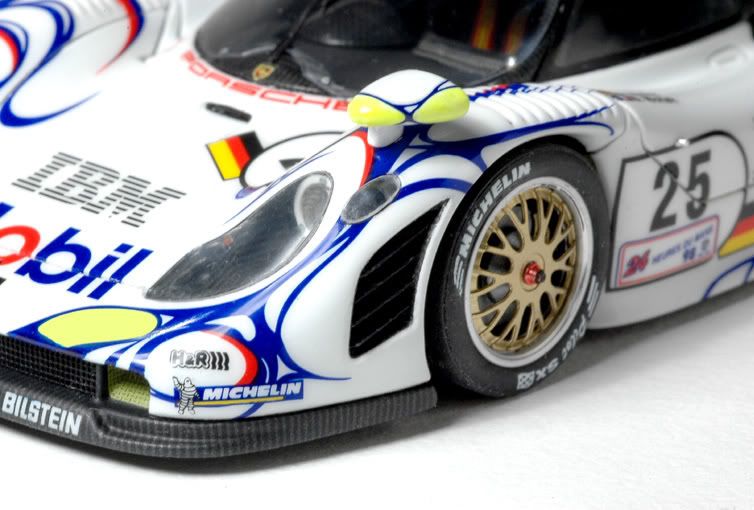 I have to say though that the contrast of the picture makes it probably look even better than it is :-) The covers of the little additional headlights were fixed with only two tiny drops of superglue each. I didnt dare to add Future that would have made the edges less visible because I was afraid it would just fill them up too quickly running in places where I didnt want it to go! Just about visible in the previous picture is a PE mesh that I painted black and mounted in the front air duct. Also I added the slats in the air outlets each side in front of the front wheels. I made these from 0.1mm nickel silver sheet and painted them black. First I wanted to CF them but ultimately spared myself the work because it was just not visible :-) So believe it or not but this was it and finally the little thing was finished. I could have added more details here and there but in the end decided against it. I think it looks o.k. like that. Here you can see a final rear view with the wing and the missing diagonal strut mounted. 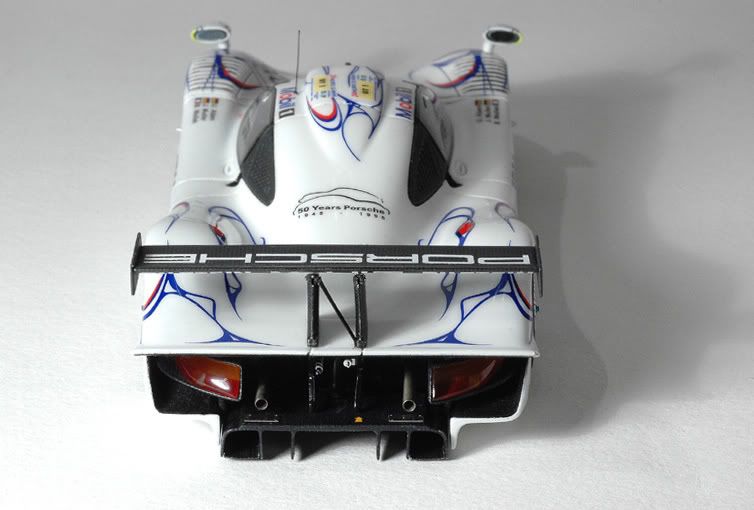 And another picture with some reference for size:  More pictures are in the finished gallery: http://www.automotiveforums.com/vbul...40#post5041840 Thanks for watching and all your comments. They're much appreciated! Cheers Jaykay
|
|
#66
12-08-2007, 11:34 AM
|
||||
|
||||
|
Re: LeMans Porsche 911GT1 '98 BBR 1:43
 Incredible. Really amazing what detail you put in this "little" car. It's hard to believe that it's in 1/43 scale. Trully a great piece of art. Can't wait to see your next project. Incredible. Really amazing what detail you put in this "little" car. It's hard to believe that it's in 1/43 scale. Trully a great piece of art. Can't wait to see your next project.  Shovel a.k.a. Mark
|
|
#67
12-08-2007, 12:25 PM
|
||||
|
||||
|
Re: LeMans Porsche 911GT1 '98 BBR 1:43
Jaw breakingly beautiful work. AFMOTY in my book
Quote:

__________________
Guideline for happy modeling: Practice on scrap. Always try something new. Less is more. "I have a plan so cunning, you could put a tail on it and call it a weasel" - Edmund Blackadder
|
|
#68
12-08-2007, 02:08 PM
|
||||
|
||||
|
Re: LeMans Porsche 911GT1 '98 BBR 1:43
Quote:

|
|
#69
12-08-2007, 03:55 PM
|
|||
|
|||
|
Re: LeMans Porsche 911GT1 '98 BBR 1:43
[quote=jaykay640
Now find the difference to this picture yes, brake callipers are installed. [/quote]  Thanks a lot jaykay that you didn't offer the story behind this pictures. It would to embarrising for me. Thanks a lot jaykay that you didn't offer the story behind this pictures. It would to embarrising for me.  As allways this is one more of your models wich keeps me thinking about another hobby for me. Its awesome!!! Thomas
|
|
#70
12-11-2007, 06:56 PM
|
|||
|
|||
|
Re: LeMans Porsche 911GT1 '98 BBR 1:43
Brilliant work. All the little details pay off in the end.
|
|
|
POST REPLY TO THIS THREAD |
 |
|
|


