|
|
| Search | Car Forums | Gallery | Articles | Helper | Air Dried Beef Dog Food | IgorSushko.com | Corporate |
|
|||||||
| WIP - Street Post topics for any "Works In Progress" street vehicles projects in this sub-forum. |
 |
 Show Printable Version | Show Printable Version |  Subscribe to this Thread
|
|
|
Thread Tools |
|
#46
 06-23-2005, 03:38 AM
|
||||
|
||||
|
Re: Watch out Skylines. Here comes the Mustang GT-R
scratchbuilt....as in built from nothing? no kits? built from pure scratch? kaput? lol sorry, i am a bit drunken tonight.
__________________
Ride #1: 1994 Mercedes-Benz W124 E320 Coupe (My first car/love) Ride #2: 1975 Mercedes-Benz W116 280S (The restoration/hobby/project car) ~Chris~ My Diecast Collection! 
|
|
#47
06-23-2005, 04:09 PM
|
||||
|
||||
|
Re: Watch out Skylines. Here comes the Mustang GT-R
That is one great looking mustang! You did a really good job on it. Keep up the good work.
|
|
#48
06-26-2005, 02:03 PM
|
||||
|
||||
|
Re: Watch out Skylines. Here comes the Mustang GT-R
I tried to lay a sheet of carbon fiber decal to cover the entire dashboard (excluding two ends) with no success. I wasted two large portions of the expensive Scale Motor Sport decal and some setting solution, so I applied decals in four sections. As long as the patterns are aligned, the seams aren't so noticeable.
Then, I coated the dashboard with Tamiya smoke gray, which made the dash look too dark, so I don't recommend this. I should have used TS-13 clear.  The dashtop was made from two sheets of plastic. I scribed some grooves at the front (green), and made a pair of cuts on both top and bottom sheets (red and light blue arrows). This way, the slits When two halves are glued together, the seam lines lie at edges (pink arrows), making the filling and sanding easy.  I used small pieces of plastic to make the vents (green arrows). I also added small details, seemingly plastic caps to hide screws, with slices of a small plastic rod (yellow arrows).  I glued short sections of brass rod into the grooves. After all grooves were filled with brass rods, I added another curved piece and painted the dashtop with Mr. Surfacer.  Small switches were made with styrene and brass, and the dashboard was finished.  Next time: Finishing interior
|
|
#49
06-26-2005, 05:08 PM
|
||||
|
||||
|
Re: Watch out Skylines. Here comes the Mustang GT-R
Holy cow. You are definately a master of scratchbuilding. I am learning tons of techniques with this. Thanks for posting up all the progress, I've learned a lot.
__________________
-Mike AF Director of Media / Photographer  [email protected] | AutomotiveForums.com | Flickr Gallery
|
|
#50
07-03-2005, 12:07 AM
|
||||
|
||||
|
Re: Watch out Skylines. Here comes the Mustang GT-R
After the rollcage was installed, I glued the dashboard, and the seat. Here, I'm shaping the side impact bars. Notice that the driver side is widened outward, while the passenger side is straight.
 The seatbelts are Studio27 seatbelt kit. The early show car didn't have the passenger seat, so I didn't make one. Later the real car added a seat, as seen in the Road&Track feature.  The shifter was made of a combination of styrene rods of two different sizes. The boot is Tamiya epoxy putty.  Moving on to the exterior, here's how I made the stays. First, I cut out a styrene sheet in the desired shape (top), then I put two extremely small drops of superglue to fix the part on another sheet of plastic (middle). After trimming, filing and sanding, I carefully pried two pieces apart with a hobby knife (bottom). Superglue doesn't melt plastic, so cleaning the glue spots is very easy. This way, you can make a pair of identical parts in a matter of minutes.  Here's a pair of vacuum formed taillight cover. It was painted with Tamiya acrylic clear red. The bottom 1/3 are reflectors, so I applied baremetal from the back side. Since the reflector has some kind of pattern, I cut out a small piece of brass mesh, and pressed it hard on the baremetal. It's unclear in these pictures, but yup, the patterns are there.  I'm sure a lot of people will find the following technique useful: how to make a race-car wing. Cut out a pair of plastic sheet. Make the bottom piece slightly wider than the top one. Curl them on a side of a spray can or something, and add two smaller pieces of plastic to the bottom face of the top sheet as shown. The top part is the left, and the bottom sheet is the right; both are upside down.  You don't want a wavy wing, so make sure you clamp both the leading and trailing edges when you glue the top and bottom pieces together.  Round the leading edge with a sand paper. Depending on how you make the spar between the top and bottom elements, you can make any type of airfoil you want. The winglets are also made of styrene (the orange piece).  I added a 1.5mm-wide narrow styrene at the trailing edge to represent the Gurney Flap.  Now, the wing is ready to paint. Here, I was test-fitting to determin the angle of the wing.  If you want to make one of those irregular 3d wings (like the one with a raised center section), combine this technique with the one I described in the dashboard making. Next time is how to make a simple front lip spoiler, stay tuned.
|
|
#53
07-04-2005, 04:58 AM
|
||||
|
||||
|
Re: Watch out Skylines. Here comes the Mustang GT-R
.......(stunned silence).........
__________________
Guideline for happy modeling: Practice on scrap. Always try something new. Less is more. "I have a plan so cunning, you could put a tail on it and call it a weasel" - Edmund Blackadder
|
|
#54
07-04-2005, 05:02 AM
|
||||
|
||||
|
Re: Watch out Skylines. Here comes the Mustang GT-R
Awesome work so far!
__________________
Zeljko Segin http://www.hrmodeler.com - Fast wheels - my pages My current project - ..... 
|
|
#55
07-04-2005, 09:20 AM
|
|||
|
|||
|
Re: Watch out Skylines. Here comes the Mustang GT-R
Perfect??? YEAHHHHHH
__________________
 http://www.minituner.com.br WIP: Project NoMother (Nomad '55)**UPDATED (09/02/2005) My Mustang Boss 429 (Completed) My Mercedes Benz CLK DTM 2000 Street (Completed)
|
|
#58
07-05-2005, 01:55 PM
|
||||
|
||||
|
Re: Watch out Skylines. Here comes the Mustang GT-R
you're my hero
|
|
#59
03-27-2006, 01:19 AM
|
||||
|
||||
|
Re: Watch out Skylines. Here comes the Mustang GT-R
Sorry for resurrecting an old thread, but my Mustang GT-R model hasn't
been finished yet--it needs the engine! I was going to finish it in time for the contest in Houston, but the finishing work of my Diablo SE30 model took a longer than expected, so the Mustang model ended up as a curbside once again. (I'm pathetic.) Anyway, this is the last step of the stage 1, where the model was presented as a curbside. The radiator was nothing but a piece of styrene, painted in black. 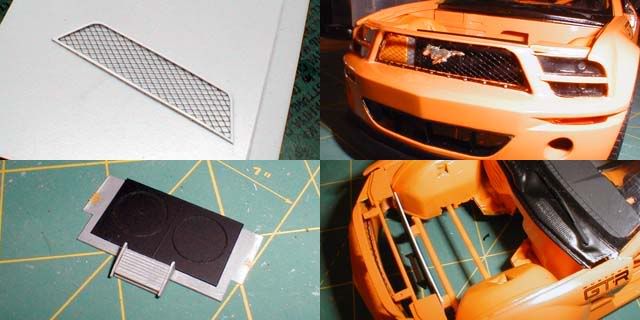 I scratchbuilt the front lower suspension member and the lower control arms. These are one-off parts made for the GT-R, and they look quite different from the stock ones. All I needed was styrene rod to make those relatively simple parts. 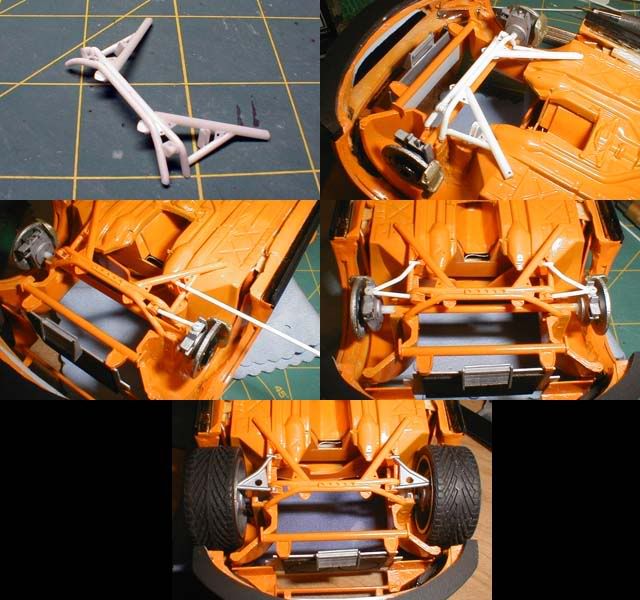 I made the stabilizer bar from a styrene sheet. The steering rod was a modified part from Revell's Mustang Cobra kit. 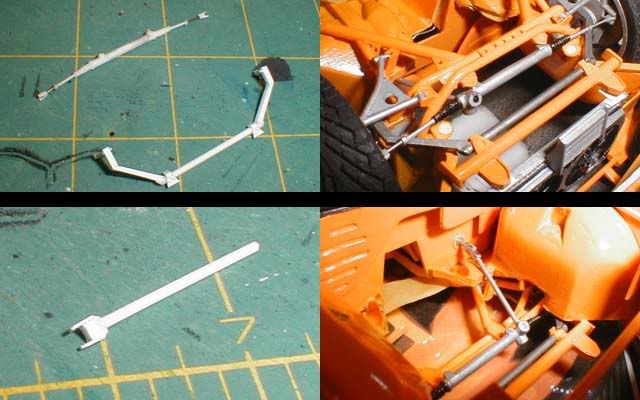 For the 2006 Houston show, I made the final version of the radiator. The core was styrene, sandwiched with photo-etched radiator faces. The front one is simple because the large portion is hidden. The back part will be more visible, so I used the more accurate Detail Master photo-etched radiator face. 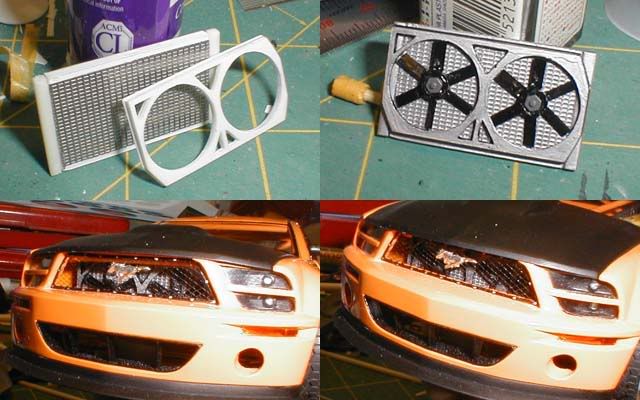 This time, it will go all the way to the finish, including a scratchbuilt Cammer 5.0, so stay tuned.
|
|
|
POST REPLY TO THIS THREAD |
 |
|
|