|
|
|

|
|
| Search | Car Forums | Gallery | Articles | Helper | Air Dried Beef Dog Food | IgorSushko.com | Corporate |
|
| Latest | 0 Rplys |
|
|||||||
| WIP - Motorsports Post topics for any "Work In Process" motorsports vehicles in this sub-forum. |
 |
 Show Printable Version | Show Printable Version |  Email this Page | Email this Page |  Subscribe to this Thread
|
|
|
Thread Tools |
 12-31-2011, 02:55 AM
|
#46 | |
|
AF Regular
Join Date: Nov 2002
Location: Salt Lake City, Utah
Posts: 117
Thanks: 0
Thanked 0 Times in 0 Posts
|
Re: 2011 flying lizard porsches
The wing uprights are different as well. The 2011 car has the skeleton style uprights, while the older car has solid ones. I saw the skeleton ones on scaleproductions the other day, but can't find them now.
__________________
-= Nick =- '04 VW R32T |
|

|

|
|
12-31-2011, 01:42 PM
|
#47 | |
|
AF Regular
Join Date: Nov 2002
Location: Salt Lake City, Utah
Posts: 117
Thanks: 0
Thanked 0 Times in 0 Posts
|
Re: 2011 flying lizard porsches
I took some measurements, the Fujimi model is a tiny bit bigger.

__________________
-= Nick =- '04 VW R32T |
|
|
|
|
|
01-02-2012, 01:02 PM
|
#48 | |||
|
AF Enthusiast
Thread starter

Join Date: Apr 2004
Location: mexico
Posts: 601
Thanks: 9
Thanked 30 Times in 27 Posts
|
Re: 2011 flying lizard porsches
Quote:
Quote:
|
|||
|
|
|
|
01-04-2012, 03:31 PM
|
#49 | |
|
AF Newbie
Join Date: Jul 2011
Location: Venaria Reale
Posts: 34
Thanks: 1
Thanked 3 Times in 3 Posts
|
Re: 2011 flying lizard porsches
[quote=sam01contact;6948501]Time to continue! But before I do...some responses to your kind comments:
I will do this after I make the final assembly of one of the cars, just to be sure everything is OK. You are right. The Carrera body is perfect for the blue car. The orange car has a different engine cover and tail lights. I am planning to adapt the Fujimi parts to one of the Carrera bodies. Thanks Robi! The Fujimi headlight covers are too big for the Carrera body. I am planning to do some modifications to the Carrera pieces to make them look a little better. I think is either that or making new thermoformed pieces. This is great news!! But I am a little worried after seeing the photo of the paint jars, since they look plain paints, not pearlescent. I have some close up photos of the cars and I believe the paints used in the real cars are pearlescent. After checking Zero Paints catalogue, it looks to me that Arancio Atlas Pearl or Arancio Borealis Pearl (Lamborghini colors) would be better choices for the orange car. Well, let me show you the latest work I have done: First, I opened holes to use screws to attach the body to the chassis. The screw heads will be covered by the diffusers: 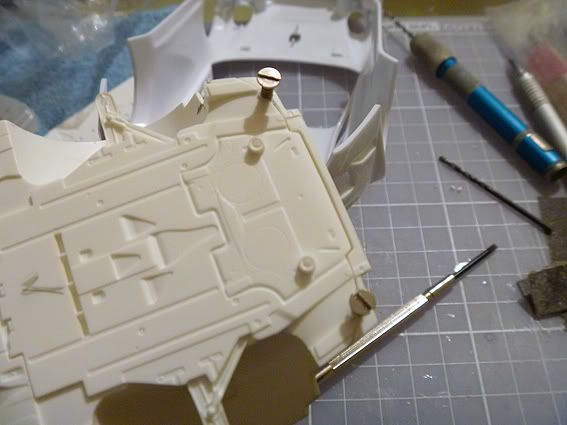 Well done !!! I have the same when I made the 997 RSR #80 by Profil24 Here you can see what I did... |
|
|
|
|
|
01-04-2012, 11:26 PM
|
#50 | |
|
AF Enthusiast
Thread starter
Join Date: Apr 2004
Location: mexico
Posts: 601
Thanks: 9
Thanked 30 Times in 27 Posts
|
Re: 2011 flying lizard porsches
Before I continue with the suspension and body work, I would like to revisit the chassis and diffusers.
As you can see in this photos: 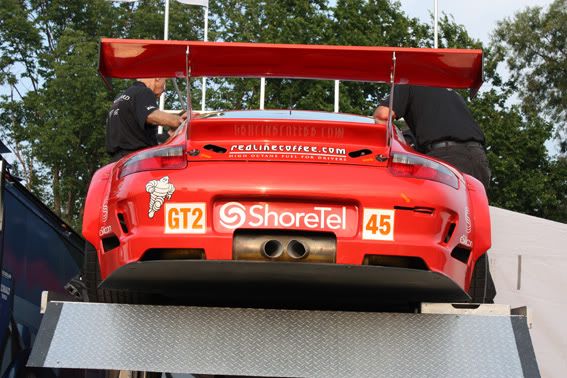 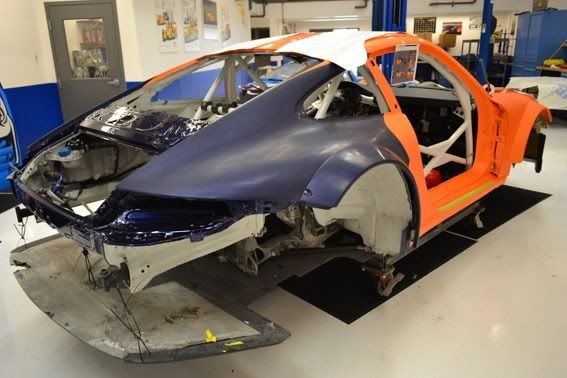 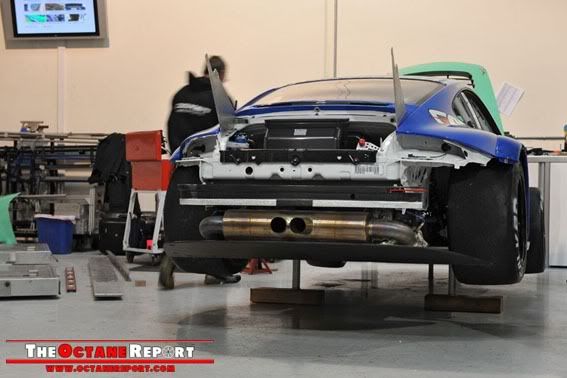 The rear diffuser should not have the "fins" Fujimi molded in the part. The part also have a bend just below the rear suspension, and It should be absolutely flat: 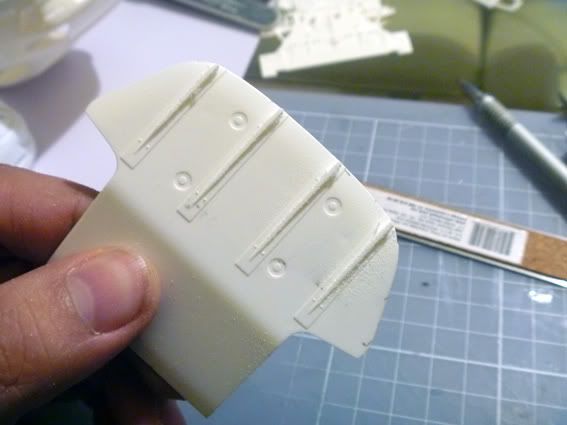 The chassis in the Fujimi kit sits too high, so you get a gap between the chassis and the front diffuser: 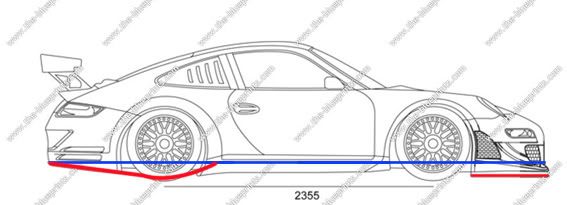 The diffusers and chassis should appear like this: 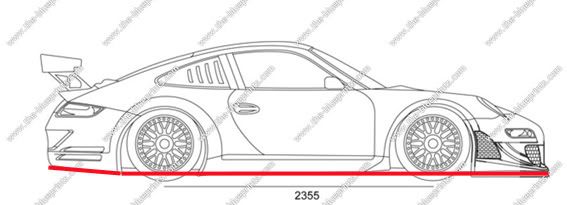 To do this, I used sheet styrene to obtain a new rear diffuser and central chassis and suspension "shields": 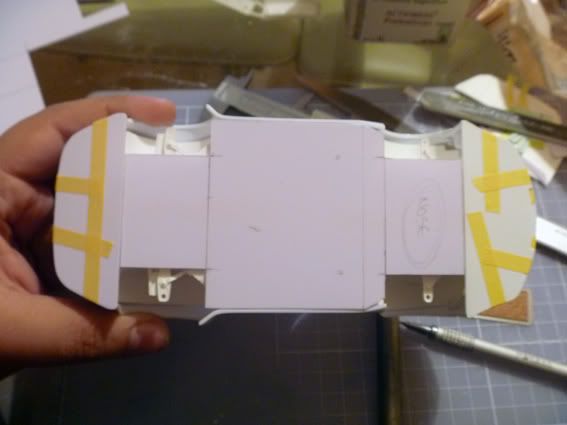 I used Tamiya masking tape to do templates for carbon fiber decals. I will also use photoetched parts to add rivet and air jack detail:  In my next post, I will show you some detailing of the suspension and engine parts, and after that, I will cut the bodies to "transplant" the rear of the fujimi body to the carrera body. Jedi801 did an excellent job with his model, but after closely checking the 2 bodies, I think I will do my cut right here:  I believe this way I can easily match the parts and reinforce the union. To do a super fine cut, I will use the nylon thread technique. Thanks for watching!  |
|
|
|
|
|
01-05-2012, 09:39 AM
|
#51 | |
|
AF Enthusiast
Join Date: May 2009
Location: Tucson, Arizona
Posts: 1,469
Thanks: 12
Thanked 126 Times in 120 Posts
|
Re: 2011 flying lizard porsches
Sam01contact - why would you want to make the cut on the rear of the body like that?? there are several compound curves that you will have to match. Also I see it will require a lot of putty to match smoothly?? Jedi made the cut where I think it is most logical. Also what in the "nylon" method?? never heard of that technique can you explain it? I do like your changes to the belly pans and diffusers. Thanks again for sharing all your work - John
|
|
|
|
|
|
01-05-2012, 04:30 PM
|
#52 | |
|
AF Enthusiast

Join Date: Feb 2006
Location: Melbourne
Posts: 1,057
Thanks: 5
Thanked 26 Times in 26 Posts
|
Re: 2011 flying lizard porsches
Nice work with the floor area, bring on the cutting.
|
|
|
|
|
|
01-06-2012, 01:55 PM
|
#53 | ||
|
AF Fanatic

Join Date: Feb 2004
Location: Hartford, Connecticut
Posts: 5,601
Thanks: 7
Thanked 108 Times in 103 Posts
|
Re: 2011 flying lizard porsches
Quote:
__________________
In Progress    
|
||
|
|
|
|
01-06-2012, 02:35 PM
|
#54 | |
|
ItaloSvensk

Join Date: Mar 2009
Location: Marstrand
Posts: 3,383
Thanks: 1,077
Thanked 296 Times in 270 Posts
|
Re: 2011 flying lizard porsches
wasnt better to make the floor part after the transplant operation?
__________________
Paolo - LoveGT40 Modelworks website www.alsoldatino.com my YT channel : https://www.youtube.com/channel/UCIp..._as=subscriber FB: https://www.facebook.com/alsoldatino |
|
|
|
|
|
01-06-2012, 02:46 PM
|
#55 | ||
|
AF Enthusiast
Join Date: May 2009
Location: Tucson, Arizona
Posts: 1,469
Thanks: 12
Thanked 126 Times in 120 Posts
|
Re: 2011 flying lizard porsches
Quote:
|
||
|
|
|
|
01-08-2012, 07:14 PM
|
#56 | |
|
AF Regular
Join Date: Nov 2002
Location: Salt Lake City, Utah
Posts: 117
Thanks: 0
Thanked 0 Times in 0 Posts
|
Re: 2011 flying lizard porsches
Sam, do you have any good reference for the interior? I have some decent shots of the dashboard, but nothing from the seats back.
__________________
-= Nick =- '04 VW R32T |
|
|
|
|
|
01-12-2012, 12:42 AM
|
#57 | ||||||
|
AF Enthusiast
Thread starter
Join Date: Apr 2004
Location: mexico
Posts: 601
Thanks: 9
Thanked 30 Times in 27 Posts
|
Re: 2011 flying lizard porsches
Quote:
Quote:
Quote:
Quote:
Quote:
Now, on with some work I did in the suspension and engine areas...I upgraded the shock absorbers:   And I did new shock supports...this way, I can paint and detail them separately from the chassis:  At his time, I prepared the photoetched brake discs (new calipers are on their way!): 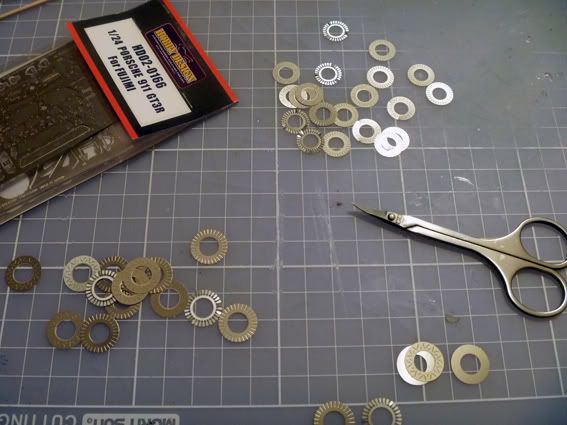 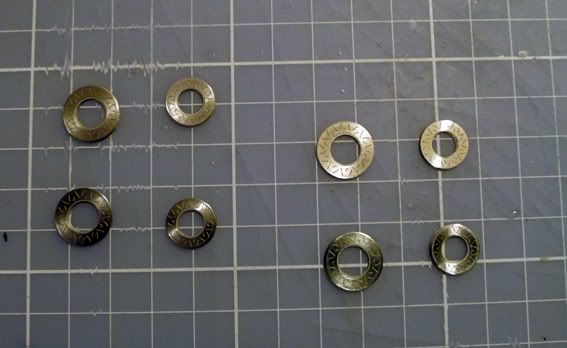 Fujimi molded the calipers and wheel mounts in the same piece, and since I will prepare separate calipers, I sanded off this detail from the original parts: 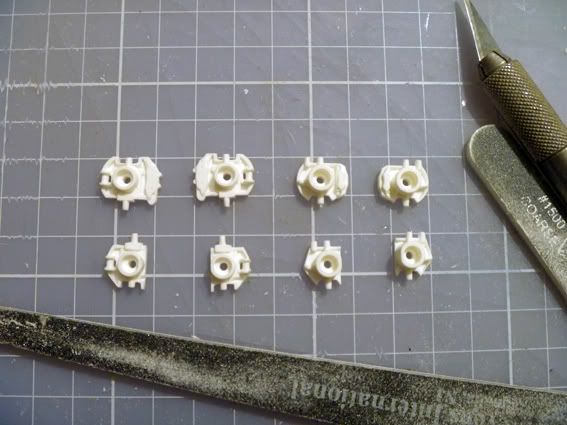 The engine looks good to me. With some masking and detail painting it will look very good: 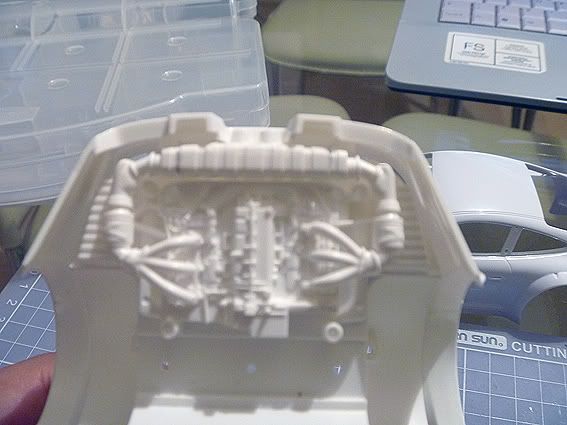 The exhaust system looks good in the Fujimi rear section of the body (orange car): 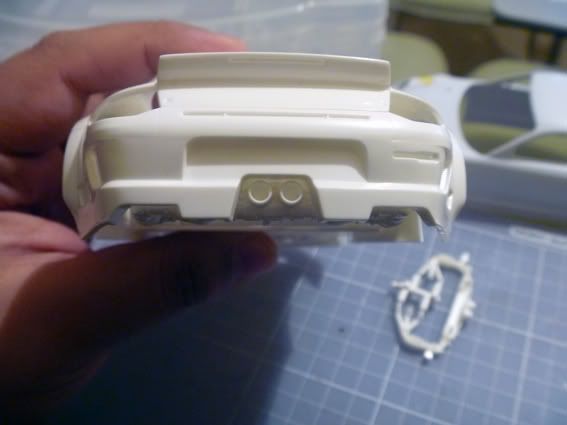 The Carrera body (blue car) is another story...The openings are bigger, and you can see the exhaust part is hollow: 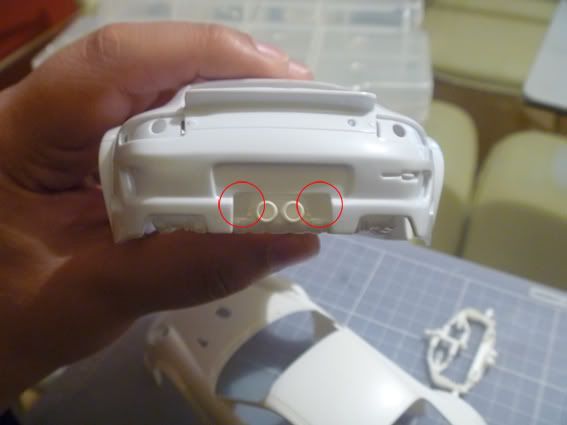  I added some styrene to cover the "missing" sections of the exhaust system. I also sanded off the exhaust tips (I will use brass tubing to do new tips):   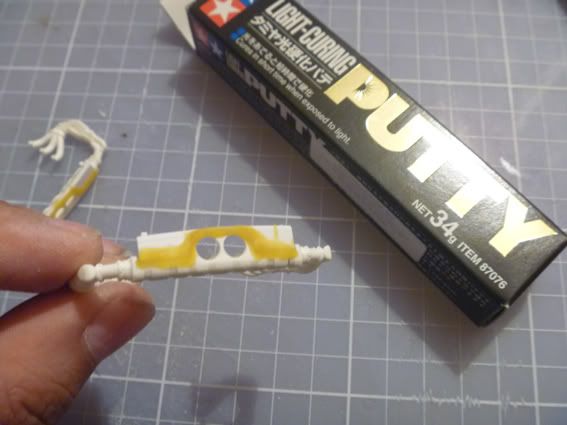 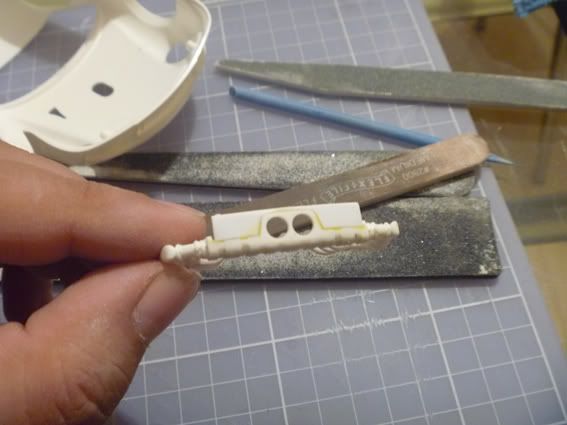 Now, the exhaust system looks complete in the carrera body. I will detail this part with alclad chrome and some heat stain painting. 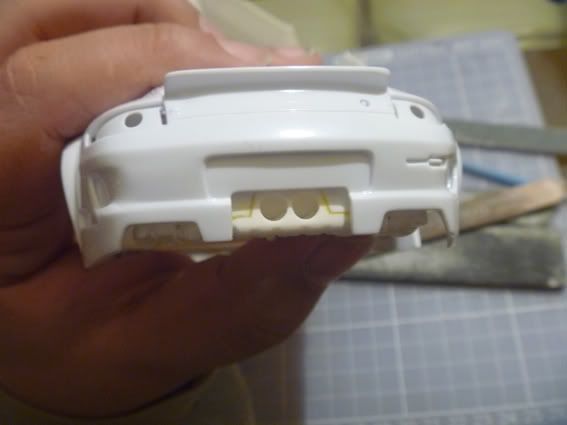 That´s it for the moment...I will prepare the body modification photos for my next post! Thanks for your interest and comments!  |
||||||
|
|
|
|
01-12-2012, 03:08 PM
|
#58 | |
|
AF Enthusiast
Join Date: May 2009
Location: Tucson, Arizona
Posts: 1,469
Thanks: 12
Thanked 126 Times in 120 Posts
|
Re: 2011 flying lizard porsches
Sam01 - I wasn't criticizing with my comments - just asking some questions and thinking in print with others - Your skill is above mine at this point and I am learning some good points from you and Nick "Jedi"- I have already made my own shocks and springs using wire and aluminum tubing and rod. I like your exhaust modification as I am trying to do the "blue" car first and that was a help as I was going over several ideas to correct that problem. I had also planned to use brass tubing for the exhaust. I am awaiting word on availability for some Hobby Design items for these cars. Unfortunately my digital camera is broken - so no pictures - and unless someone buys me one, my studies at the University here are spending all my money - I'm spending my food money to build my kits - just joking. I'm interested in your cut on the body panels Sam - any further thoughts? do you see what I mean about all the compound curves? It's not impossible, but it would take a lot to fix if it didn't work out. I think Nick's cut is more logical and then just modify the portion "corner" of the rear light on the Carrera RSR that is not correct. We wouldn't think less of you and your skills if you changed your mind about the place to cut. I made my "joint" cut solid by using 0.010" thick plastic strip behind the cut rather than what Jedi did. What thickness did you use on the exhaust modification? and the shock supports? both of those came out very nicely. - thank you for sharing this build with the forum - John
|
|
|
|
|
|
01-14-2012, 09:43 PM
|
#59 | |
|
AF Enthusiast
Join Date: May 2009
Location: Tucson, Arizona
Posts: 1,469
Thanks: 12
Thanked 126 Times in 120 Posts
|
Re: 2011 flying lizard porsches
Sam01 - do you know the Hobby Design part number for the GT3R BBS wheels they make?? - I've been looking for them but can't find them - thanks - John
|
|
|
|
|
|
01-14-2012, 10:28 PM
|
#60 | ||
|
AF Enthusiast
Thread starter
Join Date: Apr 2004
Location: mexico
Posts: 601
Thanks: 9
Thanked 30 Times in 27 Posts
|
Re: 2011 flying lizard porsches
Quote:
I am using Scale Production Wheels instead. They have separate chrome inserts, and aluminum rings. |
||
|
|
|
| The Following User Says Thank You to sam01contact For This Useful Post: |
John18d (01-14-2012)
|
| ||||||||||||||||||||||||||||
|
POST REPLY TO THIS THREAD |
 |
|
|


