|
|
| Search | Car Forums | Gallery | Articles | Helper | Air Dried Fresh Beef Dog Food | IgorSushko.com | Corporate |
|
|||||||
| WIP - Street Post topics for any "Works In Progress" street vehicles projects in this sub-forum. |
 |
 Show Printable Version | Show Printable Version |  Subscribe to this Thread
|
|
|
Thread Tools |
|
#31
 01-04-2009, 11:29 AM
|
||||
|
||||
|
Re: Ferrari 250GT SWB (Gunze/RM&M)
Time for an update. I've been working on the R&MM engine mostly. Engines are my favorite thing in the world and this has to be the nicest one I've ever had the privilege of constructing in this scale. The pieces are remarkable and the details very accurate in comparison with my reference material.
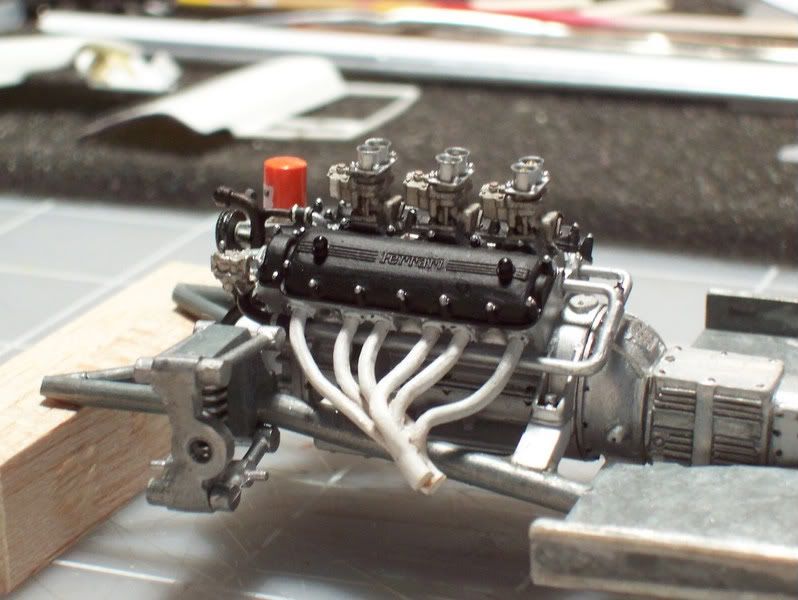 The block was sprayed with Model Master aluminum plate and weathered with Pollyscale oily black. I also shot the carb trumpets with aluminum plate, then rubbed in some S&J powder as Norm suggested in the instructions. He mentioned to me once that he wrote the instructions years before many of the current products were available and to substitute modern equivalents where appropriate. So far, I haven't needed to and I've learned some (many really) new techniques from that little instruction set! The carburetor bodies were brushed with Model Master Jet Exhaust lightened with silver, then the whole was weathered with oily black. The little brass fitting for the inlet filter was singled out for a dab of mixed Testor's copper/flat black.  Here is a shot of the engine in the car to check for hood clearance before attaching the carbs permanently. I measured for this when I modified the chassis engine mounts but it doesn't hurt to take a moment to verify. The carbs really came to life when I added the tiny venturi's to the inside of the trumpets. It's common to see this part a bit out of scale because roll cutting makes the wall thickness more pronounced. Before roll cutting each off the stock I squared the pretty end with a file, then machined the inside diameter with a #11 blade until there was no discernible wall thickness remaining. Then I roll cut the part and installed it with a dab of white glue using a piece of wire as an alignment tool. Be very careful pressing them into the bore and use a soft instrument like a toothpick. Otherwise you could dent the rim and have to start all over.  Another shot of the R&MM engine. It's a kit in itself and I think every Ferrari modeler should build one. Mind you I still have yet to install the throttle linkage, fuel line plumbing, distibutors, ignition looms, generator, coils, etc, etc ,etc, etc.... Last edited by CrateCruncher; 01-05-2009 at 08:18 AM. 
|
|
#32
01-04-2009, 12:18 PM
|
|||
|
|||
|
Re: Ferrari 250GT SWB (Gunze/RM&M)
This is rather impressive stuff. I'll definitely stay tuned, having the feeling that one can learn a thing or two from you. Keep up the progress!
|
|
#34
01-05-2009, 10:29 AM
|
|||
|
|||
|
Re: Ferrari 250GT SWB (Gunze/RM&M)
Wow. Wow! The engine is beautiful! I've been waiting to see the RMoM motor built up. It looks fantastic. You've done a superb job on it!
Your hinges and opening bits are great. Your building skills are phenomenal. I love your steering wheel. I am amazed that you're able to do that at 1:24. It just boggles! I kind of want to try it just to try it; not much that I build uses a wooden steering wheel but that looks like such a fun challenge that I might try it. That's just stunning and I don't know if I could actually make it come out. It's always a thrill when a new member comes in and surprises with fantastic skill and great talent. I can't wait to see this come together!!
__________________
It ain't cool 'till your wife hates it. Imagine a world without Alabama Recent builds: Rocket Bunny FR-S and stock BRZ Toyota bB Bro-style Civic K20 powered SiR converted EK WIP I build slowly and poorly. 
|
|
#35
01-08-2009, 05:57 PM
|
||||
|
||||
|
Re: Ferrari 250GT SWB (Gunze/RM&M)
Thanks for the kind and welcoming thoughts everyone. There are quite a few impressive builders on this forum raising the bar. I've been really stretching to the bleeding edge of my skills on this build which I have to think is a good thing.
Back to the build. I'm working on the notorius RMM throttle linkage the last couple of days and just about have it licked. I started out building it to the letter of the instructions.  Here is what the photoetch bits for the throttle shaft bearings start out looking like. After assembling the three pieces of etch the holes are reamed out. The next step is to slide them on the shaft and glue them to the engine. Once thats done, the two mounting holes in each bracket are used as guides to drill into the cam cover and sink a pair of Grandt bolts. Nothin' to it, right? This is the point where my head began spinning around and spraying puke on all the walls! The brackets kept popping off - start over. Once past that I couldn't for the life of me get those dang bolts in the tiny little holes. Argh!!!  So here is my solution. Thread the bolts into the brackets BEFORE mounting the brackets to the cam cover.  Tah Dah! Finished brackets in 20 minutes after fighting the other way for 4 hellish hours. (Those planning to build this engine might scribble a note in their instructions about this.)  Here the brackets are shown painted on the engine with the Grandt bolts installed and no one knows I cheated (Well except you guys reading this post that is).  So now it was on to more small scale lunacy with the links to the throttle bodies fabricated. The little black pieces represent ball-link keepers and are cut from wire insulation, expanded with a straight pin and slipped onto the shafts. They'll be painted silver but I kept them black so they would photograph. The little spring was made from a strand of the copper wire removed from the insulation used to make the ball-link keepers. It was just wrapped around a 0.01" rod and slipped off. Kinda cool hugh? I told you this engine was awesome!  And here finally is the entire assembly so far. The middle carb started my head spinning again until I remembered I have a loop light with a magnifier that put a ton of light right where I needed it. It was still kinda like finding a gnat sphincter with a railroad spike but everything went together eventually.  I measured for the last bend in each link individually by hooking the finished end in the carb and dabbing a tiny amount of white paint on the unfinished end where the bend needed to be. No way could I get a ruler in there!  I've still yet to mount the return spring or accelerator cable bracket and unfortunately 2/3's of this linkage is going to eventually be obscured by the fuel rail which fits onto the carbs just above it. One last comment. Make sure when building the SWB version of this engine that the intake manifold is slid as far forward in the valley as possible so the linkage lines up properly with all the other bits on the engine. The instructions aren't explicit on this so I centered it and wound up about 0.5mm too far back.
|
|
#37
01-08-2009, 11:27 PM
|
||||
|
||||
|
Re: Ferrari 250GT SWB (Gunze/RM&M)
Great work with the engine. I've built couple of these and "cheated" just like you
 You have made one small error that can cause some problems in the future. The cooling water lines that run to the back end of the block should be a lot closer to the engine behind the block. Please take a look at this picture to get a better idea what i mean. You have made one small error that can cause some problems in the future. The cooling water lines that run to the back end of the block should be a lot closer to the engine behind the block. Please take a look at this picture to get a better idea what i mean.-Niko
__________________
  
|
|
#38
01-09-2009, 04:39 PM
|
||||
|
||||
|
Re: Ferrari 250GT SWB (Gunze/RM&M)
Looks great so far
__________________
https://www.instagram.com/ecemodelling/
|
|
#39
01-09-2009, 09:16 PM
|
||||
|
||||
|
Re: Ferrari 250GT SWB (Gunze/RM&M)
Thanks guys! Niko, what on earth are you talking about? Whats wrong with my waterline?
 Slow progress today but got the lower ignition wires into the guides and spark plug cavities without much resistance. Oh, and I fixed the glaring error in the rear waterline. Thanks for the heads up Niko. It would have been more difficult to fix once the distributors are in place. Last edited by CrateCruncher; 01-09-2009 at 11:29 PM.
|
|
#40
01-10-2009, 09:31 PM
|
|||
|
|||
|
Re: Ferrari 250GT SWB (Gunze/RM&M)
Dude, this looks unbelievable! I really like your attention to detail.
I cannot wait to see this continue. When I the very first picture of a finished car, I thought that was your model. Now that I see this detail, I realize your model will very well end up looking just like your first picture of the real thing! Keep it up! Andy
|
|
#41
01-11-2009, 04:24 AM
|
|||
|
|||
|
Re: Ferrari 250GT SWB (Gunze/RM&M)
Now I understand why you did not start on the F40 TK yet
 .....stunning job you did on this one! I love the steering wheel and the engine is a little gem .....stunning job you did on this one! I love the steering wheel and the engine is a little gemTon
|
|
#43
01-17-2009, 03:38 PM
|
||||
|
||||
|
Re: Ferrari 250GT SWB (Gunze/RM&M)
FINALLY, I'm finished with the engine...Well, at least as much as I can do until the chassis and firewall are further along. This engine has been a great experience. It just kept getting more fun with every part I added.
I somehow had the foresight to scribble a note to myself years ago in the instructions to set the carb locations front to back using the fuel rail as a guide. Thank goodness I did. That part fit perfect. The yellow fuel line was enhanced by wrapping silver thread around a 30 gage piece of wire. I also had some compression fittings on-hand to enhance the fuel line. I bmf'd the tops of the crankcase breathers and dabbed a bit of smoke into the serrations. I may tone them down a bit later. They seem kinda bright. More fun with Grandt bolts on the generator mounts but things went much better this time. I've been making engine noises like a kid every time I look at it. What a great engine kit! Norm Veber and Replica's & Miniatures of Maryland made one fine engine...Enough talk, here's some pics:     
|
|
#45
02-07-2009, 11:13 AM
|
||||
|
||||
|
Re: Ferrari 250GT SWB (Gunze/RM&M)
Well it's been ages since my last update to this thread. I have been working on the model and taking quick pics along the way. My goal is to have it finished for a contest in San Antonio on the 21st. Only 2 weeks...
Gunze plastic is very brittle and I'm pushing it by opening up the body as I did. After breaking and repairing the A-pillars more times than I can remember I finally got smart and reinforced them with fine copper wire emersed in thick CA applied with the head of a pin. No more breaks and I can get back to building.  I debated over color for some time but ultimately decided it should be Ferrari RED. Finish was 3 coats Duplicolor white primer, 3 coats of TS-7 Italian Red knocked down with 6000, 1 thick coat of DuPont 2K ChromaClear, MicroMesh to 12000, and final polish with 3M Finesse-It II. Lotsa work! The rubber for the windshield was painted in prior to clear coating.  This photo shows the scratch built door upholstery being made to fit together. Panels are built-up styrene sheet sprayed with Tamiya primer, TS-29, then TS-6 for that cheap vinyl stretched over cardboard look. Window crank is a bent straight pin with roll-cut aluminum tube and 00-90 washer for bezel. The door handle was fabricated from aluminum wire with a needle file and steel wool, then drilled from the back for a length of straight pin. The other door handle is just about to be cut from the wire. (Kinda basic interior for 4.5 million bucks!  ) ) Here's a neat trick I discovered recently. I cook a lot and tried sharpening my exacto blades with the Heinckels sharpener I use for my cutlery. Since I cut a lot of metal and stuff I've begun using this tool constantly. 
Last edited by CrateCruncher; 02-07-2009 at 01:35 PM.
|
|
|
POST REPLY TO THIS THREAD |
 |
|
|


