|
|
| Search | Car Forums | Gallery | Articles | Helper | Air Dried Fresh Beef Dog Food | IgorSushko.com | Corporate |
|
|||||||
| WIP - Motorsports Post topics for any "Work In Process" motorsports vehicles in this sub-forum. |
 |
 Show Printable Version | Show Printable Version |  Subscribe to this Thread
|
|
|
Thread Tools |
|
#31
 03-27-2003, 02:47 AM
|
||||
|
||||
|
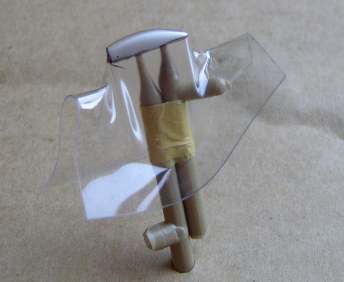
Small update (roof scoop)
I made the secondary roof scoop (not included in the kit) by heat forming a piece of thermaform plastic over a pattern made from plastic sheet.
  -Mikko 
|
|
#33
03-27-2003, 05:23 AM
|
||||
|
||||
|
Re: Small update (roof scoop)
Quote:

__________________
There is a lesson in every kit.
|
|
#34
03-27-2003, 05:30 AM
|
|||
|
|||
|
Re: Small update (roof scoop)
Quote:
Your Pug is coming along well, I look forward to seeing more progress. Ray
__________________
|
|
#36
04-26-2003, 07:48 AM
|
||||
|
||||
|
It's been a while since my last update, but the progress with the project has slowed down a bit.
I decided to remake the lower gravel shields, as the first ones were too thin in my opinion and more importantly the upper line was not quite straight. I made new shields by making the upper part from one plastic strip and then adding milliput epoxy putty to the lower part to make the shield look like one part. 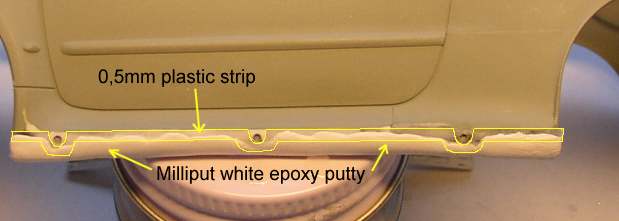 I also corrected the sit of the car by raising the rear suspension by about 0.5mm.  And then there's some progress in the interior. The spare wheel is actually a 14" wheel from Hasegawa Integrale, but it's practically impossible to see difference in size compared to other wheels. I added a round disc with 5 holes to the inside of the wheel to add a bit detail. Belt buckles are Reji's etched parts and belt is made of Tamiya masking tape painted blue. Fuel tank is covered with SMS carbon fibre decal.  That's all for now. I have some final priming to do on body and then I'm hopefully ready to paint it yellow with a mix of Tamiya acrylics. -Mikko
|
|
#38
04-26-2003, 08:31 AM
|
||||
|
||||
|
Very nice, but I have one question, do the gravel tires have the seam line down the center of the tires. I know some slicks do but I dont know if this could be corrected if not. Very Nice so far..
|
|
#39
04-26-2003, 09:20 AM
|
||||
|
||||
|
Looks super Mikko, really like the gravel sheilds, neat solution to the problem using the plastic card. Ride height look ready to rumble. The fuel tank looks good too, going to CF the mirror shells?
Quote:

|
|
#40
04-26-2003, 09:50 AM
|
||||
|
||||
|
Quote:
 No, I was just curious....
|
|
#42
04-26-2003, 12:13 PM
|
||||
|
||||
|
Yes, I'm going to carbon fibre the mirror shells too. However I think SMS black/pewter CF is a tad too bright or is that just an illusion? To my eyes the mirrors (and other CF:s too) look much darker in pictures.. Maybe I should give the mirrors a final coat with Tamiya's smoke or something like that to cut down that bright pewter color a bit.
And no, the should be no seam line on the tires. I just put them on so I could take photos. -Mikko
|
|
#43
04-26-2003, 08:24 PM
|
||||
|
||||
|
Quote:
|
|
#44
04-26-2003, 10:10 PM
|
|||
|
|||
|
Quote:
I don't know how easily you will be able to get it, but I have found the Renaissance C/F decals to be great as far as the darkness of the grey goes. On another note, I do know you can use Tamiya smoke over the SMS decals to make them look darker. Ray
__________________
|
|
#45
05-11-2003, 02:37 PM
|
||||
|
||||
|
The Pug has now received a couple of coats of paint. I made the yellow by mixing Tamiya's acrylic Lemon Yellow and some Orange, because Lemon Yellow was too bright. Now I have to wait for the paint to harden before I can polish it (it has some orange peel and few small imperfections which need to be taken care of).
I wasn't sure what color the undersurface shield should be. First I painted it silver, but then I thought it might be yellow because everything looks so yellow inside the radiator opening. I'm not sure if it's right, but I think yellow looks nicer than silver anyway:sun:  I haven't used Renaissance decals before, but atleast on the sheet they look nice...  ...except for the light misalignment of light blue:  That's it for now. Interior still needs seatbelts for the co-driver and then it's nearly finished. I hope it won't take long to finish the whole model, but now I have to wait for the paint on the body to harden and Tamiya acrylics need quite a long time to cure  -Mikko
|
|
|
POST REPLY TO THIS THREAD |
 |
|
|


![D[X]P's Avatar](image.php?u=58570&dateline=1092715420)

![Send a message via ICQ to D[X]P](https://staticaf.com/vbulletin/images/misc/im_icq.gif)
![Send a message via AIM to D[X]P](https://staticaf.com/vbulletin/images/misc/im_aim.gif)