|
|
|

|
|
| Search | Car Forums | Gallery | Articles | Helper | Air Dried Dog Food | IgorSushko.com | Corporate |
|
| Latest | 0 Rplys |
|
|||||||
| WIP - Motorsports Post topics for any "Work In Process" motorsports vehicles in this sub-forum. |
 |
 Show Printable Version | Show Printable Version |  Email this Page | Email this Page |  Subscribe to this Thread
|
|
|
Thread Tools |
 02-12-2011, 11:16 AM
|
#31 | |
|
AF Enthusiast
Join Date: Dec 2004
Location: Warsaw
Posts: 553
Thanks: 4
Thanked 6 Times in 4 Posts
|
Re: Ferrari F430 GT Krohn Racing
Great interior detailing! I like it very much.
|
|

|

|
|
02-12-2011, 07:01 PM
|
#32 | ||
|
AF Enthusiast
Thread starter

Join Date: Apr 2004
Location: mexico
Posts: 601
Thanks: 9
Thanked 30 Times in 27 Posts
|
Re: Ferrari F430 GT Krohn Racing
Thanks for your comments!!
Quote:
http://www.novedadesneon.com/EPaysof...045&CatID=1496 You can find the spring in a lot of colors. If you want the spring to have a specific shape, you can insert some solder wire and bend it to that position. About the length, the springs I bought are a foot long. Hope this info helps!  |
||
|
|
|
| The Following User Says Thank You to sam01contact For This Useful Post: |
rallymaster (02-18-2011)
|
|
02-13-2011, 08:23 AM
|
#33 | |
|
AF Enthusiast

Join Date: Jun 2006
Location: Swalmen, Netherlands
Posts: 798
Thanks: 3
Thanked 14 Times in 14 Posts
|
Re: Ferrari F430 GT Krohn Racing
That interior is looking very real.
You have a good eye for detail. Everything just looks right. Amazing stuff. And a great tip concerning the cooling hose. I have used accessories from Renaissance (look for BOAx parts) in the past. But they're rather small in size (max. 4 mm diameter) and quite expensive compared to your solution... |
|
|
|
|
|
02-17-2011, 08:02 PM
|
#34 | |
|
AF Enthusiast
Thread starter
Join Date: Apr 2004
Location: mexico
Posts: 601
Thanks: 9
Thanked 30 Times in 27 Posts
|
Re: Ferrari F430 GT Krohn Racing
Time for a new update!!
I finished the roll cage and glued it in it´s place. I added rubber protections and attached the seatbelts to the cage:  In this photo you can see that I added the missing electronic box in the rear wall of the cockpit. I wired this box and added the radio wiring (the one that goes to the driver´s helmet):  And here´s the hose that goes from the cooling box to the driver´s helmet: 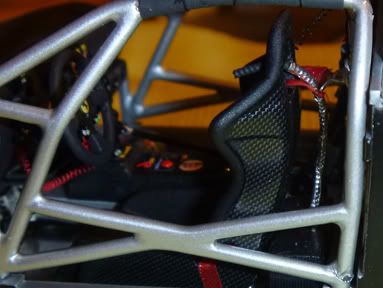 That´s it for the moment! I will begin work in the wheels and brake discs!! Thanks for watching!!  |
|
|
|
|
|
02-18-2011, 03:18 PM
|
#35 | |
|
AF Enthusiast

Join Date: Jul 2003
Location: Madison, Wisconsin
Posts: 2,493
Thanks: 7
Thanked 8 Times in 8 Posts

|
Re: Ferrari F430 GT Krohn Racing
Holy crap that is amazing! you must have some great reference photos
__________________

|
|
|
|
|
|
02-18-2011, 05:19 PM
|
#36 | ||
|
AF Enthusiast

Join Date: Jun 2005
Location: north-eastern France
Posts: 2,959
Thanks: 15
Thanked 148 Times in 147 Posts
|
Re: Ferrari F430 GT Krohn Racing
Sam,
thanks for your answer and tip !! excellent !!  I thought to a spring seeing it but didn't really dare to ask... Seemed too simple if not scratched !!  but it's really a spring and this is a great tip !  I'll try to find such things here. And what to say about your last update which is once more a kick in the ass...!! Great details, seems real...  Quote:
__________________
Phil 
|
||
|
|
|
|
03-29-2011, 03:41 PM
|
#37 | |
|
AF Enthusiast
Thread starter
Join Date: Apr 2004
Location: mexico
Posts: 601
Thanks: 9
Thanked 30 Times in 27 Posts
|
Re: Ferrari F430 GT Krohn Racing
Finally, after a month of being swamped at work, I had a little time to work on the Ferrari!
Inspecting the body, I see the proportions look good for a GT car. Minimal work will be needed to represent the Krohn racing car:  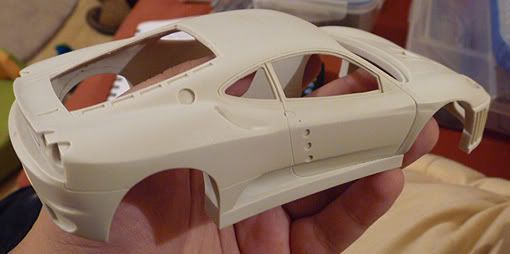 I'll cover the 2 NACA ducts in the front of the hood and open the square in the center to add styrene strips as air intakes:  In the rear, I'll open holes for the engine cover grilles: 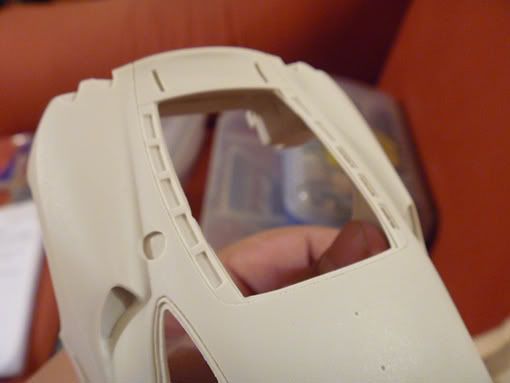 OK, Before I do those modifications, I sand off the molded-in door panels in the interior of the body. I'll use the Challenge panels and detail them separately:  And now I begin work in the body...I open the engine grilles: 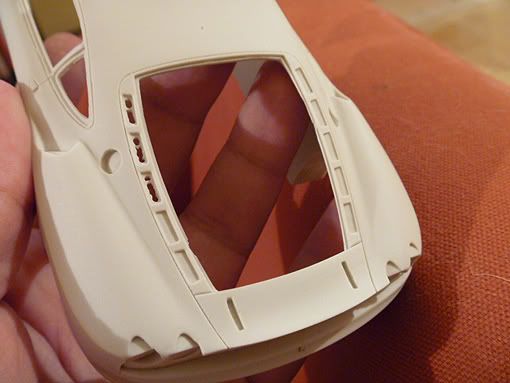 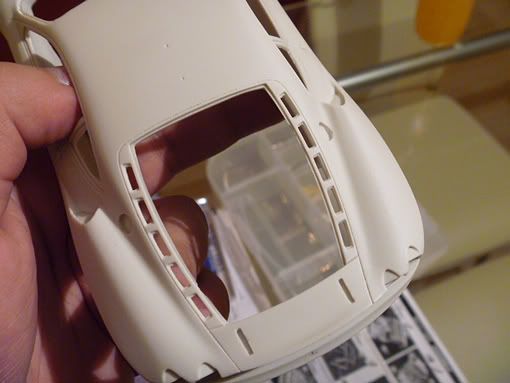 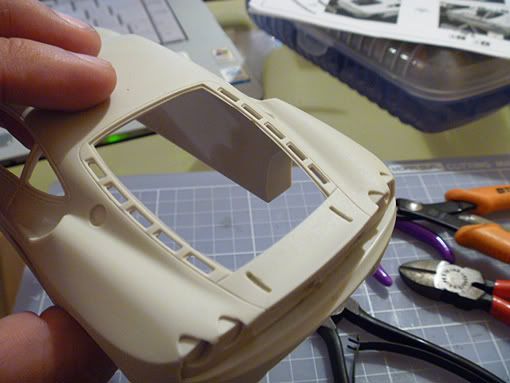 Next, I open holes for the rear ventilation grille. In this area, I open little holes for the engine cover fasteners:   While I work in the body, I prepare the little details for paint (lights, emblems, grilles, etc.):  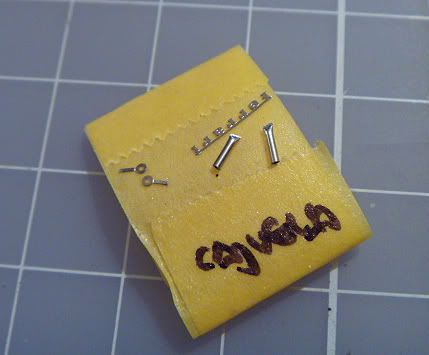  I open holes for the antennas and prepare their bases using hypodermic needles. I use a sharpening stone to level every cut I do on the needles:  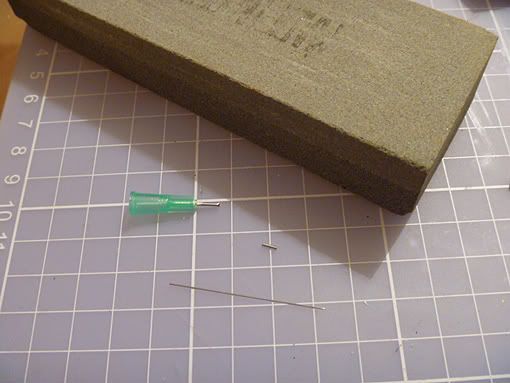  In the sides, I only need to open holes to mount the side mirrors. It's also necessary to fill the key holes in the doors. I use cyanoacrylate to fill the holes:   In the Studio 27 kit you will find white metal pieces to cover the NACA ducts if you want to. I use this pieces and cover them with cyanoacrylate to fill the holes:  The nose air intakes of the GT car must be more "square" than those in the Challenge version. You must have a lot of patience and care in this step, because the Studio 27 body has a lot of bubbles and irregularities in this area:  That's it for now! I hope to show you the painting process in my next post. Thanks for watching!! |
|
|
|
|
|
04-26-2011, 06:58 PM
|
#38 | |
|
AF Enthusiast
Thread starter
Join Date: Apr 2004
Location: mexico
Posts: 601
Thanks: 9
Thanked 30 Times in 27 Posts
|
Re: Ferrari F430 GT Krohn Racing
Thanks to a couple days off from work, I had some time to advance in this project:
Still in time, I realized I needed to make holes in the sides and front for some bolts.   I also needed to add a styrene strip to complete the "frame" of the air inlets in the front bumper: 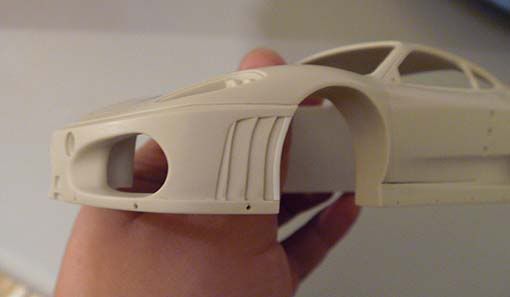 This image shows the interior door panels detailed and covered with carbon fiber: 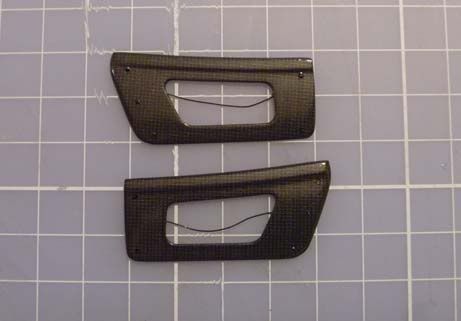 I realized the tyres were a little small for the rims, so I placed them in a tube a month ago, so they could stretch a little. Before I removed them from the tube, I applied warm air with a hair dryer to prevent them to shrink to their original size: 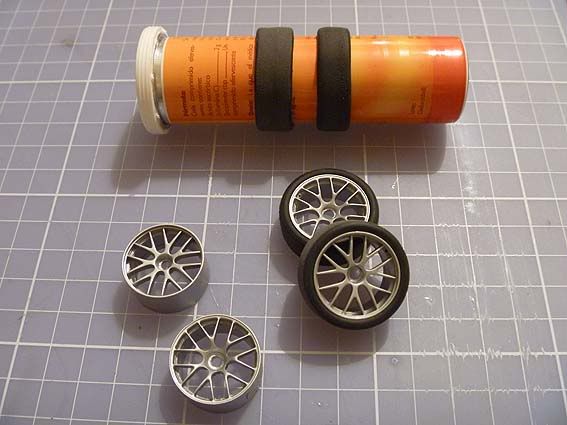 After placing the tyres in the rims, I applied the decals using some microsol. To make the decal film disappear, I placed a coin over the rims and sprayed some flat lacquer to the tyres. The coins prevented the lacquer to land on the rims, so they stayed shinny  Here´s a photo of the finished wheels. I used 2 sets of Hobby Designs rims (the rear rims should be "flatter" than the front ones). I sanded off the center nut and replaced them with Scale Production nuts: 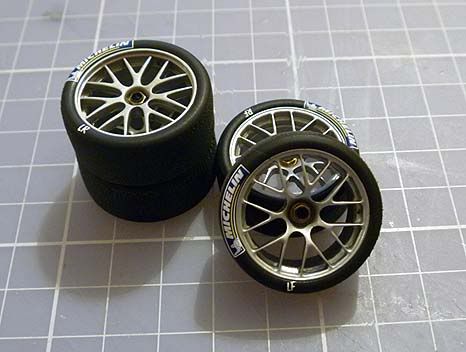 And finally, I began the paint process! First, I applied a "guide coat" with gray primer. That way, is better to see and correct any imperfections (in this photos you can see the hood air inlets I did with styrene stripes):  After correcting all the imperfections in the body, I applied 2 coats of white primer, as a base to the fluorescent green:   After wet sanding the white primer with a 8000 pad, I applied the green colour. This was a mix of fluorescent yellow and fluorescent green from ZERO PAINTS. The paint is very easy to apply and it dries with a matt finish, so it is very easy to sand off any dust particle or imperfection:  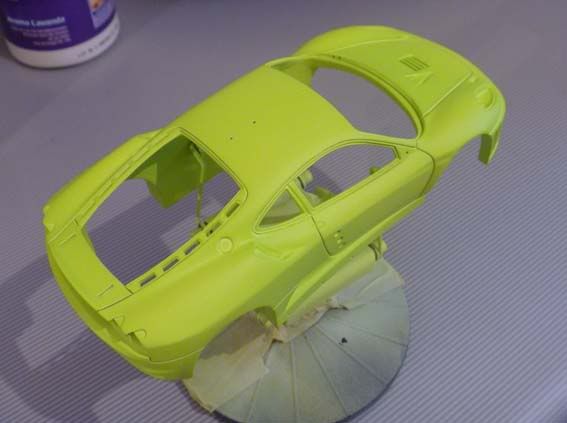  After 24 hours in the dehydrator, I applied ZERO PAINTS clearcoat. This stuff is simply excellent! The coverage is great and if you apply a final coat with a little more thinner, you end up with a great shine!! 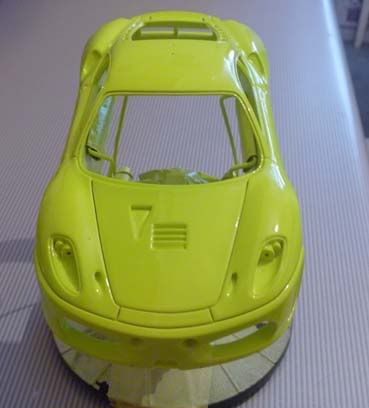  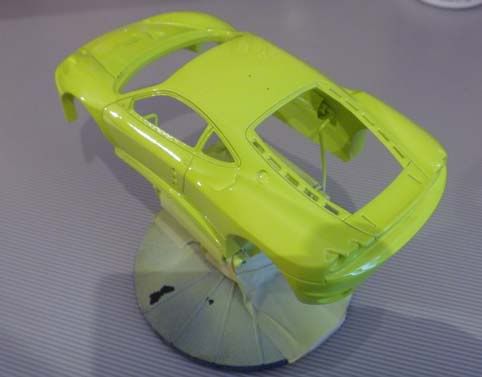 Well, that´s it for the moment. Next, I will paint the inside of the body and put the decals!! Thanks for watching! |
|
|
|
|
|
04-26-2011, 08:20 PM
|
#39 | |
|
AF Enthusiast

Join Date: Oct 2008
Location: Auckland
Posts: 2,761
Thanks: 51
Thanked 136 Times in 134 Posts
|
Re: Ferrari F430 GT Krohn Racing
Wow, love the Colour!!! Excellant work on the details too!!
__________________
 It's Not wheather you Win or Lose, its how you look while you play the Game |
|
|
|
|
|
04-27-2011, 01:53 PM
|
#40 | |
|
AF Regular

Join Date: Sep 2008
Location: Jacksonville, Florida
Posts: 310
Thanks: 11
Thanked 3 Times in 3 Posts
|
Re: Ferrari F430 GT Krohn Racing
very cool! i was hoping you would resume work on this build!
|
|
|
|
|
|
04-27-2011, 03:22 PM
|
#41 | |
|
AF Enthusiast
Join Date: Jul 2003
Location: Madison, Wisconsin
Posts: 2,493
Thanks: 7
Thanked 8 Times in 8 Posts
|
Re: Ferrari F430 GT Krohn Racing
Fun update to read through. Good job on the body prep
__________________
|
|
|
|
|
|
04-27-2011, 08:54 PM
|
#42 | |
|
AF Enthusiast
Join Date: Jun 2005
Location: north-eastern France
Posts: 2,959
Thanks: 15
Thanked 148 Times in 147 Posts
|
Re: Ferrari F430 GT Krohn Racing
eye-catching color !!
it's almost a pain there will be a livery to cover it !! A plain color body with only the racing attributions over will be the best livery possible IMO once all painting details done and PE details added.
__________________
Phil
|
|
|
|
|
|
04-27-2011, 10:05 PM
|
#43 | |
|
Mugrosa's Alley

Join Date: Apr 2009
Location: Kailua, Hawaii
Posts: 155
Thanks: 19
Thanked 11 Times in 11 Posts
|
Re: Ferrari F430 GT Krohn Racing
this is an awesome build, lots of good tips in this wip thanks and keep up the good work
__________________
I'm a Marine, I got this! |
|
|
|
|
|
04-28-2011, 11:30 AM
|
#44 | |
|
AF Enthusiast
Join Date: May 2003
Posts: 559
Thanks: 0
Thanked 1 Time in 1 Post
|
Re: Ferrari F430 GT Krohn Racing
Awesome skills my friend !
__________________
Mart Bee |
|
|
|
|
|
04-28-2011, 12:32 PM
|
#45 | ||
|
AF Enthusiast
Thread starter
Join Date: Apr 2004
Location: mexico
Posts: 601
Thanks: 9
Thanked 30 Times in 27 Posts
|
Re: Ferrari F430 GT Krohn Racing
Thanks for the kind words! I am having lots of fun with this one!
Quote:
In this case, I actually like the contrast between the blue stripes and the green colour. |
||
|
|
|
| |||||||||||||||||||||||||||||||||
|
POST REPLY TO THIS THREAD |
 |
|
|


