|
|
|

|
|
| Search | Car Forums | Gallery | Articles | Helper | Air Dried Beef Dog Food | IgorSushko.com | Corporate |
|
| Latest | 0 Rplys |
|
|||||||
| WIP - Street Post topics for any "Works In Progress" street vehicles projects in this sub-forum. |
 |
 Show Printable Version | Show Printable Version |  Email this Page | Email this Page |  Subscribe to this Thread
|
|
|
Thread Tools |
 08-06-2010, 05:16 PM
|
#31 | |
|
AF Regular

Join Date: Jun 2005
Location: Hammond, Louisiana
Posts: 477
Thanks: 13
Thanked 2 Times in 2 Posts
|
Re: Novitec Rosso Ferrari 599
Man this is a real grate subject you have going on here, grate body work man keep it up.
__________________
Oops I didn't see you down there sorry for running you over!  http://s162.photobucket.com/albums/t248/White_r34/ |
|

|

|
|
08-09-2010, 01:12 AM
|
#32 | |
|
AF Enthusiast
Thread starter

Join Date: Jun 2008
Location: Kuala Lumpur
Posts: 505
Thanks: 2
Thanked 6 Times in 6 Posts
|
Re: Novitec Rosso Ferrari 599
tompidom, gionc & white_r34: thanks
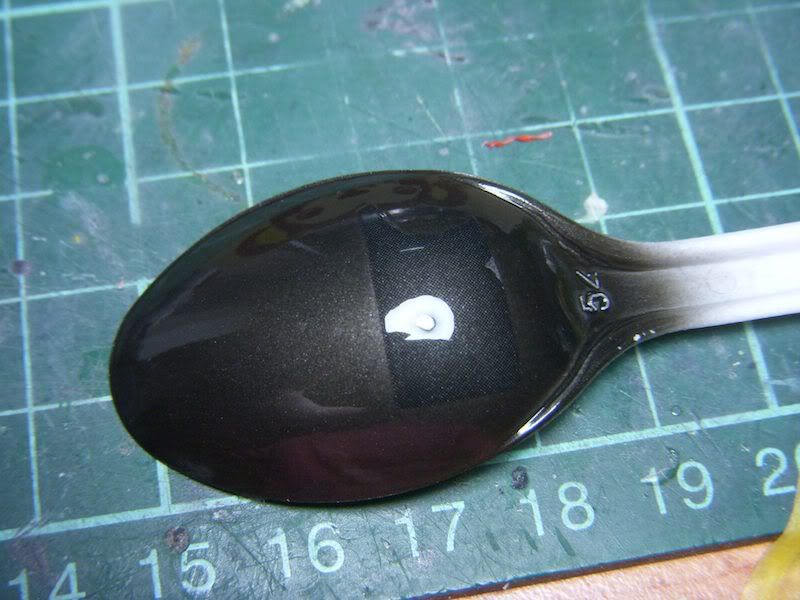
 robi j: actually that's exactly what i've plan in my mind, hope it turn out what i want  scratch built the door pocket, sorry for the dark pics   i need to use some matte black for the under chassis & wheels, but i'm not too sure to use flat black or semigloss black. so i test it again on the spoon left: gunze flat black VS right: gunze semigloss black  left: gunze semigloss black VS right: gaia black 60% + gunze flat base 20% + steel 20%  i might use gunze semigloss black or the gaia mix for the chassis & rear diffuser, the flat black is too flat IMO Last edited by Entau; 08-09-2010 at 07:34 AM. |
|
|
|
|
|
08-09-2010, 02:26 AM
|
#33 | |
|
AF Enthusiast
Join Date: Apr 2010
Location: Noord-Holland
Posts: 649
Thanks: 30
Thanked 56 Times in 40 Posts
|
Re: Novitec Rosso Ferrari 599
Id say go for the semi gloss!
__________________
Check out my Youtube Channel for Video's of my builds and some tips and tricks http://www.youtube.com/user/xrcflash https://www.facebook.com/thescalemodelingchannel My online webshop www.thescalemodeler.com |
|
|
|
|
|
08-10-2010, 12:02 PM
|
#34 | |
|
AF Regular

Join Date: Jan 2005
Location: Puebla
Posts: 439
Thanks: 6
Thanked 13 Times in 3 Posts


|
Re: Novitec Rosso Ferrari 599
I would go also for the semi gloss black, that would be close to the real thing.
You did a very good choice on the CF decals pattern size, (here is where I went wrong with mine, LOL) and I'm sure you will get them right. What I did to ease the process was using two decals, one for the lower section (from the middle of the air vents) and then another for the upper section, don't do it with one decal. Great job, keep it coming!
__________________
Happy modeling! Ramon Garcia Puebla, Mexico |
|
|
|
|
|
08-10-2010, 03:32 PM
|
#35 | |
|
Getting Old...
 Join Date: May 2003
Location: Lugano, Switzerland
Posts: 753
Thanks: 0
Thanked 0 Times in 0 Posts
|
Re: Novitec Rosso Ferrari 599
Great work. Saw a 599 on the street the other day. What a fantastic looking car.
Keep up with the great details. Very interesting and impressive. Anyone that has really tried to make small details like that (like the window switch, or the door pocket), knows that getting them so nice and neat is NOT an easy task. Thanks for the WIP. It will be fun to follow along. Murray |
|
|
|
|
|
08-10-2010, 03:37 PM
|
#36 | |
|
AF Regular
Join Date: Dec 2007
Location: Atlanta, Georgia
Posts: 136
Thanks: 0
Thanked 2 Times in 2 Posts
|
Re: Novitec Rosso Ferrari 599
Very nice work. I really like the modification of the center console. I have to get some of those photo etched blades. They seem to be pretty handy.
|
|
|
|
|
|
08-10-2010, 11:40 PM
|
#37 | |
|
AF Enthusiast
Thread starter
Join Date: Jun 2008
Location: Kuala Lumpur
Posts: 505
Thanks: 2
Thanked 6 Times in 6 Posts
|
Re: Novitec Rosso Ferrari 599
yeah, semigloss it will be
tompidom, murray & pharr7226..thanks  ramon, thanks for the tips..looks like i've to split it pharr7226, actually the photo-etch you saw in the vent cutting pic is just to show i cut it, i didn't use it, i use those with tiny saw, they cut nicer but much slower  ok, some updates  the first door pocket was glue using thin cement, result was not so good because it soften the plastic too much, the 2nd one was glue with super glue, result was much better & easier, i was able to glue it more 'straight', the first one soft too much it bend  bottom is the 2nd door pocket  then i trace out the carbon fiber shape   done with interior modification & detailing, only require minor 1000 wetsand on some places, should be able to start painting any time soon    |
|
|
|
|
|
08-11-2010, 05:22 AM
|
#38 | |
|
AF Enthusiast

Join Date: Mar 2004
Location: Gold Coast, AUSSIE!!!!
Posts: 827
Thanks: 26
Thanked 32 Times in 32 Posts
|
Re: Novitec Rosso Ferrari 599
really, really sweet build!!
I'm lovin this build!
__________________
   
|
|
|
|
|
|
08-11-2010, 08:29 AM
|
#39 | |
|
AF Enthusiast

Join Date: Feb 2006
Location: Salonica
Posts: 1,336
Thanks: 138
Thanked 111 Times in 106 Posts
|
Re: Novitec Rosso Ferrari 599
Awesome, just perfect...
The interior is absolutely amazing... |
|
|
|
|
|
08-11-2010, 09:30 AM
|
#40 | ||
|
AF Newbie
Join Date: May 2010
Location: Moscow
Posts: 21
Thanks: 3
Thanked 0 Times in 0 Posts
|
Re: Novitec Rosso Ferrari 599
Quote:
|
||
|
|
|
|
08-12-2010, 12:13 AM
|
#41 | |
|
AF Enthusiast
Thread starter
Join Date: Jun 2008
Location: Kuala Lumpur
Posts: 505
Thanks: 2
Thanked 6 Times in 6 Posts
|
Re: Novitec Rosso Ferrari 599
countach, gtziaf & scolopendra: many thanks
my cutting mat's unit is 1x1cm for each square box although i really wanted to start painting on my interior, but i guess maybe not, better finish all modification & sanding work before any paint job, my table is super messy   Novitec Rosso's side vent is sightly larger than the stock 599, and the shape also more edgy  so i roughly marked the shape, file the hole to make it bigger and then filled with polyester putty  then i carefully sand to get the shape, because it's not easy to get a straight line   still a lot of work is require  Exhaust tip also different from stock 599, i tried sanding on the plastic but don't think i can get the result i want, it's too thick and difficult to get it thin  so i try this, 4mm metal tube from MSM, although slightly bigger than i want, i think it's better than the plastic  so i cut it half, mark the length with tape, file & sand it off, then insert some plastic on the bottom to act as female peg, and slowly file & sand to get the slanted shape  here's how it look, but not yet finish...still need some sanding to get it right   and the tricky rear spoiler, i have no idea how the thing looks like, only base on few angle from my reference pics, so the shape might not be correct   sand, sand, sand and more sanding until i got his     comments are welcome |
|
|
|
|
|
08-12-2010, 03:42 AM
|
#42 | |
|
AF Newbie
Join Date: May 2009
Location: Nottingham
Posts: 72
Thanks: 5
Thanked 2 Times in 2 Posts
|
Re: Novitec Rosso Ferrari 599
There are some reasonable pics showing the rear spoiler here - http://www.novitecuk.com/prod-599-images.html
|
|
|
|
|
|
08-12-2010, 11:13 AM
|
#43 | |
|
AF Regular

Join Date: Sep 2008
Location: Jacksonville, Florida
Posts: 310
Thanks: 11
Thanked 3 Times in 3 Posts
|
Re: Novitec Rosso Ferrari 599
Between you Ramon I swear I am never going to try to build another Ferrari kit again. Hats off to you sir, you are making it all look so easy!
Stuart |
|
|
|
|
|
08-12-2010, 12:21 PM
|
#44 | |
|
AF Enthusiast
Thread starter
Join Date: Jun 2008
Location: Kuala Lumpur
Posts: 505
Thanks: 2
Thanked 6 Times in 6 Posts
|
Re: Novitec Rosso Ferrari 599
ukponchoman, thanks...but still no top view which i'm looking for...
 Stuart, don't said that  , i actually gain a lot of tips from ramon's wip, i admit it's no easy...take the air condition vent for example, he separated it but i destroy it luckily i have replacement parts and that was already in plan..... i didn't follow exactly, only what i think i'm capable of, so do you , i actually gain a lot of tips from ramon's wip, i admit it's no easy...take the air condition vent for example, he separated it but i destroy it luckily i have replacement parts and that was already in plan..... i didn't follow exactly, only what i think i'm capable of, so do you |
|
|
|
|
|
08-16-2010, 03:29 AM
|
#45 | |
|
AF Enthusiast
Thread starter
Join Date: Jun 2008
Location: Kuala Lumpur
Posts: 505
Thanks: 2
Thanked 6 Times in 6 Posts
|
Re: Novitec Rosso Ferrari 599
small update on the headlight:
i use some kotobukiya parts again for the headlight, size was correct but too thick  so i attach it to a dremel and thin it down with knife & smoothed with sandpaper 800 grit   basicly the original headlight is too short and inaccurate, so i separated it for easier painting and more realistic looking  compare to the original, although not much difference, but imperfection masking will show it a lot  the transparent headlight cover also doesn't fit, it is protruding from the body contour, so i carefully sand off the transparent part to make it fit & flush with the body  |
|
|
|
|
|
|
POST REPLY TO THIS THREAD |
 |
|
|