|
|
| Search | Car Forums | Gallery | Articles | Helper | Air Dried Fresh Beef Dog Food | IgorSushko.com | Corporate |
|
|||||||
| WIP - Motorsports Post topics for any "Work In Process" motorsports vehicles in this sub-forum. |
 |
 Show Printable Version | Show Printable Version |  Subscribe to this Thread
|
|
|
Thread Tools |
|
#17
 06-03-2009, 05:01 AM
|
||||
|
||||
|
Re: Jordan 191
I was waiting for your next plastic project despite I enjoyed the previous metal ones. What to say? Simply fantastic, I could yet image the final result. You amaze us !
Robi 

|
|
#18
06-03-2009, 08:35 AM
|
||||
|
||||
|
Re: Jordan 191
Hello jaykay. One question: when you've built your jig you considered the height from the ground? Because in your photos the undertray of the car seems in contact with the ground. Perhaps you have done so only to get a reference of the x and y position of the axes of the wheels, not for the z one ....
Sorry for my english. I hope you understand me so far. This car seems to become a DaVinci like your previously McLaren.
|
|
#19
06-03-2009, 09:58 AM
|
|||
|
|||
|
Re: Jordan 191
Grazie ragazzi. Siamo molto italiano oggi:-)
Maxone....no problem at all. Your english is surely better than my italian....especially because when i write it's usually only phonetics. I only learned to speak some:-) You observed the layout for the jig right. The undertray sits on the ground and the metal pins are a reference for the uprights in x, y and z ( without brakes and wheels attached ). Once the wheels are attached the car will sit allright. I chose to do it like this because it makes the jig more simple and it takes the tolerances of the wheels and brakes out of the system when i rebuild the suspension arms between the monocoque/transmission and the uprights. You'll see:-) I've been busy with the lathe and mill the last weekend. When i have organized that stuff and taken some pictures i'll post an update.
|
|
#20
06-03-2009, 11:21 AM
|
||||
|
||||
|
Re: Jordan 191
OK.
I ask that because, only in my mind, I thought something like this for my Benetton B188 ... far away light years from your realizzation, but in my mind the ideas run free  . I don't know how you'll have the correct "order" (does it the right way to translate "assetto"? I don't know . I don't know how you'll have the correct "order" (does it the right way to translate "assetto"? I don't know ), but I seen that you can do things that we, umans, can't. ), but I seen that you can do things that we, umans, can't.Good work! EDIT: Ok, I'm stupid. I have seen the photos one more time and I understand how. Bye.
|
|
#21
06-03-2009, 04:50 PM
|
|||
|
|||
|
Re: Jordan 191
Hi everyone, as promised heres some more progress.
Last weekend I finally had some time to play with the lathe and mill ( I dont wanna push the envelope with my neighbours too much so I cant do that during weeknights :-) and now I can show you some new parts. I mainly focused on the wheels and uprights. At first I wanted to modify the kit uprights and use them. Here you see the fronts ( already a bit sanded ): 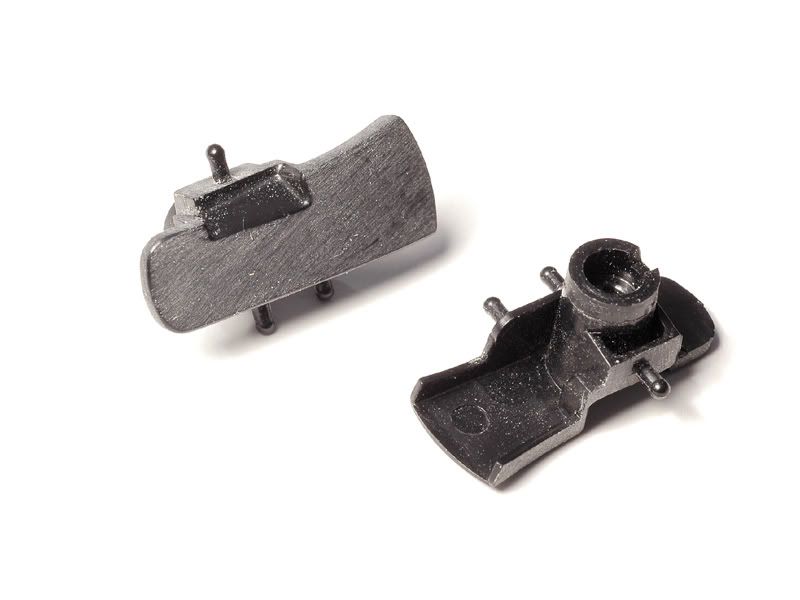 and the rear ones together with the typical Tamiya brakedisc + calliper pieces: 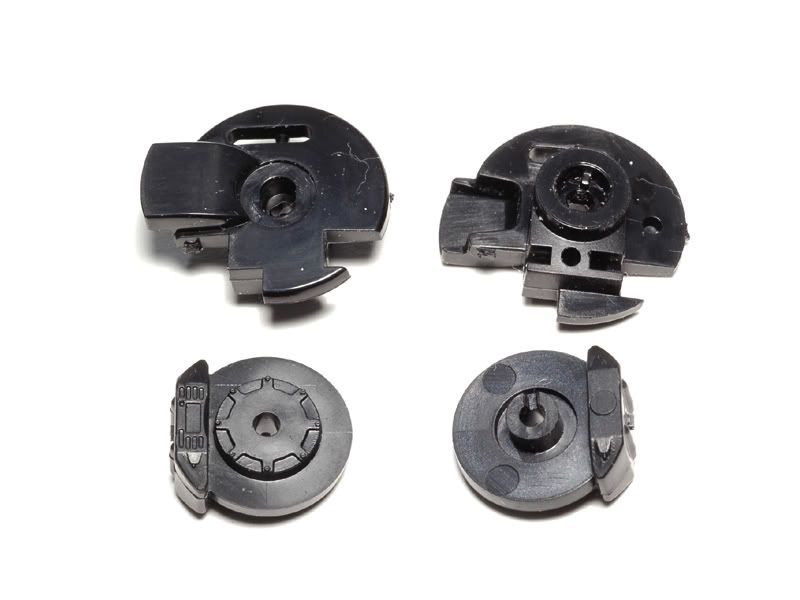 After some fiddling and checking against the reference pictures I realized though theres no point and I should rather build the uprights from scratch. The Tamiya parts are all right as long as you keep the wheels mounted, but I want them removable and then it would show the suspension arms are not connected like on the real 191. So I made some bits from renshape on the lathe. The small round hub is further detailed with segments from the big ring which needed more sanding and filing. 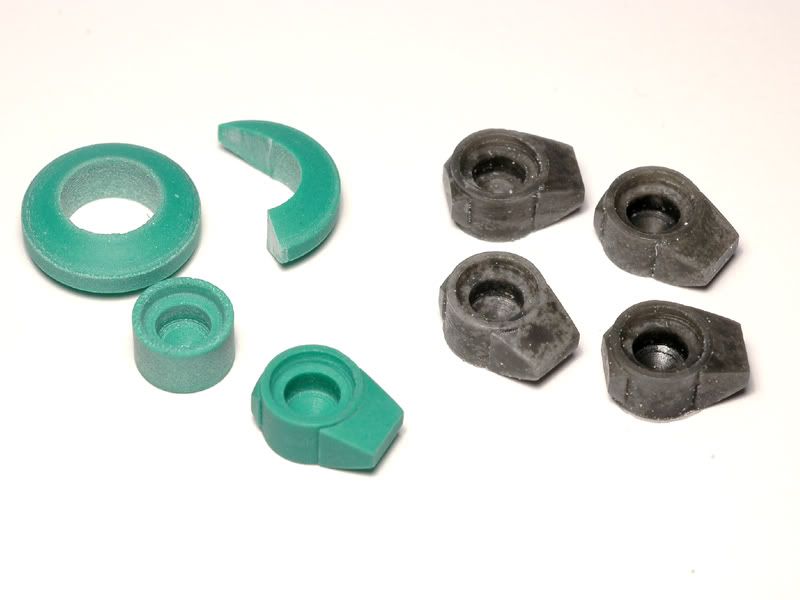 That took quite some time and instead of making all four that way which was the original plan, I decided to cast the rest from resin. They do need more work of course to connect the suspension arms ( different for front and rear ). To make the wheels removable ( and the wheels and brakediscs rotate together ) I had to make axles and proper wheelnuts instead of the Tamiya screws. Here is one screw in the making from brass rod. At first I expected problems with the little extension shaft ( or however you may call that ) of the nuts because thats all very thin but they worked just fine. I used brass because I want to blacken them chemically later. 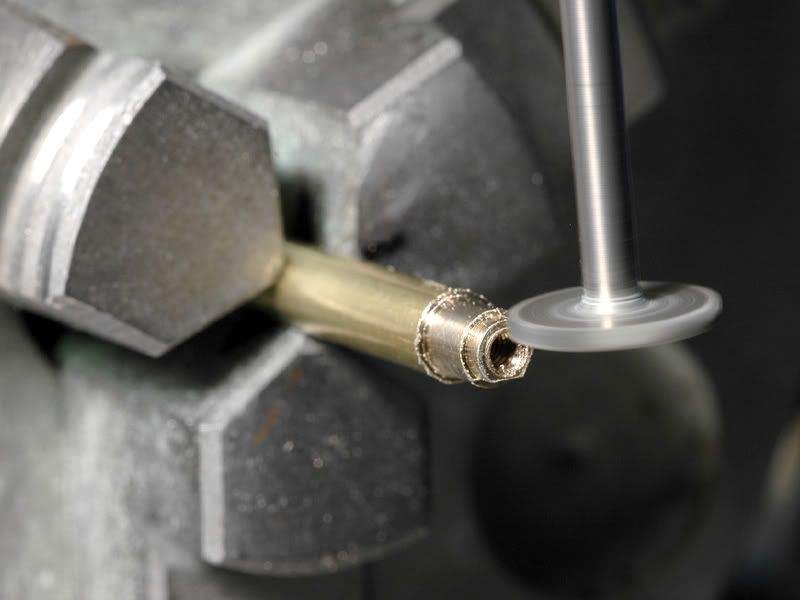 In the meantime however I got the impression from reference pictures, that Jordan used the black nuts only on the left side and red ones on the right. Can anyone confirm that? The stub axles were then turned from aluminium and the little green rings will later fix the axles in the uprights and keep them movable. 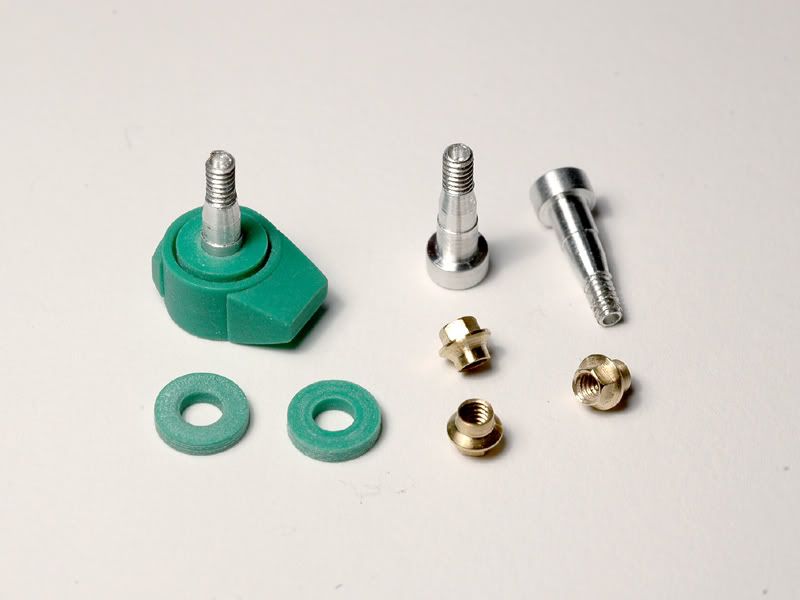 I also made new brakediscs from renshape. They have the same size as the kit ones and I put in the ventilation holes. In front you can see the PE parts I made for the hub things that hold the discs. 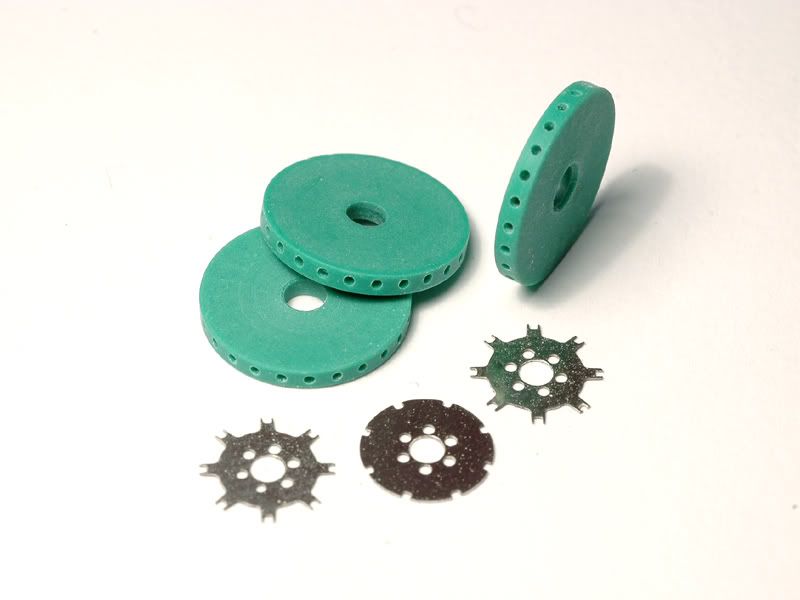 Here are all the parts put together. 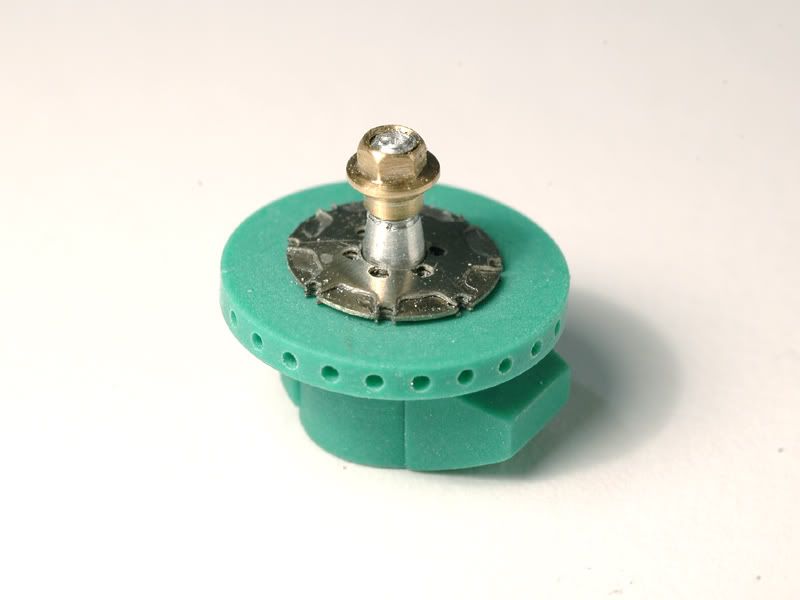 Unfortunately I got the placement and size of the six holes around the axle in the etched parts wrong when I did the artwork before actually starting work on the kit back in winter, so I have to redo them along with some other etched parts that didnt come out right because I was a bit ambitious with sizes and stuff :-) Of course I also did something about the brake callipers. They have to be separate from the discs. I cut one off its Tamiya disc and filed and sanded and then milled it and added some detail to finally get the part on the left: 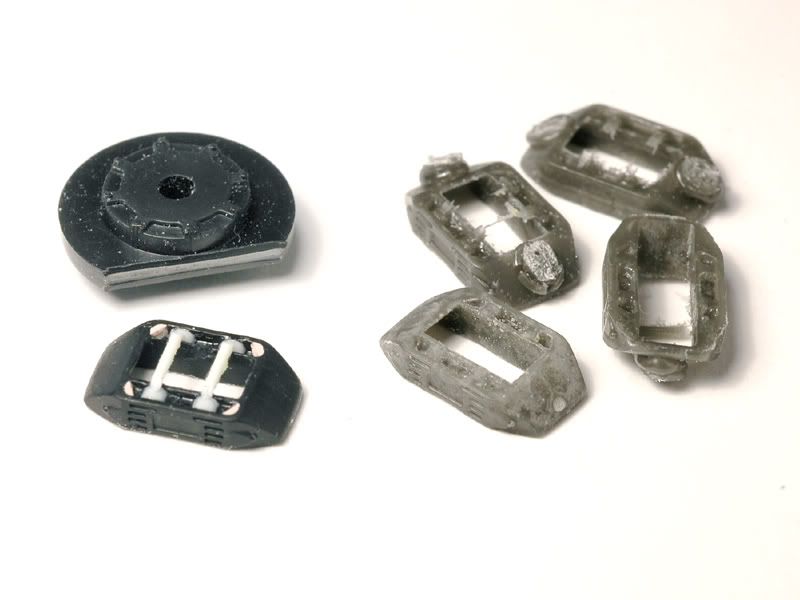 Since that was a lot of work again that I didnt wanna repeat 3 more times I cast it. The resin bits to the right are not really convincing like they are now but some cleanup should help :-) Finally to get the wheels mounted to my new hubs and brakes I had to modify the Tamiya rims as well. I enlarged the centre holes to fit the axles and added a shamfer at the front for the wheelnuts. On the insides I puttied the ejector pin marks and the big circular gap around the spokes that Tamiya had to leave open to avoid sink marks on the outside. 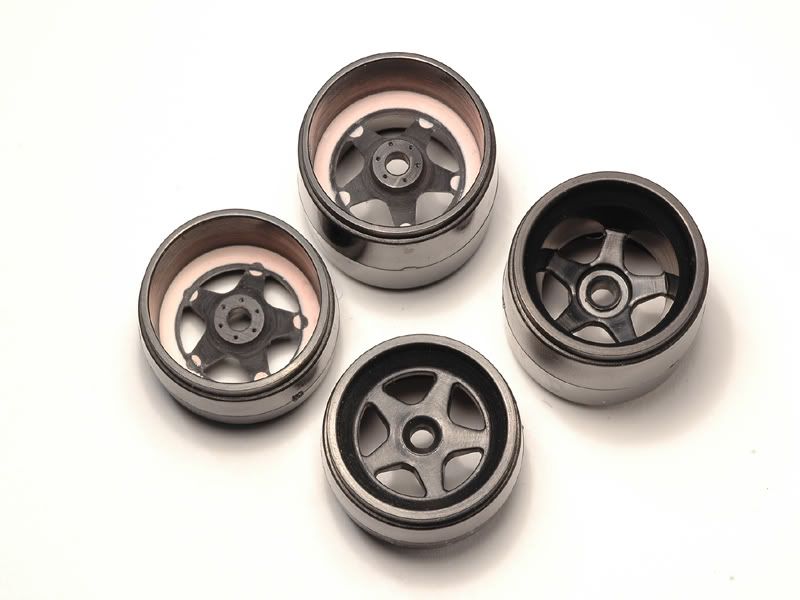 I filled everything up with thinned polyester putty and then sanded the rims chucking them in the lathe first and later my hand drill/motor tool for the fine work. Finally I made the 6 holes whose positions I got wrong on the opposing brakedisk PE parts. They are a bit small yet but that will be changed later. So, thats it again. I hope you liked it and stay tuned for more :-) P.S......Jochen....congrats for the best of show award for your DBR9! That's definitely deserved and quite an achievement among all those plane and armor dudes :-)
|
|
#23
06-03-2009, 07:35 PM
|
||||
|
||||
|
Re: Jordan 191
Hey this is cheating lol!!!
|
|
#24
06-04-2009, 01:20 AM
|
||||
|
||||
|
Re: Jordan 191
Scale magic fantasy !! Love it

__________________
Guideline for happy modeling: Practice on scrap. Always try something new. Less is more. "I have a plan so cunning, you could put a tail on it and call it a weasel" - Edmund Blackadder
|
|
#25
06-04-2009, 11:53 AM
|
||||
|
||||
|
Re: Jordan 191
Excellent work as usual JayKay. Thank you for sharing all your progress to see how everything goes together and let us get inside your mind. I look forward to the next update!
__________________
-Mike AF Director of Media / Photographer  [email protected] | AutomotiveForums.com | Flickr Gallery
|
|
#27
06-04-2009, 06:48 PM
|
||||
|
||||
|
Re: Jordan 191
Absolutely stunning!
__________________
Mario Covalski Editor Modeler Site http://www.modelersite.com 2000-2013 Thirteen years online!
|
|
#29
06-05-2009, 10:25 AM
|
||||
|
||||
|
Re: Jordan 191
Gorgeous work JayKay!
 I may have missed the plot, but are you doing you own photoetching now, or are you farming it out to someone else? Also, any chance we can have a look at that milling tool not spinning please? I use an ordinary end mill for such jobs and I'm interested in seeing what you are using! Best of luck with it!
|
|
#30
06-05-2009, 02:41 PM
|
|||
|
|||
|
Re: Jordan 191
No problem cinqster. Here's a picture of the milling heads i'm using most of the time:
 I use them mostly in the hand piece of my motor tool for grinding and stuff but also in the mill when they fit the task. For the wheel nuts i used the one on the very left but others would have done the job as well. I also have some small "standard" milling heads ( the ones that look like drills ) but need more variety there. I should mention though that the wheelnuts were sanded with fine sandpaper after milling. They looked rougher before :-) I do make my own photoetch. The only part i "farm out" is the making of the films. I posted the steps in my MP4/4 build report so i didn't repeat all that again here: http://www.automotiveforums.com/vbul...=444745&page=4
|
|
|
POST REPLY TO THIS THREAD |
 |
|
|


 Awesome!


