|
|
|

|
|
| Search | Car Forums | Gallery | Articles | Helper | Air Dried Dog Food | IgorSushko.com | Corporate |
|
| Latest | 0 Rplys |
|
|||||||
| WIP - Motorsports Post topics for any "Work In Process" motorsports vehicles in this sub-forum. |
 |
 Show Printable Version | Show Printable Version |  Email this Page | Email this Page |  Subscribe to this Thread
|
|
|
Thread Tools |
 09-18-2007, 02:15 PM
|
#16 | ||
|
AF Fanatic
Thread starter

Join Date: Dec 2004
Location: Up the creek with no paddle
Posts: 5,889
Thanks: 7
Thanked 16 Times in 15 Posts
|
Re: 36 cylinders
Quote:
 I understand you and all I can say is that it turned out not be hard at all. The way I did it was to drill out the placement holes and dry fit 2 parts together, put a fair amount of flux paste on the joint, get the solder melted onto the tip of the iron and then quickly transfer it to the join, not holding the iron too long in place. Keep a wet sponge at hand and use it to clean the tip of your iron after every join - the benefit is amazing (you'll see what I mean  ) ) I have read that for proper soldering you are supposed to heat the parts to be joined but I selected to 100% IGNORE that rule for reasons you can imagine  Afterwards I smoothed things down a bit with files and sand paper. TBH it is not perhaps as good as it might appear in the photos (although it is not bad!  ) but I also tried to put the most solder in places which will not be at all visible after assembly. ) but I also tried to put the most solder in places which will not be at all visible after assembly.HTH but if you have more questions, fire away!
__________________
Guideline for happy modeling: Practice on scrap. Always try something new. Less is more. "I have a plan so cunning, you could put a tail on it and call it a weasel" - Edmund Blackadder |
||

|

|
|
09-18-2007, 02:38 PM
|
#17 | |
|
Authorized Vendor

Join Date: Oct 2005
Location: Vicenza - veneto de rassa
Posts: 3,910
Thanks: 6
Thanked 47 Times in 41 Posts
|
Re: WIP Aston Martin DBR9 by MFH
Superjob!
Warm up parts tip is used with brass or other metals: just place a bit (very bit) of solering stain over the liquid flux, brushed in the junction, warm up parts and..... just magic parts are seamed togheter without any file job needed Obviously you can't use with white metal
__________________
 gio gio
|
|
|
|
|
|
09-18-2007, 03:05 PM
|
#18 | |
|
Razor Sharp Twit
 
Join Date: Mar 2004
Location: london
Posts: 5,865
Thanks: 0
Thanked 26 Times in 22 Posts
|
Re: WIP Aston Martin DBR9 by MFH
my "cheap" soldering iron looks so much cheaper than yours......
__________________
AF's Guidelines Read them. __________________  Currently in the process of re-hosting my photos. If any go missing, drop me a PM. |
|
|
|
|
|
09-18-2007, 03:46 PM
|
#19 | |
|
AF Enthusiast

Join Date: Feb 2006
Location: Chichester
Posts: 755
Thanks: 9
Thanked 1 Time in 1 Post
|
Re: WIP Aston Martin DBR9 by MFH
being away from home is rubbing 'cos you end up missing out on threads like this. Fabulous start Stevanski - I#ve not built a full resin kit but the work I had to do on the tail of 917K was enough for me. Your bringing this right up to a top standard, seem like everyone's prep work is just getting better and better. Cracking stuff! Another thread to follow!
__________________
Sean _______________________________ http://www.scalereproductions.co.uk _______________________________ WIP: Ferrari F40 |
|
|
|
|
|
09-18-2007, 04:10 PM
|
#20 | ||
|
AF Fanatic
Thread starter
Join Date: Dec 2004
Location: Up the creek with no paddle
Posts: 5,889
Thanks: 7
Thanked 16 Times in 15 Posts
|
Re: WIP Aston Martin DBR9 by MFH
Quote:
 Thanks, but I haven't done anything very original here except maybe the airjacks  I am just borrowing a lot of other peoples' ideas and leads e.g. Jamme's DBR9, your builds etc etc. I do have a couple of cunning plans of my own for this one though (just call me Baldric-ski  ) )I can say though that my newest toy from Dremel is making this kind of kit an absolute breeze! Their Dremel Stylus ( here and here ) is just perfect for multimedia kits and modeling in general I think. It sits beautifully in the hand, has variable speeds and is much easier to use than that flexi-cord thing of theirs. I can highly recommend it!
__________________
Guideline for happy modeling: Practice on scrap. Always try something new. Less is more. "I have a plan so cunning, you could put a tail on it and call it a weasel" - Edmund Blackadder |
||
|
|
|
|
09-18-2007, 05:24 PM
|
#21 | ||
|
AF Moderator

Join Date: Sep 2002
Location: Fort Worth, Texas
Posts: 3,262
Thanks: 38
Thanked 314 Times in 241 Posts
|
Re: 36 cylinders
Quote:
|
||
|
|
|
|
09-18-2007, 08:19 PM
|
#22 | |
|
AF Enthusiast
 
Join Date: Mar 2004
Location: Calgary
Posts: 1,071
Thanks: 0
Thanked 0 Times in 0 Posts
|
Re: WIP Aston Martin DBR9 by MFH
Great start, I'll be watching as I have one to do. What I really want to know is what's in the Thunder Valley box?
Mike
__________________
    |
|
|
|
|
|
09-18-2007, 10:11 PM
|
#23 | |
|
Image Hosting Exceeded
Join Date: May 2003
Location: Flying in circles
Posts: 4,233
Thanks: 23
Thanked 97 Times in 87 Posts
|
Re: WIP Aston Martin DBR9 by MFH
Gaaahhhh- must resist multimedia kits. Must resist!! Resolve weakening...
This will not help. Looks like a terrific project. Nice work with the soldering. I found it a major PITA on my 7, so I'm resenting you for having it go right on your first go. Also nicely done on the diffuser- seems like a nasty litte bit of work that you cleaned up beautifully. Now cover that beast with primer! I'm looking forward to seeing that paint.
__________________
PHOTOBUCKET SUCKS |
|
|
|
|
|
09-19-2007, 04:38 AM
|
#24 | |
|
AF Newbie
Join Date: Feb 2006
Location: Berlin
Posts: 51
Thanks: 0
Thanked 0 Times in 0 Posts
|
Re: WIP Aston Martin DBR9 by MFH
@Stevensky and Gio: Thanks 1000 times for your advices. It seems I have to buy an soldering iron today and give it a try.
|
|
|
|
|
|
09-19-2007, 06:22 AM
|
#25 | ||
|
AF Fanatic
Thread starter
Join Date: Dec 2004
Location: Up the creek with no paddle
Posts: 5,889
Thanks: 7
Thanked 16 Times in 15 Posts
|
Re: WIP Aston Martin DBR9 by MFH
Quote:
Basically it is a thick piece of foam with a removable felt top. I bought it some time ago and it is a wonderful addition to my bench top! It is a great surface to work on for assembly of parts etc. etc. If you drop something it doesn't break, chip or bounce onto teh floor TBH I can't imagine working without it now and it only costs $5 I think. Otherwise you must be referring to my Thunder Valley detail set for the Tamiya Lotus 25 - but since you can't see that in any of the photos, I guess not
__________________
Guideline for happy modeling: Practice on scrap. Always try something new. Less is more. "I have a plan so cunning, you could put a tail on it and call it a weasel" - Edmund Blackadder |
||
|
|
|
|
09-19-2007, 10:07 AM
|
#26 | ||
|
Razor Sharp Twit
Join Date: Mar 2004
Location: london
Posts: 5,865
Thanks: 0
Thanked 26 Times in 22 Posts
|
Re: WIP Aston Martin DBR9 by MFH
Quote:
__________________
AF's Guidelines Read them. __________________ Currently in the process of re-hosting my photos. If any go missing, drop me a PM. |
||
|
|
|
|
09-19-2007, 11:06 AM
|
#27 | ||
|
AF Fanatic
Thread starter
Join Date: Dec 2004
Location: Up the creek with no paddle
Posts: 5,889
Thanks: 7
Thanked 16 Times in 15 Posts
|
Re: WIP Aston Martin DBR9 by MFH
Quote:

__________________
Guideline for happy modeling: Practice on scrap. Always try something new. Less is more. "I have a plan so cunning, you could put a tail on it and call it a weasel" - Edmund Blackadder |
||
|
|
|
|
09-19-2007, 01:22 PM
|
#28 | |
|
AF Enthusiast

Join Date: Apr 2004
Location: mexico
Posts: 601
Thanks: 9
Thanked 30 Times in 27 Posts
|
Re: WIP Aston Martin DBR9 by MFH
klutz, you are doing a wondeful job!! Glad to see you took the soldering way!
|
|
|
|
|
|
09-19-2007, 03:34 PM
|
#29 | |
|
Registered User

Join Date: Feb 2003
Location: Berlin
Posts: 1,410
Thanks: 3
Thanked 3 Times in 3 Posts
|
Hey Klutz awesome work you've done there, good to see some of the MFH kits actually being build!
I'm building this kit too at the moment (Silverstone 05) but do you know the funniest thing? The progress pics look almost the same, I cut out the vents, drilled holes in the louvers, made air jack parts, drilled out the exhaust...and so on  One thing you should check, I saw on one build here that the left rear wheel was way to much inside the fender. I got the same thing on my kit, so I fixed it with some some new turned spacers for them. Here's a pic  the first two from left are front, then right rear and left rear which shows clearly that I needed a way longer spacer. Which color will you use for the rims? Oh by the way really good idea soldering the roll cage I might try that too.. My WIP will be up as soon as I painted the first layers green |
|
|
|
|
|
09-19-2007, 04:16 PM
|
#30 | ||
|
AF Fanatic
Thread starter
Join Date: Dec 2004
Location: Up the creek with no paddle
Posts: 5,889
Thanks: 7
Thanked 16 Times in 15 Posts
|
Re: WIP Aston Martin DBR9 by MFH
Quote:
Yes, I found that too - here's my picture 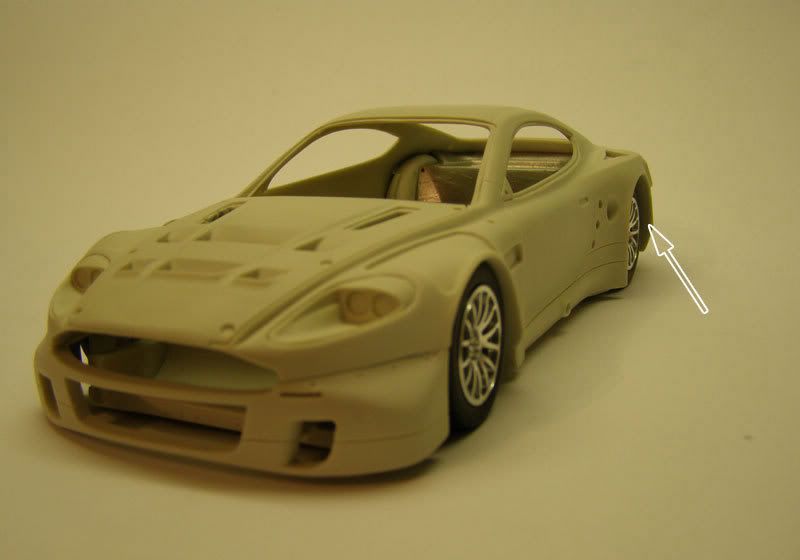 Unfortunately I can't turn anything as nice as yours  so I am planning on some simple DIY spacers so I am planning on some simple DIY spacersI could ask you the same question about the wheels I have a problem with choosing the color for them  Looking forward to your WIP! It'll be great having someone else to "borrow" ideas from! Other things I have found are the seat position is not so good and the gear lever also needs re-positioning
__________________
Guideline for happy modeling: Practice on scrap. Always try something new. Less is more. "I have a plan so cunning, you could put a tail on it and call it a weasel" - Edmund Blackadder |
||
|
|
|
|
|
POST REPLY TO THIS THREAD |
 |
|
|

