|
|
| Search | Car Forums | Gallery | Articles | Helper | Air Dried Fresh Beef Dog Food | IgorSushko.com | Corporate |
|
|||||||
| WIP - Street Post topics for any "Works In Progress" street vehicles projects in this sub-forum. |
 |
 Show Printable Version | Show Printable Version |  Subscribe to this Thread
|
|
|
Thread Tools |
|
#16
 07-23-2005, 08:48 PM
|
|||
|
|||
|
wow thats a beautiful car, but one question? does it have any good engine detail cause thats my favorite part of building models

|
|
#17
07-24-2005, 07:14 PM
|
||||
|
||||
|
Re: WIP: Fujimi 1/24 Ferrari 550 Maranello
The interior isn't too bad (I've seen worse), but there are a few problems.
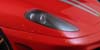
The most noticeable ones are the seat and the inner door panels. They're from the 575M instead of the 550. If you're painting the interior black, it won't be so noticeable, but for any lighter colors like tan, gray or red, you'll want the correct ones. Also, the side of the center console doesn't drape down long enough, and the edges of the black part (the carpeted area) is too sharp. I'll patch a sheet of plastic to extend the leather area, and round the edges of the carpeted area with a file and sandpaper. The back of the head-rest is provided in the kit, but not for the seat itself, so it has to be filled with polyester putty, or just close it with a styrene sheet. Also, the seatbelt anchor cover isn't tall and rounded properly, but again adding a styrene sheet will correct this easily.  Here is the comparison between three door panels. I think the Bbrago looks the best. Also the Bbrago diecast has better engine details, so if you're going to kitbash, I'll want a Bbrago instead of Maisto.  Here, I fitted the slightly narrower Maisto tire on the Fujimi wheel, and it looks alright, but... 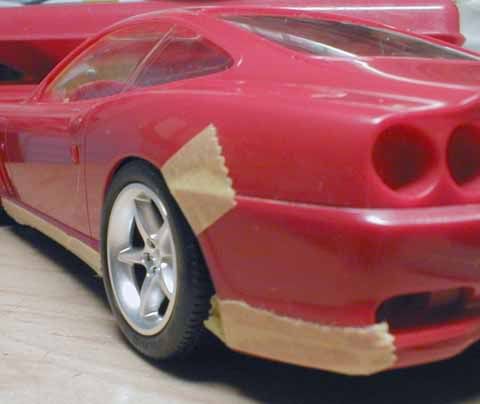 ...the problem is the front. Maisto uses the same tire for both front and rear, so the front is unusable. 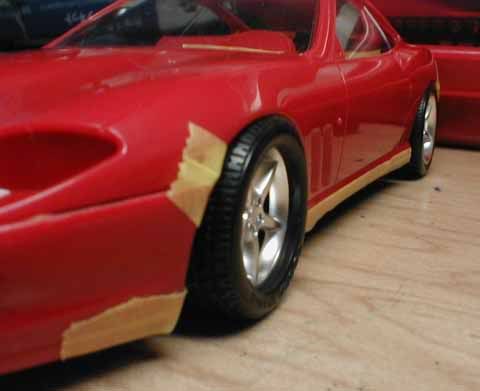 Like I mentioned in the previous post, I cut the inner lip so that the tire sits slightly inward. It corrected the chunky look of the rear tire in a matter of a handful of seconds. 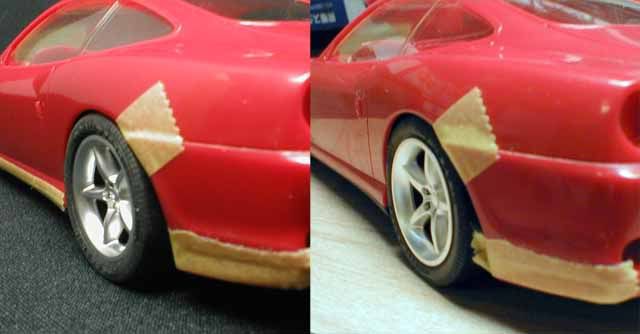
Last edited by hirofkd; 07-24-2005 at 10:45 PM.
|
|
#18
07-24-2005, 07:27 PM
|
|||
|
|||
|
Re: WIP: Fujimi 1/24 Ferrari 550 Maranello
Lookin good, glad to see you're takin the time to check out the flaws and end up with the best result, are you gonna make it red or go for a different color with this one?
|
|
#21
07-26-2005, 05:55 AM
|
||||
|
||||
|
Re: WIP: Fujimi 1/24 Ferrari 550 Maranello
Here're some updates on the body work.
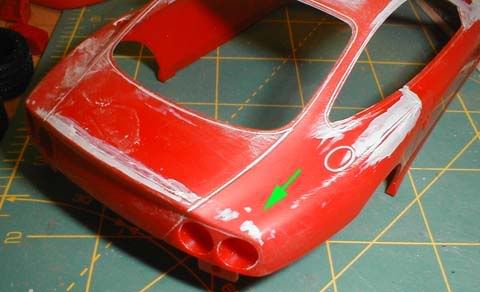
Fujimi missed a few spots. They're all minor, and easy to fix. The center part of the rear bumper should be lower, and if my calculation is correct, it should be about 11 mm wide. Use a round file to make two "gutters" and then a flat file to remove the remaining part. 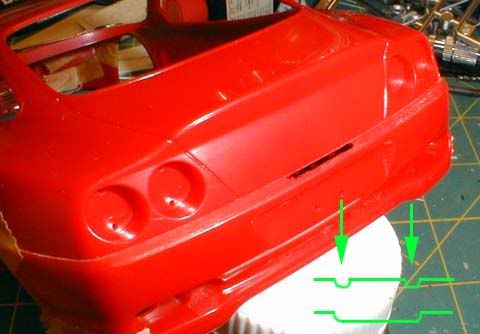 Another omission is the panel lines near the A-pilars (green arrow). The line from the hood should extend to the door. Place a ruler and scribe the omitted lines using the back of a hobby knife. I decided to remove the window sealing strips to minimize the steps caused by the thickness of the body part. I engraved a line along the raised sealing strip detail, and then filed it off. 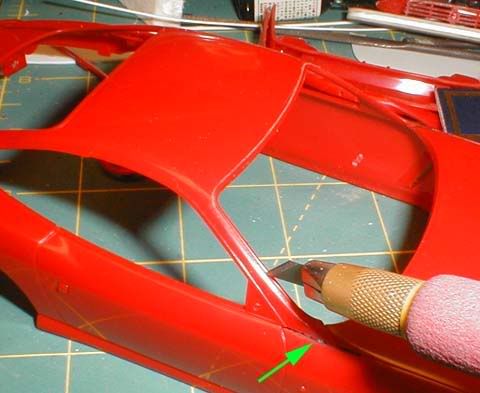 I sanded a portion of the roof so that the edge makes a smooth curve (top). Then, I applied GSI's Mr. Surfacer to fill scratches.  Here is the result It's a little hard to see, but now the step is less than 0.3 mm. The rear window frame was treated the same. 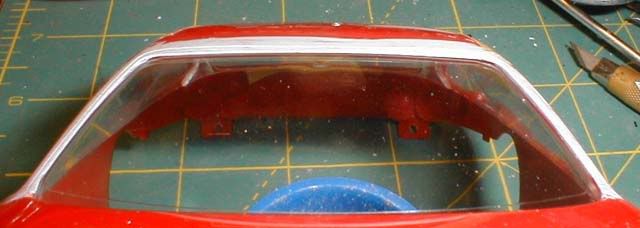 I placed the clear part, and drew lines to see how much sanding was necessary. In some areas (especially around the top of the rear quarter window), the offset is almost 2 mm! 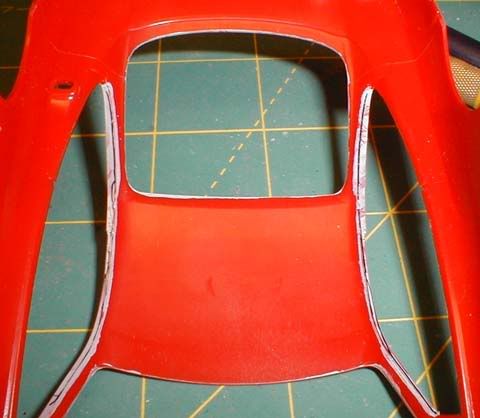 I engraved a line along the rubber strip just like I did earlier. Because the kit is still new and the condition of the mold is good, the seam lines are very fine and hard to see (green arrows). 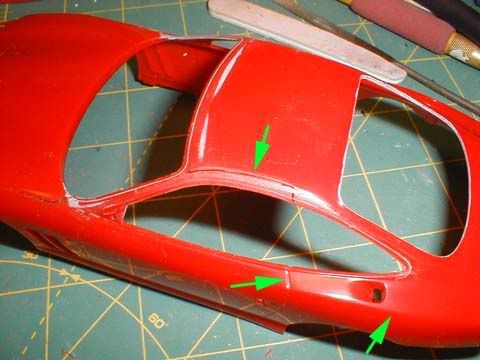 I got frustrated by the amount of sanding I had to do, so I used one of the coarsest nail file, knowing that I could remove large scratches using medium and fine files successively. But OOPS, I accidentally erased a part of the engraving and ended up re-scribing it again. This is the classic case of "Haste makes waste." 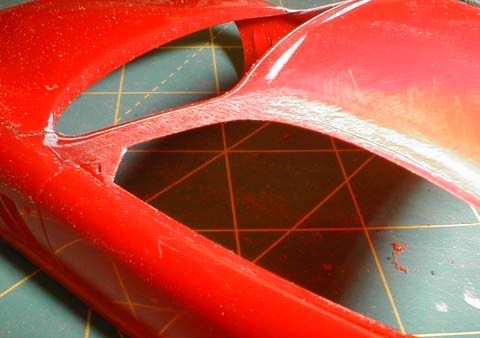 This is the result. The step is now less than 1 mm, and for the amount of work and time spend on this correction, it looks fairly decent. 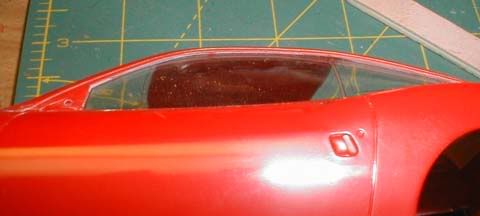 After major sanding was done, scratches had to be filled with primer. Locally applied primer should be sanded and polished to match the bare plastic, or the brush-strokes will be noticeable primer is sprayed later. 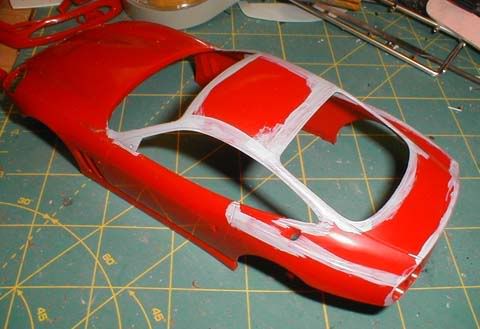 There's a fairly noticeable step along the panel line between the hood and the front fender, so I filed and leveled the step (green arrow). Also, I enlarged the air outlets using a sharp hobby knife. 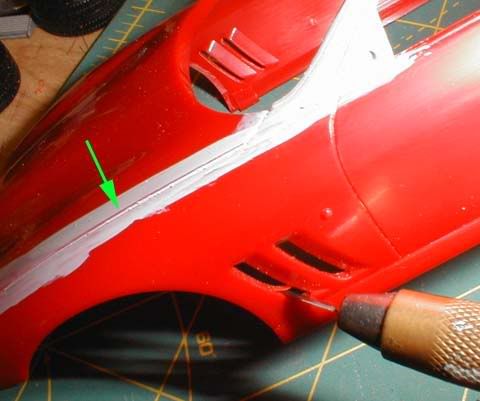 Although not shown here, the body has been already primed. While waiting for the primer to dry, I'll work on the interior.
|
|
#22
07-26-2005, 07:04 AM
|
||||
|
||||
|
Thank you! Looking great! You found a few areas I missed. I'm prepping mine for primer and this helps a lot. My bumpers didn't fit well at all, they were both bowed out and had to be bent on both sides to fit flush w/the body.
__________________
My Fotki Album
|
|
#23
07-26-2005, 08:13 AM
|
||||
|
||||
|
Re: WIP: Fujimi 1/24 Ferrari 550 Maranello
I agree with Bob - thank you! This saves a lot of research time! Great progress so far!
__________________
The client is not always right. - Enzo Ferrari ItalianHorses.net    
|
|
#24
07-26-2005, 08:57 AM
|
||||
|
||||
|
Re: WIP: Fujimi 1/24 Ferrari 550 Maranello
Wow, this kit looks like a huge pain!
__________________
*Lady Modeler* Hers: 2000 Mustang GT - Bright Atlantic Blue 1999 Honda Civic - Milano Red His: 1999 Camaro SS - Hugger Orange 1969 Camaro w/ LT1/T56 Swap - Hugger Orange
|
|
#25
07-26-2005, 09:39 AM
|
||||
|
||||
|
Re: WIP: Fujimi 1/24 Ferrari 550 Maranello
Maranello C
 lness!! lness!!
__________________
http://public.fotki.com/tonioseven/
|
|
#26
07-26-2005, 10:25 AM
|
||||
|
||||
|
Re: Re: WIP: Fujimi 1/24 Ferrari 550 Maranello
Quote:
.Some of the fixes are to items (vent openings) that simply had to be molded that way, it's the nature of plastic and molds. Others are more picky like correcting the scale of the window trim. Adding the missing panel lines and the bevel under the trunk lid takes only a few minutes. My Maranello bumpers didn't fit too well, they both had to have the ends bent in slightly to line up w/the fenders. Looked bad, but the fix was easy. If someone does a simple buildup OOB it's going to look quite good regardless  . Just because people are correcting some minor details doesn't make it a bad kit. . Just because people are correcting some minor details doesn't make it a bad kit.This kit isn't a pain. Waiting about 8 years for a Maranello kit was a royal pain   . .
__________________
My Fotki Album
|
|
#27
07-26-2005, 04:32 PM
|
|||
|
|||
|
Re: WIP: Fujimi 1/24 Ferrari 550 Maranello
Why did it take so long for someone to put out this kit? I don't have it, but it looks like a really nice kit, but still, between Tamiya, Revell, and Fujimi, you'd think someone coulda put it out sooner, the 550/575 replacement is a year away. Keep up the good work though, sorry bout my rambling, what color is it gonna be?
|
|
#28
07-26-2005, 04:41 PM
|
||||
|
||||
|
Why the Maranello was avoided for so long is anyone's guess. It's probably a combination of the hobby market changing, and Mattel licensing Ferrari models for awhile that screwed up the availability of all plastic Ferrari kits. Ever since that eased up, there have been a number of new Ferrari kits issued and many older ones reissued.
There was a time when the Maranello would have been a Tamiya kit without question. But this car came at the wrong time for Tamiya to do a new Ferrari model, and by the time Tamiya was making new Ferrari models again the Maranello probably wasn't new and hot enough for them to consider. I'm just glad we got this one, it's much easier to make this one look good vs. upgrading a Maisto or Burago diecast of it. I sure hope Tamiya, and not Fujimi, does the F430.
__________________
My Fotki Album
|
|
#29
07-28-2005, 11:53 PM
|
||||
|
||||
|
Re: WIP: Fujimi 1/24 Ferrari 550 Maranello
I always wet-sand the entire body to check for any dimples or bumps. I found very shallow indentation above the tail lights (arrow), but little bit of extra sanding took care of it.
 When I test-fitted the rear bumper, there was a light gap. I noticed that the bottom part of the tail light brackets interfered with the bumper, so I filed the marked areas. 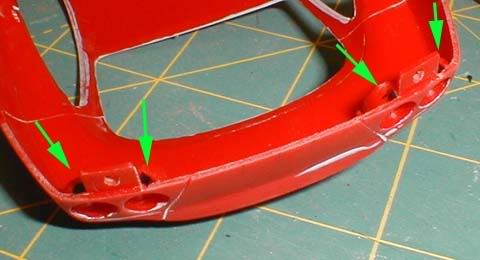 If you're making the US version, make sure to remove the side turning lights, and add the corner markers on the f/r bumpers. After painting the body color, you can apply pieces of baremetal and coat them with clear orange and clear red to simulate them. 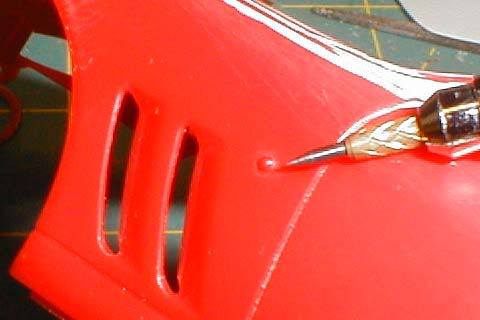 Another pleasant surprise is the headlight cover. It fits perfectly. 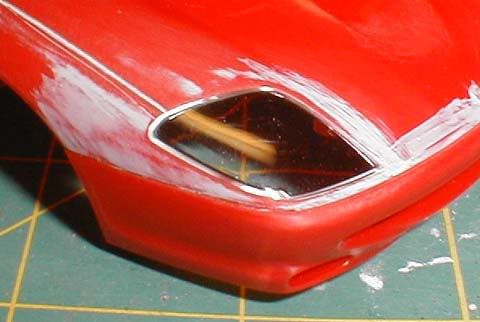 I sprayed Tamiya gray primer on a piece of plastic, then painted it with TS-51 Racing Blue--my color of choice. Gray undercoat looked too dark, so I decided to use white for the base coat. 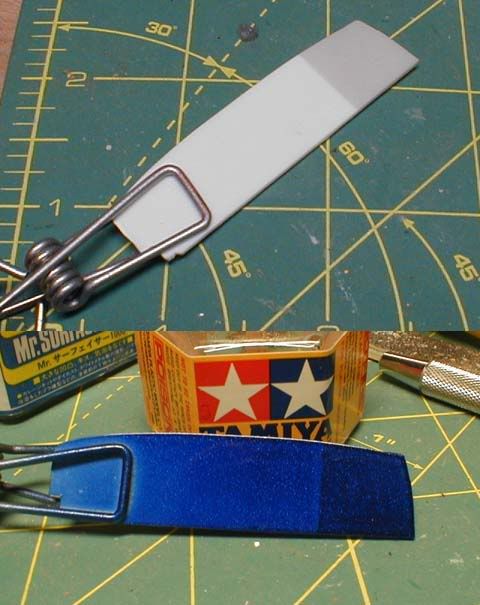 Two coats of Tamiya Gray Primer were applied, followed by two coats of Gunze White Primer. (I waited for a few hours between the gray and white primers.) 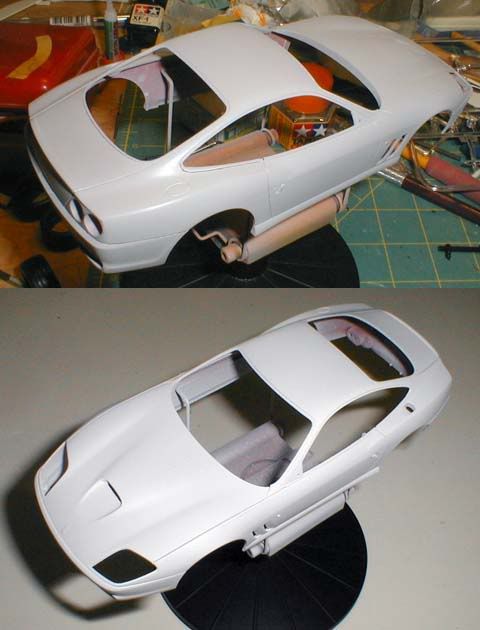 While waiting for the primer to dry, I worked on the interior a bit. Here, I pressed a sheet of tracing paper on the seat belt bracket cover to copy the shape. 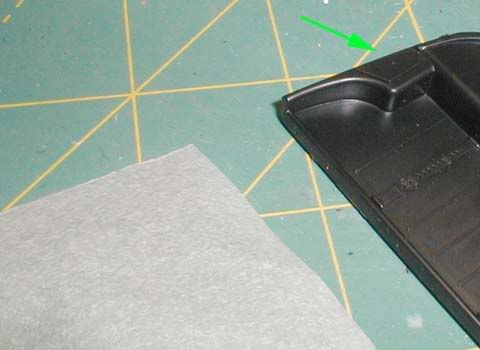 Then, I drew lines with a mechanical pen, and transferred the pattern on a sheet of plastic.  I used a small file to bevel the center part on both bottom and top parts as shown to make the opening for the seat belt. 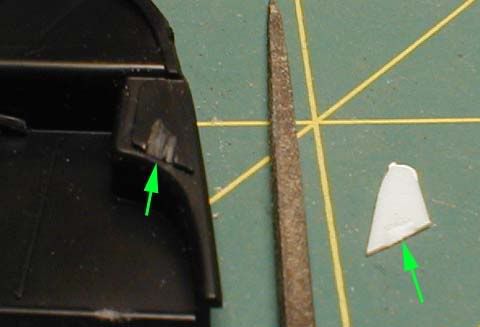 Here's the result. They are much rounder than the kit. Make sure the outer edge (arrows) doesn't interfere with the clear window part. 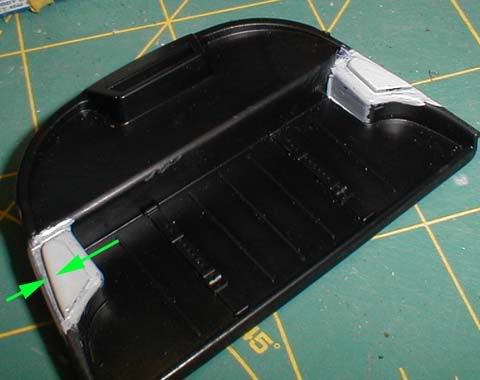 Because the center console is a little too wide, I shaved little portions on both sides.  Then, I used nail files (from coarse, medium to fine successively) to round the center tunnel. 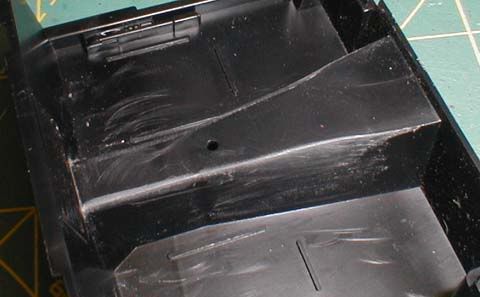 Well, that's it for today. Boy, I'm enjoying this kit. Thanks for looking.
|
|
#30
07-29-2005, 01:06 AM
|
||||
|
||||
|
Re: WIP: Fujimi 1/24 Ferrari 550 Maranello
Thanks for the step by step tips on correcting this one.
Looking forward to seeing more 
|
|
|
POST REPLY TO THIS THREAD |
 |
|
|