|
|
| Search | Car Forums | Gallery | Articles | Helper | Air Dried Beef Dog Food | IgorSushko.com | Corporate |
|
|||||||
| WIP - Motorsports Post topics for any "Work In Process" motorsports vehicles in this sub-forum. |
 |
 Show Printable Version | Show Printable Version |  Subscribe to this Thread
|
|
|
Thread Tools |
|
#16
 05-22-2023, 02:01 PM
|
|||
|
|||
|
Re: Porsche 935/78 Moby Dick
Hi Deathtrap, looking great so far! Shame about the distortion in the print but when you know the problem you can fix it. I hope your next print will come out nicely! I also started a blender model couple of days ago, I am learning how to use it. Do you think I have too many construction lines? I tried to reduce them to the minimum though. I still need to finish the front and the side window area and add all the creases around the wheelarches. How did you make the windows, constructed the edges or with boolean? Thanks
    

|
|
#17
05-25-2023, 04:39 AM
|
|||
|
|||
|
Re: Porsche 935/78 Moby Dick
Hello all!
I find the 935/78 very successful and would like to ask how you do the creation of the models. Are there any good tutorials? I would like to create the 835/78 in the original version with the closed door panels and the flat rear spoiler. Thanks already for the help! Zakspeed
|
|
#18
05-25-2023, 09:22 AM
|
|||
|
|||
|
Re: Porsche 935/78 Moby Dick
Hi Corrado,
Nice little project you have going there. Unfortunately I still have found a way to fully resolve the issue. I think it is because of a few bits adding up to each other: - My FEP needs replacement - Thickening the walls of the model will make it more sturdy - Splitting the model in 2 will also make it easier to print Quote:
Quote:
The windows and wheel arches I created using designed edges. So no booleans. For the holes like the 3 in the bonnet, I used a ShrinkWrap modifier and then apply and resolve that on the main model. Demo: https://www.youtube.com/watch?v=Ci1jBOm_5NY&t=197s As far as I have learned so far, there are 2 ways to make you model solid. Either use the Solidify modifier, or 'by hand'. I used the modifier first, but didn't like the compromises I had to do in the problem areas. So I went with the manual option on designing the inside of the body shell. Quote:
This design is by far not my first one. I have created a couple far simpler things first, like rims and brake disks. For this project, I used yet another Youtube tutorial: https://www.youtube.com/watch?v=VGPvxIrobFE&t=1041s I hope this was all helpful.
|
|
#19
05-26-2023, 05:22 AM
|
|||
|
|||
|
Re: Porsche 935/78 Moby Dick
Thanks a lot!
Regards Zakspeed
|
|
#20
05-27-2023, 05:42 AM
|
|||
|
|||
|
Re: Porsche 935/78 Moby Dick
Hi Deathtrap,
Even with the problems you're finding with distortion, panel thickness, etc (all of which I'm sure can be overcome), it's impressive to see the overall quality of these 3D prints now. It's scratch-building in a new way! Enjoying your progress, and looking forward to seeing what you do with the interior. Good luck! SB
|
|
#21
04-03-2025, 09:42 AM
|
|||
|
|||
|
Re: Porsche 935/78 Moby Dick
Not sure about others, but I couldn't access AF for many months, so now I'm updating some of my threads.
 After a cool down, I picked up this build again. I got some help for other modelers and managed to get a decent printed body    After having the resin cure for a good long term, I started sanding and scribing the body. For some measurement I'd put a 964 RS underbody next to it and the wheel arches seem to line up very wel.  Then it was time to print some of the small parts.  ...hmmm, never made a picture of the printed parts...  Since for the moment I will not be designing the interior, I'm using a donor car. I've got a few of these given to me years ago. This is a Fujimi 930 that I stripped down    I had to cut of a piece of the top of the nose section as the 935 has such a slanted nose, a 'regular one' doesn't fit.   En doing through my bits box, I found a RHD dashboard  This will all need to be modified too...
|
|
#22
04-03-2025, 09:46 AM
|
|||
|
|||
|
Re: Porsche 935/78 Moby Dick
Then it was time to do a bit of work on the rear bumper. It needs to be smoothed out and fit in that long tail.
     The forward bulkhead needs to be changed, as it also has to be a RHD.   While I was cutting and scratch building, I decided to incorporate the light weight doorpanels.    
|
|
#23
04-03-2025, 09:50 AM
|
|||
|
|||
|
Re: Porsche 935/78 Moby Dick
Then it was time to finish up that interior. I cut out the floor and replaced that with a flat piece of styreen. And using cardboard I figured out how to create plastic parts to build up the rear quarters
   There is this hump, that covers the transmission and engine. And the first steps of the (visible part of the) rollcage.  
|
|
#24
04-03-2025, 09:51 AM
|
|||
|
|||
|
Re: Porsche 935/78 Moby Dick
Currently I'm putting a bit more attention on the rear bumper. I've added a bit more of the body, so I can incorporate the tail lights and close of the tail section.
 
|
|
#25
04-26-2025, 07:15 AM
|
|||
|
|||
|
Re: Porsche 935/78 Moby Dick
More work is done the last few weeks. I noticed this forum was down a lost, so qutie a big jump in time with progress
Interieur frames are done, including the seat. (keeping in mind this will still be a curbside model.       Next up will be applying some primer
|
|
#26
06-09-2025, 03:05 PM
|
|||
|
|||
|
Re: Porsche 935/78 Moby Dick
Hello Deathtrap,
Making good progress! Seeing your version of the seat frame brings back some memories... For detail photos, probably the best place is www.freisinger-motorsport.de. They have pages of detail shots from when they rebuilt the second frame, from start to finish. It was seeing these that made me think that scratchbuilding the 935-78 was possible - without them I would definitely have struggled. I found a lot of reference photos there for the 956 too, but they've rebuilt and restored all sorts of road and competition Porsches. All the best, SB
|
|
#27
09-20-2025, 03:57 AM
|
|||
|
|||
|
Re: Porsche 935/78 Moby Dick
After a long absence I'm back with an update. It maily took so long, because this forum can be unreachable for months
 Anyway, here we go with a steam of pictues Main parts put in primer  Then design some detail parts and print them.    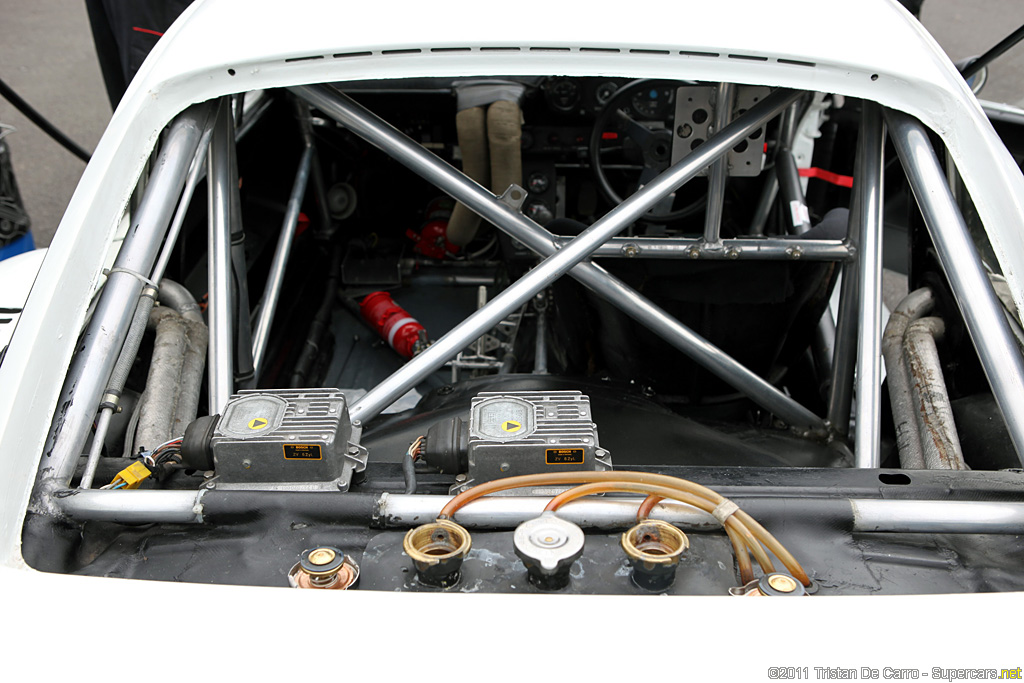   Working on the body panels to smooth everything out.    Then it is time to prepare some decals     The last parts to be finished are the wheels. I'm pleased with the results and I feel these are ready to be printed.   And after quite a few attemps, I finally got the grill printed.  
|
|
#28
09-24-2025, 03:46 AM
|
|||
|
|||
|
Re: Porsche 935/78 Moby Dick
Time to get printing. I've sliced the parts for the wheels. This first iteration probably is 'just a test print' as I'm expecting small print defect.

|
|
#29
09-27-2025, 05:31 PM
|
|||
|
|||
|
Re: Porsche 935/78 Moby Dick
I finished printing my wheels. I'll let them cure a while before I start painting.
  Next up was the body. It received the first coat of white. I will very lightly sand it before applying the second coat.
|
|
#30
09-30-2025, 04:02 AM
|
|||
|
|||
|
Re: Porsche 935/78 Moby Dick
Second coat of grand Prix White. De model is now picking up its true white color. I wil lightly sand this again and apply a 3rd coat. If all goes well, the Martini striping will be next.
 And I still had to install the Bosch ingition boxes. So the interior is now complete.  Ow and SB, thx for the link www.freisinger-motorsport.de That is a very good site that I will be using as a reference. I'm planning for this 935/78 to also create a model with a full interior frame, suspention and engine details. (this one will remain sort of a curbside)
|
|
|
POST REPLY TO THIS THREAD |
 |
|
|


