|
|
|

|
|
| Search | Car Forums | Gallery | Articles | Helper | Quality Dog Food | IgorSushko.com | Corporate |
|
| Latest | 0 Rplys |
|
|||||||
| WIP - Street Post topics for any "Works In Progress" street vehicles projects in this sub-forum. |
 |
 Show Printable Version | Show Printable Version |  Email this Page | Email this Page |  Subscribe to this Thread
|
|
|
Thread Tools |
 05-08-2010, 02:25 PM
|
#16 | ||
|
AF Regular
Thread starter

Join Date: Apr 2010
Location: La Ciotat
Posts: 143
Thanks: 1
Thanked 3 Times in 3 Posts
|
Re: Integra Type R
Quote:
 Very little update as I had an extremely busy week at work and I couldn't get my hands on the model. Better too much work than not enough, but sometimes it's just too much...  Anyway, here's what I find the time to do: began scratchbuilding some detail parts for the recaros: 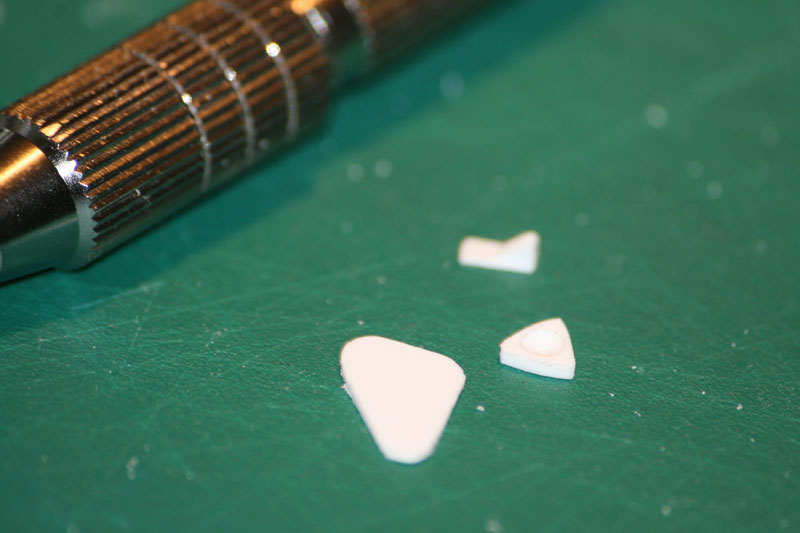 parts now ready to paint (tomorrow as I'm taking my wife to theater tonight):  couldn't get my hands on a can of faux fabric, so I painted the recaros with Tamiya XF-7 (flat red) and I'm rather happy with the result. More detailing to come. 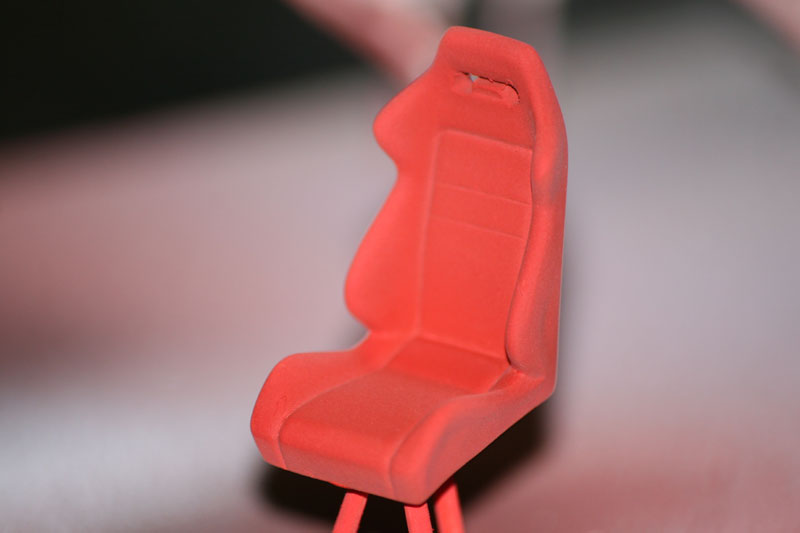 and just for the fun of it, I painted shocks using öhlins color scheme, because I'm just worth it  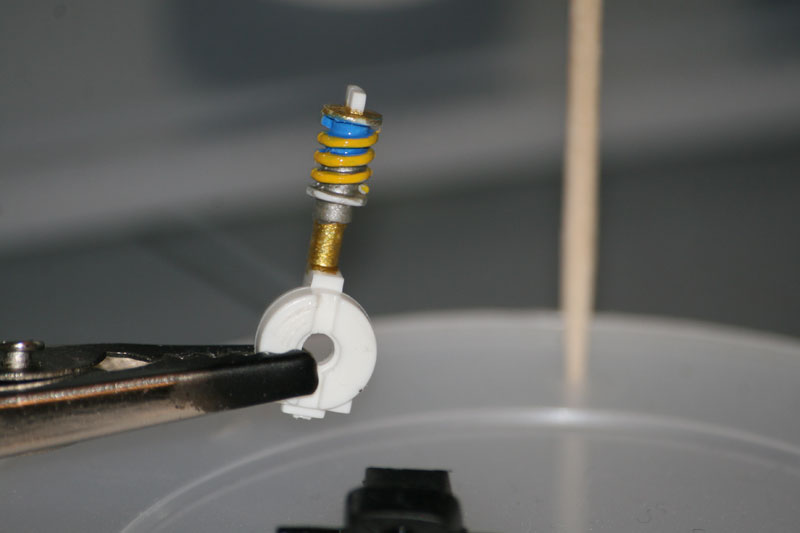 chassis has been weathered too, but no pic yet, you will have to wait a little.  More news soon!
__________________
|
||

|

|
|
05-08-2010, 04:08 PM
|
#17 | |
|
AF Regular
Join Date: Aug 2008
Location: Santo Domingo, Massachusetts
Posts: 273
Thanks: 13
Thanked 8 Times in 8 Posts
|
Re: Integra Type R
The recaro's parts is awesome!!!
Good very good!! |
|
|
|
|
|
05-13-2010, 09:03 AM
|
#18 | |
|
AF Regular
Thread starter
Join Date: Apr 2010
Location: La Ciotat
Posts: 143
Thanks: 1
Thanked 3 Times in 3 Posts
|
Re: Integra Type R
Thanks for comments.
Recaros are now finished, rather happy with the result even if it can always be better. 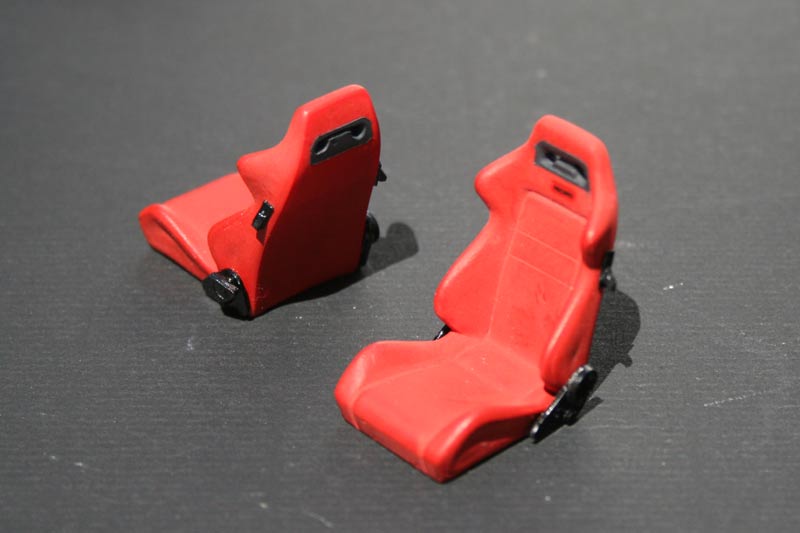 Began working on the rollcage as well. I decided to go for a 6-point model as the spirit of this car is not really a hardcore racer but rather a daily drive that hits the track from time to time. I started making the templates with soldier wire, then build up the real thing with steel wire that was pretty hard to bend, but was of the correct diameter to replicate a 40mm tube. A quick look inside the tub:  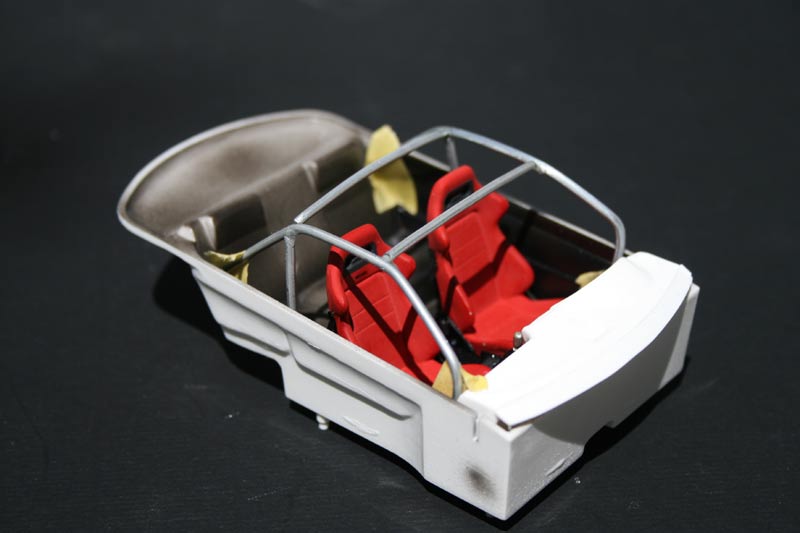 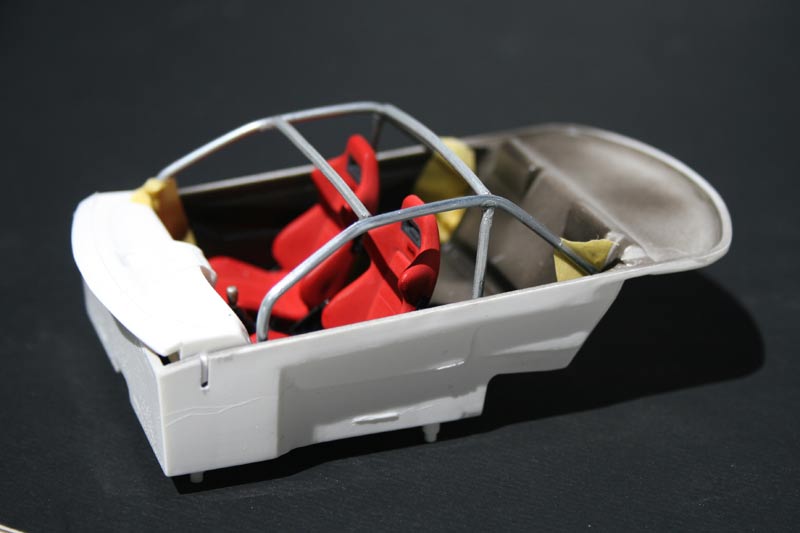 And a view alone: 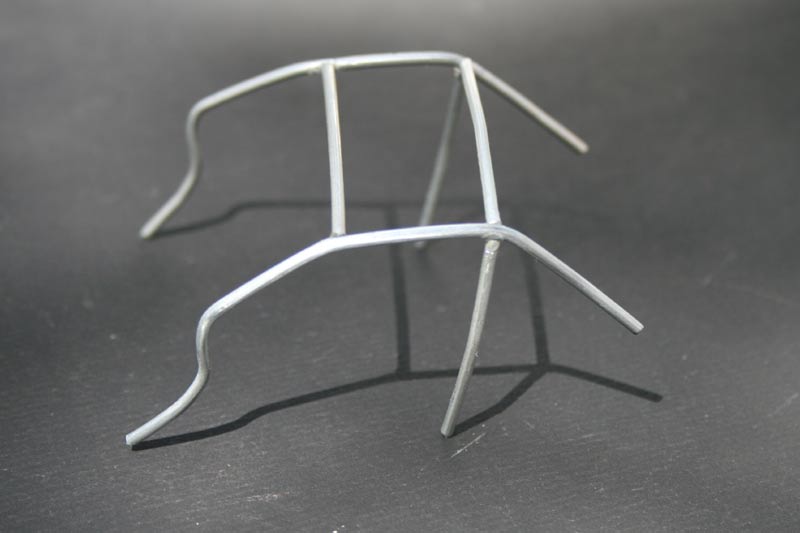 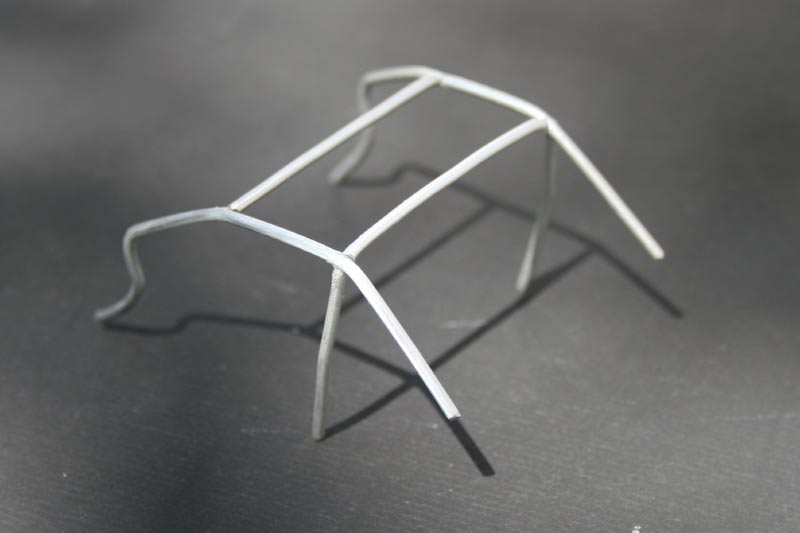 I'm just trying to find the best solution for keeping it assembled, here are the choices I have so far: -keep it bonded with CA glue (as it's at the moment) and handle it very carefully as it can be broken easily -try to soldier it to give more strength, but I'm not sure it can work good -replicate it with plastruct so that I can glue the parts really good, but will lose the metal finish of the steel wire  Any ideas welcome
__________________
|
|
|
|
|
|
05-13-2010, 04:51 PM
|
#19 | |
|
AF Regular

Join Date: Feb 2004
Location: The Hell
Posts: 352
Thanks: 3
Thanked 2 Times in 2 Posts

|
Re: Integra Type R
Hi there!!
Nice Integra build. Maybe someday you can tell how you make those Recaros step by step, he he, those are awesome... About the rollcage... I think the best way to keep the metal look is soldiering it. One of the forum members (can't remember hwo) it's building a circuit Mitsu Evo V. It's a really really ambicious work. Maybe you can get some advice from him, because he's doing the entire chassis, rollcage, engine and some other things in metal... Hope that helps. I hope you'll keep us tuned about this project. CHEERS |
|
|
|
|
|
05-14-2010, 06:58 PM
|
#20 | |
|
AF Regular
Thread starter
Join Date: Apr 2010
Location: La Ciotat
Posts: 143
Thanks: 1
Thanked 3 Times in 3 Posts
|
Re: Integra Type R
Hey Vladamor!
Yea, I remember that splendid time attack Evo. Incredible build and skills that I'm far from matching honnestly. Anyway, I tried soldering steel wire and it doesn't work really good. If I remember correctly that Evo guy build everything from brass rod, which must be easier to solder. I took the option to stay with CA glue, and painted everything in the color I wanted, after all, it doesn't really have to be structural, isn't it? Here is the result: 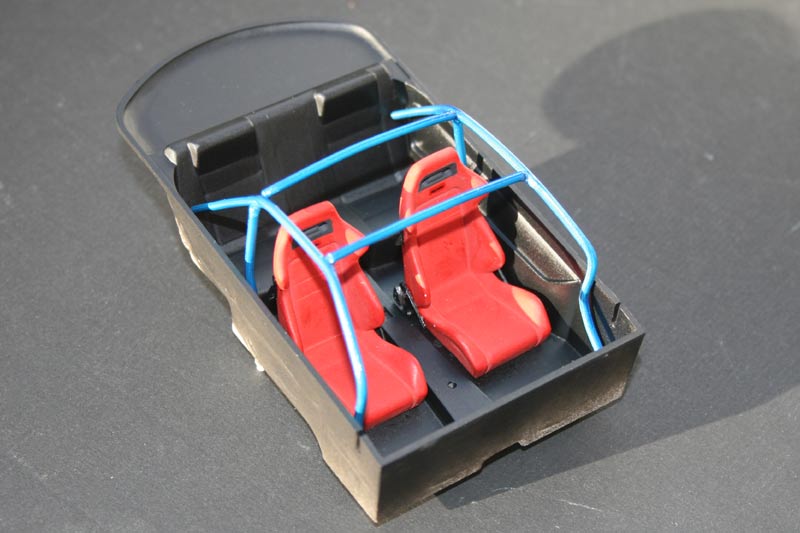 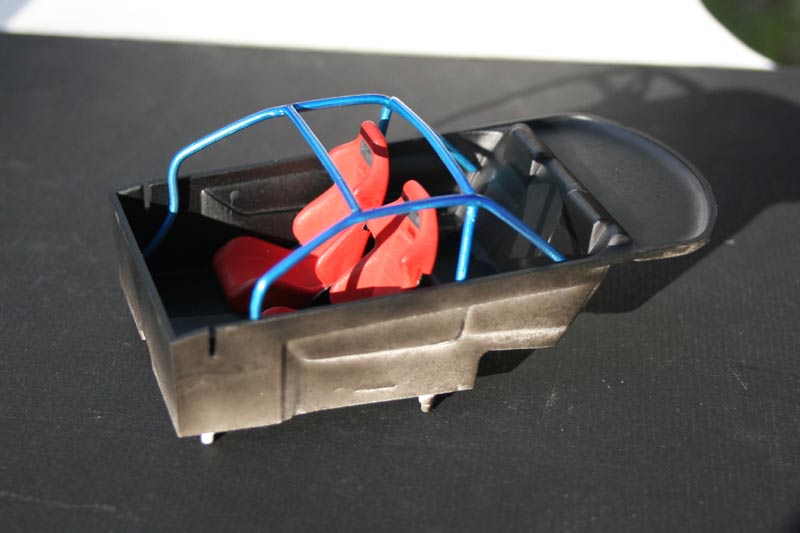 As for the recaros, well maybe should I detail with more pictures but the steps are quite easy: -1/filling the "hole" in the back of the seats -2/drilling the passages for the harness -3/scratchbuild reclining handles -4/scratchbuild pivot plates -5/paint and glue together Looks easy like this, but it really is. All you need is a good reference, which in my case was easy as I own the real seats :P Began building a new rear sway bar with soldier wire. Too lazy to comment, here are the pics  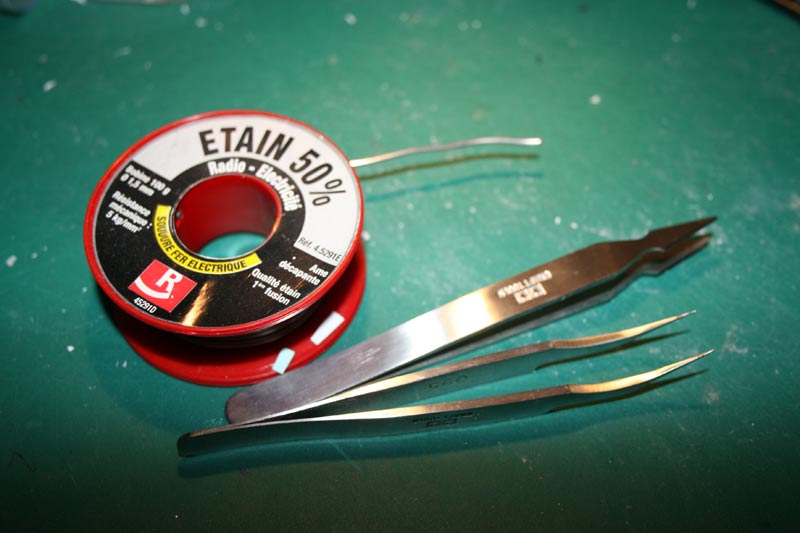 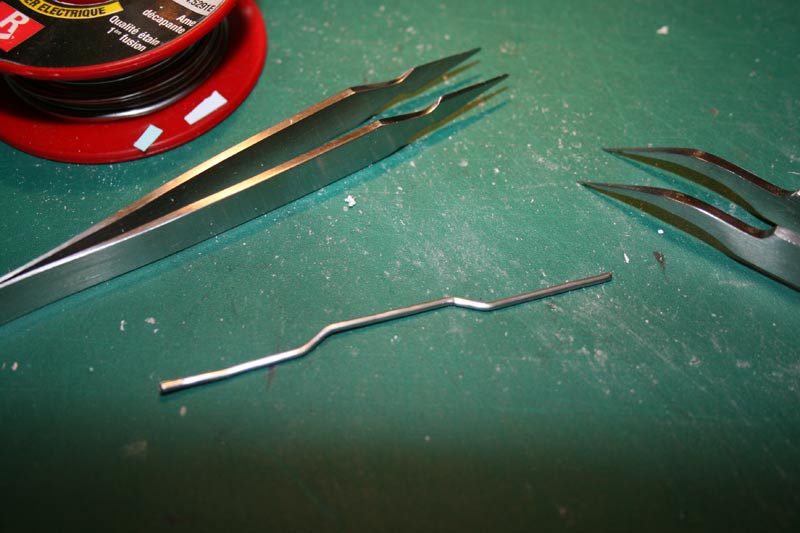 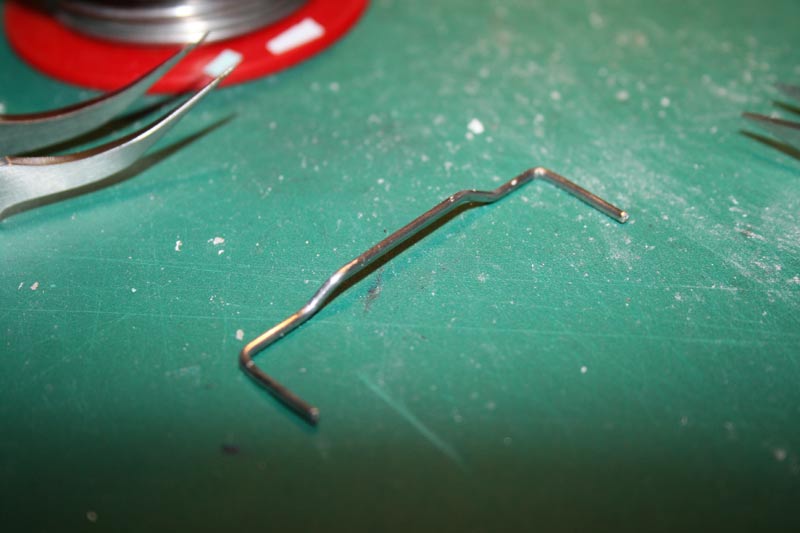 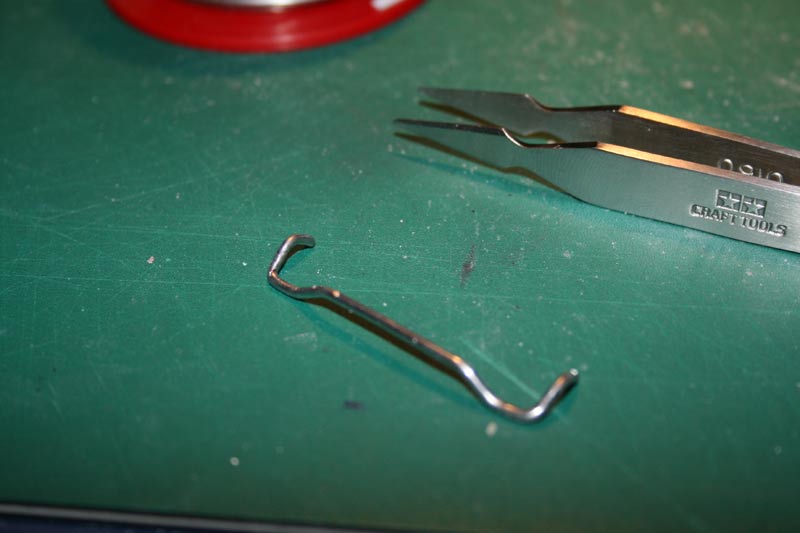  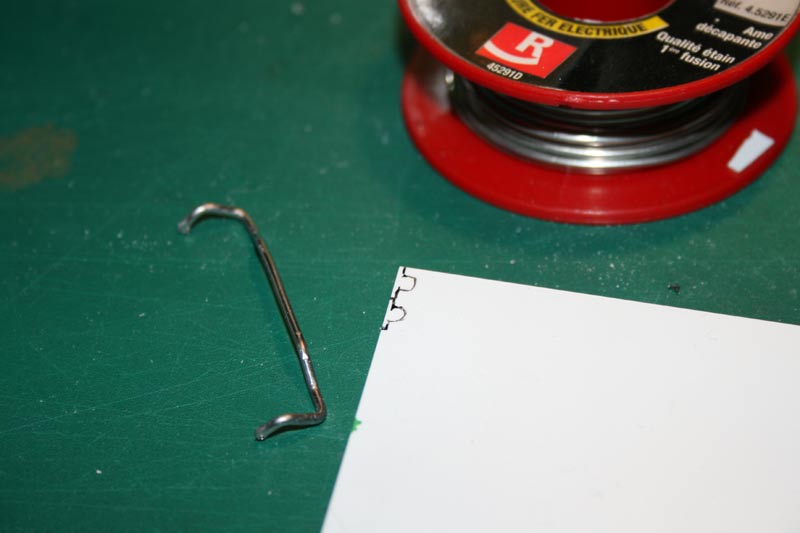 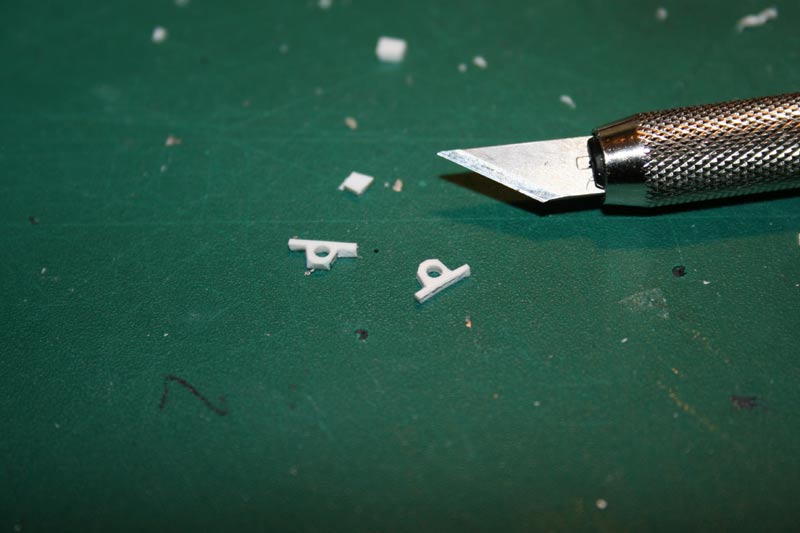 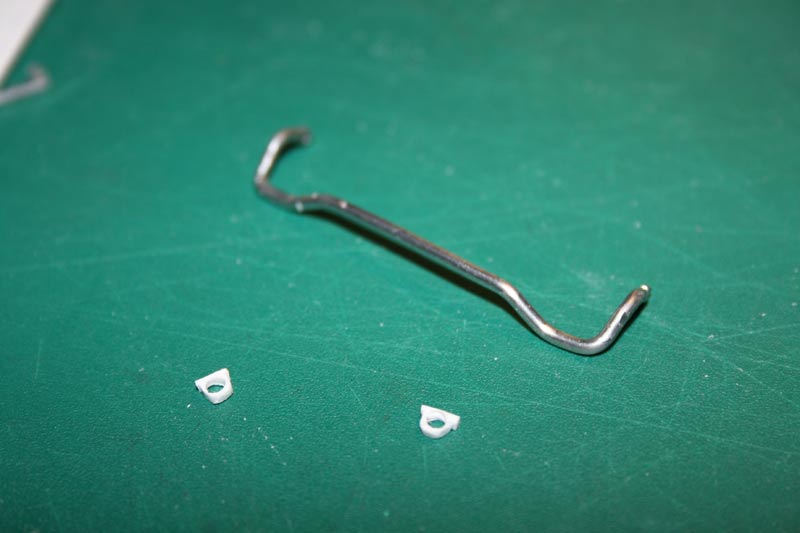  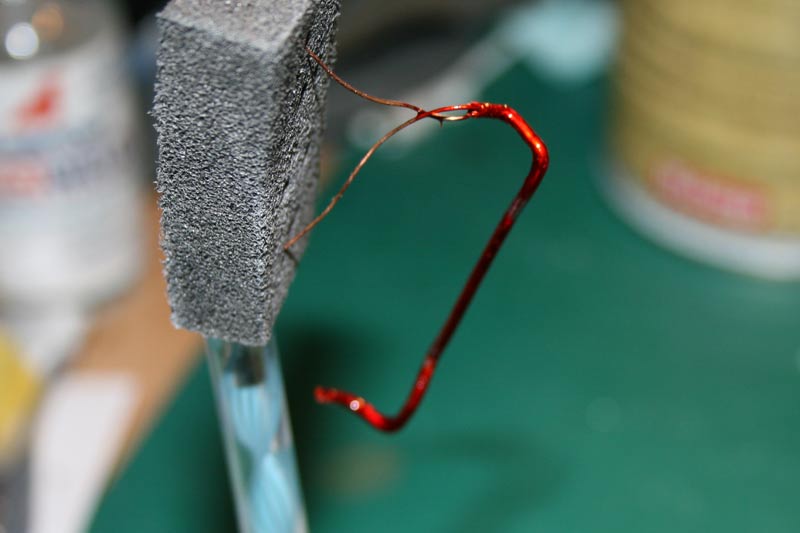 Sorry for the bunch of pics...
__________________
|
|
|
|
|
|
05-15-2010, 07:36 AM
|
#21 | |
|
AF Regular
Join Date: Jan 2009
Location: Hong Kong
Posts: 122
Thanks: 1
Thanked 1 Time in 1 Post
|
Re: Integra Type R
I admire your attention on small details! Btw, do you think the kit wheels are a little on the small side?
 |
|
|
|
|
|
05-15-2010, 12:25 PM
|
#22 | |
|
AF Regular
Thread starter
Join Date: Apr 2010
Location: La Ciotat
Posts: 143
Thanks: 1
Thanked 3 Times in 3 Posts
|
Re: Integra Type R
Thanks a lot for comments.
Yep, I think the kit wheels are too small, but don't get me wrong, they're correct in the scale. The fact is that '96 spec ITR were released with 15 inches wheels, easily indentified by a 4-lugs bolting pattern. Thats the ones Fujimi provides with this kit. '98 spec and later models were equipped with 16 inches (PCD 5x114.3) which suits better the line of the car IMO, that's why I choosed to go for the Enkeis in 16", but original wheels are not wrong.
__________________
|
|
|
|
|
|
05-16-2010, 11:49 AM
|
#23 | |
|
AF Regular
Thread starter
Join Date: Apr 2010
Location: La Ciotat
Posts: 143
Thanks: 1
Thanked 3 Times in 3 Posts
|
Re: Integra Type R
Too much wind to paint anything this week-end, so I kept on working on small interior details.
First I wanted to add some gauges to check for oil temperature and pressure and afr. I cut 3 pieces of sprue, intentionaly too long so that they're easier to hold. 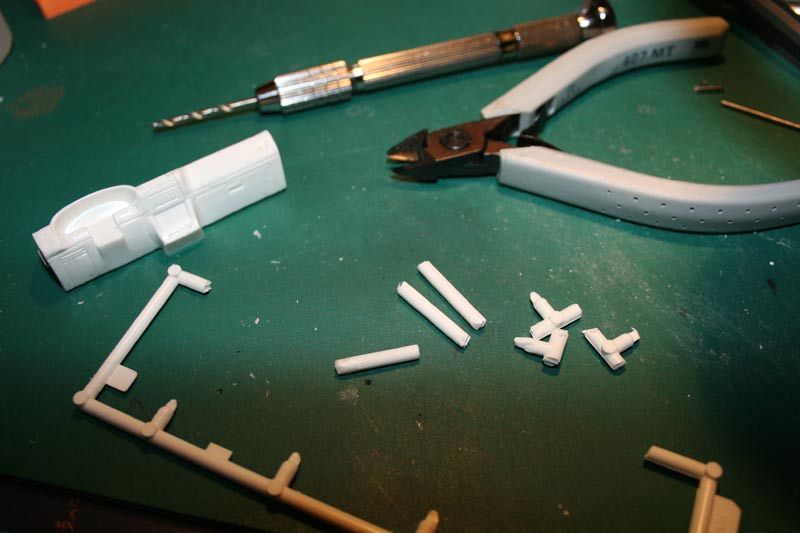 Once cleared of molding lines and rounded with sand paper, sprue diameter is 2.7mm which qualifies it to create 60mm gauges easily (I know it makes rather 64.8mm, but I'm not that perfectionist). 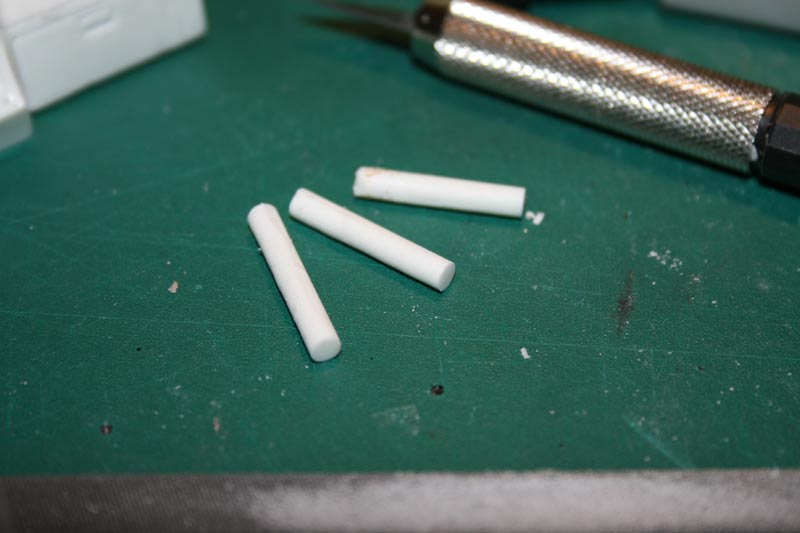 Before beginning such a delicate drilling, i use to pinpoint the center of the rod, then I pre-drill it using a 0.3mm drill bit. 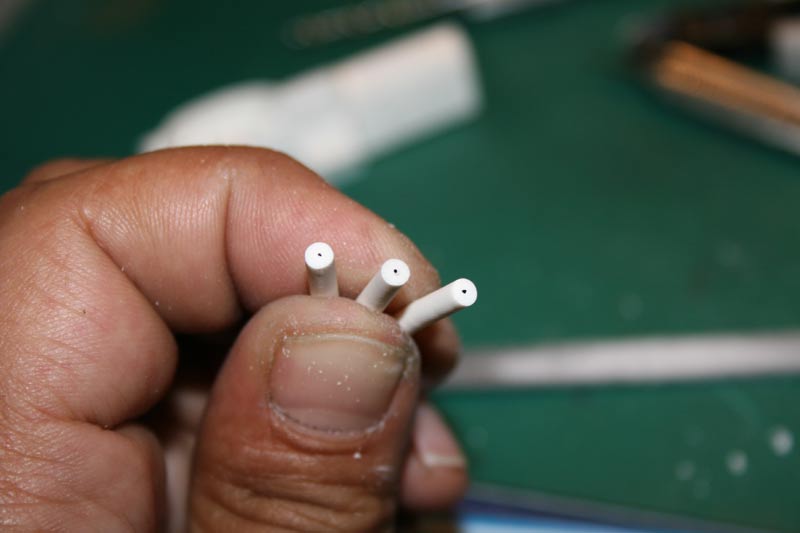 Once done, I drill really delicately with a 2.5mm drill bit until around 0.5mm depth. I prefer drilling directly with 2.5 instead of beginning smaller and going up because the walls are only 0.1mm thick so the drill bit would push everything outward and break the wall. If you've been patient and carefull enough you should end up with something like this, if it's not the case well just file off 2 more millimeters on the rod and try again. 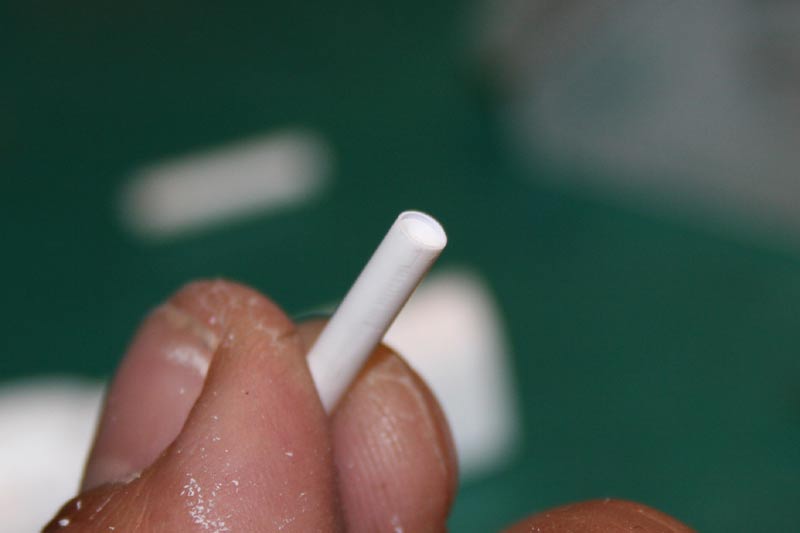 Then the 3 rods were cut down to the appropriate length (3.5mm) lightly filed on the back so that they sit with an angle pointing to the drivers head and glued on the dahboard with a light angle too. 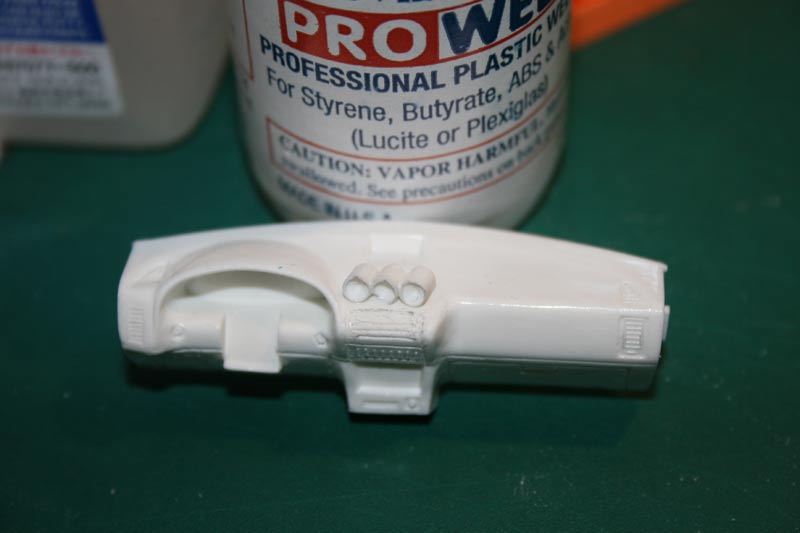 Everything was puttied up to give a dashboard pod look to the 3 gauges. 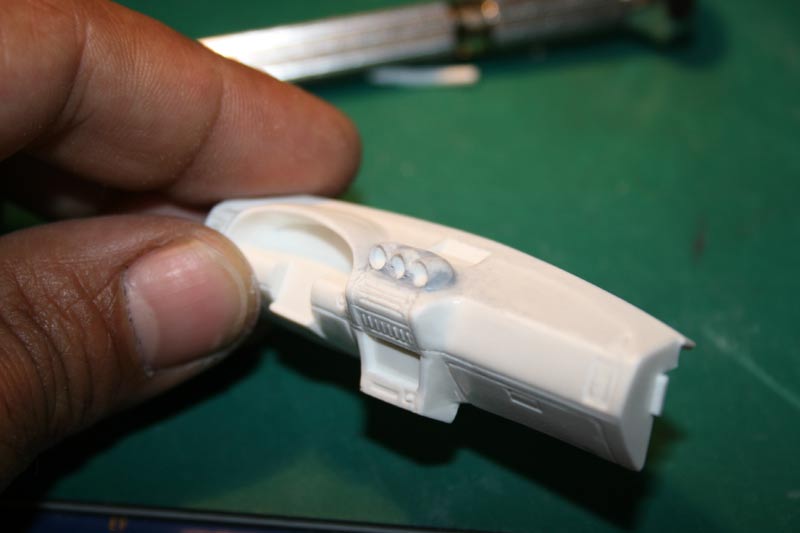 Final dashboard in primer: 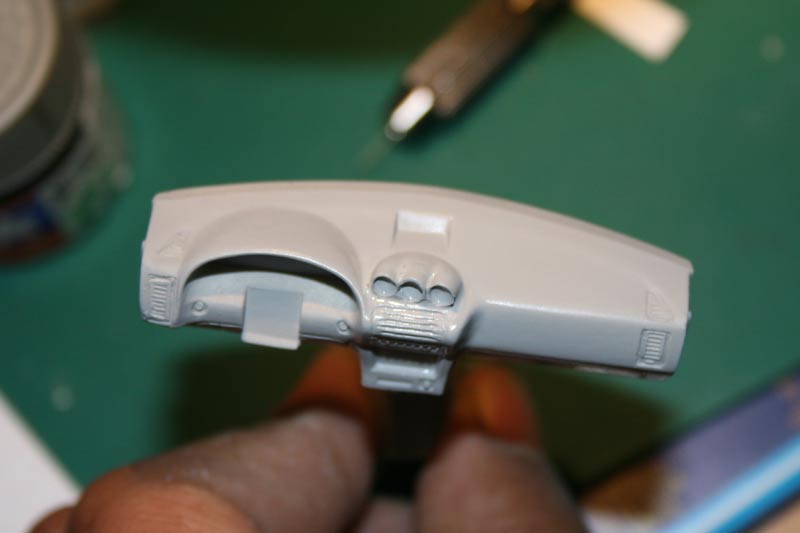 Once it will be dry I will begin preparing it for final paint. I also created some pedals from styrene: 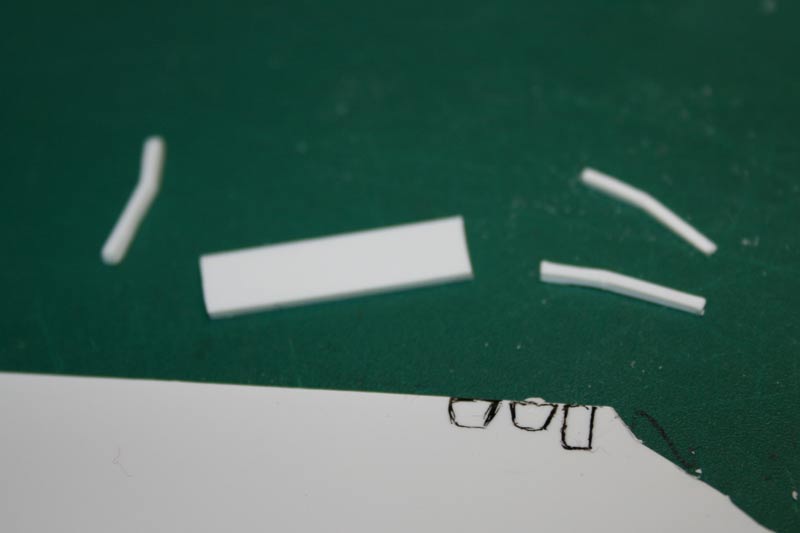 Pedal pads were cutted down, drilled with a 0.3mm drill bit (even if not very visible on the picture) and then assembled. Next step painting... 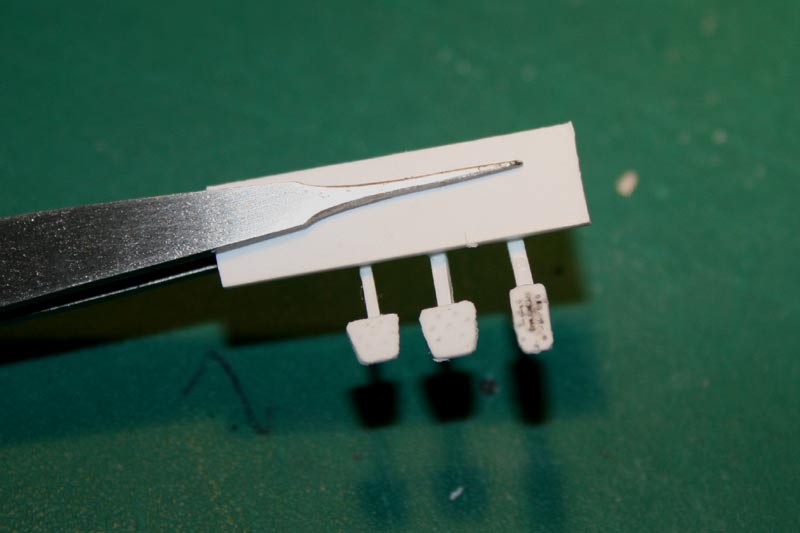 Thanks for following, as always comments and advises welcome
__________________
|
|
|
|
|
|
05-16-2010, 06:19 PM
|
#24 | |
|
Sweet, sweet tiny Hondas.
 Join Date: Jul 2003
Location: Austin, Texas
Posts: 5,723
Thanks: 50
Thanked 89 Times in 65 Posts
|
Re: Integra Type R
Wow, a lot of cool work into this car. I really like your roll cage, I love how it bends around the dashboard, very cool and very accurate to what people are doing these days. I love it. Keep it up.
__________________
It ain't cool 'till your wife hates it. Imagine a world without Alabama Recent builds: Rocket Bunny FR-S and stock BRZ Toyota bB Bro-style Civic K20 powered SiR converted EK WIP I build slowly and poorly. 
|
|
|
|
|
|
05-17-2010, 10:19 PM
|
#25 | |
|
AF Fanatic

Join Date: Feb 2004
Location: Hartford, Connecticut
Posts: 5,601
Thanks: 7
Thanked 108 Times in 103 Posts
|
Re: Integra Type R
The swaybar came out cool, the solder is 1.5mm? Also the gauge pod came out great, with the putty on it looks really good.
__________________
In Progress    
|
|
|
|
|
|
05-24-2010, 11:27 AM
|
#26 | |
|
AF Regular
Thread starter
Join Date: Apr 2010
Location: La Ciotat
Posts: 143
Thanks: 1
Thanked 3 Times in 3 Posts
|
Re: Integra Type R
Thanks for comments guys!
@ MidMazar: yeah solder is 1.5mm which is a bit too thick for a sway bar, unless you want a really stiff one. Unfortunately it was the closest I could find from what I needed for this, and as it's not too much eye-catching I think I'm gonna stick with this one. Small update for all the followers around, interior is now nearly finished. Pedal set is painted airframe aluminium and glued, interior floor is flocked with Dark Grey flocking using 3M photomount spray glue. I also add Blitz ice blue gauges in the gauge pod. I just scaled down a picture I found on the internet and printed it at max resolution on glossy photo paper, then cut and glue. Result looks rather convincing to me. Tell me what you think about it. 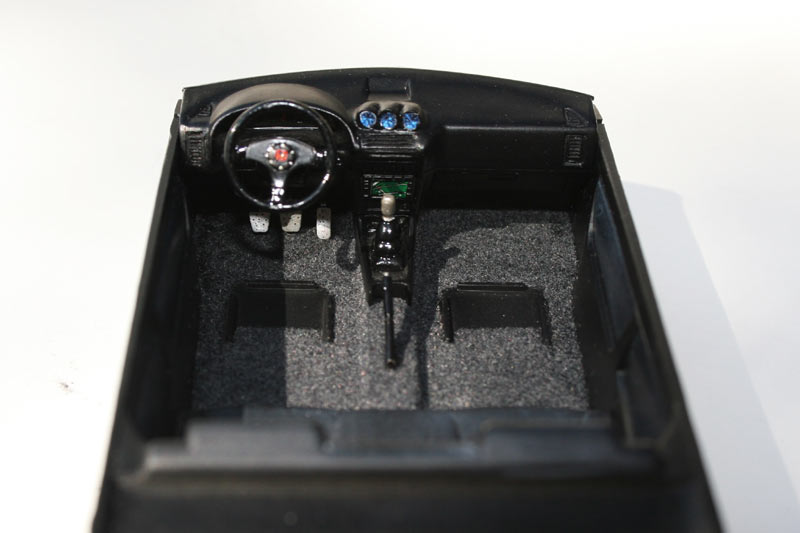 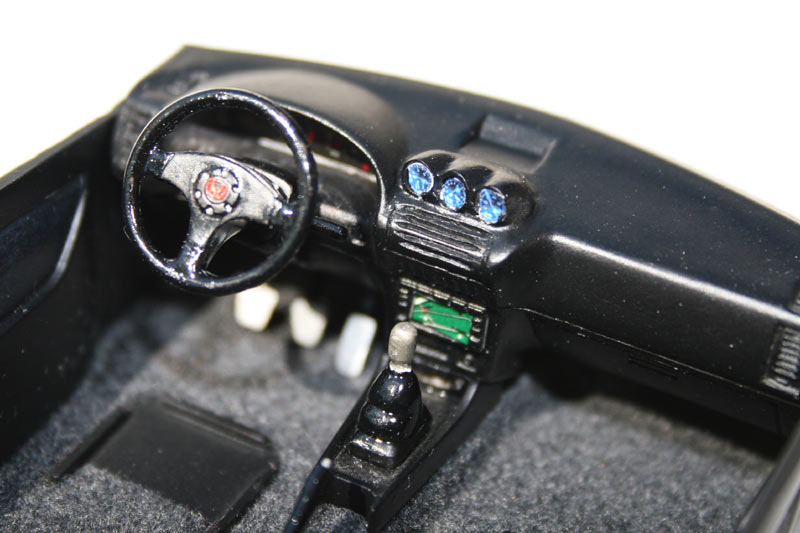 Another point that was quite time consuming was the assembly of the 4pt harness. If you have shaky hands and no patience, don't ever think of doing this... More seriously, half of the nervous breakdown I got when building this came from the fact I'm not that used of building photo-etched details. The kit is from HobbyDesign and I found it quite nice and accurate, only mistake to be noticed, the end buckles (the ones that come either in the harness lock or on the chassis bolts) are not wide enough to let the "harness" pass through. I found this really weird. I made shoulder pads using the same photo paper than for the gauge after having print the sparco logo and a wide blue area (I also made black and red ones, but finally decided for the blue). The thickness of the paper gives a nice bulk impression. You can't see them in the pictures but underneath the shoulder pads are sparco label directly glued on the harness. Same technique except I "peeled off" the photo paper to have a really thin support. Enough of talking, here are the pictures. 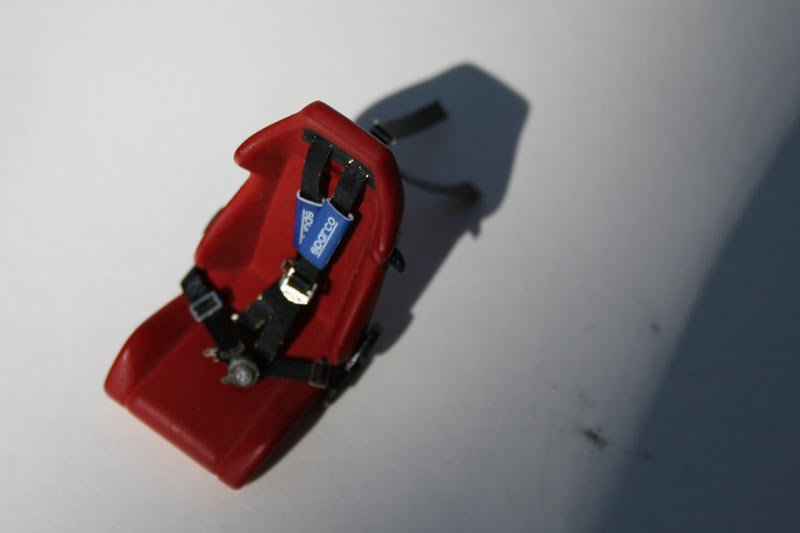   Thanks for looking, more to come soon, and as always, comments and critics are welcome.
__________________
|
|
|
|
|
|
05-24-2010, 12:32 PM
|
#27 | |
|
AF Enthusiast

Join Date: Jul 2003
Location: Madison, Wisconsin
Posts: 2,493
Thanks: 7
Thanked 8 Times in 8 Posts

|
Re: Integra Type R
seats look really good and so does the detail on the dash.
__________________

|
|
|
|
|
|
05-24-2010, 01:51 PM
|
#28 | |
|
AF Enthusiast

Join Date: Nov 2004
Location: London
Posts: 1,421
Thanks: 0
Thanked 0 Times in 0 Posts

|
Re: Integra Type R
The amount of detail you have put into this is absolutely amazing! Keep up the excellent work
__________________
Steve |
|
|
|
|
|
05-24-2010, 06:27 PM
|
#29 | |
|
AF Newbie
 Join Date: May 2010
Location: psl, Florida
Posts: 33
Thanks: 0
Thanked 0 Times in 0 Posts
|
Re: Integra Type R
this is gonna be one sick teggy when its done,especially with all the attention to detail you have put in.
|
|
|
|
|
|
05-24-2010, 10:46 PM
|
#30 | |
|
Sweet, sweet tiny Hondas.
Join Date: Jul 2003
Location: Austin, Texas
Posts: 5,723
Thanks: 50
Thanked 89 Times in 65 Posts
|
Re: Integra Type R
Wow. I really LOVE what you've done with the interior. Gorgeous seats!! And the gauge pod. Wonderful!
__________________
It ain't cool 'till your wife hates it. Imagine a world without Alabama Recent builds: Rocket Bunny FR-S and stock BRZ Toyota bB Bro-style Civic K20 powered SiR converted EK WIP I build slowly and poorly.
|
|
|
|
|
|
|
POST REPLY TO THIS THREAD |
 |
|
|


