|
|
|

|
|
| Search | Car Forums | Gallery | Articles | Helper | Air Dried Beef Dog Food | IgorSushko.com | Corporate |
|
| Latest | 0 Rplys |
|
|||||||
| WIP - Motorsports Post topics for any "Work In Process" motorsports vehicles in this sub-forum. |
 |
 Show Printable Version | Show Printable Version |  Email this Page | Email this Page |  Subscribe to this Thread
|
|
|
Thread Tools |
 09-07-2010, 08:43 PM
|
#241 | |
|
AF Enthusiast

Join Date: Oct 2008
Location: Auckland
Posts: 2,761
Thanks: 51
Thanked 136 Times in 134 Posts
|
Re: Jordan 191
Simply amazing engineering!!! This has gone beyond modeling. Incredible!!
__________________
 It's Not wheather you Win or Lose, its how you look while you play the Game |
|

|

|
|
09-08-2010, 06:34 AM
|
#242 | ||
|
Authorized Vendor

Join Date: Oct 2005
Location: Vicenza - veneto de rassa
Posts: 3,910
Thanks: 6
Thanked 47 Times in 41 Posts
|
Re: Jordan 191
Quote:

__________________
 gio gio
|
||
|
|
|
|
09-08-2010, 08:01 AM
|
#243 | |
|
AF Enthusiast

Join Date: Jun 2008
Location: Kuala Lumpur
Posts: 505
Thanks: 2
Thanked 6 Times in 6 Posts
|
Re: Jordan 191
unbelieveable!!...extremely detail
 |
|
|
|
|
|
09-08-2010, 11:45 AM
|
#244 | |
|
AF Newbie
Join Date: Mar 2010
Location: Seoul
Posts: 33
Thanks: 0
Thanked 1 Time in 1 Post
|
Re: Jordan 191
damn nice...
__________________
www.tomatograndprix.com |
|
|
|
|
|
09-09-2010, 04:57 AM
|
#245 | |
|
AF Newbie

Join Date: Aug 2010
Location: Hampshire
Posts: 7
Thanks: 0
Thanked 0 Times in 0 Posts
|
Re: Jordan 191
OMG i am definitely at the other end of the modelling scale to this but has been amazing to read through this build and see what could be done with some time, patience and allot of skill.
AMAZING work!!!!
__________________
 It doesn't matter if you win by an inch or a mile; winnings Winning!! |
|
|
|
|
|
09-10-2010, 10:25 AM
|
#246 | |
|
AF Newbie

Join Date: Jul 2010
Location: Selden, New York
Posts: 40
Thanks: 0
Thanked 1 Time in 1 Post
|
Re: Jordan 191
jaykay, I've held off commenting until I read through the entire thread to date. Your work is not only outstanding, but built to a higher level then most of us mere mortals can even dream of. Looking forward to finally seeing the competed model, if one can just call what you've created a model. It's more like a masterpiece.
|
|
|
|
|
|
09-14-2010, 01:31 PM
|
#247 | |
|
AF Newbie
Join Date: Sep 2010
Location: katy, Texas
Posts: 1
Thanks: 0
Thanked 0 Times in 0 Posts
|
Re: Jordan 191
That is a crazy looking model dude, awesome work now put it on Youtube????
uberwurx.com |
|
|
|
|
|
09-16-2010, 08:17 AM
|
#248 | |
|
AF Enthusiast

Join Date: Oct 2005
Location: Monza
Posts: 1,150
Thanks: 21
Thanked 56 Times in 38 Posts
|
Re: Jordan 191
Superlative Jay, superlative...
Robi |
|
|
|
|
|
09-18-2010, 12:48 PM
|
#249 | ||
|
AF Vendor
 
Join Date: Sep 2008
Location: Puettlingen
Posts: 768
Thanks: 7
Thanked 57 Times in 48 Posts
|
Re: Jordan 191
Quote:
dito, its incredible, hope we see us in Frankfurt Mike |
||
|
|
|
|
09-19-2010, 05:32 AM
|
#250 | |
|
AF Enthusiast

Join Date: Dec 2005
Location: Southampton
Posts: 701
Thanks: 27
Thanked 8 Times in 8 Posts
|
Re: Jordan 191
Sensational detail...

__________________
Paul On the bench; 2003 LV Rossi Honda RC211V |
|
|
|
|
|
09-25-2010, 10:52 AM
|
#251 | |
|
AF Newbie
Join Date: Sep 2008
Location: hong kong
Posts: 1
Thanks: 0
Thanked 0 Times in 0 Posts
|
Re: Jordan 191
Wonderful job. Wait for your next project.
|
|
|
|
|
|
09-25-2010, 10:57 PM
|
#252 | |
|
AF Regular

Join Date: Aug 2005
Location: London, Kentucky
Posts: 272
Thanks: 19
Thanked 13 Times in 12 Posts
|
Re: Jordan 191
This is an amazing builld! I really enjoy that it is the Jordan and not another Ferrari, McLaren or Williams Honda. No offense to the builders of those teams, it's just nice to see a different team represented with such a superb build!
Rob |
|
|
|
|
|
10-16-2010, 04:06 AM
|
#253 | |
|
AF Enthusiast
Join Date: May 2009
Location: Tucson, Arizona
Posts: 1,469
Thanks: 12
Thanked 126 Times in 120 Posts
|
Re: Jordan 191
Jay - your work and attention to detail is unbelievable for 1/20 scale - I have this kit to build but have no hope of replicating a fraction of the work and skill you have put into this build - truly amazing - John
|
|
|
|
|
|
10-17-2010, 03:42 AM
|
#254 | |
|
AF Enthusiast

Join Date: Feb 2003
Location: Chicago
Posts: 528
Thanks: 2
Thanked 17 Times in 16 Posts
|
Re: Jordan 191
What else can I say!?
I am serious! What else can I really say here?? Anyone??? 
__________________
-- CifeNet |
|
|
|
|
|
11-01-2010, 02:55 PM
|
#255 | |
|
AF Enthusiast
Thread starter
Join Date: Aug 2005
Location: where "sky grey" is a colour
Posts: 823
Thanks: 3
Thanked 32 Times in 29 Posts
|
Re: Jordan 191
Hi everyone
Its been quite a while again since my last update. I had other things to do lately ( real life :-) so progress was very slow once more. Anyway I have something new to show finally. Ill start with the last biggie in the engine bay, the induction system. Originally, when I started this build I just wanted to put an air filter on the Tamiya piece, to cover up the rudimentary intake trumpets etc. In hindsight I should have stuck to that plan :-) But when I finally got there I thought that after all the other silly details I had done up to that point, it would be odd to not do the induction system. I ended up building it four times Initially I started by modifying the Tamiya kit part. That worked nicely, until I tried to fit some scratch made trumpets in the tray and came to realize that the part was way to narrow to fit the trumpets plus the injection system inside. So, after toying around with measurements I made a completely new tray and cover from 0,25mm styrene sheet and other materials, painted and decaled it and so on. Everything was fine until I tried to fit the almost finished and assembled part under the cowling ..you guessed right it didnt fit anymore :-( Somehow at some point I had gotten the measurements wrong and it was now too wide. I still cant explain why. It was only about 1mm too wide but that was a crucial one and there was no way to just cut out a slice or something to make it fit. So on I went for No.3. I built it like the second version but a bit smaller and with some improvements ( I thought ). It worked o.k. but a couple of things just didnt look as good as on the previous one. This went on until the final assembly of all the little pieces when I decided that it just wasnt good enough and to start all over again. This ( fourth ) time I took extra care to build everything precise and clean and thats what Im gonna show you :-) I made the parts from a mix of Renshape and styrene sheet, plus 0,1mm strip metal for the frame on the tray that holds the lid with the air filter, and turned aluminium bits for the bottom of each trumpet to represent the throttle slides.  The parts were then individually primed, sanded, painted, CF-decaled, cleared, sanded and polished. In the next picture the trumpets have already received their aluminium bottoms and been installed in the tray. 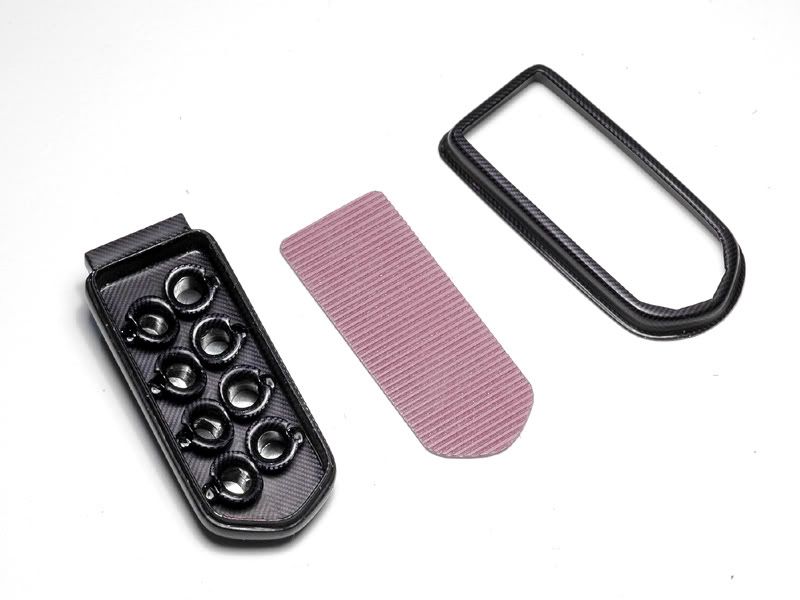 After that I installed the injection system made from metal tubes and rods, turned aluminium bits, wires and R.B.motion A/N-fittings.  The proportions are not exactly as on the original. I had to make my version of the induction a bit short so the spacing between the trumpets wouldnt look too wrong. I still dont know if the Tamiya engine is too long, or the cowling too narrow or if its really just a matter of material thicknesses being too big in scale. Anyway, with that sub assembly ready I could mount it on top of the engine and get on with cables and stuff around it. In the next picture you can already see some additional parts on the right hand side of the tray. 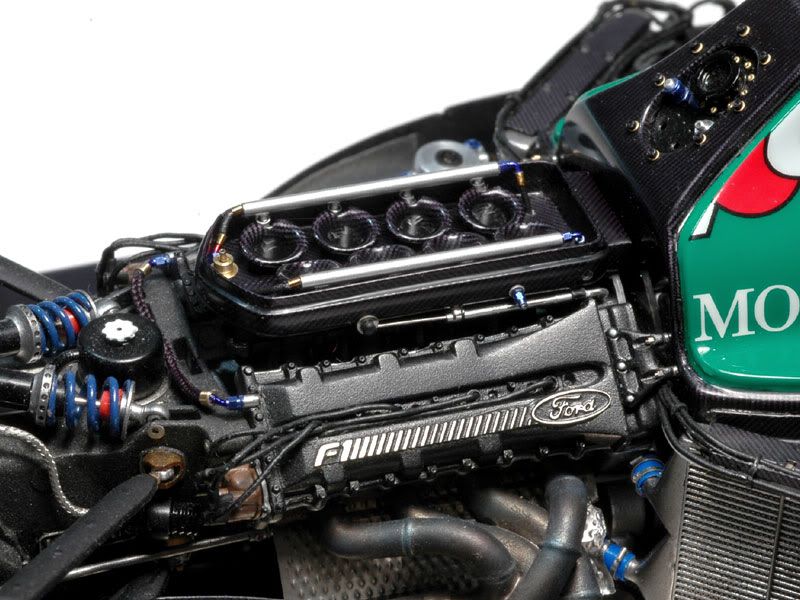 Then I could mount the ignition system ( at least I think thats what these parts are ). Theres an electronic unit with two cylinders on top of it which are connected to the distributors by cables. These have to be the ignition coils I guess. In the next picture you see the parts I built from styrene, renshape and etched bits in front of the Tamiya kit part prior to painting. 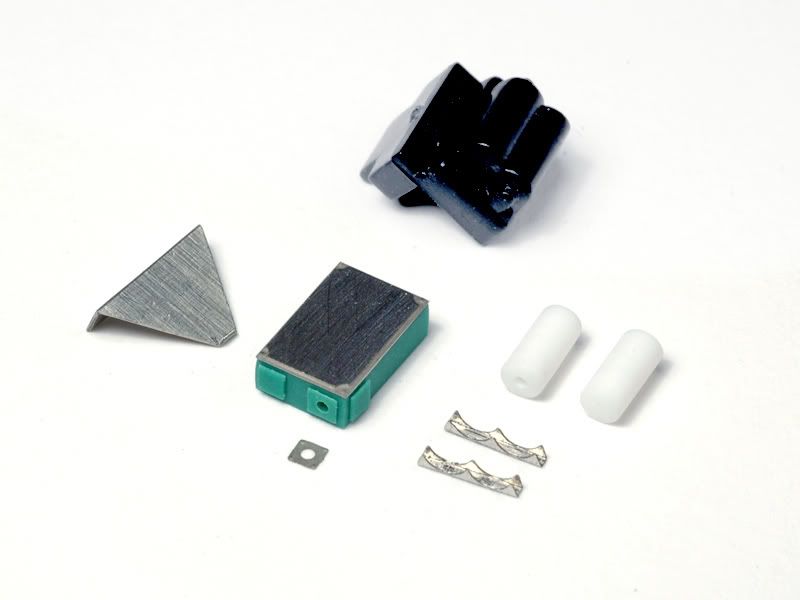 And next up two more pictures of the finished parts in their place on the engine. 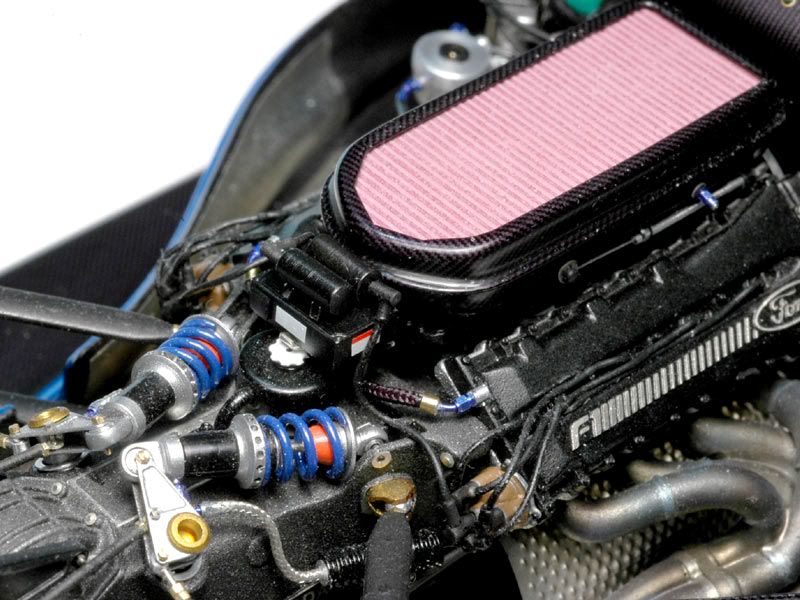 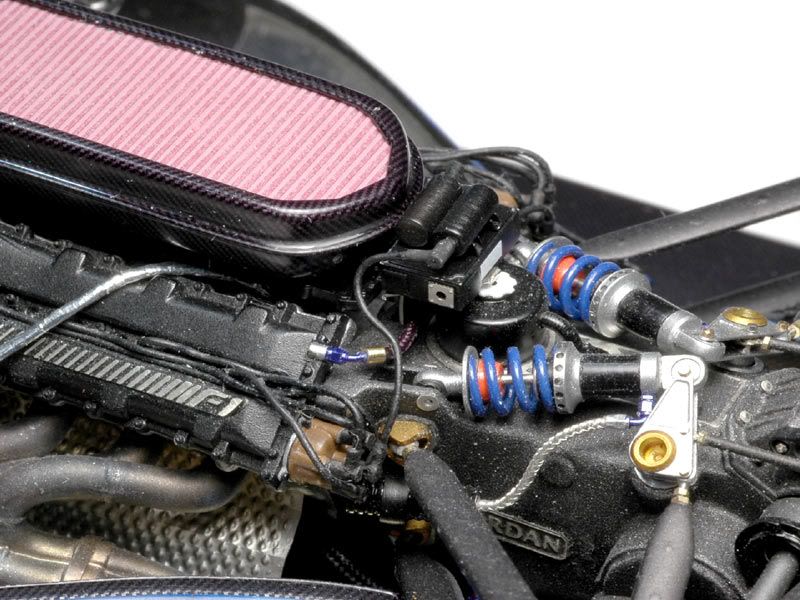 Thats it for the moment. There will be more cables and hoses in the next update :-) |
|
|
|
|
|
|
POST REPLY TO THIS THREAD |
 |
|
|


