|
|
|

|
|
| Search | Car Forums | Gallery | Articles | Helper | Quality Dog Food | IgorSushko.com | Corporate |
|
| Latest | 0 Rplys |
|
|||||||
| WIP - Motorsports Post topics for any "Work In Process" motorsports vehicles in this sub-forum. |
 |
 Show Printable Version | Show Printable Version |  Email this Page | Email this Page |  Subscribe to this Thread
|
|
|
Thread Tools |
 05-03-2007, 10:25 AM
|
#196 | |
|
AF Regular

Join Date: Jan 2005
Location: Puebla
Posts: 439
Thanks: 6
Thanked 13 Times in 3 Posts


|
Re: Eighties Contest Entry: 1988 McLaren MP4/4 (and Introduction)
IMPRESSIVE!
I know I already said it about this build, but every update is a new amazing surprise, your level of detail is outstanding, I think this is by far, the best F1 car build I have ever seen, and this thread is up to the same level. Congratulations and thank you for this awesome guide to perfection.
__________________
Happy modeling! Ramon Garcia Puebla, Mexico |
|

|

|
|
05-03-2007, 10:28 AM
|
#197 | |
|
AF Premium User
 
Join Date: Mar 2003
Location: Mexico City
Posts: 379
Thanks: 1
Thanked 0 Times in 0 Posts

|
Re: Eighties Contest Entry: 1988 McLaren MP4/4 (and Introduction)
OMG! You are making what I only dream of doing to my cars.
Now the carrot is further!  well, GREAT! well, GREAT!
__________________
Rodrigo Mexico    Hey!!! monkeys can't recreate things with such perfection. Hey!!! monkeys can't recreate things with such perfection.Respect the evolution!!!  (message to people making fun of our hobby) (message to people making fun of our hobby)
|
|
|
|
|
|
05-03-2007, 12:32 PM
|
#198 | |
|
Captain Over Engineer
 Join Date: Feb 2003
Location: New York, New York
Posts: 6,711
Thanks: 27
Thanked 29 Times in 23 Posts

|
Re: Eighties Contest Entry: 1988 McLaren MP4/4 (and Introduction)
Good God...thats all I know what to say. That is some of the finest scratch building I have seen.
__________________
-Mike AF Director of Media / Photographer  [email protected] | AutomotiveForums.com | Flickr Gallery |
|
|
|
|
|
05-03-2007, 12:40 PM
|
#199 | |
|
AF Regular

Join Date: Feb 2006
Location: NorCal!, California
Posts: 475
Thanks: 0
Thanked 0 Times in 0 Posts
|
Re: Eighties Contest Entry: 1988 McLaren MP4/4 (and Introduction)
wow.
|
|
|
|
|
|
05-03-2007, 03:30 PM
|
#200 | |
|
AF Moderator

Join Date: Sep 2002
Location: Fort Worth, Texas
Posts: 3,262
Thanks: 38
Thanked 314 Times in 241 Posts
|
Re: Eighties Contest Entry: 1988 McLaren MP4/4 (and Introduction)
One more time you prove that good reference material is very important! Awesome job.
|
|
|
|
|
|
05-03-2007, 07:53 PM
|
#201 | |
|
AF Enthusiast
 
Join Date: Mar 2004
Location: Calgary
Posts: 1,071
Thanks: 0
Thanked 0 Times in 0 Posts
|
Re: Eighties Contest Entry: 1988 McLaren MP4/4 (and Introduction)
Excellent update. Thanks for sharing.
Mike
__________________
    |
|
|
|
|
|
05-04-2007, 08:23 AM
|
#202 | ||
|
Registered User

Join Date: Feb 2003
Location: Berlin
Posts: 1,410
Thanks: 3
Thanked 3 Times in 3 Posts
|
Re: Eighties Contest Entry: 1988 McLaren MP4/4 (and Introduction)
Another awesome update! But do you know what the worst part is? You do so many things I want to do for my McLaren, but I am struggling at 1/12 and you do all this in 1/20
 ! ! Quote:
Last edited by Decs0105; 10-03-2007 at 05:20 AM. |
||
|
|
|
|
05-04-2007, 02:14 PM
|
#203 | |
|
AF Enthusiast

Join Date: Aug 2005
Location: Chengdu. CHN
Posts: 1,269
Thanks: 20
Thanked 36 Times in 19 Posts
|
Re: Eighties Contest Entry: 1988 McLaren MP4/4 (and Introduction)
hallucination... I need to take some rest...
|
|
|
|
|
|
05-05-2007, 05:50 AM
|
#204 | |
|
AF Newbie
 
Join Date: Apr 2003
Location: Moscow
Posts: 62
Thanks: 0
Thanked 0 Times in 0 Posts
|
Re: Eighties Contest Entry: 1988 McLaren MP4/4 (and Introduction)
Ghrrr, mmm...aaaa, I..mmm, I would...khm... can i pay you for some lessons? ))))) What i can say, i have ordered MP4/4 and MP4/5B from HLJ several days ago, plus decals and PE, spent 150$ - and thats all you fault ))) How i will explain this new addition to the huge pile of unfinished models to my lovely wife? I dont know!
PS PLEASE keep updating - i am absorbing the information from your thread like a sponge (Bob), thank you! )) |
|
|
|
|
|
05-14-2007, 03:31 AM
|
#205 | |
|
AF Enthusiast
Thread starter
Join Date: Aug 2005
Location: where "sky grey" is a colour
Posts: 822
Thanks: 3
Thanked 32 Times in 29 Posts
|
Re: Eighties Contest Entry: 1988 McLaren MP4/4 (and Introduction)
This is another update so it must be October already
.time is flying!:-)
Working on the pieces I showed you on the last one got me back into the swing on this model after all. I didnt continue on the suspension pieces though but spent some time on the missing pieces in the cockpit that had been lying around half started for ages. The thing is that I knew all the time what I wanted to do but didnt think it would be possible that way. In the end I decided to just give it a try and to my own surprise I can report it worked! So I have some real eye candy to show today i think:-) Theres only one little letdown in the story .. My dad recently decided that he really needed the macro lens we have been sharing for a long time. The only problem is ..we live 300km apart now so that means I cant use it for thge time being. This turned out to be a problem with the parts I just built because they are bloody small:-) Seems like I have to get my own lens sooner or later. For now my standard one had to do which is less than perfect. See for yourself . To the cockpit then. There were three main things still missing: The dashboard, the steering wheel and the roll bar adjuster. The last one was a novel addition at McLaren. It gave the drivers a lever to change the front roll bar setting during the race. Apparently Senna played with it a lot when he had nothing much to do during the later stages of some races:-) The real one looks like this: 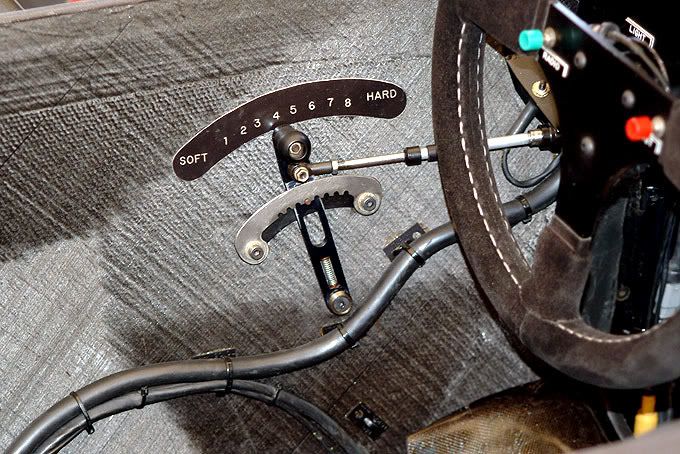 Tamiya supplies a plastic blob to represent this but this part just cried for PE parts. So I replaced it. At least the Tamiya piece was good for taking measurements :-) In the next picture you already see my finished one. For comparison theres also the black Tamiya part and some international monetary reference for the size:-) You probably understand now why I need a real macro 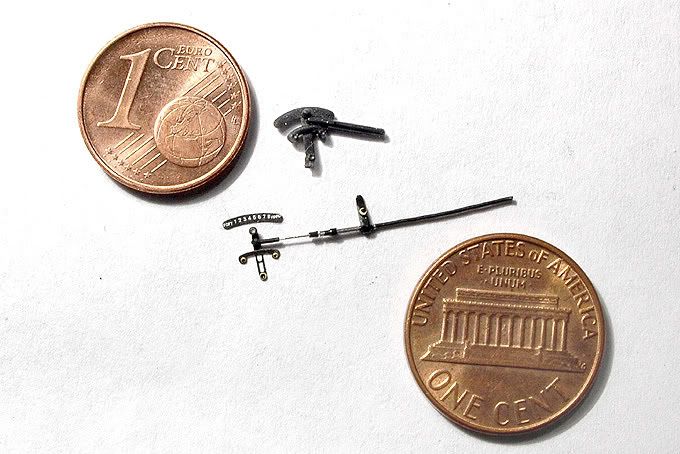 To the left you have the etched bits. The part with the numbers and the lever had to be airbrushed black and I added a styrene knob that I turned in the motor tool ( complete with a hole in the top that I filled with some silver paint). I also added some tiny brass PE washers. The bowden wire to the right was built using a 0,5mm injection needle and some Modelers plug wire plus some scratched bits. The real party piece though are the numbers on the part above the lever! They are each just 0,2mm high but still readable. A decal ( especially a home made one ) wouldnt become crisp enough to do that. These numbers are white custom made dry transfers. They are manufactured in a chemical process and while thats a bit difficult to calculate it does every now and then give very good results. I thought that it wasnt gonna work but gave it a try anyway and it worked! That of course made me even more ambitious:-) To the dashboard and steering wheel then. Next you see front and back side of the parts that come in the kit: 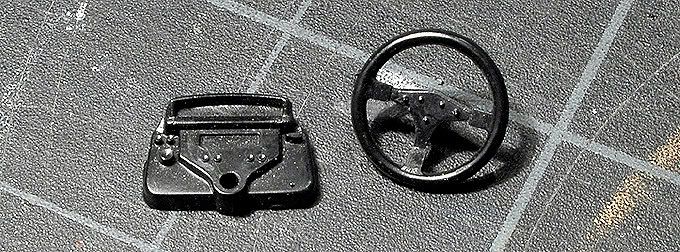 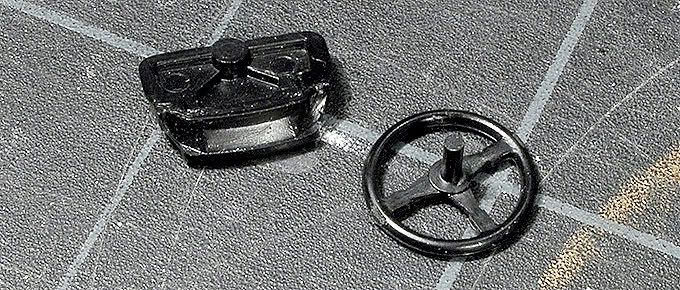 They are a good starting point but do lack detail of course. Heres the real thing for comparison: 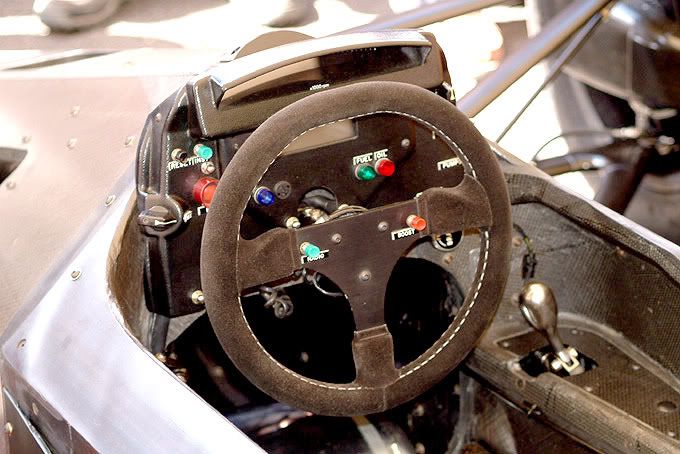 I started with the steering wheel by cutting out the spokes because they were quite thick and replaced them with a brass PE piece. I tried to burnish it to get a better metal look but the result was uneven so it had to be painted in the end. The rim was sanded and I improved the shape using some body filler, files and glass paper. For the slightly flattened shape of the top of the rim I just bent it with pliers. 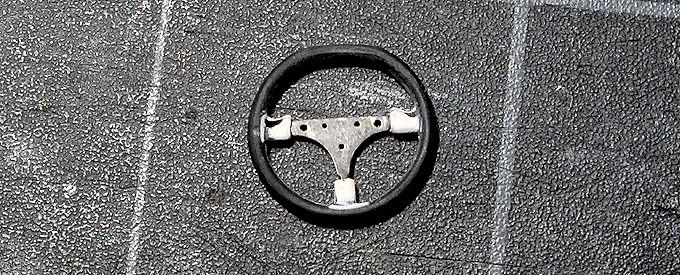 One thing I always planned to have was a removable steering wheel. The one really tricky part to make was the tube with those grooves the steering wheel is stuck on because I wanted some grooves and not just a clean tube! For comparison again a picture of the real part: 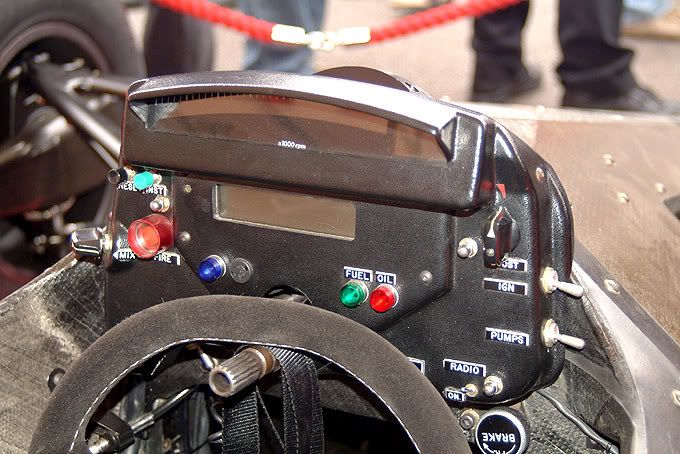 This is where my mill and the dividing head I showed you in my last update came into play. With a lens shaped milling head I managed to cut these grooves. They are 0,1mm deep on a 0,8mm brass tube. Again that worked better than expected! 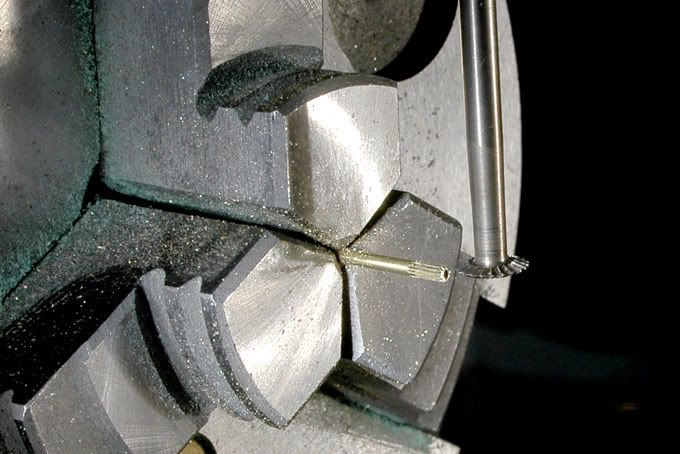 There are less grooves than on the original and they are deeper than they should be in scale .but thats a compromise I had to make:-) In the next picture you see the main parts of the dashboard/steering assembly before painting. Along with the steering wheel theres the dash that I had to rework in a couple of places and strip off the moulded in buttons. Also there are the two brass tubes for the steering column, the parts for the back of the steering wheel ( one turned from aluminium, one a brass tube on a photo etched base ), some switches ( one again turned aluminium and two made from styrene ) and the display glasses that I cut and sanded/polished to shape with micromesh from 0,1mm transparent film. 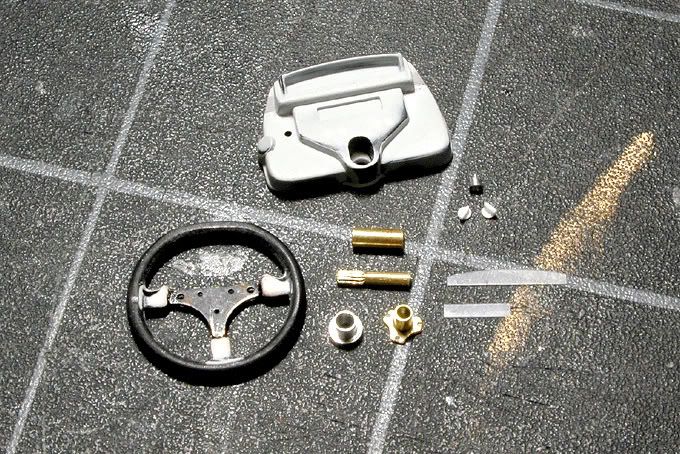 One big step later this is what the dashboard looks like after painting and dressing up with buttons and control lights. 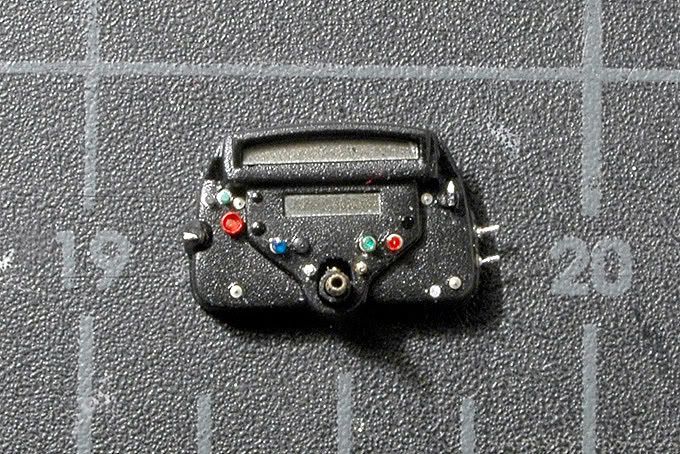 I could go on how every detail was made but I dont wanna completely bore you guys :-) It did take time! Should anyone have a question feel free to ask You may notice though that something is missing compared to the original ..yep those little labels:-) Thats where I got more ambitious after the dry transfers worked on the roll bar adjuster. Originally I wanted to leave them off because i rather dont have a detail on a model than have it looking bad ( like some white brushed on dots in this case ). The characters are even smaller here ( 0,15mm high ) and they are really tricky to read but you can read them .with a magnifier :-)  To put them on I rubbed them onto black decal film. I then cut them out with a fresh No11 scalpel and fixed them on the dash with semi gloss clear enamel paint. Like this I got those white edges ( from the decal carrier paper ) like on the real labels! I also worked on the inside of the dashboard. As you can see some of the components are visible when the cowling is removed: 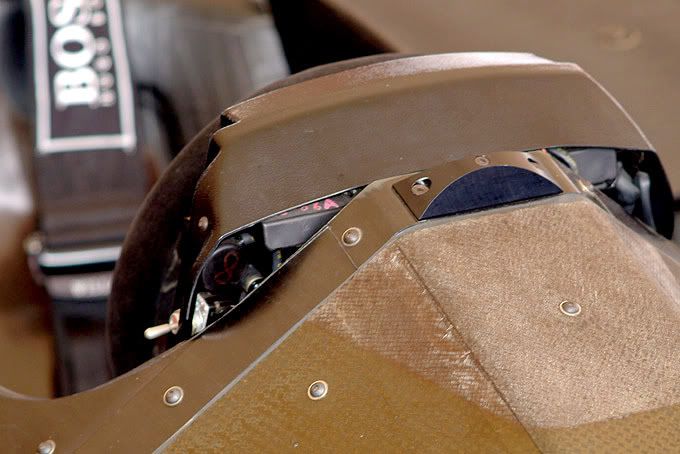 I thinned out the walls of the part in the visible areas and after painting it black added the details from styrene and nickel silver bits. The messy lower part will of course disappear once the dash is mounted. 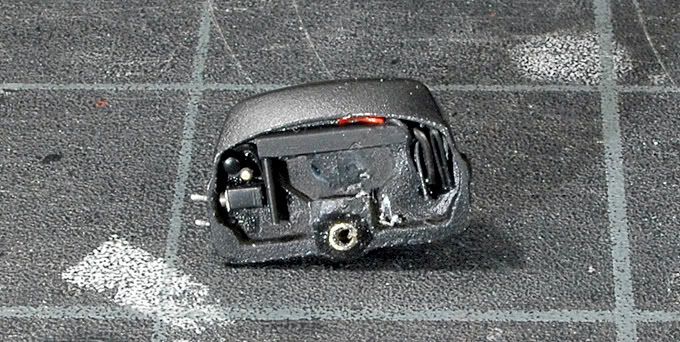 This leaves us of course with the steering wheel. Here is a shot of its back side. That looks quite simple compared to the Playstation controllers in current cars :-) 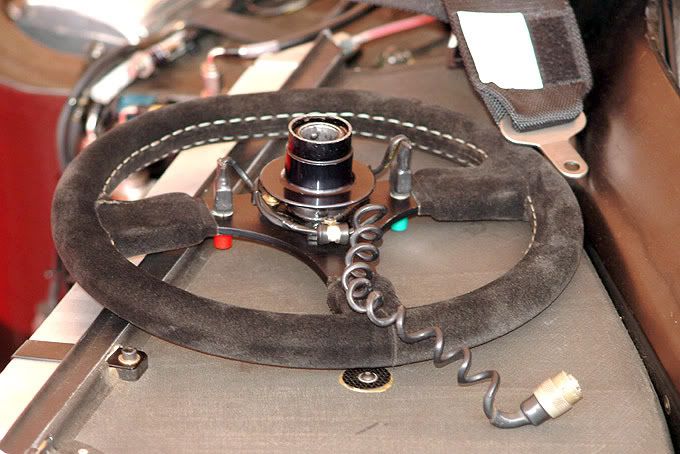 The one detail that i wanted to have on the model, but that always looked a bit undoable to me in that scale, was the white stitching. Painting it on wasnt really going to be an option. Its very difficult to properly do that with a brush and then I wanted to have a rough surface look like on the real one and that further ruled out a white painted line. I decided to try it the other way round:-) From both sides ( there are two seams ) I superglued on a 0,15mm styrene thread ( plastic sprue heated over a candle ). 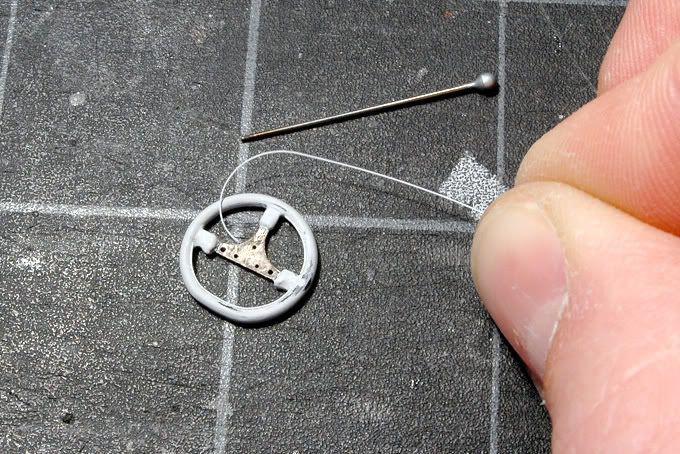 Then I airbrushed the whole steering wheel semi gloss black ( mainly for the steering wheel centre ) and afterwards carefully scratched the paint off the white thread with the No11 blade. Thats not difficult since the thread is raised from the rim surface:-) After masking off the spokes I airbrushed the steering wheel again with un-thinned matt black enamel paint using high pressure and spraying from 10+ cm distance. Doing that with little paint in many dry layers, a rough surface builds up that looks quite a lot like this rough leather on the real one. To make a long story short against my expectations this actually worked according to my plan as you can see in the next picture: 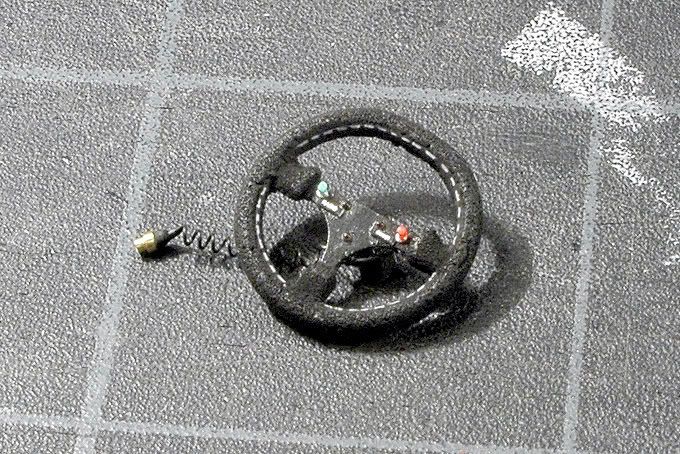 Here the steering wheel is already finished. After scratching the paint off the thread again I divided the remaining white line with a brush and matt black paint. The next time I do this Ill try an even thinner thread. It looks like that should work too. I have to say the pictures somehow dont do the parts justice. I may be prejudiced but in real life and from normal viewing distance the parts look better :-) On the finished steering wheel you can also see the two switches made from turned aluminium bases and styrene buttons. The aluminium parts have very thin spikes that go through holes in the PE spokes to fix them better and onto which I glued the plugs/wires from the back. That may sound a bit over the top but I wanted a more solid construction so I dont break everything too easily when removing/mounting the wheel. Added to that on the front for detailing up the wheel centre are three blackened brass rivet heads and two more labels ( which to be honest are hardly readable even under a magnifying glass :-) On the back of the steering wheel I added cables as per the original and the painted steering wheel centre parts that slide on the column piece of the dashboard. 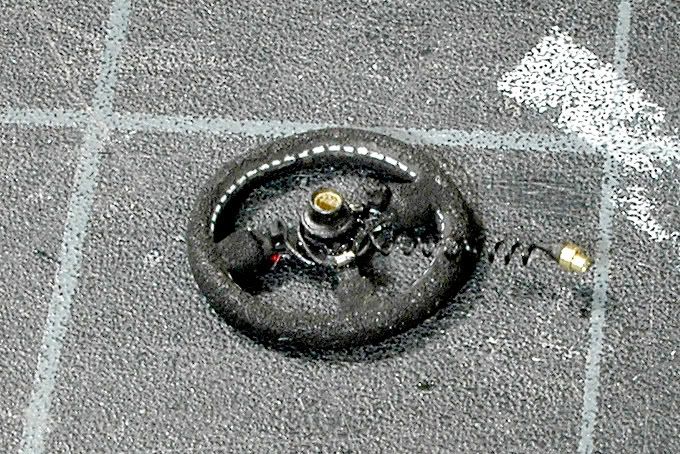 The plug is made from brass rod with a blob of matt black paint at the end and black styrene thread for the wire. For the spiralled part I wound it around a needle. I drilled a hole in the underside of the dash and the plug can be connected :-) My reference is a bit weak on this part so I decided to go with that. At least the plug on the real dash really goes there :-) Once the dash is installed it will be really tricky to put the plug in place anyway. For now this is what the two parts look like when put together. 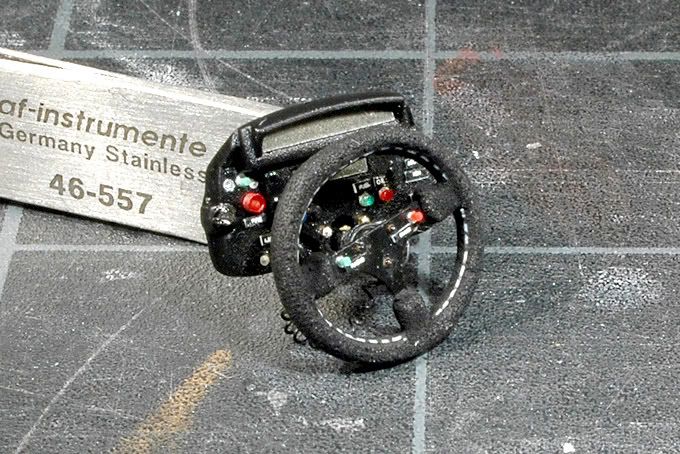 And finally another money shot of the pieces: 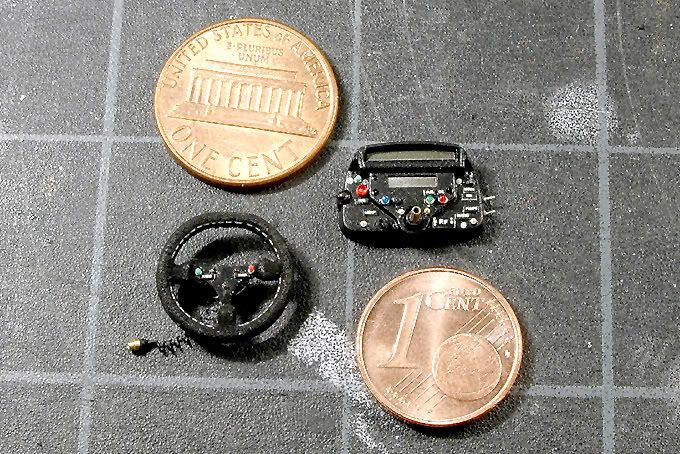 They are really small and I can hardly believe now just how long it took to do them but Im really happy about how they came out. My main aim was to get them as clean as I could because its pretty easy to make all those tiny parts and add PE details and mess them completely up with glue and paint in the process .I can tell:-) I hope you liked this update. Let me know if that was I bit too lengthy writing. I think I got carried away in some places but that wasnt even everything I could write yet :-) Cheers and see you for the next one! |
|
|
|
|
|
05-14-2007, 03:57 AM
|
#206 | |
|
AF Enthusiast

Join Date: Dec 2003
Location: Zagreb
Posts: 2,176
Thanks: 4
Thanked 23 Times in 22 Posts
|
Re: Eighties Contest Entry: 1988 McLaren MP4/4 (and Introduction)
I don't know what to say, this is true inspiration for every model builder, thanks for sharing all those interesting techniques with us.
|
|
|
|
|
|
05-14-2007, 04:16 AM
|
#207 | |
|
AF Enthusiast
 
Join Date: Feb 2006
Location: Manchester
Posts: 759
Thanks: 0
Thanked 2 Times in 2 Posts
|
Re: Eighties Contest Entry: 1988 McLaren MP4/4 (and Introduction)
Hi Jaykay,
Of course it wasn't too long of an update; I could have read twice as much. My only question concerns the Fire button. Did you make that yourself? Kind regards, BillyPee P.S. In terms of the macro lens, a cheaper option is to get extension tubes or a macro filter.
__________________
On the workbench: Completed WIPs: Completed Models Gallery: |
|
|
|
|
|
05-14-2007, 04:46 AM
|
#208 | |
|
AF Newbie
Join Date: Apr 2003
Location: Moscow
Posts: 62
Thanks: 0
Thanked 0 Times in 0 Posts
|
Re: Eighties Contest Entry: 1988 McLaren MP4/4 (and Introduction)
I would be speechless if it was 1/12, but such a detail level in 1/20..... insane, you are a real master.
__________________
  
Last edited by EvoVI; 05-14-2007 at 05:54 AM. |
|
|
|
|
|
05-14-2007, 05:50 AM
|
#209 | |
|
AF Enthusiast

Join Date: May 2003
Location: Sunshine Coast, AUSTRALIA
Posts: 2,218
Thanks: 16
Thanked 8 Times in 8 Posts
|
Re: Eighties Contest Entry: 1988 McLaren MP4/4 (and Introduction)
I realised I had finished reading this update and was just staring at the screen
 ......then a drop of dribble ran down my chin and snapped me out of it! Incredible work! ......then a drop of dribble ran down my chin and snapped me out of it! Incredible work!
__________________
Rob 
|
|
|
|
|
|
05-14-2007, 06:18 AM
|
#210 | |
|
AF Enthusiast

Join Date: Mar 2005
Location: Barnsley
Posts: 3,199
Thanks: 8
Thanked 111 Times in 107 Posts
|
Re: Eighties Contest Entry: 1988 McLaren MP4/4 (and Introduction)
The stitching on the steering wheel is incredible.The whole dashboard/steering wheel area is a model in itself.In 1/12th scale this would be good,but in 1/20th scale it is fabulous.Excellent work.
__________________
Steve Noble |
|
|
|
|
|
|
POST REPLY TO THIS THREAD |
 |
|
|

