|
|
|

|
|
| Search | Car Forums | Gallery | Articles | Helper | Air Dried Beef Dog Food | IgorSushko.com | Corporate |
|
| Latest | 0 Rplys |
|
|||||||
| WIP - Motorsports Post topics for any "Work In Process" motorsports vehicles in this sub-forum. |
 |
 Show Printable Version | Show Printable Version |  Email this Page | Email this Page |  Subscribe to this Thread
|
|
|
Thread Tools |
 09-25-2006, 10:12 AM
|
#151 | |
|
AF Enthusiast
 
Join Date: May 2006
Location: London
Posts: 197
Thanks: 0
Thanked 0 Times in 0 Posts

|
Re: Eighties Contest Entry: 1988 McLaren MP4/4 (and Introduction)
Amazing.
Euan
__________________
You're not meant to use wood... 
|
|

|

|
|
09-26-2006, 05:14 PM
|
#152 | |
|
AF Enthusiast

Join Date: Oct 2005
Location: Monza
Posts: 1,150
Thanks: 21
Thanked 56 Times in 38 Posts
|
Re: Eighties Contest Entry: 1988 McLaren MP4/4 (and Introduction)
JayKay I'm still searching on the dictionary the right word to describe what you're doing...
You're not human. Roberto  |
|
|
|
|
|
09-27-2006, 06:05 AM
|
#153 | |
|
AF Regular

Join Date: Sep 2006
Location: Zaragoza
Posts: 232
Thanks: 3
Thanked 0 Times in 0 Posts
|
Re: Eighties Contest Entry: 1988 McLaren MP4/4 (and Introduction)
You're a Tamiya engineer??? It's incredible the work you're doing!!!! it's Amazing!!!
 |
|
|
|
|
|
09-29-2006, 04:50 PM
|
#154 | |
|
AF Enthusiast

Join Date: Feb 2006
Location: Melbourne
Posts: 1,057
Thanks: 5
Thanked 26 Times in 26 Posts
|
Re: Eighties Contest Entry: 1988 McLaren MP4/4 (and Introduction)
It is like reading a novel you do not want to put down. Excellent work.
|
|
|
|
|
|
10-01-2006, 08:12 PM
|
#155 | |
|
AF Enthusiast
Thread starter
Join Date: Aug 2005
Location: where "sky grey" is a colour
Posts: 823
Thanks: 3
Thanked 32 Times in 29 Posts
|
Re: Eighties Contest Entry: 1988 McLaren MP4/4 (and Introduction)
Hi everybody again. Here comes another update
.and this time quicker than usual :-)
First up thanks for all those positive comments again. I really appreciate this and it is a great motivation to get on with the model. Robrex ..I dont think though that you need me to become a better modeller, if thats necessary or possible at all ..but thanks!! :-) I managed to get some modeling time and now that the painting of the monocoque is over some things just go quicker as Im adding new little pieces or stuff I already prepared so here we go with some progress. Before I could carry on with the gearshift that I gave you a preview of in the last update I had to attack the steering column. Only after this was installed I could put the other cockpit elements in place. You dont see a lot of it but it had to be done and I wanted to make it nice and crisp .which was my main concern. Heres the real one: 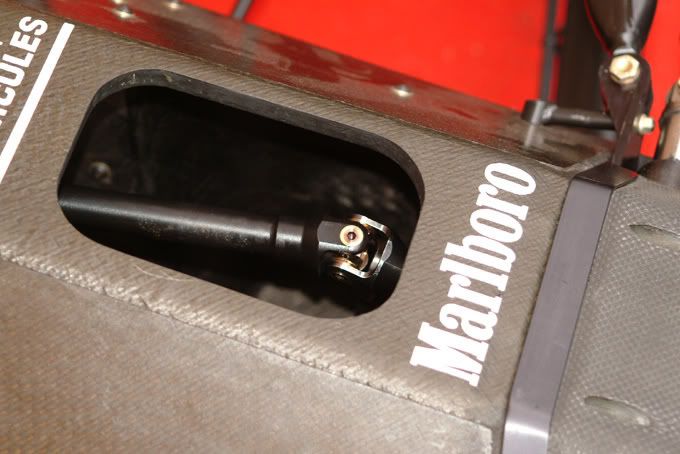 It looks very sharp and undoable in scale but I tried and am pretty happy with the result. I made the basic shape of the universal joint parts from aluminium on the lathe and then very carefully filed and sanded the details by hand and rotary tool. The columns are 0.8mm brass tubes. For reference I put a ruler .they are quite small:-) 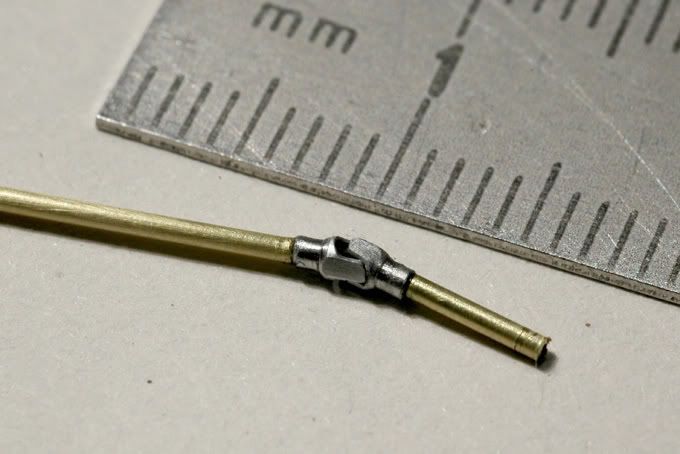 Then I glued on brass PE washers from SRC and airbrushed them semi gloss black. After sanding off the paint from the brass washers they look like this: 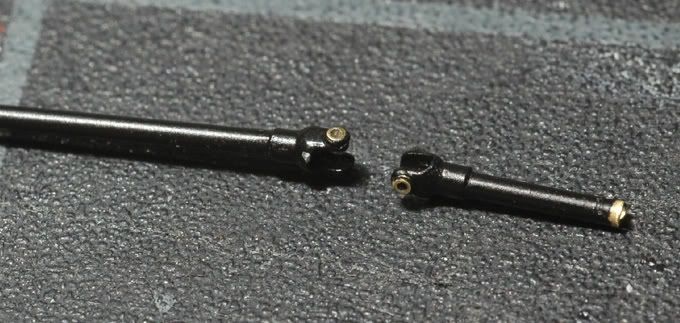 Not exactly like the original but close enough and finally here the whole assembly is installed in the nose of the monocoque: 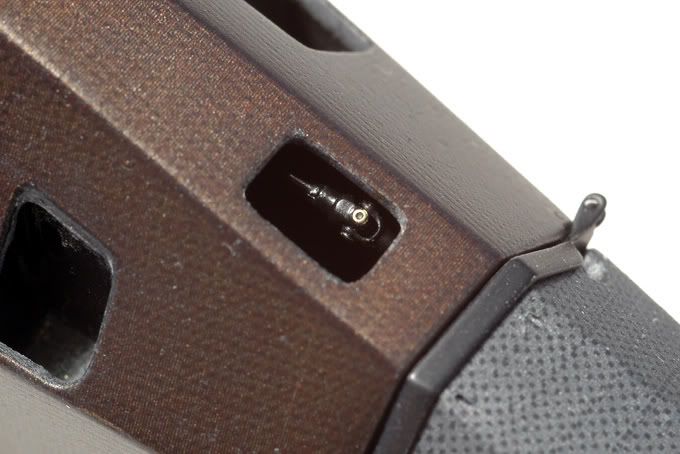 After this was finally done I could also install the part with the pedals and fire extinguisher, the seat and the armrest with the gearshift. 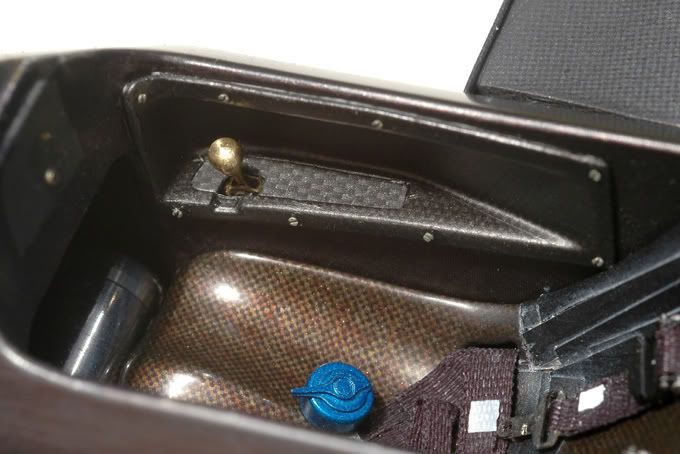 The PE screw heads are from a set by MCG ( Model Car Garage ) and the smallest I have yet seen on the market. I fixed them with tiny drops of matt clear paint. I think Ill tone them down a bit. Like this they are too bright compared to the original. In the meantime I also worked on the sidepods. Here you see the forward ones. 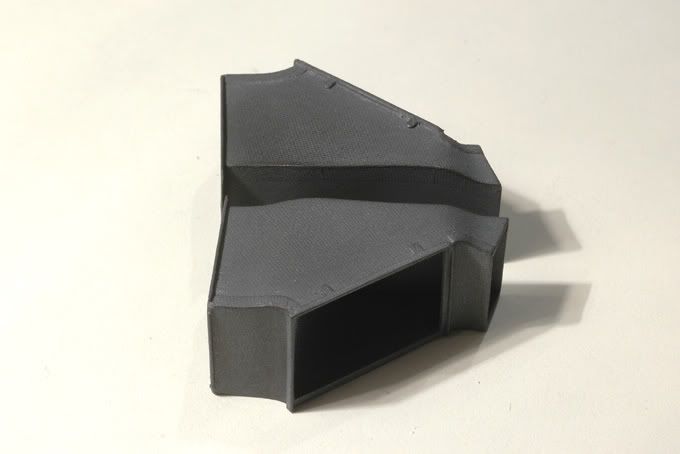 For their surface finish I tried something different with the CF decals. As you can see in the next picture of a real one they dont show a bright pattern that changes its look with the light but rather has a structure you can feel when youre touching it. 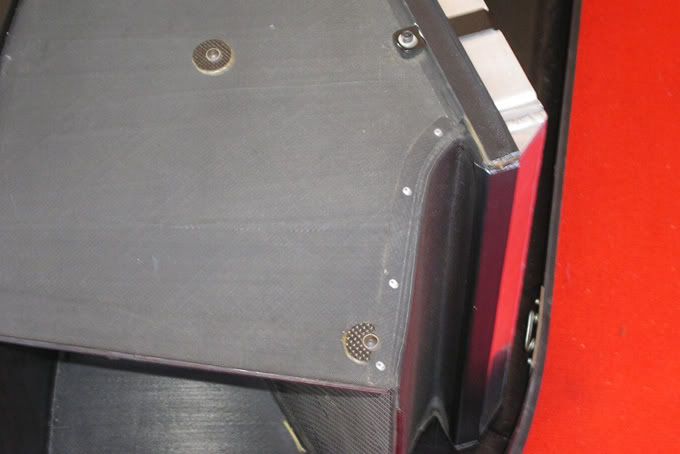 For recreating this, my home made Kevlar decals turned out to be very useful. Unlike the decals you can buy, their black laser printed mesh pattern is raised. After painting the sidepods gun metal grey I covered all the visible surfaces up with the stuff ( which involved a good deal of MicroSol again ). I then sprayed them with a misty layer of gun metal grey mixed with matt clear. Like this the structure is still visible but the colour is uniform. To improve the look I later rubbed the pieces a bit with my fingers which made the raised areas of the pattern a bit glossy. In the next picture I put them in place ( they are not yet glued though ). You can see I added the big washers and rivet heads that hold the mesh inside that protects the radiators from debris on the real car. The mesh will follow later. 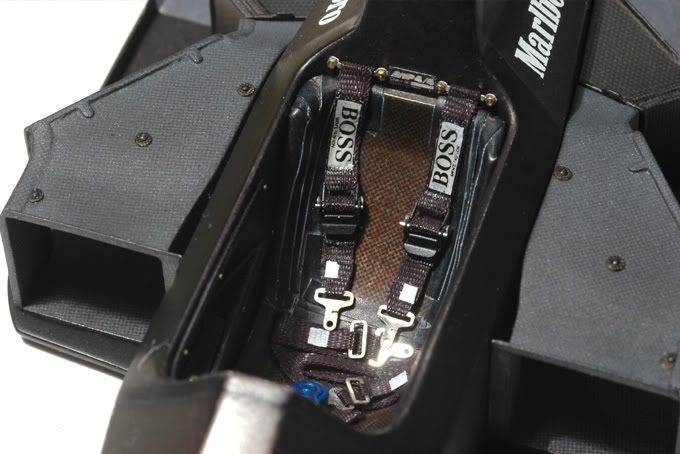 The washers are brass PE and I covered them with SMS 1/43rd scale Kevlar decal after a layer of clear paint ( apparently decals dont stick well on unpainted surfaces ). The decals were a bit too bright so I toned them down with a mix of matt black and clear and added the rivet/screw heads I made from styrene. I may sound silly with all those steps Im doing to those little bits but once you start thats were you get to in the modeling asylum :-) More importantly you can also see I added the seatbelts. The lap belts are glued to the seat. For the shoulder belts I drilled little holes and fixed them with the PE brackets that come in the Perfect Parts set. I used 0.8mm brass screw heads from Galtran.com. It wasnt even necessary to use glue. I just pushed them in and they stay:-) I also added the Boss stickers now that the belts were in place. The decals that came in the seatbelt set didnt react to MicroSol though so I used Robrexs advice and used some plastic cement. That worked but they didnt turn matt! :-) Some matt paint will take care of that though. In between the belts I added the chassis plate. Its again a dry transfer on a piece of 0.1mm nickel silver. You may remember the big one I made for the box. This is from the same data .but this time in scale .and without the chassis number etched in :-) While doing all this I also carried on doing more new bits. I started to assemble the electronic boxes from my PE parts. Here you can see some laid out in the right order after each one was cleaned with files and sanded. 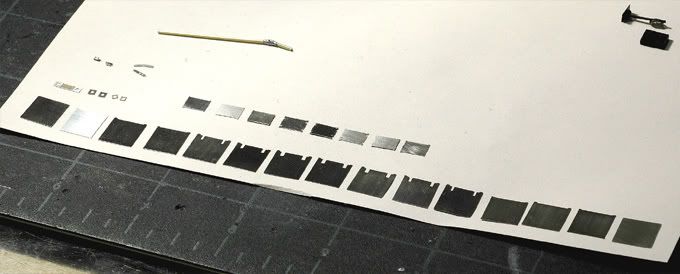 In plastic kits these boxes always have flat sides but as you will know also from car stereo amplifiers the usually have fins for cooling. To replicate this I etched pieces with varying sizes that I then stack up layer by layer. I use epoxy glue for this because it gives you a chance to move the pieces in the right place. Superglue doesnt let you do this. The whole process is a bit time consuming and in the end you just get one black brick from all these nice bits but I think its one of these little details thats worth the effort. Here you can see the boxes before painting. I also did the mounting plates for the electronic connectors. 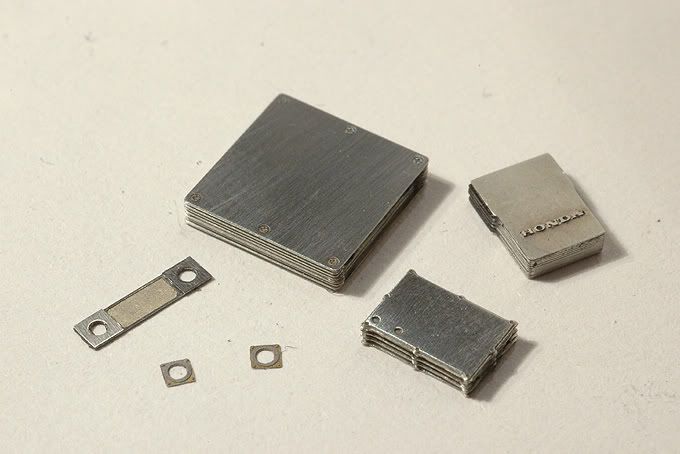 Next up is the fuel filler. Its a PE plate for the base with a turned part on top. The little holes in the top ring I filed in by hand. Now it needs some paint. It wont be very visible after the roll bar is installed unfortunately .  In the next picture of the real car you see the area on top of the tank where the big electronic box and the fuel filler ( under roll bar ) go. 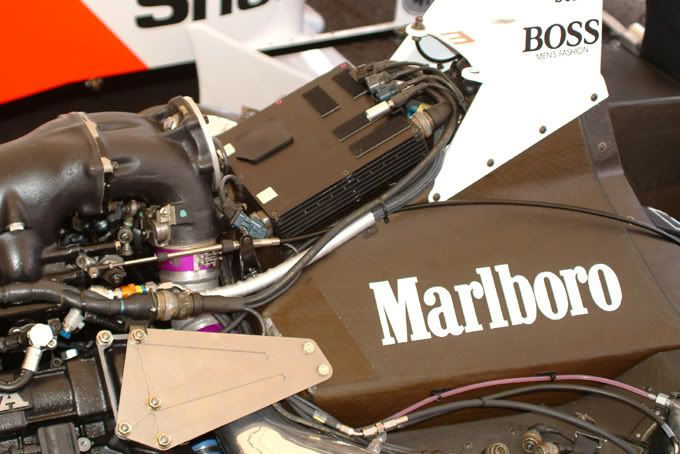 For comparison here is the model with the now painted E-box and the unpainted fuel filler put in place but not yet glued. I have to work on those cables and the roll bar first. 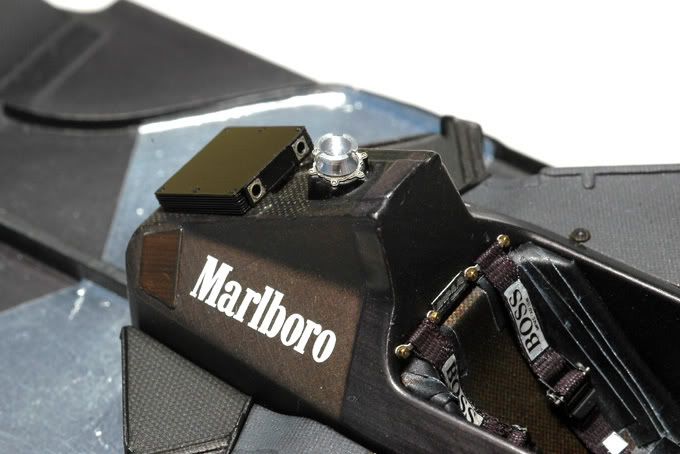 As you can also see I added Bare Metal Foil in the engine bay and on the rear end of the monocoque and the Marlboro stickers on top of the tank. 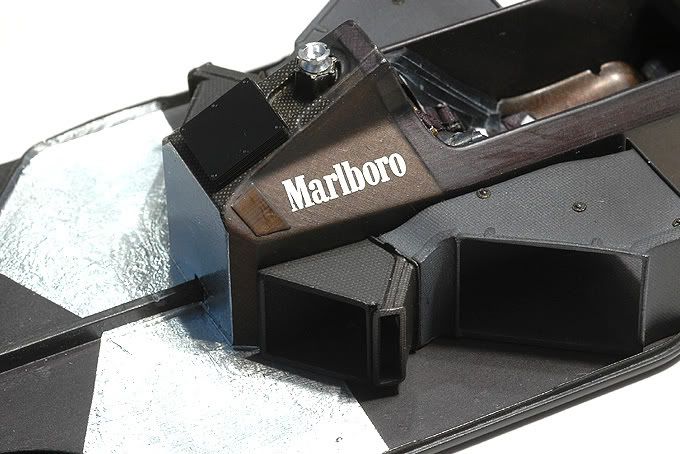 Those were a story of their own. I have several decals sheets for this model just in case:-) First theres the one that comes in the Tamiya kit which will be used only partially .if at all. I then bought a Studio27 High-Tech sheet, mostly because of the fluorescent red colour that is a perfect match for the automotive paint Ill be using for the cowling and rear wing. Then I also got the standard Studio27 sheet of the Japanese GP because the name stickers on the roll bar are different and who knows what else ( you never know and a backup is never bad :-) Finally I already had the Marlboro decal sheet from F1Specialties for all the McLarens. You can just about see in the next picture that the red parts are a little different from sheet to sheet. I dont wanna get into that fluo red discussion again but this just shows there are differences and I think its best to match the paint to the stickers. 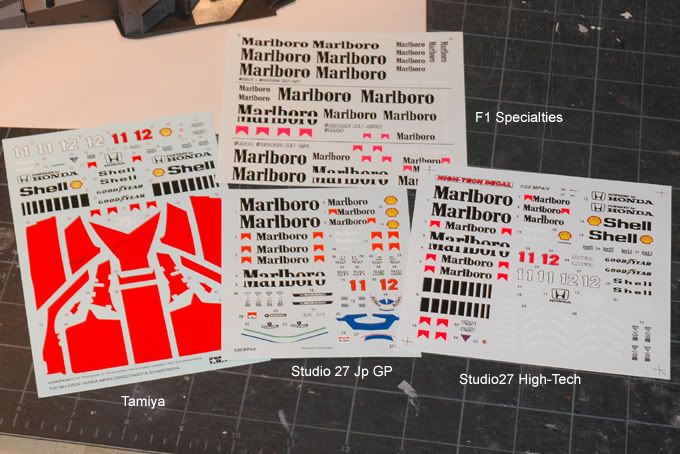 The funny ( or not so funny ) part here are the said white Marlboro stickers for the tank. They should be individual letters with no carrier film around them to shine out on the dark and matt underground. So Studio27 High-Tech is the one .not! It turned out they are too small. From the reference pictures in the F1Modeling Senna Giga Special it seems like they were small in the early season ( correct for the Tamiya kit ) but somewhat bigger for the late season car Im building. Of course both Studio27 sets have the same small logos The F1Specialties logos have the correct size but I decided against them because the carrier film would show ( unless I over paint them with matt clear ). I chose to get dry transfers in the correct size. They worked fine and are true to the original with individual characters:-) So much for being pedantic again . So much for that .but I managed to give myself a new problem while taking the pictures for this update. When I put the High-Tech decal sheet back into its plastic bag the freakin piece of crap got stuck right on top of some of the stickers with its glued end. When I tried to peel it back off very carefully a couple of the carrier film bits came off ( %§&X$§#!!!!) and among them of course the red Nr 12 for the nose! I dont know how I will get that number in place now and I dont really wanna buy another sheet just for that! Bugger! Normally the first thing I do with those bloody Studio27 decal bags is to cut off this annoying glued end just because of that. I really wished they could come up with another way to seal these bags! Rant off! This is it for now. The next update will take a bit longer again as Im going on holidays for a week :-) Cheers |
|
|
|
|
|
10-01-2006, 09:33 PM
|
#156 | |
|
That thing got a Hemi?
 
Join Date: Jul 2004
Location: London
Posts: 9,337
Thanks: 0
Thanked 2 Times in 2 Posts

|
Re: Eighties Contest Entry: 1988 McLaren MP4/4 (and Introduction)
that work is just amazing..
__________________
Seatbelts Saved My Life 
|
|
|
|
|
|
10-01-2006, 10:15 PM
|
#157 | |
|
AF Regular

Join Date: Feb 2006
Location: NorCal!, California
Posts: 475
Thanks: 0
Thanked 0 Times in 0 Posts
|
Re: Eighties Contest Entry: 1988 McLaren MP4/4 (and Introduction)
this is absolutely insane.
|
|
|
|
|
|
10-02-2006, 01:40 AM
|
#158 | |
|
AF Enthusiast

Join Date: May 2003
Location: Sunshine Coast, AUSTRALIA
Posts: 2,218
Thanks: 16
Thanked 8 Times in 8 Posts
|
Re: Eighties Contest Entry: 1988 McLaren MP4/4 (and Introduction)
Amazing!
You said yourself Jaykay, that getting comments gives you motivation to build more..well reading your thread makes me want to build more! That's how it's making me a better modeler! You have raised the bar SOOOOOOO high!!!! Thanks
__________________
Rob 
|
|
|
|
|
|
10-02-2006, 01:44 AM
|
#159 | |
|
AF Enthusiast
Join Date: Feb 2006
Location: Melbourne
Posts: 1,057
Thanks: 5
Thanked 26 Times in 26 Posts
|
Re: Eighties Contest Entry: 1988 McLaren MP4/4 (and Introduction)
Wonderful work....I love the linkage set-up.
|
|
|
|
|
|
10-02-2006, 03:15 AM
|
#160 | |
|
AF Enthusiast
 
Join Date: Feb 2006
Location: Manchester
Posts: 759
Thanks: 0
Thanked 2 Times in 2 Posts
|
Re: Eighties Contest Entry: 1988 McLaren MP4/4 (and Introduction)
Hi JayKay,
Great work and another fabulous update. I will never get tired of this thread. Cheers, BillyPee
__________________
On the workbench: Completed WIPs: Completed Models Gallery: |
|
|
|
|
|
10-03-2006, 05:58 AM
|
#161 | |
|
AF Regular
Join Date: Feb 2005
Location: Newcastle
Posts: 209
Thanks: 0
Thanked 1 Time in 1 Post
|
Re: Eighties Contest Entry: 1988 McLaren MP4/4 (and Introduction)
Great progress, this build is really moving along. I have a studio 27 hitech decal sheet with a spare no12 if you are interested. I believe the sheet covers 4/4 to 4/8, and I am doing the 4/5b which uses no 27. I am guessing the 12 on the sheet would be the correct size and what you are after.
|
|
|
|
|
|
10-04-2006, 03:45 PM
|
#162 | |
|
AF Enthusiast

Join Date: Sep 2006
Location: USA, Florida
Posts: 590
Thanks: 3
Thanked 6 Times in 6 Posts
|
Re: Eighties Contest Entry: 1988 McLaren MP4/4 (and Introduction)
Hi JayKay,
Your work is just out of this world Dave |
|
|
|
|
|
10-05-2006, 08:30 PM
|
#163 | |
|
AF Regular

Join Date: Aug 2004
Location: Canela
Posts: 172
Thanks: 0
Thanked 0 Times in 0 Posts
|
Re: Eighties Contest Entry: 1988 McLaren MP4/4 (and Introduction)
Great, great work Jaykay!!!
|
|
|
|
|
|
10-06-2006, 03:28 AM
|
#164 | |
|
AF Enthusiast
Join Date: May 2004
Location: Kalmar
Posts: 2,047
Thanks: 66
Thanked 25 Times in 25 Posts
|
Re: Eighties Contest Entry: 1988 McLaren MP4/4 (and Introduction)
You are so skilled and seem to have so much fantasy to get those details covered. What I really like is that you put down a lot of effort to describe the process, you would probably get a lot of
 :s and :s just by showing us the photos. But as Rob sais this shows what you can do with a kit if you earn your skilles and breed those with a lot of fantasy, time and motivation. Hope we can keep feeding you that last ingredient. :s and :s just by showing us the photos. But as Rob sais this shows what you can do with a kit if you earn your skilles and breed those with a lot of fantasy, time and motivation. Hope we can keep feeding you that last ingredient.My hat off and my most humble regards. Joel
__________________
Visit my FB page www.facebook.com/one12th |
|
|
|
|
|
10-06-2006, 03:50 PM
|
#165 | ||
|
AF Regular

Join Date: Sep 2004
Location: Vallensbaek Strand
Posts: 237
Thanks: 4
Thanked 0 Times in 0 Posts
|
Re: Eighties Contest Entry: 1988 McLaren MP4/4 (and Introduction)
Quote:
 . I am many-times Danish IPMS champ and LIGHTYEARS away from the Jaykay level. My MFH FW16 looks like something done by a 5-year old child compared to the MP 4/4. . I am many-times Danish IPMS champ and LIGHTYEARS away from the Jaykay level. My MFH FW16 looks like something done by a 5-year old child compared to the MP 4/4.
__________________
Best regards Allan Nielsen Denmark |
||
|
|
|
|
|
POST REPLY TO THIS THREAD |
 |
|
|

