|
|
|

|
|
| Search | Car Forums | Gallery | Articles | Helper | Air Dried Beef Dog Food | IgorSushko.com | Corporate |
|
| Latest | 0 Rplys |
|
|||||||
| WIP - Motorsports Post topics for any "Work In Process" motorsports vehicles in this sub-forum. |
 |
 Show Printable Version | Show Printable Version |  Email this Page | Email this Page |  Subscribe to this Thread
|
|
|
Thread Tools |
 08-13-2006, 09:00 AM
|
#136 | |
|
Authorized Vendor

Join Date: Oct 2005
Location: Vicenza - veneto de rassa
Posts: 3,910
Thanks: 6
Thanked 47 Times in 41 Posts
|
Re: Eighties Contest Entry: 1988 McLaren MP4/4 (and Introduction)
Hey Jay Kay
this is one of the most fun and pedagogical threads of ever: I read all another time now, I forgot your full-explanation on PE works and in breake turning/milling: simply fantastic. I can't stop to thank you so much for the fantastic effort, for the model's quality, for the huge number of detail and for the instructive "cut" of this fantastic thread. Keep up the awesome job!
__________________
 gio gio
|
|

|

|
|
08-13-2006, 02:26 PM
|
#137 | |
|
AF Fanatic

Join Date: Dec 2004
Location: Up the creek with no paddle
Posts: 5,889
Thanks: 7
Thanked 16 Times in 15 Posts
|
Re: Eighties Contest Entry: 1988 McLaren MP4/4 (and Introduction)
"bloody hell!" sums it up best , I think
 Stunning work Mr. Jaykay!!! BTW, what don't you like about the RB Motion parts? I was under the impression that they are pretty fine yet you call them "positively ridiculous". Looking forward to more updates and hoping for as much "modelling weather" as possible in your part of the world 
__________________
Guideline for happy modeling: Practice on scrap. Always try something new. Less is more. "I have a plan so cunning, you could put a tail on it and call it a weasel" - Edmund Blackadder |
|
|
|
|
|
09-21-2006, 03:58 AM
|
#138 | |
|
AF Enthusiast
Thread starter
Join Date: Aug 2005
Location: where "sky grey" is a colour
Posts: 823
Thanks: 3
Thanked 32 Times in 29 Posts
|
Re: Eighties Contest Entry: 1988 McLaren MP4/4 (and Introduction)
Update time again
finally:-)
First up about my description for the RB Motion parts in my last post as positively ridiculous i wanted to say just that! They are so nice that its a challenge to keep the rest of the model look as nice and crisp! They are ridiculous in a good way and I can only recommend them ..not that anyone gets me wrong :-) To the model then! In my last update I showed you my failed attempt to get the right CF look on the seat and the turbo air ducts. When they turned out crap I decided to strip them and try something else. As a reminder heres another picture of the real seat. 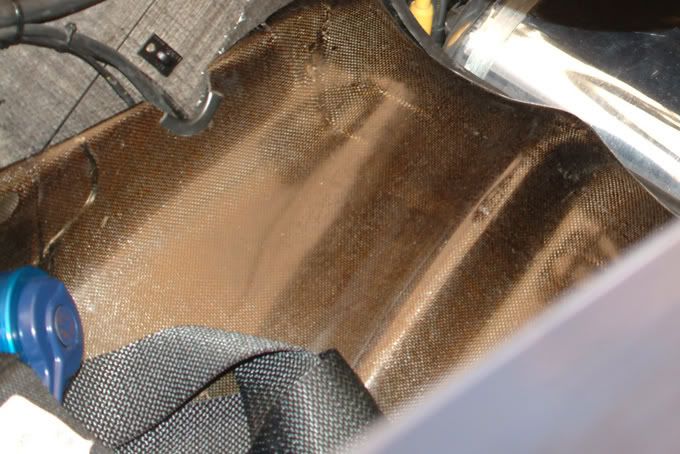 After painting the seat silver I added one layer of red flakes that I printed on transparent decal film. You can see the first half done in this picture.  Because of the shape of the seat its not possible to do it all with one piece of decal. Like this it took a good deal of time and Micro Sol already :-) The seam line will later be hidden anyway so its no problem. Next I put on one layer of my own Kevlar decals. Since they are also printed on clear film the red flakes underneath still showed through. It turned out that the contrast with the silver base coat was very drastic so I put on a thin misty layer of gun metal grey to tone it down. Then I added the orange/brown tone. This time I went for a mix of transparent yellow, transparent red, and ( very important ) matt black and matt clear. The resulting paint looks a lot like Tamiya smoke. The matt parts are important because the make it dry faster and hence not run and build puddles. I added a bunch of thin layers until I got the right look. Finally I added two thick layers of automotive gloss clear ( with sanding in between ). Here is the seat after the second layer. It needs some sanding and polishing to get the last unevenness ( from the decal layers ) out of the surface and a little bit less shine. The glossiness of the clear coat is a bit too much compared to the real thing. In the next picture you see it after that and with some tape added like on the seat in the car I photographed at Goodwood. I cant tell if Ayrton Senna had his seat taped up like that back in the days because in all my pictures he sits in the car ..so I decided to do it like this. The tape stripes are cut from black electrical insulation tape and to highlight the edges and make the tapes look a bit worn I brushed on some white pastel chalk dust with a brush. 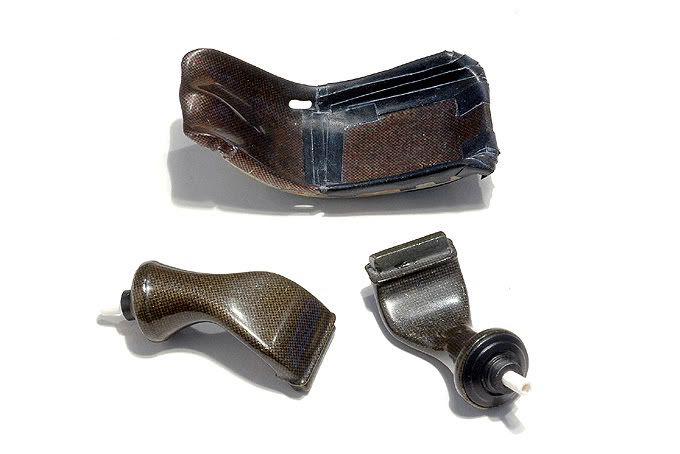 Also in the picture you see the turbo air ducts that mostly got the same decal and paint treatment as the seat. The difference is that I started with a gun metal grey base coat and didnt put the red flakes. In this picture the seat and ducts look very much alike but in real life the difference is bigger and the pattern of the ducts doesnt show as much. The photo and lighting change the look somewhat. The ducts are covered with two pieces of decal each ( one on the outside and one on the inside and lots of patience and decal solution :-) The problem was that with each layer of decal and paint the edges get softer and thicker. I tried to get a little crispness back while sanding and polishing but I had to be very careful not to sand through the paint anywhere. Ultimately the pieces turned out mostly like I wanted them but most importantly a whole lot better than my first try so it was worth the extra hours spent redoing everything. Of course that wasnt everything. The monocoque also had to go on. Initially it was much less tricky than the turbo ducts. I also airbrushed it with my custom smoke mix to tone the decals down from the look they had in the picture I posted in the last update. The paint mix also took care of the magenta problem. Heres the result after clear coating but before some final surface treatment. I also redid the nosecone. When I put it next to the monocoque after painting the colour just didnt look right. Also I was unhappy with the seam line at the lower edge of it that I described last time. It was too big. So I stripped the nosecone ( Btw ..is that just me? ..It was a real effort to make those decals stick nicely in the first place but then, when I wanted them off no sir! I really had to get nasty with glass paper in some places to make them go ..). Anyway I sanded the seam line smoother, painted the nosecone gun metal grey this time and redid the CF decals. Then I covered them up with a mix of matt clear and just a bit of matt white. I think that looks quite good now. Heres the real car again for comparison:  And this is a closer look at the front part of the chassis. Even in the picture you can see the effect that the patterns show more the closer you get and Im quite happy about how everything came out . although it took quite some time.  A serious amount of work did go into the underside of the car. Here you see what it looks like right now, before some final touches and detailing. 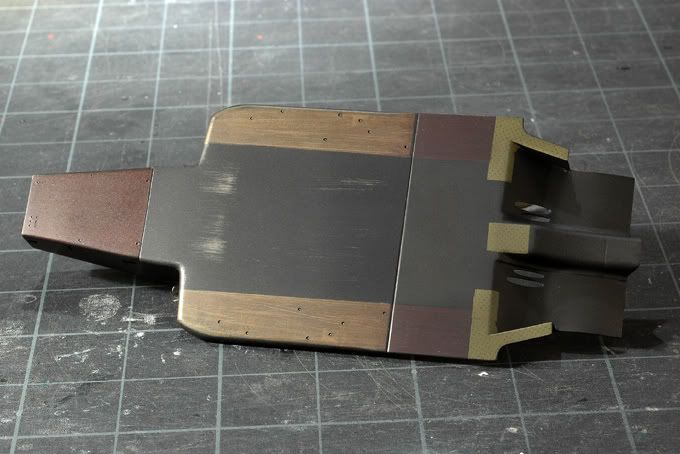 My special thanks go to fellow AF member Cinqster who was cleverer than me and took some pictures of the cars underside when it was on display in Goodwood :-) Here are two of them. The first one shows the middle part of the undertray and what you might mistake as a wooden legality plank. 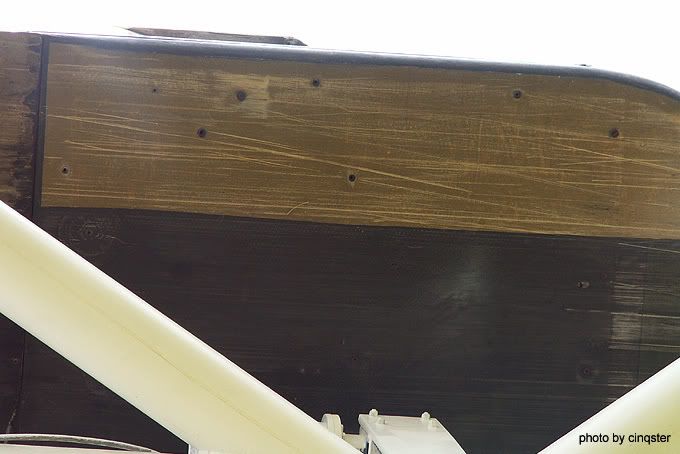 It looks a lot like wood with those scratches but I guess its some kind of Kevlar. This photo was actually the starting point of my decal. I changed it to the right size in Photoshop and added the part at the front thats missing in the picture. This I printed on clear decal film and put it on the grey primer patches that I masked off when spraying the undertray black. Afterwards I also smoked these areas a bit and added some scratches in the black paint with rough glass paper so the primer showed again. Next is a picture of the diffuser area. This clearly got used and also the vertical diffuser fins are missing. 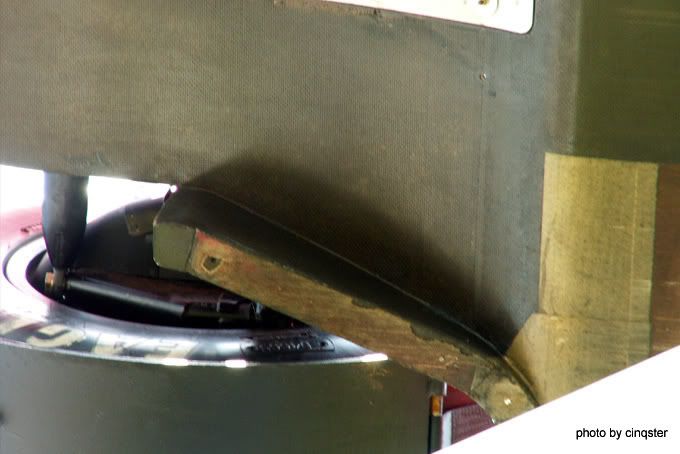 I decided to keep my model diffuser in better shape. There was no way to mask and paint the yellow and brownish areas on top of the Studio 27 CF decals I already put on so I cut out the pieces from clear decal film and airbrushed those. Its no problem to apply the decals afterwards but of course they become thicker and less flexible. On top of them I added decal layers with dot pattern and stripes ( dark brown patches ).  To get the undertray surface even after all those decal layers I put on three thick layers of automotive ( 2K ) clear coat, each of them carefully wet sanded. The final layer also went on the top side of the monocoque. This layer was very wet ( not a problem with that stuff as it runs a whole lot less than model paint ) and a lot thicker than what I normally put on to be on the safe side for sanding. I hoped to get a very smooth finish to start with but instead I earned orange peel and a lot of sanding to do. Great! It wasnt a problem for all those straight surfaces but the diffuser area and the edges around the upside of the undertray were really annoying. My plan was to get surfaces with various levels of sanding/polishing finish that would look very much like the original finishes but that didnt work out so I changed my plan. After everything looked mostly right and even I covered the whole monocoque up with a thin layer of semi gloss clear ( in my case a mix of Revell matt clear and Humbrol matt clear which is rather glossy !? :-) Next I sprayed some Revell matt clear through a very thin photoetched mesh on top of that. You can see the effect in this picture:  The pattern thats visible is not from the CF decals like in the foreground of the picture but from the paint. For comparison see the lower right corner ( in front of the diffuser ) where its missing. I couldnt do that in every little corner ( that would have meant to cut to shape and hence waste a lot of expensive PE mesh ) but it wouldnt show too much in all areas anyway. On the cockpit front area I did the same but with the glossy stuff to get a variety of that look like on the real car where this area is shinier. In the tank area of the monocoque right behind the drivers head and on the sides theres yet another surface look. Its more like a cross striped pattern as on the decals. To get that messy surface I added the stripes with a thin brush and old ( less fluid ) clear that wouldnt flow and even out before airbrushing the semi gloss layer on. That worked out quite nice. See the real look in this picture: 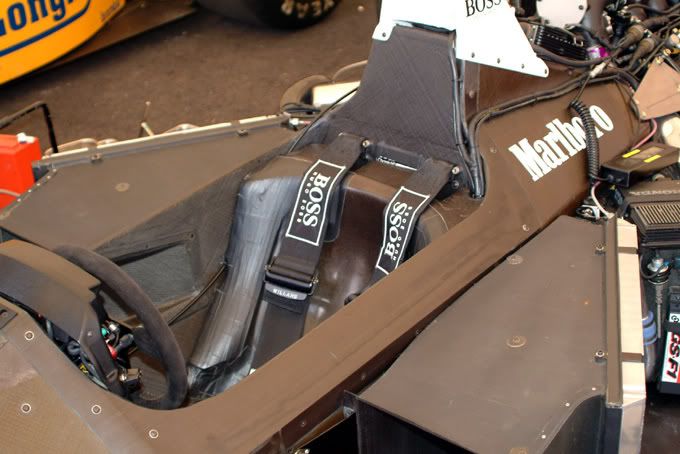 I have to do some surface treatment here and there still like polishing the cockpit surrounding a bit or adding scratches on the underside ( the clear layers evened out those scratches I put in the black paint so now you see scratches underneath a perfect surface ..that would be odd :-) But now its time to add details and some eye candy. The bare monocoque looks quite dull, almost like armour ( no offence :-) The next thing to do in the cockpit were the seatbelts. 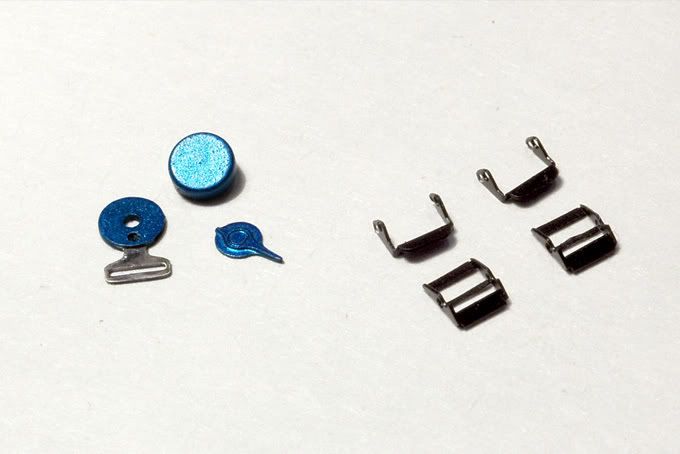 I used the Perfect Parts T2B set that looks quite good and is the best Ive seen so far. The shoulder adjusters were painted semi gloss black after bending them to correct shape. The round lock piece is turned metal and the buckles come chromed. I sanded them with a 3600 grid pad to take away some of that chrome shine ( but incidentally also took away the complete chrome layer on two edges ..its quite thin, which is generally good if you dont try to change its look :-) The blue was airbrushed over a thin layer of aluminium, because directly on the polished surfaces it easily ran from the air pressure and got uneven and was topped off with a thin layer of matt clear. It did make me feel a bit pedantic to put three different layers of paint on such little pieces but once you start .thats the way it goes I guess :-) In the next picture you see the assembled belts before they will go in place. 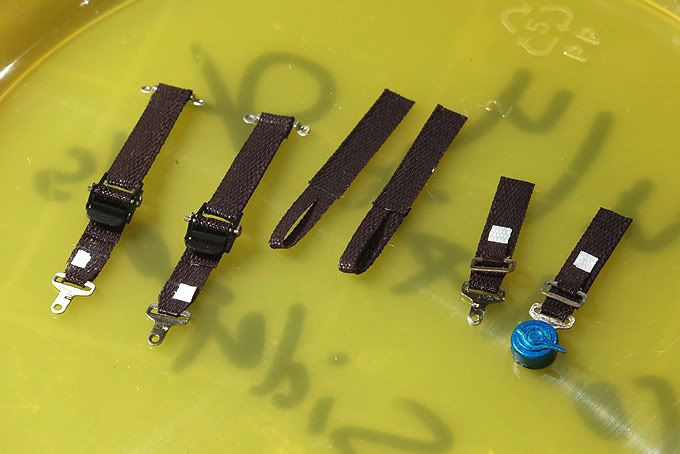 The belt material will never have as small a pattern as it should be in scale but its quite good and I like it better then the sticky stuff in the SMS set thats no fun to handle for me. Cutting and gluing with superglue was no problem. I added bits of white decal to represent the stickers on the real belts and then airbrushed on the belts a very thin layer of matt clear to take away the shine of the plasticky fabric. That made for some tricky masking of the shiny buckles:-) Next time I think Ill do that before assembly Whats missing still are the boss stickers on the shoulder straps. I decided to add them when the belts are installed in the car because im afraid the decals will brake during handling once they are dry. In the picture above there are black stickers with white lettering on the belts but in all the pictures I have of Senna racing they are white with black lettering and these correct stickers come with the Perfect Parts set. Finally for this update alittle teaser for things to come. Another piece of candy I already made and that will be installed soon: the gearshift . 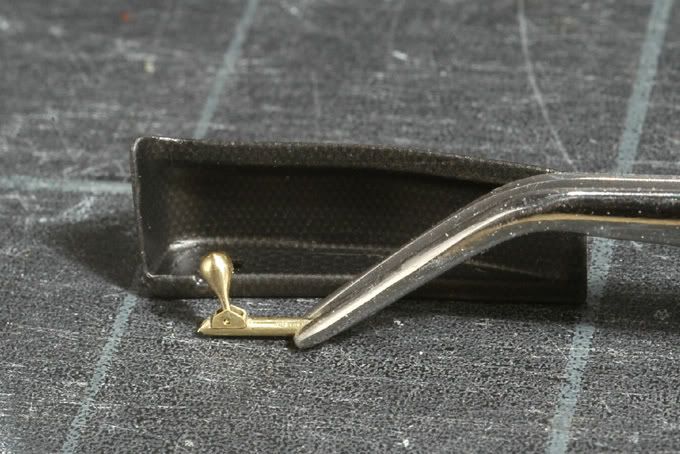 I made a basic cylindrical piece from brass in the lathe and then did the round shaping with files, various milling heads and glass paper while spinning it in the hand piece of my Proxxon drill ( aka Dremel or whatever you use :-) That took some time because not only was the brass quite uncooperative, but I had to make two of them since the first one turned out a bit too small :-) The pieces that hold it are also made from brass rod and a square tube. This is it again .for now. Hope you liked it. Its sad theres no new contest going on ( not that Im in any position to complain! ). But lately progress seemed to be generally slow around here ( summer maybe ) and I already had ideas about at least a curbside entry for that smoke and booze theme . Keep em coming guys. You must be building faster than me :-) Cheers |
|
|
|
|
|
09-21-2006, 04:24 AM
|
#139 | ||
|
AF Enthusiast

Join Date: May 2003
Location: Sunshine Coast, AUSTRALIA
Posts: 2,218
Thanks: 16
Thanked 8 Times in 8 Posts
|
Re: Eighties Contest Entry: 1988 McLaren MP4/4 (and Introduction)
Quote:
Check out the belts on my 312T3 and also the FW24. Once you try this technique I guarantee you'll be hooked! The only hassle may be the matt clear coat you layed down? As for the rest of the build... this is the best F1 model I have ever seen! You are certainly an inspiration! Thanks for making me a better modeler!!!
__________________
Rob 
|
||
|
|
|
|
09-21-2006, 04:26 AM
|
#140 | ||
|
AF Regular

Join Date: Sep 2003
Location: Turku
Posts: 485
Thanks: 0
Thanked 0 Times in 0 Posts
|
Re: Eighties Contest Entry: 1988 McLaren MP4/4 (and Introduction)
Quote:
-Niko
__________________
  
|
||
|
|
|
|
09-21-2006, 04:27 AM
|
#141 | |
|
Authorized Vendor
Join Date: Oct 2005
Location: Vicenza - veneto de rassa
Posts: 3,910
Thanks: 6
Thanked 47 Times in 41 Posts
|
Re: Eighties Contest Entry: 1988 McLaren MP4/4 (and Introduction)
I agree with Robrex: best F1 or at least best inspiring thread, news any corner. SUPER.
__________________
gio
|
|
|
|
|
|
09-21-2006, 05:54 AM
|
#142 | |
|
AF Regular
Join Date: Feb 2005
Location: Newcastle
Posts: 209
Thanks: 0
Thanked 1 Time in 1 Post
|
Re: Eighties Contest Entry: 1988 McLaren MP4/4 (and Introduction)
Great work Jaykay, absolutely stunning build. This is definitely my favourite thread. I love seeing all the methods use use to attack different problems. Really makes me want to finish my mp4/5b after seeing your pics.
Thanks for the tip about the seatbelt decals Rob. It took me a few goes to find a method to get them to stick down, and not just look like they were sitting there. I'll have to try the cement method. |
|
|
|
|
|
09-21-2006, 07:48 AM
|
#143 | |
|
AF Enthusiast

Join Date: Dec 2003
Location: Zagreb
Posts: 2,176
Thanks: 4
Thanked 23 Times in 22 Posts

|
Re: Eighties Contest Entry: 1988 McLaren MP4/4 (and Introduction)
Unreal work or....to real. No matter what I am simply amazed.
True inspiration. |
|
|
|
|
|
09-21-2006, 08:19 AM
|
#144 | |
|
AF Enthusiast
Join Date: May 2004
Location: Kalmar
Posts: 2,047
Thanks: 66
Thanked 25 Times in 25 Posts
|
Re: Eighties Contest Entry: 1988 McLaren MP4/4 (and Introduction)
"#¤/%#"&/&#="#&¤&#¤/"#&¤& - Syntax Error in brain speach center. Please reboot!
/Joel
__________________
Visit my FB page www.facebook.com/one12th |
|
|
|
|
|
09-21-2006, 08:31 AM
|
#145 | |
|
AF Enthusiast
 
Join Date: Jan 2005
Location: Aylesbury
Posts: 445
Thanks: 0
Thanked 0 Times in 0 Posts
|
Re: Eighties Contest Entry: 1988 McLaren MP4/4 (and Introduction)
I've just read this thread from start to finish!
Absolutely inspirational - a joy to read! Can't wait for more |
|
|
|
|
|
09-21-2006, 10:04 AM
|
#146 | |
|
AF Regular
 Join Date: May 2006
Location: Ancona
Posts: 136
Thanks: 0
Thanked 0 Times in 0 Posts
|
Re: Eighties Contest Entry: 1988 McLaren MP4/4 (and Introduction)
I cannot believe What you've done!!! absolutely amazing!!
Keep it up!! |
|
|
|
|
|
09-21-2006, 01:21 PM
|
#147 | |
|
AF Regular

Join Date: Jun 2005
Location: london
Posts: 414
Thanks: 3
Thanked 22 Times in 20 Posts
|
Re: Eighties Contest Entry: 1988 McLaren MP4/4 (and Introduction)
Not only outstanding model making but great updates and photos.
Keep them coming. |
|
|
|
|
|
09-22-2006, 02:35 AM
|
#148 | |
|
AF Enthusiast

Join Date: Aug 2005
Location: Chengdu. CHN
Posts: 1,269
Thanks: 20
Thanked 36 Times in 19 Posts
|
Re: Eighties Contest Entry: 1988 McLaren MP4/4 (and Introduction)
dream...only a dream...= =
|
|
|
|
|
|
09-22-2006, 07:53 AM
|
#149 | |
|
Registered User

Join Date: Feb 2003
Location: Berlin
Posts: 1,410
Thanks: 3
Thanked 3 Times in 3 Posts
|
Re: Eighties Contest Entry: 1988 McLaren MP4/4 (and Introduction)
Jaykay this "model" is so awesome, I don't know what to say
 |
|
|
|
|
|
09-23-2006, 11:53 AM
|
#150 | |
|
AF Regular

Join Date: Feb 2006
Location: NorCal!, California
Posts: 475
Thanks: 0
Thanked 0 Times in 0 Posts
|
Re: Eighties Contest Entry: 1988 McLaren MP4/4 (and Introduction)
this is an amazing build, jay. i'm learning a lot from it. the homemade decals are incredible, and your attention to detail is inspiring. great work all the way around.
 |
|
|
|
|
|
|
POST REPLY TO THIS THREAD |
 |
|
|

