|
|
| Search | Car Forums | Gallery | Articles | Helper | Air Dried Beef Dog Food | IgorSushko.com | Corporate |
|
#166
 03-28-2010, 07:43 PM
|
||||
|
||||
|
Re: Jordan 191
Amazing detail, excellant committment to airbrush tiny parts multible times to get the right look, do you use a paint brush at all?
__________________
 It's Not wheather you Win or Lose, its how you look while you play the Game 
|
|
#167
03-29-2010, 05:34 PM
|
|||
|
|||
|
Re: Jordan 191
Quote:
Quote:
Everyone else also thanks for your comments. I hope i can post some progress on the front suspension the coming weekend.
|
|
#168
04-02-2010, 10:50 AM
|
|||
|
|||
|
Re: Jordan 191
Hi everyone
Heres some more progress, this time starting with the front suspension. I connected the uprights with the upper and lower A-arms and then mounted them to the chassis. Trouble started when I wanted to install the pushrods. Again it seems the paint and glue compromised parts fit in several places and things got a bit nasty and annoying. Ultimately I came out the winner of the battle though with the damage to the paint mostly fixed and in less visible places :-) 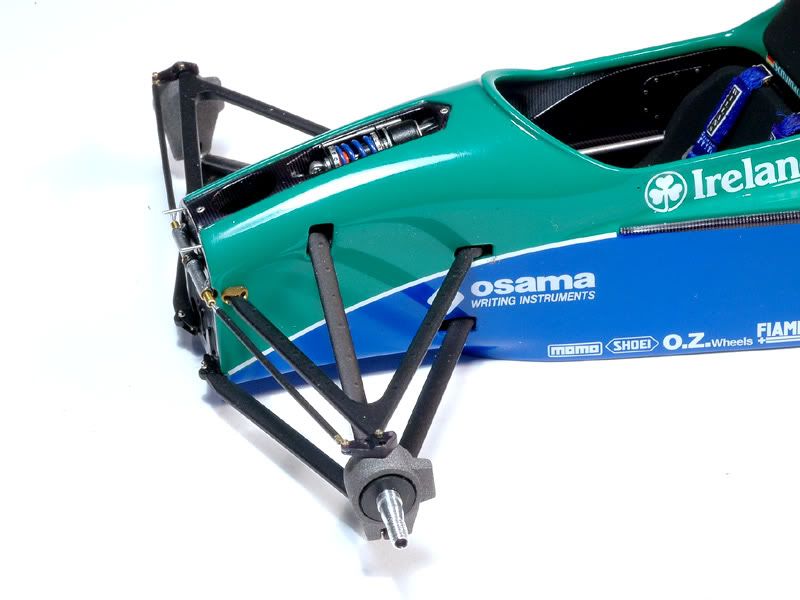 The front damper received some additional bits for detailing and to hold it in place. Its a bit tight around it and I doubt in reality it would have much of a chance to move, but it looks like serious business :-) 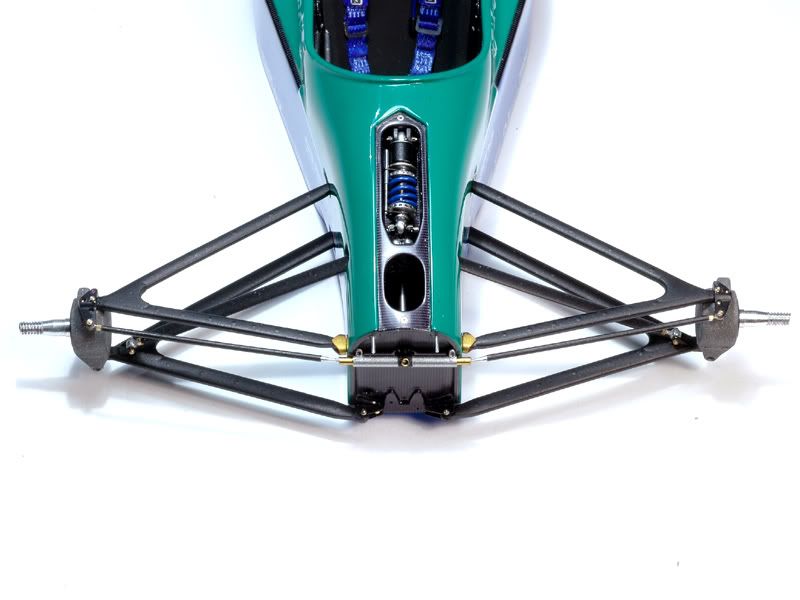 Then I mounted the steering elements, while the suspension parts were still held by the jig and the uprights in the correct angle. Afterwards I installed the stub axles and now the jig has done its job and doesnt work anymore. You can also see the little turned aluminium pins above the steering which will hold the nosecone. I didnt just use wire because over time that might work loose and get pushed backwards. These pins have a slightly wider ring machined in where they enter the monocoque so this wont happen. 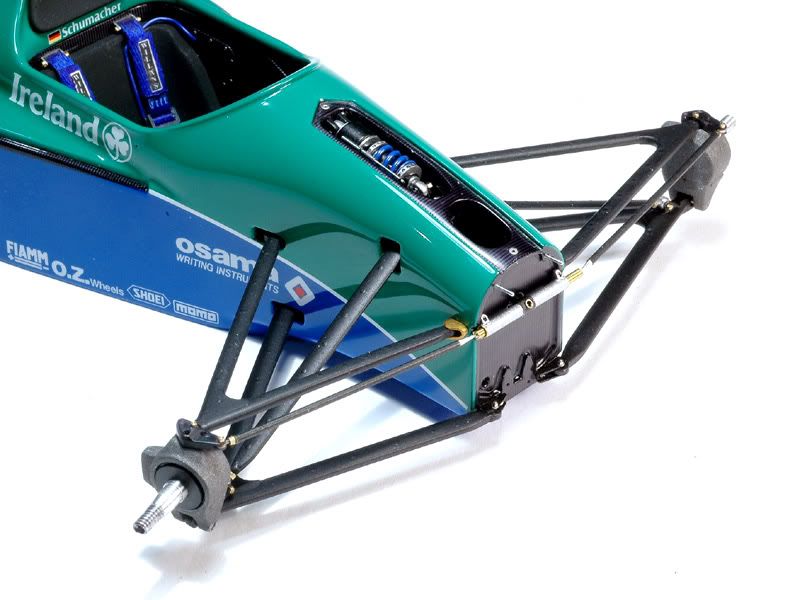 Next up I glued the front brake ducts in place using epoxy glue. They were also CFd painted and slightly polished. 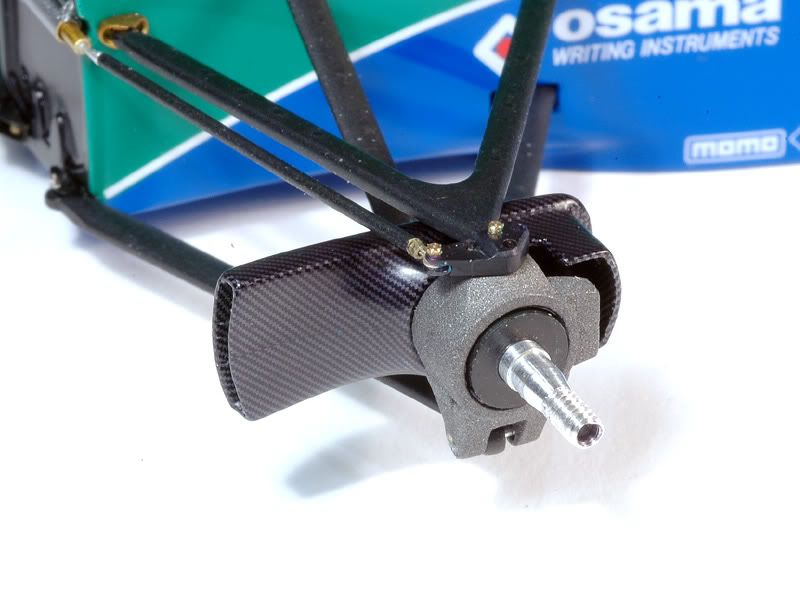 Another shot seen from the inside: 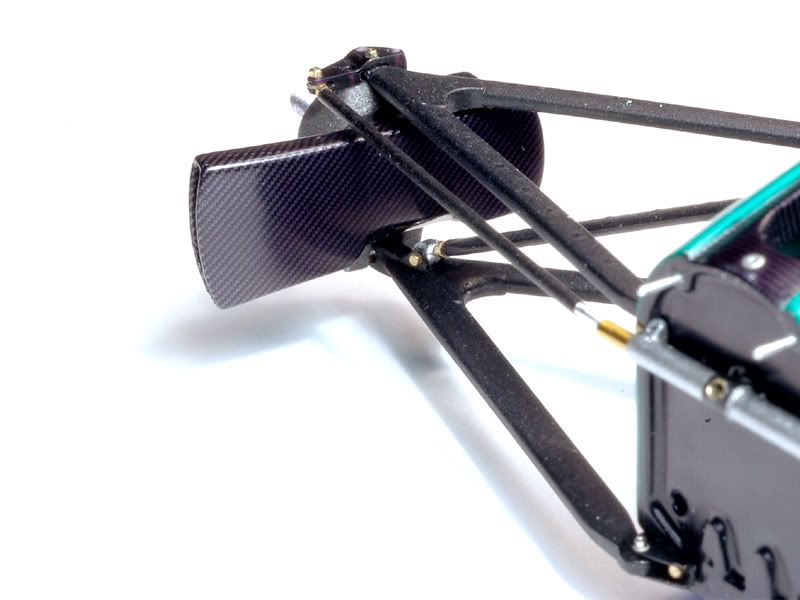 As you can see in the next picture the steering still moves. There is quite a bit more play in the steering than I had hoped for, but I cant really do much about it now. For a static model its o.k. but the straight line driving would be rather abbysmal :-) Now that Ive done it Ive come up with a an idea how to improve that, but Ill have to keep it for another build 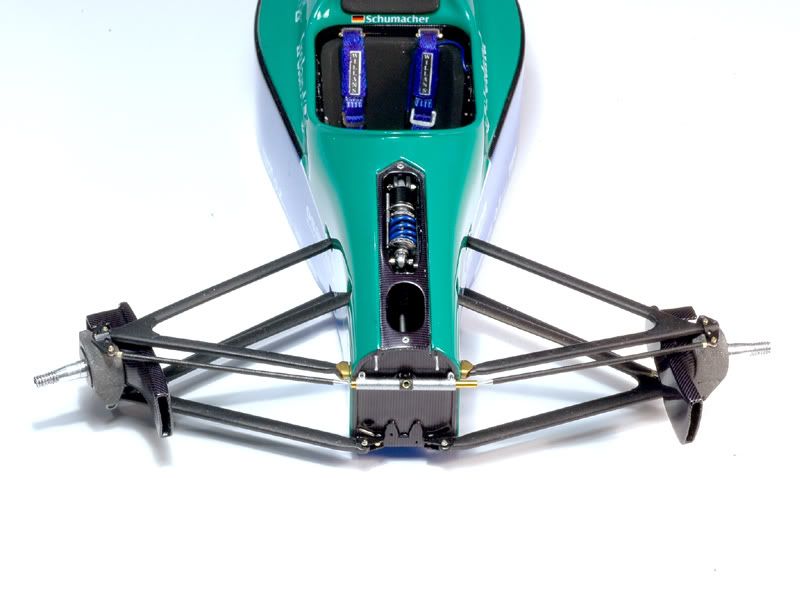 At this point it was time for the brakes. The discs were painted with a brownish matt paint mix at the edges. The sides were first painted with Alclad Steel and some Jet Black mixed in to darken it. Then I dusted over some Zero silver to get more of a glittering effect. Its not exactly like the real carbon brake disks but looks convincing :-) Next time I may try another approach using custom made CF decals The paint was followed by a good layer of 2K-clear and then sanded and slightly polished. This gives some extra depth to the look. The orange disc parts received the same paint treatment as the suspension brackets on the gear box and were detailed with locator pins for the wheels made from 0,5mm nickel silver rods around the centre and 0,5mm nuts w/bolt stems from Scalehardware around the outside. On the back I added etched hex bolts. 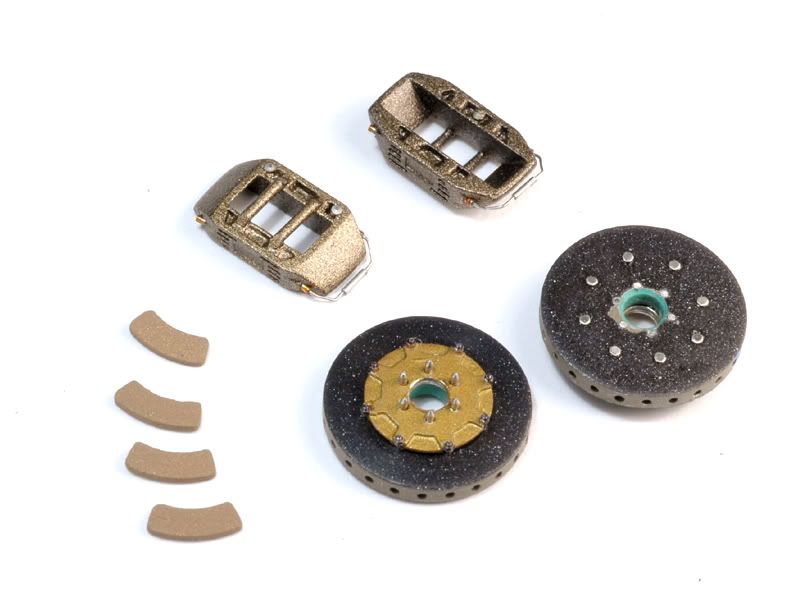 The brake callipers are painted Alclad Pale Gold. They didnt come out as crisp as I had wished but I added some extra details do distract from that on top of the individual brake pads :-) 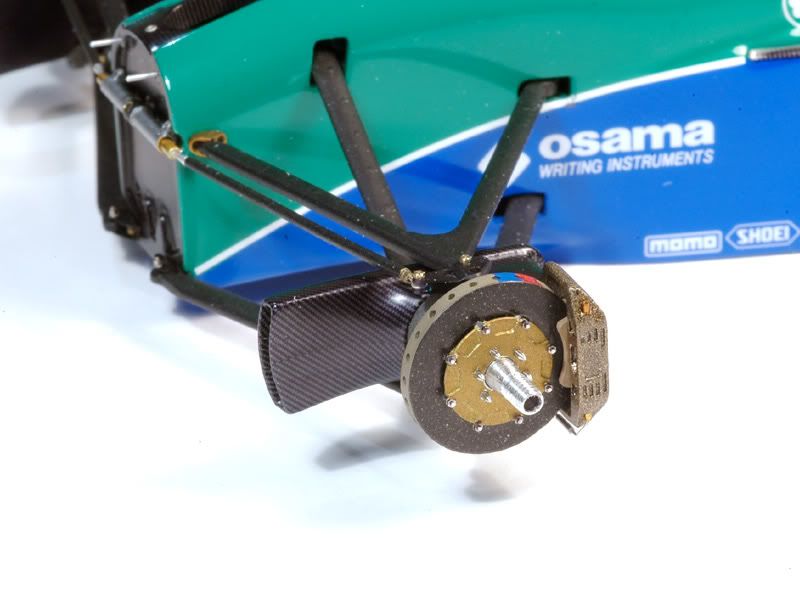 The wheel hubs and brake discs still move as planned though. I still have to add brake lines. 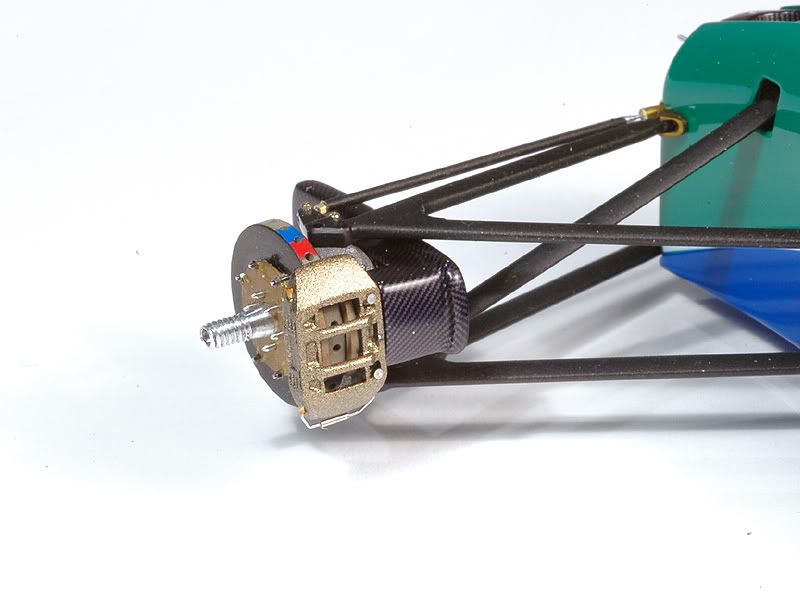 So heres a front overview with all the new parts visible: 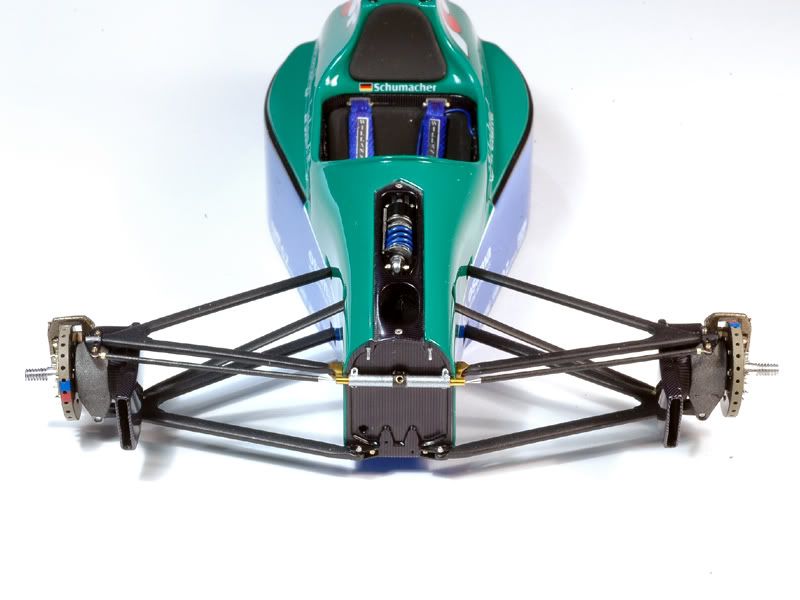 And finally a shot together with the rear part of the car. I also installed the brakes for the rear wheels obviously :-) 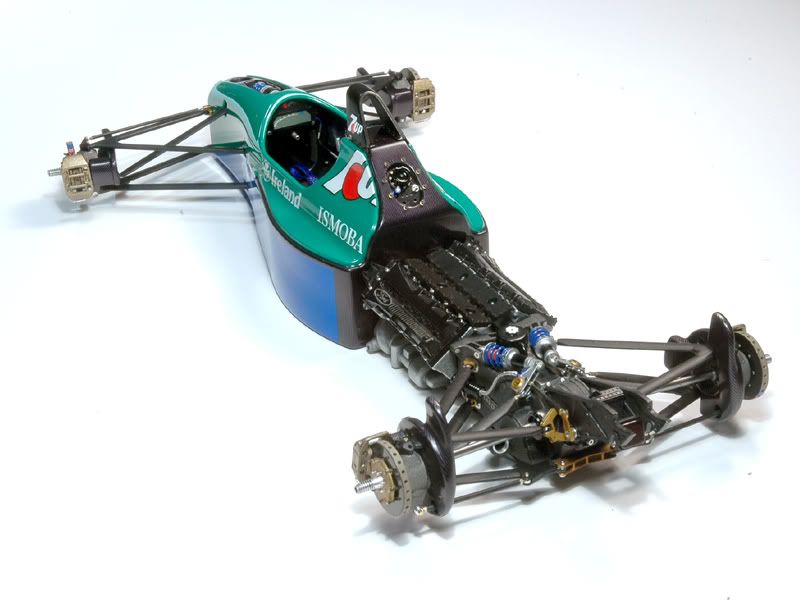 Now I have to carry on with the undertray so I can put them together for good. More about that next time! P.S. I have one question for you: How do the pictures look on your screens? On mine they look fine but Im typing this sitting at my dads computer and the pictures look way too bright here. Question is ..which screen is not adjusted correctly? Do the pictures look too bright on your screen as well ( with the black parts looking very greyish )? Thx!
|
|
#169
04-02-2010, 11:02 AM
|
||||
|
||||
|
Re: Jordan 191
Wow, I really have no idea which part to praise the most. I love the clearcoated and polished brake discs (even if it's one of the more simple parts of the build), the rest is beyond impressive as well.
As for the pictures - they look fine to me but I'm no professional photographer or graphics designer. Besides, whether black looks grey in the photographs is really insignificant and definitely not what we're looking for and at in your posts 
__________________
 Would love to resume my duties as AF's own official thread bastardizer!!!   1:29:53.435 || 207.316 || 310.596
|
|
#170
04-02-2010, 11:17 AM
|
|||
|
|||
|
Re: Jordan 191
Great looking brakes and suspension. Your right about the pale gold paint. It looks like the flakes are to large for 1/20th scale.
On your camera, the lense is picking up the dust on the suspension arms it's so sharp. I guess thats good and bad. The photos look fine on my screen at home. This built is really setting benchmarks car model builders will shoot for. To think alot of artists look down on model builders. I would like to see them do what your doing(A mix of engineering and art). Tom Tanner/Scale Designs/Ferrari Expo 2010 model/photo contest-Chicago April 24th 2010
|
|
#171
04-02-2010, 01:04 PM
|
|||
|
|||
|
Re: Jordan 191
This has to be one of the great models. In 1/8 scale, it would be fantastic; in 1/20, it's beyond breathtaking. Hopefully, the body panels will be removable so your exquisite chassis detail can still be seen.
Your photos are very crisp and the color is excellent; the focus and exposure seem spot on. They are not too bright or too dark on my screen: the blacks look black and the greys look grey.
__________________
D D M S Last edited by Didymus; 04-02-2010 at 02:51 PM.
|
|
#172
04-02-2010, 01:54 PM
|
||||
|
||||
|
Re: Jordan 191
Absolutely, stunningly, mind-blowingly awesome and inspiring
 I'm stunned......
__________________
Guideline for happy modeling: Practice on scrap. Always try something new. Less is more. "I have a plan so cunning, you could put a tail on it and call it a weasel" - Edmund Blackadder
|
|
#173
04-02-2010, 02:18 PM
|
|||
|
|||
|
Re: Jordan 191
JayKay
Wow. Please let us know when/where you will eventually have this model on display. Hopefully in a show or contest. I will drive a long way to see it when it's done. Your are a really great craftsman. Murray
|
|
#174
04-02-2010, 11:52 PM
|
|||
|
|||
|
Re: Jordan 191
The black does look a little grey on my laptop screen, but mostly light balance. The bodywork looks absolutely smashing though, really nice. The front shock assembly is amazing, considering it came from one photo. Very well done.
One thing about the calipers, the pads look as though they are half on/half off of the rotor, and the caliper seems too far off of the hub centerline. Do the calipers sink onto the upright a little bit more? And yes, the metallic flake on the calipers is too heavy. I believe the calipers are anodized billet aluminum. Also the bridge spacers across the caliper are usually stainless tubing with long bolts, or cotter pins securing it in place. It seems almost cast as part of the caliper halves. Might be worth another look. It looks so good coming together, what a fantastic build!
|
|
#175
04-03-2010, 02:42 AM
|
||||
|
||||
|
Re: Jordan 191
Simply.....wow.
__________________
Paul On the bench; 2003 LV Rossi Honda RC211V
|
|
#176
04-03-2010, 02:54 AM
|
||||
|
||||
|
Re: Jordan 191
Amazing detail. I wouldn´t have the commitment to stay with such a project for such a long time. That fact deserves respect indeed.
Robert
__________________
Recently finished Projects:
Porsche 911 Carrera RS 3.0 Current Projects: Ferrari 250 GTO LM 1962 (chassis #3387)  
|
|
#177
04-03-2010, 05:44 AM
|
|||
|
|||
|
Re: Jordan 191
Thanks everyone!
The pale gold is indeed a bit grainy. I almost have a feeling like the Alclad is getting "old" because the last time i used it it wasn't like that. Raikkobin is right about the front left brake calliper sitting a bit too far back. That was the first one i mounted. The others are a bit closer/tighter but not as tight as on a real brake...tolerances. Trying to improve that one will be a bit like asking for trouble but i'll have a look into that. The bridge spacers on the Jordan brakes were not extra parts but cast in though, so that's true to the original. Nevertheless there's room for improvements :-) It seems i have a thing with brake calipers. They were the road block that put me off the MP4/4 because those are even more complicated ( and there are 8 of them... ). My next build will have Brembos...they are more simple :-)
|
|
#179
04-11-2010, 05:33 AM
|
|||
|
|||
|
Re: Jordan 191
Here comes another update!
After getting to the point I showed you last time I finally had to get back to the undertray. This needed some attention before I could put it together with engine and monocoque. In the engine bay I installed some heat shields. The ones on the floor are etched and on the sidewalls I used some bare metal foil. These were then slightly heat stained with Alclad transparent yellow. The exhaust end pieces were made from some strong tin foil.  The underside also got some more detailing. At the rear in the diffusor I added some heat shielding, made from CF decal and some etched surrounds for the exhaust outlets. These were also heat/dirt stained with transparent yellow and smoke. I only have one shot of the real car that shows a diffuser tunnel from behind. I tried to recreate what I can see there, but I had to guess mostly :-) On the rest of the cars underside I added some scratches with a 1500 grit Micromesh pad. I dont know how it really looks there and I didnt wanna overdo it so thats gonna be it :-) 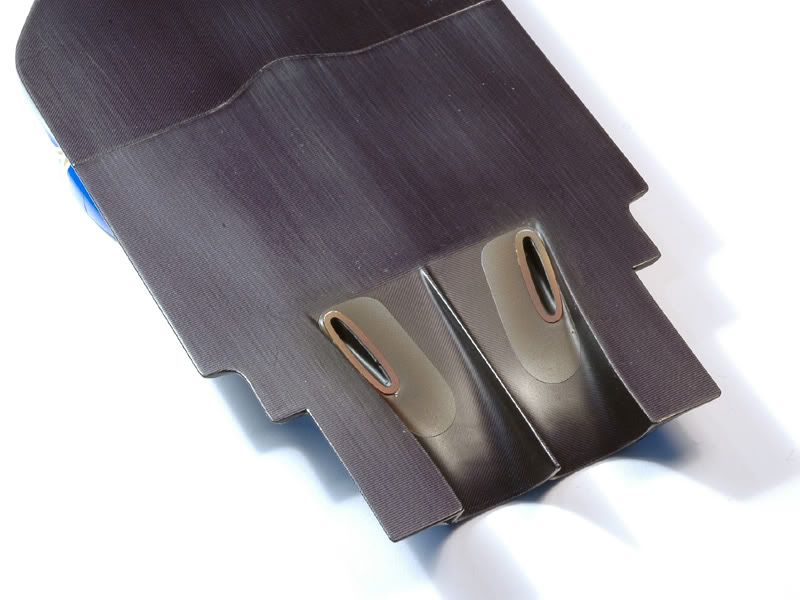 With the undertray ready I had to prepare the engine for installation. I made a gearshift linkage from plastic rod and bits of metal tube and sprayed it Alclad Magnesium. At that point I also realized there were some mesh hose connections missing that run from the gear box to the pumps on both sides of the engine. I made these with Sakatsu mesh hose and R.B.Motion A/N-fittings. I didnt bother to do anything with the pumps because they were then covered up with some more heat shielding anyway, that protects them from the exhaust heat on the real car. I made those shields from tin foil. The texture was pressed in by rolling the grip of a fine Tamiya pin vise over the tin foil on a rubber underlay. I added etched parts at the top that hold the shielding curtains and some heat staining again. 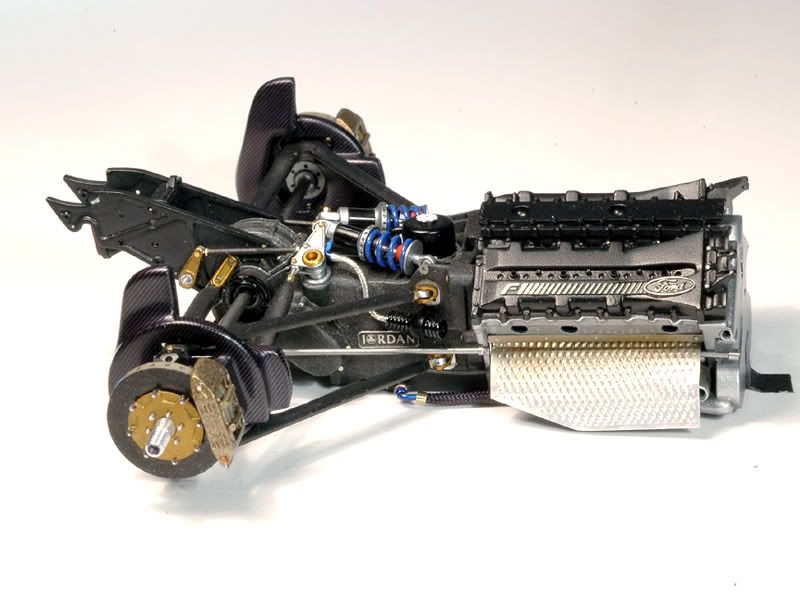 Then I had to get to the exhaust pipes. I was always a bit scared of messing them up because thats the first time I had to do some proper heat staining. Over a base of gloss black enamel I first painted them Alclad Highly Polished Aluminium. I masked off the weld seams with tape strips and then started the staining with transparent yellow, red and blue and thinned Jet Black. From there I carried on using the Tamiya Make-Up sets and various pastels. To build up the powdery stuff layer by layer I put on thin coats of matt clear enamel paint in between as a fixative. It took quite some time and I probably could have reached a similar result quicker with paint but Im quite happy about how they turned out. 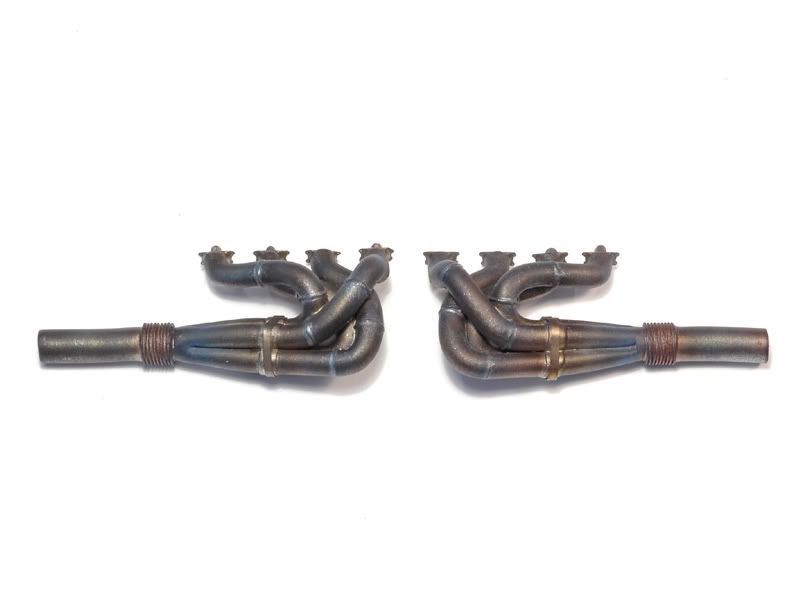 So I finally glued the engine on the undertray and installed the exhaust pipes. 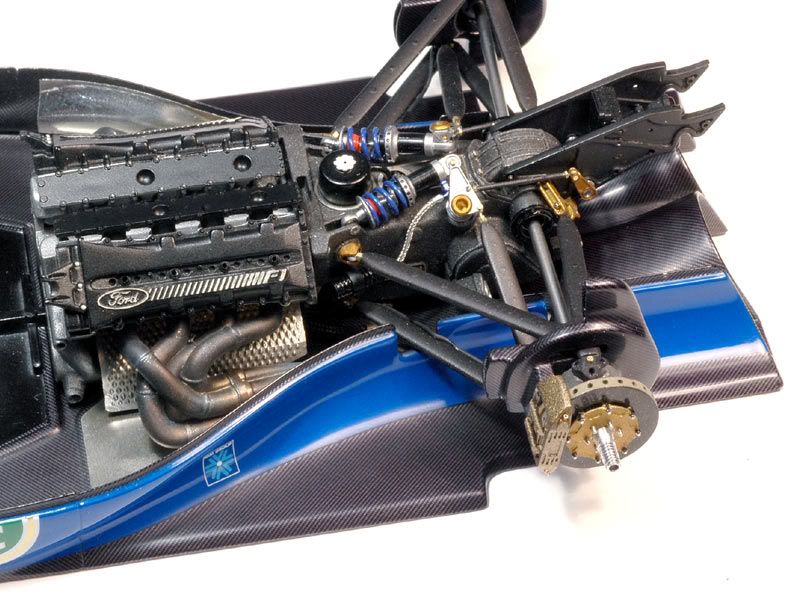 Im still a bit worried that I may have forgotten something and that the engine fixed to the undertray will give me stupid problems at some point but I had to do this finally to be able to build and install more parts. Ill see :-) 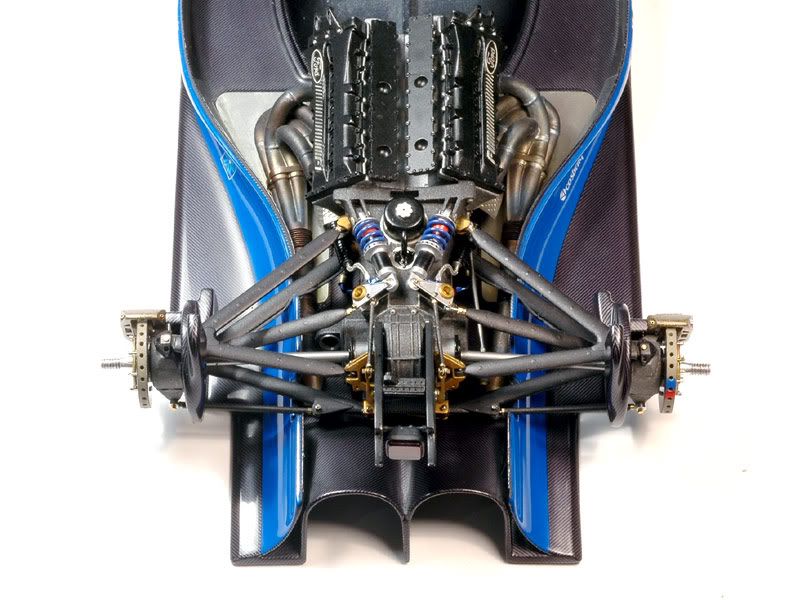 Thats it again. See you for the next update!
|
|
 |
POST REPLY TO THIS THREAD |
 |
|
|


