|
|
| Search | Car Forums | Gallery | Articles | Helper | Air Dried Beef Dog Food | IgorSushko.com | Corporate |
|
#106
 12-16-2009, 10:07 PM
|
||||
|
||||
|
Re: Jordan 191
This is freakin mind blowing!!!!

|
|
#107
02-11-2010, 02:34 PM
|
|||
|
|||
|
Re: Jordan 191
Hi everyone
Its been a while but here finally comes an update. After the last one I simply had no time for modeling for the rest of 09. Since early January ive been working on the Jordan again but this was mostly painting, decaling and polishing which is time consuming and annoying and doesnt deliver much in the way of progress pictures to show :-) Anyway, heres what I did: After painting the bodywork colours I masked them off and painted black for the areas that were going to be covered with CF. I then set off for a near endless journey of decaling. I mostly used Crazy Modeler 0124 decals. They are almost identical to SMS 1024, just a bit darker. My reasoning for that was that they might spare me darkening them. During application I learned though that they are nicer and more forgiving to work with than their SMS counterparts ( which I used on the underside of the floor ). They take a lot of abuse and with the help of MicroSol turn rubbery but dont disintegrate or become too fragile to handle like the SMS ones did for me. Especially for complicated surfaces they are my new weapon of choice. The brake ducts that I will show at a later point wouldnt have been possible with the SMS decals I have. Anyway this first picture shows the main parts CFd and shot with one layer of protective 2K-clear: I tried to lay out the patterns like on the original as far as the reference pictures showed them. It took a lot of time :-) When I was done I realized though, that the CF was way too light compared to the real car, so after the layer of clear I masked the green and blue areas once more and toned the CF down with ZERO Smoke. It was the first time I used that stuff and it worked nicely. Unlike the Tamiya smoke which is a bit brownish ( warm grey ) this one is more blueish ( cool grey ) just like Alclad Smoke. It works fine for the Jordan with its blue and green bodywork but might work less well with a Ferrari or Lotus 99T. Ill have to try that :-) Heres a shot of the darkened CF on the model next to the bare decal: 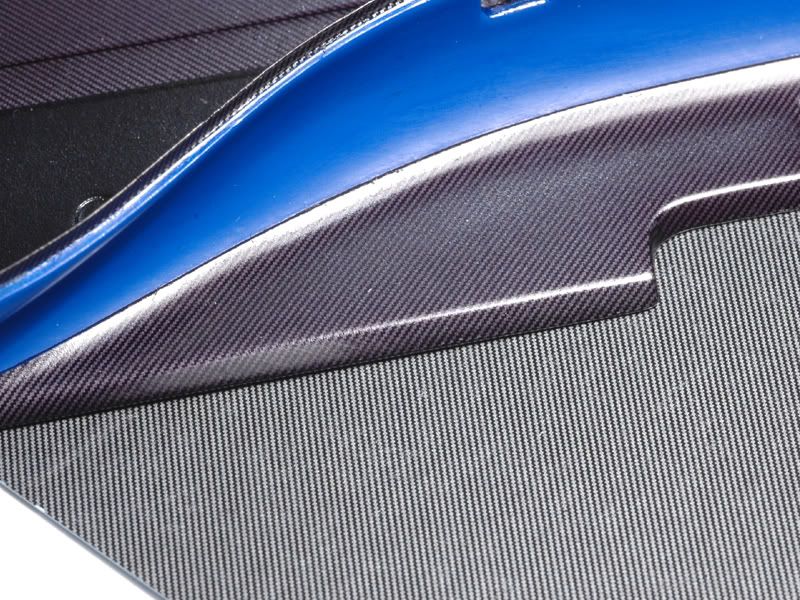 The pattern shows well with direct light but appears black from 30cm away or with less light. Thats the effect I wanted to achieve for a realistic appearance. However it did make me feel a bit stupid when I realized how much work I put into first putting all that CF and then almost making the pattern disappear again ..modeling masturbation :-) The next picture is a whole lot of time later. Thats how the bodywork looks right now after livery decals, several layers of clear and endless sanding and polishing. At the time of applying them i felt like ranting about the inaccuracies of Studio27 decals at this point but Ill spare you that :-) I ended up using a mix of Tamiya and S27 decals but the combination of them still doesnt let you build a 100% accurate Spa version. Maybe for others they work. Also, if you build this version forget about the livery guides in the S27 set or the Jordan 191 Perfect manual. They are both wrong One pet thing of mine I wanted to get right ( or at least a bit better than on previous builds ) was the paint finish and differences between painted and bare CF areas. Theres room for improvement but Im starting to be happy about it now :-) I wet sanded the paint with 1200 and 2000 grit sandpaper to even out the surfaces ( and get rid of dust particles ) and then polished with micromesh up to 4000 grit to get a semi gloss surface. On the undertray and monocoque I then masked off the CF areas and carried on polishing and finally waxing all the areas that are in blue or green. I hope you can see the result with different levels of glossiness in the next picture. 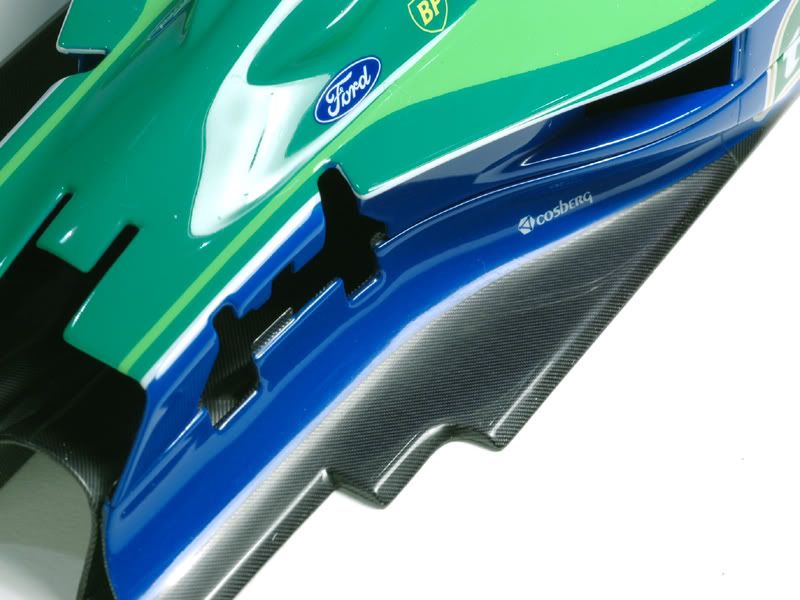 The front wing went through the same process. I ended up using a lot more clear than I wanted ( gotta try a different approach on the next model ), which kept me worried about the cowling still fitting in the end. As a safety measure I didnt paint and decal the inside of the nosecone and the cowling yet. This was going to leave a chance to thin them locally if the fit turned out too tight. In case of the nosecone that proved to be a wise decision. Theres some filing and scraping necessary to make it fit to the monocoque again Next up is the underside of the nose. Same process of paint with CF decals darkened. There are some vertical strakes missing that will follow once I install the flaps and endplates. 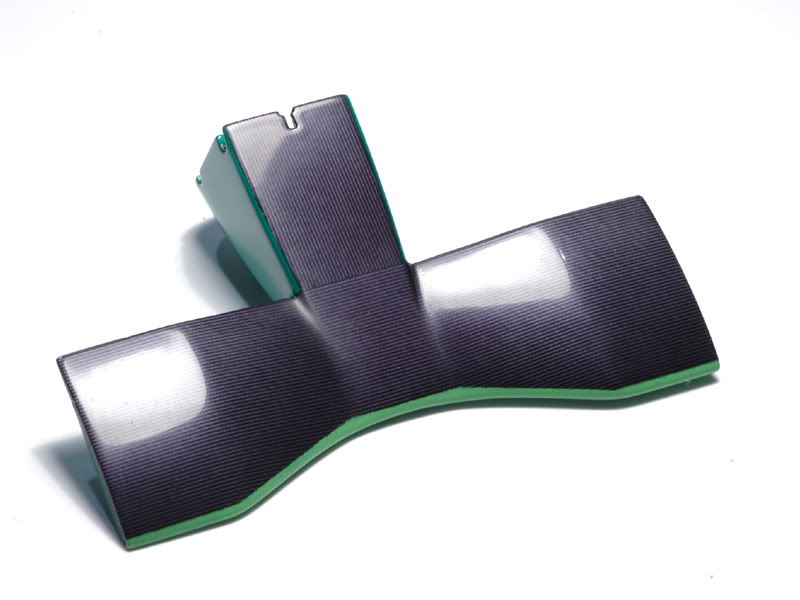 The monocoque with bare CF areas as per the original. Lots of sanding/polishing and masking 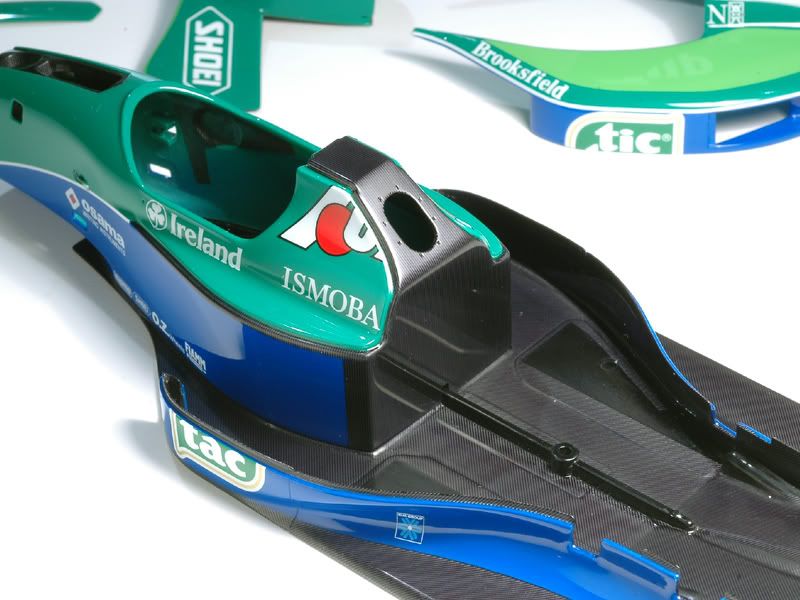 Besides all the painting, sanding and polishing ( of wich theres still a lot to come on smaller bits like the wings ) I also worked a bit on small parts which I like better :-) For the rear light I first tried to modify the kit part but soon realized i could just as well scratch it. So I made the body from renshape plus a holder from wire and styrene bits. The glass piece is made from red plexi glass. 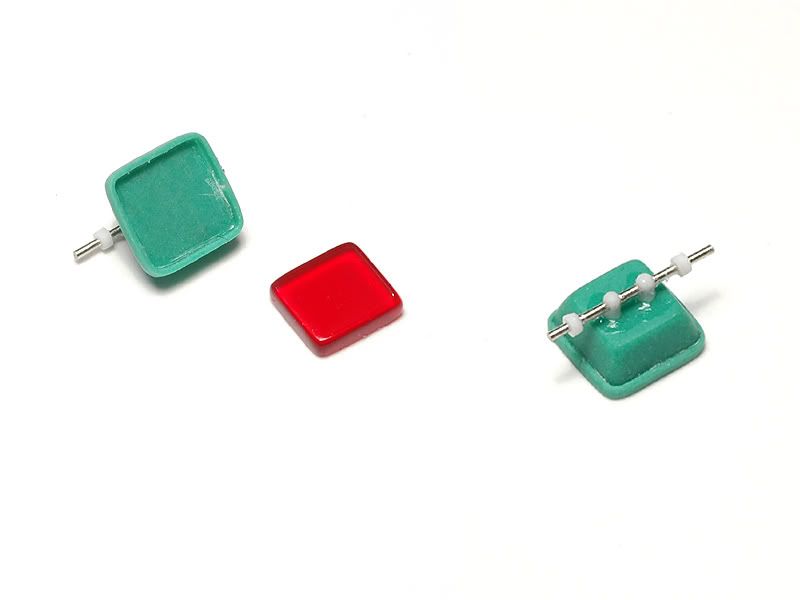 After spraying it Jet Black I installed it on the rear wing support. That one and the gear box oil cooler that I already showed were also painted Jet Black. You can also see a turned aluminium piece in front of the cooler that is part of the anti roll bar. 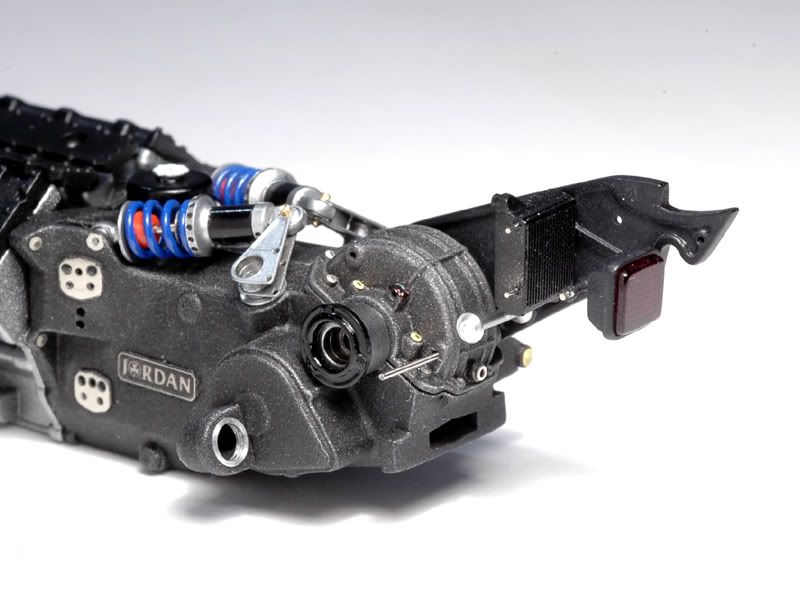 To get a somewhat faceted look for the rear light I painted some silver through a mesh on the backside, followed with black which hides a drop of glue that holds the glass piece. 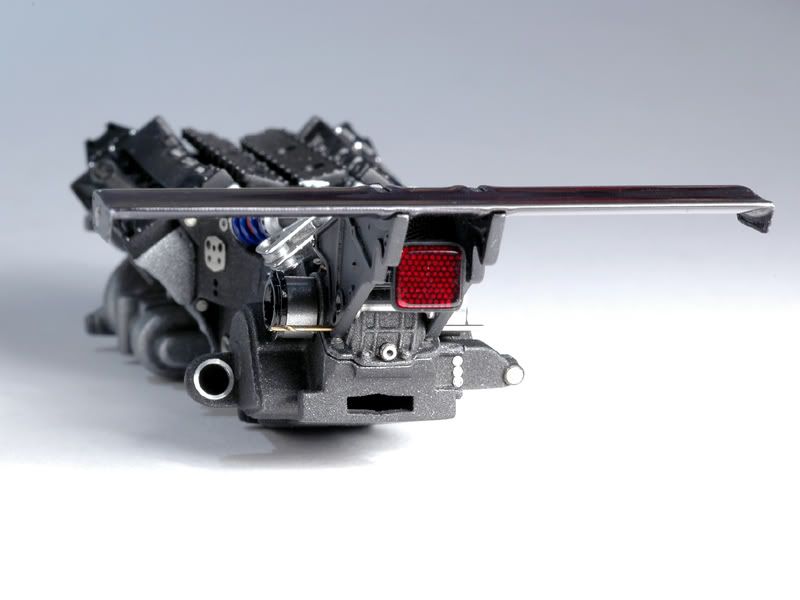 The wing support is mounted to the gearbox housing with Scalehardware hex bolts w/studs. The drill is just to hold it in place as long as some parts are still missing :-) A/N-fittings and hoses for the radiator will also follow later. The rear beam wing has been CFd, painted and sanded/polished just like the monocoque and undertray. 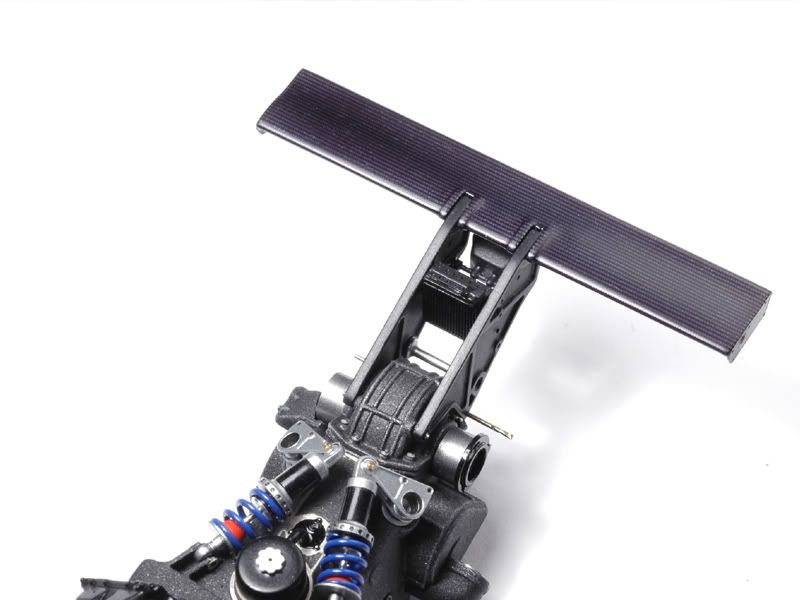 So thats it for now. I think I need to play some more with some small bits because Im fed up with clear coat polishing at the moment but theres still a good deal of that to come :-( At least so far most parts came out like I wanted them to :-) Thanks for following!
|
|
#108
02-11-2010, 02:46 PM
|
|||
|
|||
|
Re: Jordan 191
Wow, great job decaling. Your clearcoat is almost perfect after polishing. Looks like alot of work and fun!!
Tom Tanner/Scale Designs/Ferrari Expo 2010 model/photo contest-Chicago April 24th 2010
|
|
#109
02-11-2010, 03:38 PM
|
|||
|
|||
|
Re: Jordan 191
EUH, WOOOOOOOOW, unbelievable what a build of this car, i just can't stop watching it...
keep it up.. Paul.
|
|
#110
02-11-2010, 03:39 PM
|
||||
|
||||
|
Re: Jordan 191
Flawless result !!
__________________
Phil  
|
|
#112
02-11-2010, 06:06 PM
|
||||
|
||||
|
Re: Jordan 191
Excellent work mate! Your CF work looks flawless and extremely realistic. I'm glad to see the decals have been darkened. Thanks for the tips you provide in your posts about how you execute every little detail. I learn more from your posts than I do from other people.
__________________
-Mike AF Director of Media / Photographer  [email protected] | AutomotiveForums.com | Flickr Gallery
|
|
#113
02-11-2010, 06:29 PM
|
||||
|
||||
|
Re: Jordan 191
Again Amazing Work!!!! Beautiful finish & nice work on all the Carbon.
I think that SMS has changed their CF colours, theyve made it in a darker grey colour rather than the silver. heres a comparo i did with old & new 1024 CF twill weave, seat has old Silver CF & Interior base has new grey CF. It is alot more realistic 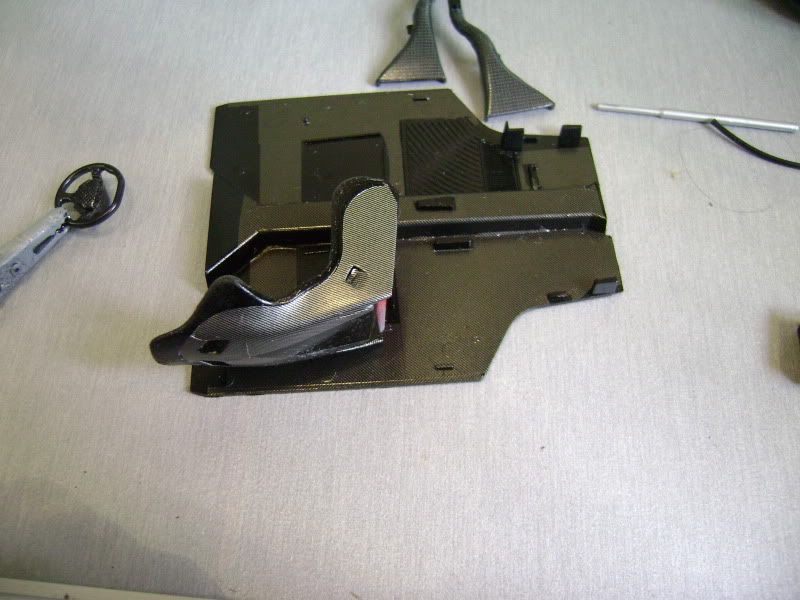 Cant wait to see what you do next!!!
__________________
 It's Not wheather you Win or Lose, its how you look while you play the Game
|
|
#114
02-12-2010, 02:16 AM
|
||||
|
||||
|
Re: Jordan 191
Holy shmoly!
 Looks simply stunning! As always, you amaze with each update  I have a question about the rear brake light that you scratched. In the photo below there seems to be some sort of (realistic!) pattern in the red glass. How did you achieve this? (I am guessing some p/e plate behind the red plexi but....?) Quote:
 
__________________
Guideline for happy modeling: Practice on scrap. Always try something new. Less is more. "I have a plan so cunning, you could put a tail on it and call it a weasel" - Edmund Blackadder
|
|
#116
02-12-2010, 06:45 AM
|
||||
|
||||
|
Re: Jordan 191
Wohooo awesome, love it! I did the same thing with sanding the "CF clear" to get a somewhat semi-gloss finish on my Aston. But you might consider someday to just spray some semi gloss clear. You simply sand the 2k clear and apply one thin layer. The 2k then gives you this "deep" look but it is still semi-gloss
 . Which I think looks a bit better, in real life at least, you probably won't see any differences on pics . Which I think looks a bit better, in real life at least, you probably won't see any differences on pics 
Last edited by Decs0105; 02-12-2010 at 09:57 AM.
|
|
#117
02-12-2010, 07:13 AM
|
|||
|
|||
|
Re: Jordan 191
Quote:
Quote:
I first had wild plans to mill a pattern from the backside but ended up just spraying some silver through a mesh ( in this case the silver foil thing from a BRAUN electric shaver ). Some black followed after that or the glue that holds the part would show :-) Thanks everyone for the comments! Much appreciated. Makes me feel less stupid when spending so much time on that stuff :-)
|
|
#119
02-12-2010, 02:49 PM
|
||||
|
||||
|
Re: Jordan 191
Quote:
 (I guessed pretty close though )
__________________
Guideline for happy modeling: Practice on scrap. Always try something new. Less is more. "I have a plan so cunning, you could put a tail on it and call it a weasel" - Edmund Blackadder
|
|
#120
02-12-2010, 03:10 PM
|
||||
|
||||
|
Re: Jordan 191
Great idea with different glossiness for the CF decals. Painted body looks awesome!
|
|
 |
POST REPLY TO THIS THREAD |
 |
|
|


