|
|
|

|
|
| Search | Car Forums | Gallery | Articles | Helper | Quality Dog Food | IgorSushko.com | Corporate |
|
| Latest | 0 Rplys |
|
|||||||
| WIP - Motorsports Post topics for any "Work In Process" motorsports vehicles in this sub-forum. |
 |
 Show Printable Version | Show Printable Version |  Email this Page | Email this Page |  Subscribe to this Thread
|
|
|
Thread Tools |
 04-30-2007, 02:23 PM
|
#46 | |
|
AF Enthusiast

Join Date: Jun 2005
Location: Céroux-Mousty
Posts: 506
Thanks: 11
Thanked 5 Times in 5 Posts

|
Re: Converting the BMW M1 Protour into a Ferrari Daytona 365 GTB/4 LeMans
Titanic work, steve.........!
I sold this kit and transkit a few months ago, as the fitting of everything is terrible! Hope to see next progress! Jamme
__________________
WIP: LaFerrari Tamiya 1/24 |
|

|

|
|
04-30-2007, 02:48 PM
|
#47 | |
|
AF Enthusiast

Join Date: Dec 2004
Location: Germany
Posts: 3,431
Thanks: 28
Thanked 80 Times in 74 Posts
|
Re: Converting the BMW M1 Protour into a Ferrari Daytona 365 GTB/4 LeMans
Hi Steve,
fixing probs seem to be familiar with this 30 year old kit. Nevertheless - great job so far
__________________
Micha       
|
|
|
|
|
|
04-30-2007, 09:13 PM
|
#48 | |
|
AF Regular

Join Date: Feb 2006
Location: NorCal!, California
Posts: 475
Thanks: 0
Thanked 0 Times in 0 Posts
|
Re: Converting the BMW M1 Protour into a Ferrari Daytona 365 GTB/4 LeMans
yikes, ski... i didn't realize the fit was so bad on that kit.
 you're off to a good start though. you're off to a good start though.  the italeri has pretty bad fit, too. i've been filling and sanding and priming and filling and sanding and priming some more. the italeri has pretty bad fit, too. i've been filling and sanding and priming and filling and sanding and priming some more.  it makes me appreciate the fit and finish of tamiya kits. it makes me appreciate the fit and finish of tamiya kits.  i've finally got the 365 body whipped into shape; one or two minor blemishes yet on the chin spoiler, but the body is almost done...  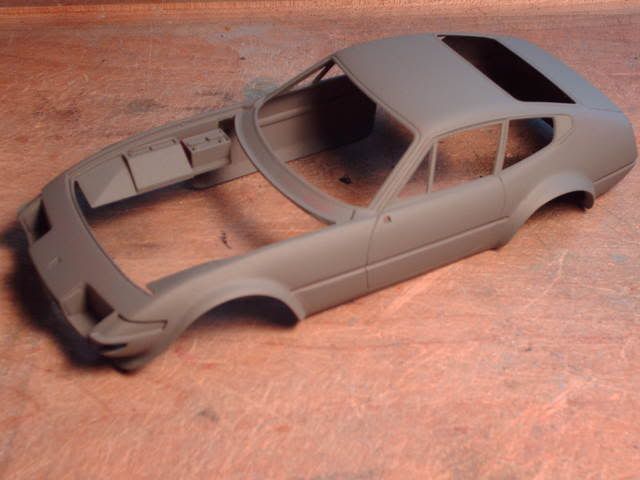 With the body in good shape, i started the chassis... and the fit was sh!te. there was a big gap between the rear roll pan and the body that needed filling with .010 x .010 styrene and 5-minute epoxy. sorry this photo is blurry: 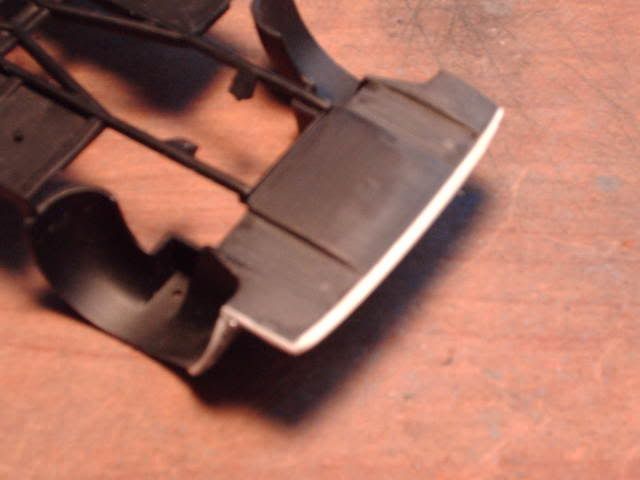 another shot: 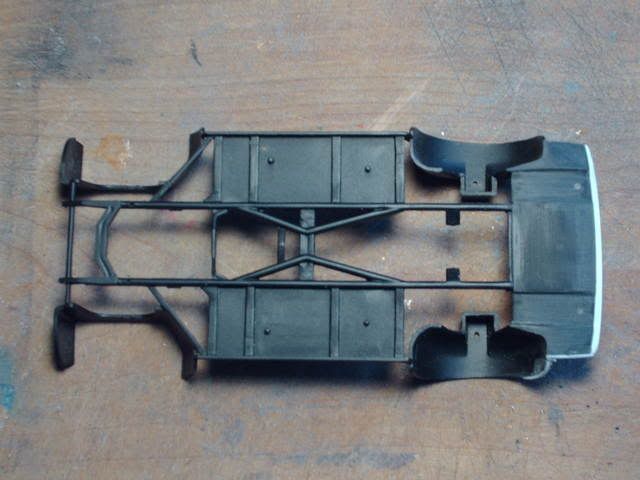 next up: finishing the chassis and starting the suspension bits. |
|
|
|
|
|
04-30-2007, 11:14 PM
|
#49 | |
|
AF Fanatic

Join Date: Feb 2004
Location: Hartford, Connecticut
Posts: 5,601
Thanks: 7
Thanked 108 Times in 103 Posts
|
Re: Converting the BMW M1 Protour into a Ferrari Daytona 365 GTB/4 LeMans
the updates rock, keep em coming.
__________________
In Progress    
|
|
|
|
|
|
05-01-2007, 12:27 AM
|
#50 | ||
|
AF Regular

Join Date: Jan 2005
Location: Puebla
Posts: 439
Thanks: 6
Thanked 13 Times in 3 Posts

|
Re: Converting the BMW M1 Protour into a Ferrari Daytona 365 GTB/4 LeMans
Quote:
category : Passenger car car maker : OPEL/VAUXHALL code : 331 color : PASTELLTUERKIS from-to : 1975-1978 panel : 17759 paint system : 2K-Autolack formula date : 15.04.83 amount : 1.0 litres Tint code - Tint name -------- Mass (g) - Cumul. (g) 2K010 ---- WEISS ------------ 933.8 ---- 933.8 2K611 ---- SCHWARZTONER --- 102.9 --- 1036.7 2K560 ---- GRUENGELBTONER --- 76.5 --- 1113.2 2K551 ---- BLAUTONER --------- 33.8 --- 1147.0 I guess you can get it at any Standox Paintshop dealer Do I get the beer? I just can't believe what I do for a beer...
__________________
Happy modeling! Ramon Garcia Puebla, Mexico |
||
|
|
|
|
05-01-2007, 05:01 AM
|
#51 | ||
|
AF Fanatic
Thread starter

Join Date: Dec 2004
Location: Up the creek with no paddle
Posts: 5,889
Thanks: 7
Thanked 16 Times in 15 Posts
|
Re: Converting the BMW M1 Protour into a Ferrari Daytona 365 GTB/4 LeMans
That body work is very impressive, C!! Nice job
 I feel much better now knowing that you are doing just as much sanding and putty work as me!  Quote:

__________________
Guideline for happy modeling: Practice on scrap. Always try something new. Less is more. "I have a plan so cunning, you could put a tail on it and call it a weasel" - Edmund Blackadder |
||
|
|
|
|
05-01-2007, 02:04 PM
|
#52 | ||
|
AF Regular
Join Date: Feb 2006
Location: NorCal!, California
Posts: 475
Thanks: 0
Thanked 0 Times in 0 Posts
|
Re: Converting the BMW M1 Protour into a Ferrari Daytona 365 GTB/4 LeMans
Quote:
|
||
|
|
|
|
05-01-2007, 02:44 PM
|
#53 | |
|
AF Enthusiast

Join Date: Mar 2003
Location: Rostock
Posts: 1,569
Thanks: 0
Thanked 0 Times in 0 Posts
|
Re: Converting the BMW M1 Protour into a Ferrari Daytona 365 GTB/4 LeMans
You guys should call this a puttying and shaping group build. Both of your building choice seem to be hard to get into shape. But both of you´re doing a flawless job.
Klutz: When I see all the work you´re putting into the BMW - this brings back memory. I should start to take pictures of all the steps I´m taking building a model to be able to remember all the sweat and tears that went into the model. Again to both of you: Great work. I´m waiting to see more.
__________________
Recently finished Projects:
Porsche 911 Carrera RS 3.0 Current Projects: Ferrari 250 GTO LM 1962 (chassis #3387)   |
|
|
|
|
|
05-01-2007, 02:48 PM
|
#54 | |
|
AF Regular

Join Date: Jun 2005
Location: Mililani, Hawaii
Posts: 402
Thanks: 0
Thanked 0 Times in 0 Posts
|
Re: Converting the BMW M1 Protour into a Ferrari Daytona 365 GTB/4 LeMans
It's always fun to watch a master at work! Keep up the great job man!
|
|
|
|
|
|
05-04-2007, 07:53 AM
|
#55 | |
|
www.hiroboy.com vendor

Join Date: Oct 2002
Location: Cheltenham
Posts: 3,842
Thanks: 0
Thanked 2 Times in 2 Posts


|
Re: Converting the BMW M1 Protour into a Ferrari Daytona 365 GTB/4 LeMans
 I have mixed up a small sample (15ml) of the colour using my paint manufactures formula and it looks wrong, any ideas ? |
|
|
|
|
|
05-04-2007, 09:27 AM
|
#56 | ||
|
AF Fanatic
Thread starter
Join Date: Dec 2004
Location: Up the creek with no paddle
Posts: 5,889
Thanks: 7
Thanked 16 Times in 15 Posts
|
Re: Converting the BMW M1 Protour into a Ferrari Daytona 365 GTB/4 LeMans
Quote:
It's "above and beyond" and I want you to know that I appreciate it. Secondly I agree, it does look "wrong"  It looks too "greeny" to me but goddam I am officially classified as red/green color blind I tried comparing the percentages of your formula and the standox formula Ramon provided:  But I don't think it really helps. Firstly they are for sure different base colors and the only major difference is in the content of black/white and in fact your formula calls for less green! So, what's up? Scenario 1: The Renaissance reference is strange. Perhaps, but I am pretty sure that this is the color they put on the model on their web page. I don;t see Etienne saying one thing and doing another. Scenario 2: Pastelturkis means different things to different manufacturers. Very probable. Scenario 3: the color you have mixed behaves completely differently under clear coat and turns more light blue. Possible I guess. Base coats do change under clear...what do you think? what to do? As you know, I really want to use your paint so I suggest the following: a) switch the blue/green proportions in your current mix at my risk in addition either: b) if you have a color in your swatch book that YOU think is closer please add it and I will purchase that or c) If you can mix to Pantone numbers please make a batch of Pantone 293 (this is the blue in the BMW logo) and I will purchase this also. How about that? does it work for you?
__________________
Guideline for happy modeling: Practice on scrap. Always try something new. Less is more. "I have a plan so cunning, you could put a tail on it and call it a weasel" - Edmund Blackadder |
||
|
|
|
|
05-04-2007, 09:33 AM
|
#57 | |
|
www.hiroboy.com vendor
Join Date: Oct 2002
Location: Cheltenham
Posts: 3,842
Thanks: 0
Thanked 2 Times in 2 Posts
|
Re: Converting the BMW M1 Protour into a Ferrari Daytona 365 GTB/4 LeMans
I will make up a few more testers and post the pics.
|
|
|
|
|
|
05-04-2007, 07:47 PM
|
#58 | |
|
Zomby Woof
 
Join Date: Nov 2002
Location: Oz
Posts: 8,871
Thanks: 0
Thanked 1 Time in 1 Post
|
Re: Converting the BMW M1 Protour into a Ferrari Daytona 365 GTB/4 LeMans
Both bodies are looking fabulous in primer, keep up the great progress.
|
|
|
|
|
|
05-08-2007, 02:09 AM
|
#59 | |
|
AF Regular
Join Date: Feb 2006
Location: NorCal!, California
Posts: 475
Thanks: 0
Thanked 0 Times in 0 Posts
|
Re: Converting the BMW M1 Protour into a Ferrari Daytona 365 GTB/4 LeMans
thanks, everyone. the weather here's been gorgeous, so i've been out riding my Ducati
but i'll get back to the 365 this week. |
|
|
|
|
|
05-10-2007, 12:00 AM
|
#60 | |
|
AF Fanatic
Thread starter
Join Date: Dec 2004
Location: Up the creek with no paddle
Posts: 5,889
Thanks: 7
Thanked 16 Times in 15 Posts
|
Re: Converting the BMW M1 Protour into a Ferrari Daytona 365 GTB/4 LeMans
A small, haphazzard and inconclusive update.
First the seat. This is the kit part. (Thanks to Micha for provding a photo od his since I forgot to take one )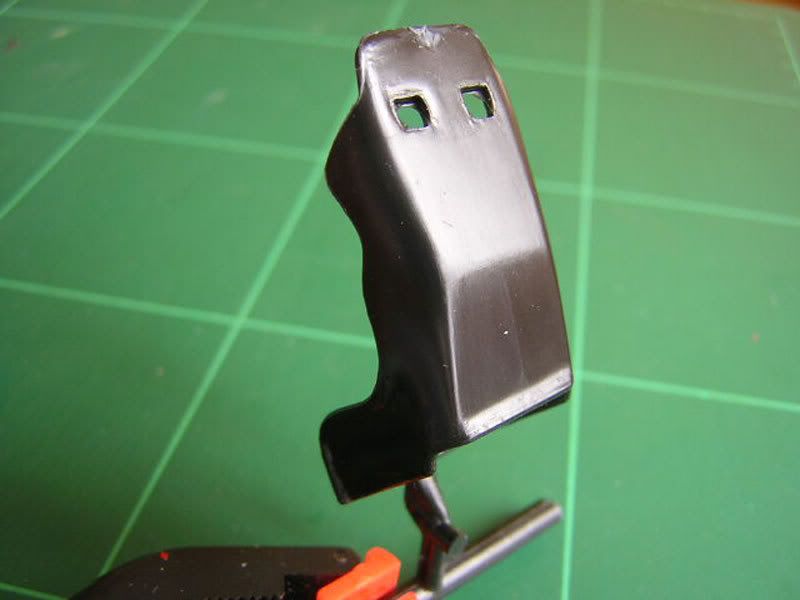 I hope that motor sports experts here won't prove me to be totally wrong on this, but looking at more or less period correct reference pictures the kit part didn't seem very accurate. Photos showed that there is some kind of covering on the seat that leaves a ridge around the seat back. Since my personal target with this build is to get acquainted with putty, that's what I used to try and do something about it (I did consider stretched sprue, but I still can't get the hang of that )Using Tamiya 2-part epoxy I made a long sausage. To ensure a perfectly uniform thickness, I rolled it out on a piece of wet glass using a second sheet as the rolling pin (I hope this is clear what I mean) and this worked beautifully! The long sausage was gently draped around the back of the seat being careful not to push too hard and left to dry out over night. When it had dried out, I trimmed the ends and fixed into place with thin CA glue run along the seam. 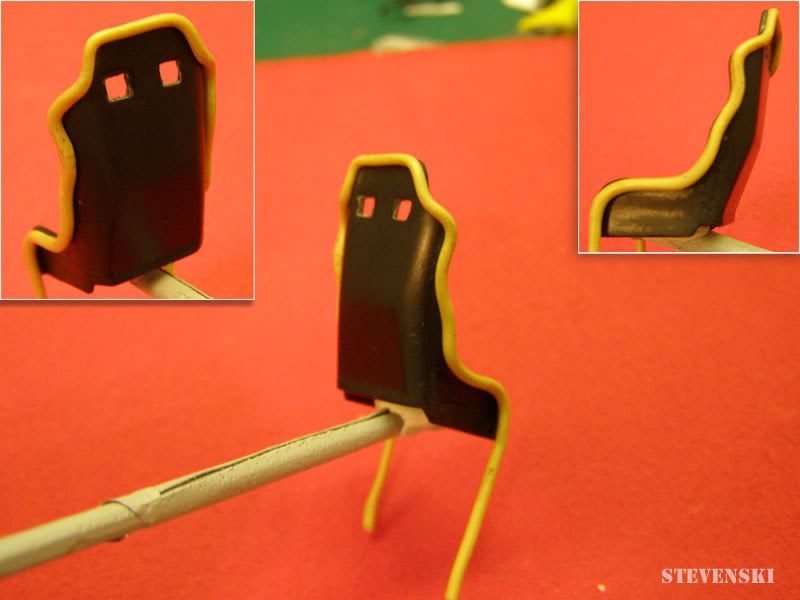 Next I used some Smooth Type Tamiya epoxy putty to mold the kit to the new edge. This took a few rounds of sanding/prime/smoothing to get right.  And here is the near final result in primer. 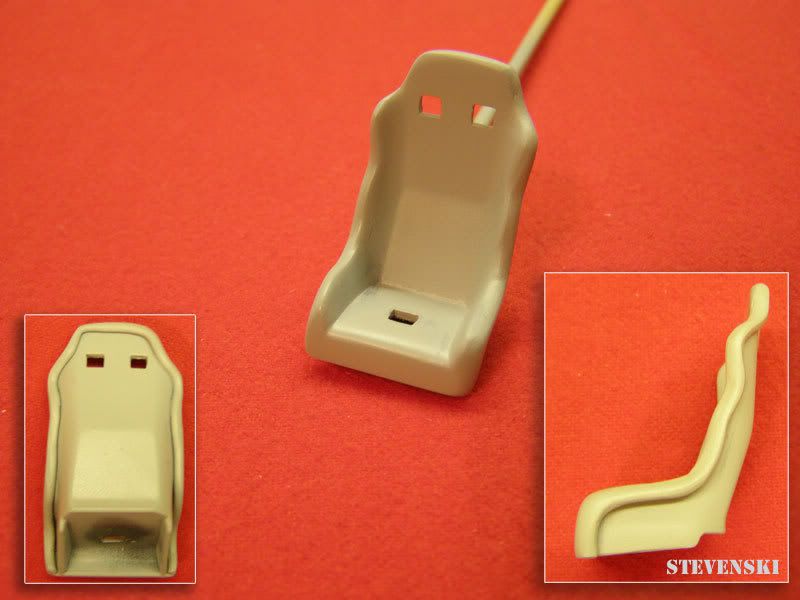 Before I do anything else to this I need to establish if it had 4 or 6-point harnesses. If the latter, I will need to cut out slots in the side. Next up for no particular reason was some engine parts. IMO a very distinctive element of the M1 engine bay is the air intake array. 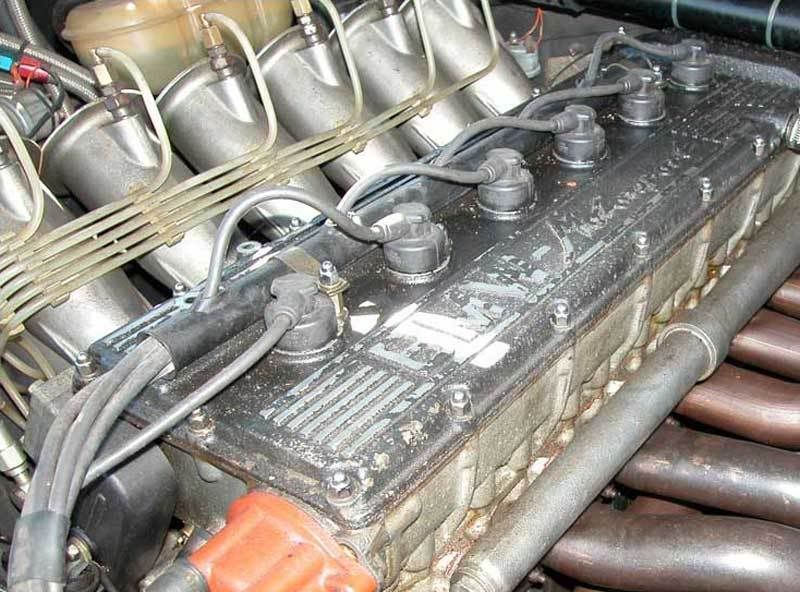 A row of wonderfully shaped and detailed breather tubes! Revell provide a row wonderfully un-shaped plastic blobs  My initial idea was to try and recreate the whole part. 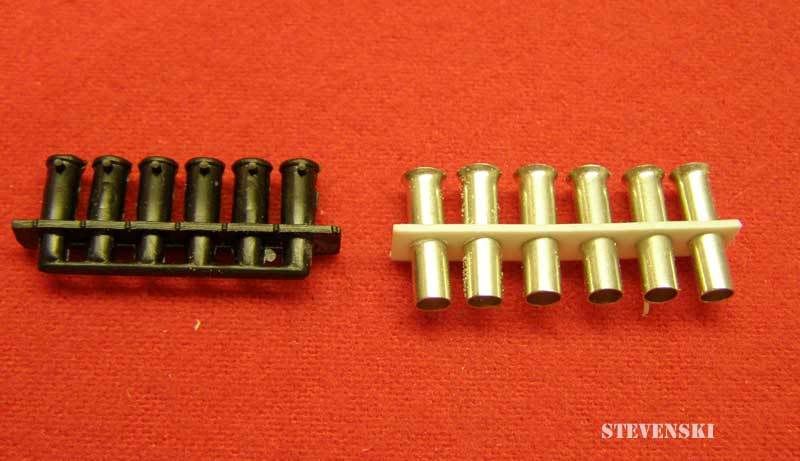 My attempt quickly told me that without some real precision tools (like a lathe  ) this was going to stress me out big time and would probably fail. ) this was going to stress me out big time and would probably fail. So I decided to use the kit part as a base to provide accurate dimensions and fit to the engine and build on that. The key for this modification to look better than the kit part is not so much the individual breather tubes but uniformity in all 6 together they need to look like a row of perfectly turned out soldiers on parade The strategy I came up with to achieve this was to gradually build up a row of pegs to put the tubes on. I centred out the part, marked of 6 equally space points and drilled 6 0,3mm guide holes. These guide holes were then drilled out to accept a piece of styrene rod. Slices of styrene tube (with an OD fitting the ID of the breather tubes) were fixed on the rod. You get the picture, I guess. 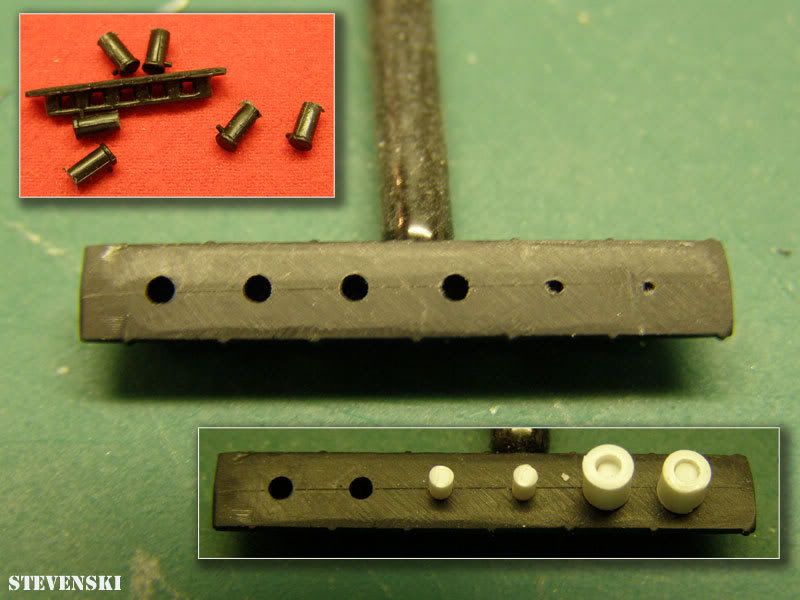 The new breather tubes (same lead boot thingy-bobs used on my Super7) then just dropped into place. 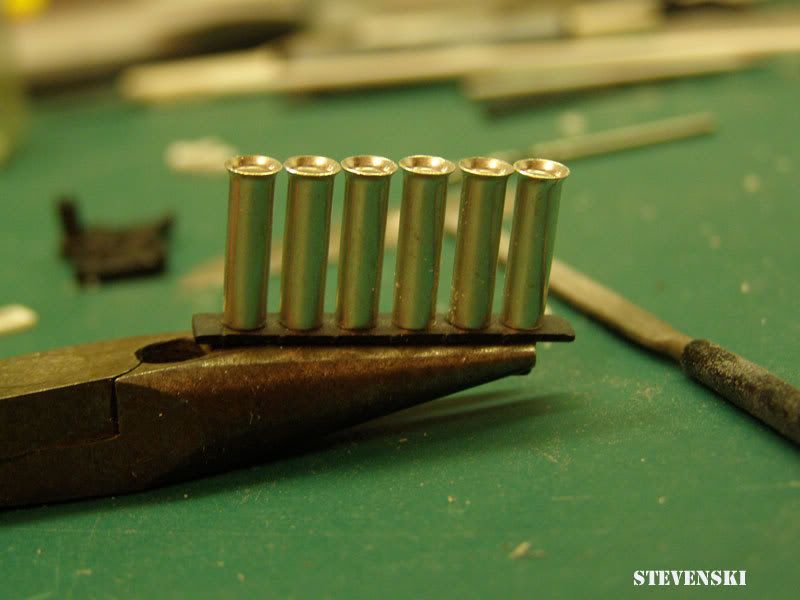 The next job was to work on the breather tubes themselves. They need to be trimmed to size and drilled out to accept whatever I can think of to reproduce the injector valves (if that's what they are?). IMO uniformity is even more critical here - any irregularities will stand out like a sore thumb here! Sadly my 2 lathe owing buddies are thousands of kilometers away and have proven records of loooooooooooong delievery times and I want to finish this build sometime this year j/kI decided to make a jig for the job using a larger sized breather tube which was cut to size and (after a couple of attempts) drilled with a guide hole. 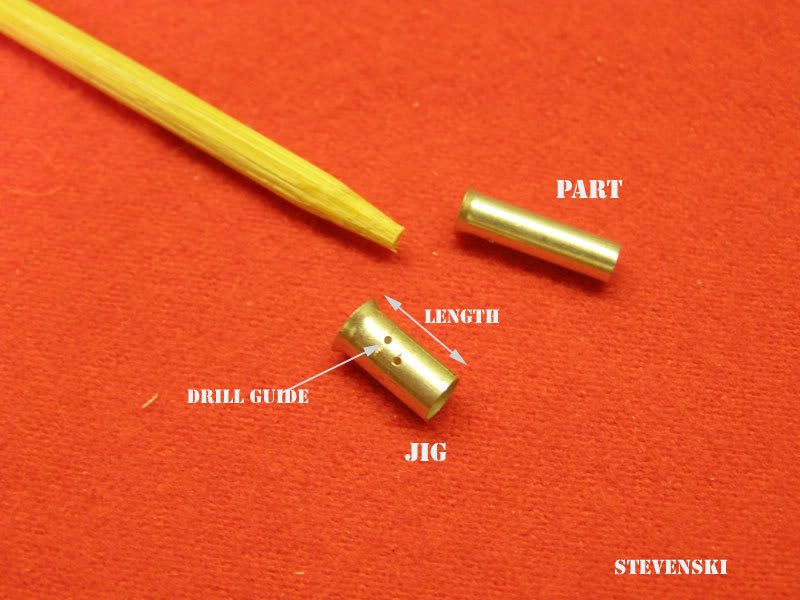 The smaller tubes were then slid inside, clamped in place with my left had and a bamboos stick while I cut and drilled with my right hand  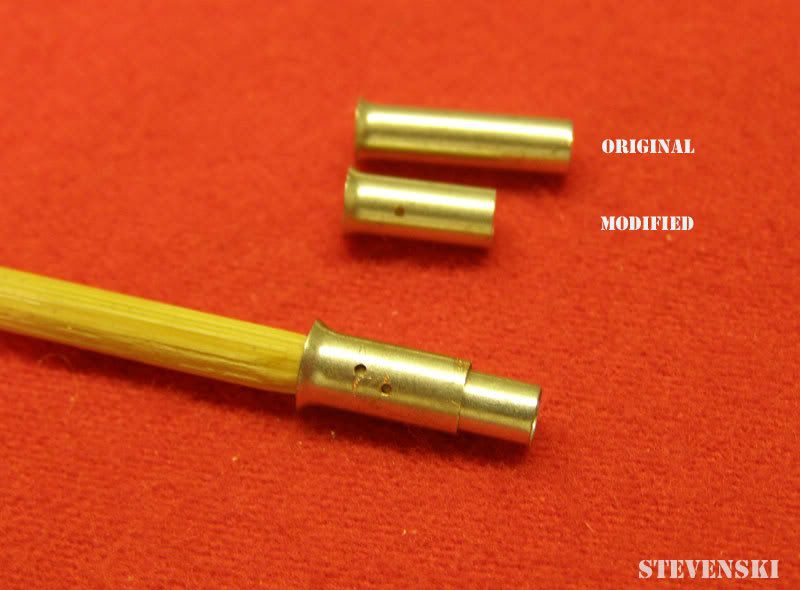 It actually worked quite well I think and here is a dry fit of the modified tubes sitting in their new home. There is some fine tuning to be done but I think it worked. 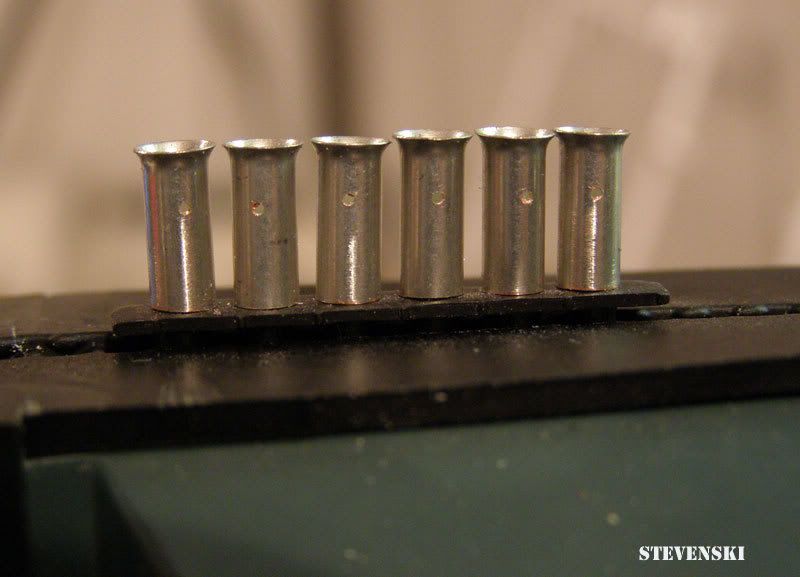 So far so good. Next to come is to work on the injector valves. I won't share with you my 100% failed roll cage :[ I think I am going to give that a miss unless I figure out how to fix it inside the tub... Thanks for looking and you're up again CeeElle
__________________
Guideline for happy modeling: Practice on scrap. Always try something new. Less is more. "I have a plan so cunning, you could put a tail on it and call it a weasel" - Edmund Blackadder |
|
|
|
|
|
|
POST REPLY TO THIS THREAD |
 |
|
|


