-
Grand Future Air Dried Beef Dog Food

Carnivore Diet for Dogs

Air Dried Dog Food | Real Beef
Go Back   Automotive Forums Car Chat > Automotive Art > Car Modeling
Register FAQ Community
Car Modeling Share your passion for car modeling here! Includes sub-forum for "in progress" and "completed" vehicles.
Reply Show Printable Version Show Printable Version | Subscription Subscribe to this Thread
 
Thread Tools
  #1  
Old 11-17-2002, 11:07 AM
flyonthewall's Avatar
flyonthewall flyonthewall is offline
Car Mod guy
 
Join Date: Feb 2002
Posts: 5,180
Thanks: 6
Thanked 11 Times in 9 Posts
Send a message via ICQ to flyonthewall
Altezza style rear lights...


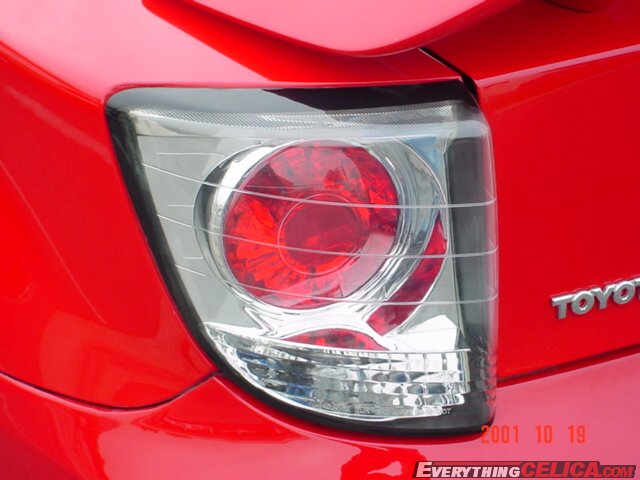
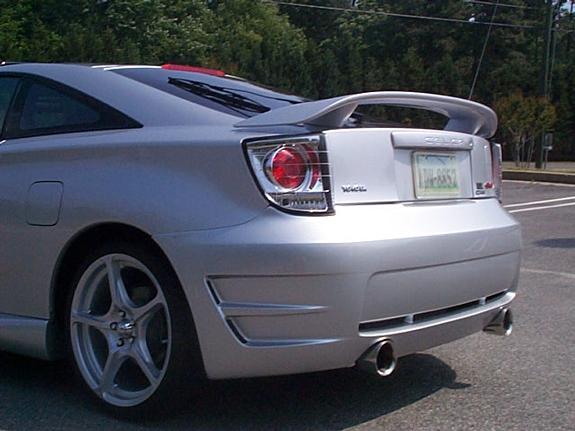
Here's what i'm doing to my upcoming Kaminari Celica build. The bodykit is now 100% complete btw, so you should see details appear on the site later in the week. I really liked the look of the rear cluster's available for the Celica as pictured above so i had to give them a go. Unfortunately its not possible to do these as a product coz it'll be too complicated, unless the clusters were seperate in the kit to begin with.

I neglected to take pics throughout the progress of this but you should get the idea. The first part i did some time ago (no pic) when i was experimenting to see if this was possible, this was to remove the detail from the back of the kit lenses. I managed this by scraping and sanding then finally polished them out with a cotton bud in my dremel and some cutting paste, they turned out ok.

The lens housing is made from styrene tube, when a short length was glued in position it was cut and sanded to shape - quite a fiddly task!


The lenses themselves are from MV Products, they are used in railroad and military modeling. I think most of our US members would have come across these before. to fit them into the housing, i glued them to the end of a smaller diameter tubing which will slide inside the other.


Ideally, i need to scribe the 3 lines in the lens but i'm not sure that i'm brave enough to attempt that, we'll see! Hope this has been helpful and given you ideas for your projects.
Reply With Quote
  #2  
Old 11-17-2002, 11:34 AM
[S]ky|ine's Avatar
[S]ky|ine [S]ky|ine is offline
AF Enthusiast
 
Join Date: Oct 2002
Posts: 258
Thanks: 0
Thanked 0 Times in 0 Posts
Send a message via AIM to [S]ky|ine Send a message via Yahoo to [S]ky|ine
Wow, thats nice!!! Did you paint the chrome paint at the rear lights??? And hope to see the finishing pic!!!
Reply With Quote
  #3  
Old 11-17-2002, 11:45 AM
Forhod's Avatar
Forhod Forhod is offline
AF Enthusiast
 
Join Date: Jun 2002
Posts: 2,399
Thanks: 0
Thanked 0 Times in 0 Posts
You did a great job on the drilling. BTW, how you do that? :tips: !
Nice idea of using the lenses.


I wonder if I can fnd them in Singapore..
__________________

Reply With Quote
  #4  
Old 11-17-2002, 11:48 AM
[S]ky|ine's Avatar
[S]ky|ine [S]ky|ine is offline
AF Enthusiast
 
Join Date: Oct 2002
Posts: 258
Thanks: 0
Thanked 0 Times in 0 Posts
Send a message via AIM to [S]ky|ine Send a message via Yahoo to [S]ky|ine
Yup... it seens no where have sell in singapore but maybe David's shop have it!!! I have think before making some euro tail lights but i can't find any lense!!! lolZ
Reply With Quote
  #5  
Old 11-17-2002, 11:48 AM
TheSyndicate's Avatar
TheSyndicate TheSyndicate is offline
AF Enthusiast
 
Join Date: Jul 2002
Posts: 1,322
Thanks: 0
Thanked 0 Times in 0 Posts


I bow down to your skills! I can't wait to see that thing finished!
Reply With Quote
  #6  
Old 11-17-2002, 12:41 PM
flyonthewall's Avatar
flyonthewall flyonthewall is offline
Car Mod guy
Thread starter
 
Join Date: Feb 2002
Posts: 5,180
Thanks: 6
Thanked 11 Times in 9 Posts
Send a message via ICQ to flyonthewall
I have come across a couple of place online which stock them;
http://www.walthers.com/exec/page/manuinfo/v516
http://www.discountmodels.com/m.v._lenses.htm
and i think hobby heaven have them too

Quote:
Originally posted by Forhod
You did a great job on the drilling. BTW, how you do that? :tips: !
I drew around the tube at the postion i wanted it. I drilled in the centre of the circle with small drill in a pin vice -1.6mm was the largest i had. I then opened up the hole with a knife then filled away upto the edges of the circle.
Reply With Quote
  #7  
Old 11-17-2002, 01:13 PM
Forhod's Avatar
Forhod Forhod is offline
AF Enthusiast
 
Join Date: Jun 2002
Posts: 2,399
Thanks: 0
Thanked 0 Times in 0 Posts
Geez, thanks for the tips!
__________________

Reply With Quote
  #8  
Old 11-17-2002, 01:32 PM
wkma7six wkma7six is offline
AF Regular
 
Join Date: Apr 2002
Posts: 333
Thanks: 0
Thanked 0 Times in 0 Posts
Re: Altezza style rear lights...

Quote:
Originally posted by flyonthewall
[IMG]
Ideally, i need to scribe the 3 lines in the lens but i'm not sure that i'm brave enough to attempt that, we'll see! Hope this has been helpful and given you ideas for your projects.
Hey Chris. Here's a tip for you 3 scribed lines. I use this technique learned from model airplanes panel line rescribing.

Try to find some Dymo label tape. I think they're also under the name Rotex. These are usually found in office supply stores. Cut them into very fairly thin straight strips and since they're self adhesive just remove the backing and apply to your clear part and carefully scribe a thin line with you scriber of choice.
Hope this will allow you to add your final details.
-Walter
__________________
Just finished: TURBONIUM

Rosy the Turbo Beetlehttp://www.automotiveforums.com/vbul...9&goto=2072489
Reply With Quote
  #9  
Old 11-17-2002, 01:34 PM
hiver77's Avatar
hiver77 hiver77 is offline
AF Enthusiast
 
Join Date: Oct 2002
Posts: 262
Thanks: 0
Thanked 1 Time in 1 Post
Hi Chris,

what's size are those lenses? I'm guessing ~ 0.2" - 0.3"?
__________________
In the finishing stage:

Reply With Quote
  #10  
Old 11-17-2002, 01:39 PM
supratuner's Avatar
supratuner supratuner is offline
AF Enthusiast
 
Join Date: Oct 2002
Posts: 3,807
Thanks: 0
Thanked 0 Times in 0 Posts
Send a message via AIM to supratuner Send a message via Yahoo to supratuner
damn ... those lights are bad
im gonna try to do that now
Reply With Quote
  #11  
Old 11-17-2002, 01:40 PM
Integra14's Avatar
Integra14 Integra14 is offline
AF Enthusiast
 
Join Date: Sep 2002
Posts: 1,296
Thanks: 0
Thanked 0 Times in 0 Posts
Send a message via AIM to Integra14
those are really sweet.. could u do like a progress steps for that?
__________________

Reply With Quote
  #12  
Old 11-17-2002, 02:05 PM
Suislide's Avatar
Suislide Suislide is offline
AF Fanatic
 
Join Date: Sep 2002
Posts: 7,007
Thanks: 0
Thanked 0 Times in 0 Posts
AAAH!!! RICE LIGHTS!!!

just kidding dude. while i hate those lights (way too overused these days, and they were ugly to begin with), i have to admit you did a really good job on them and your technique of making them was awesome.
__________________
-Brian
2013 Subaru BRZ Sport-Tech 6MT. Not stock.
Reply With Quote
  #13  
Old 11-17-2002, 02:49 PM
flyonthewall's Avatar
flyonthewall flyonthewall is offline
Car Mod guy
Thread starter
 
Join Date: Feb 2002
Posts: 5,180
Thanks: 6
Thanked 11 Times in 9 Posts
Send a message via ICQ to flyonthewall
Quote:
Originally posted by hiver77
Hi Chris,

what's size are those lenses? I'm guessing ~ 0.2" - 0.3"?
They're 5.5mm or 0.2165" to be exact! The product code is L210.

Quote:
Originally posted by wkma7six


Hey Chris. Here's a tip for you 3 scribed lines. I use this technique learned from model airplanes panel line rescribing.

Try to find some Dymo label tape. I think they're also under the name Rotex. These are usually found in office supply stores. Cut them into very fairly thin straight strips and since they're self adhesive just remove the backing and apply to your clear part and carefully scribe a thin line with you scriber of choice.
Hope this will allow you to add your final details.
-Walter
Thanks Walter, i had thought about doing it in a similar way with masking tape. If you lay down 3 or more layers, one on top of the other, it will give you a good edge to use as a guide. I want to scibe the lines on the inside of the lens so the Dyno method won't be flexible enough to stick down i'm afraid. May main concern is spacing them apart equally.
Reply With Quote
  #14  
Old 11-17-2002, 03:23 PM
RyanGiorgio RyanGiorgio is offline
AF Enthusiast
 
Join Date: Jul 2002
Posts: 2,839
Thanks: 0
Thanked 0 Times in 0 Posts
Send a message via AIM to RyanGiorgio Send a message via MSN to RyanGiorgio
THats really creative. It looks just like the ones in the pictures.
__________________

05' Civic Si - Tokico D-Specs/Progress Springs/Progress Rear Sway/CorSport Endlinks/Ingalls Torque Dampner/Energy Suspension Motor Mounts/Falken Ziex/HFP Spoiler/RSX Rims
Reply With Quote
  #15  
Old 11-17-2002, 03:35 PM
primera man's Avatar
primera man primera man is offline
"P-Man"
 
Join Date: Mar 2001
Posts: 15,179
Thanks: 0
Thanked 3 Times in 3 Posts
Send a message via AIM to primera man
ONCE AGAIN YOU SHOW US YOUR BRILLIANT MODELLING SKILLS !!!
First class job......looks so much better. Almost looks like the real thing.
Awesome work Chris
__________________

Current Build.....1/12 Scale Camaro......Almost finished!!!

View All My Models Here.
Reply With Quote
 
Reply

POST REPLY TO THIS THREAD

Go Back   Automotive Forums Car Chat > Automotive Art > Car Modeling


Posting Rules
You may not post new threads
You may not post replies
You may not post attachments
You may not edit your posts

BB code is On
Smilies are On
[IMG] code is On
HTML code is Off


All times are GMT -5. The time now is 11:06 AM.

Community Participation Guidelines | How to use your User Control Panel

Powered by: vBulletin | Copyright Jelsoft Enterprises Ltd.
 
 
no new posts