|
|
|

|
|
| Search | Car Forums | Gallery | Articles | Helper | Air Dried Dog Food | IgorSushko.com | Corporate |
|
| Latest | 0 Rplys |
|
|||||||
| WIP - Street Post topics for any "Works In Progress" street vehicles projects in this sub-forum. |
 |
 Show Printable Version | Show Printable Version |  Email this Page | Email this Page |  Subscribe to this Thread
|
|
|
Thread Tools |
 04-08-2002, 08:40 PM
|
#1 | |
|
"P-Man"
 
Join Date: Mar 2001
Location: Manawatu
Posts: 15,179
Thanks: 0
Thanked 3 Times in 3 Posts

|
Lancer EVO7 GSR next project
Well....i couldn't help myself. I said i was going to have a break to get other things done around the house....YEAH RIGHT !!!
 SO HERE IS THE NEXT PROJECT !!! Already its been primmed and painted in three coats of Tamiya Chrome Yellow. Now awaiting it to harden before a polish etc. Will be getting a major lowering job and 19" rims !!! Updates etc will follow as usual. Here's a few pics so far. The last one shows how the wheels will fill the guards up real nice    
__________________
Current Build.....1/12 Scale Camaro......Almost finished!!!    View All My Models Here. |
|

|

|
|
04-08-2002, 08:58 PM
|
#2 | |
|
Car Mod guy

Join Date: Feb 2002
Location: Manchester
Posts: 5,180
Thanks: 6
Thanked 11 Times in 9 Posts

|
you dont waste any time do u???
__________________
CHRIS... Catch me on FACEBOOK http://www.c1-models.com http://www.facebook.com/C1Models |
|
|
|
|
|
04-08-2002, 09:04 PM
|
#3 | |
|
AF Enthusiast
Join Date: Dec 2001
Posts: 151
Thanks: 0
Thanked 0 Times in 0 Posts

|
Wow!
 What a shine! Reminds me of an import show car What a shine! Reminds me of an import show car Looks like this one like all the others is gonna come out just fine! Can't wait to see this EVO finished. I don't see a lot of them finished... Just wondering, the yellow you used is the same yellow to paint an Altezza(RS200)? |
|
|
|
|
|
04-13-2002, 01:18 AM
|
#4 | |
|
"P-Man"
Join Date: Mar 2001
Location: Manawatu
Posts: 15,179
Thanks: 0
Thanked 3 Times in 3 Posts
|
Had some real fun trying to lower this old girl !!.
The new 19's are a lot wider and i run into problems of the rims touching the shocks and the wheel was still sticking about 2-3mm onutside the body. So i had to move everything inwards. Which meant moving the shocks, mounting points, and cutting all the suspension to make it shorter in width which took hours of f***ing around. I lost count on the amount of times i just had to walk away before i lost the plot. The body has been all polished up and i have to say its one of the best i've done so far. It's turned out fantastic. We have a nice new oven bake at work which i took the model down to and left in the drying oven for 8hours..... it really hardens up the paint so i dont have to wait around waiting for paint to harden so i can polish it etc. Anyway, here's a few updated pics....the first one shows the difference between the wheels in the kit to the one's im putting on. They should be shot for making such crap wheels to go with a nice kit. 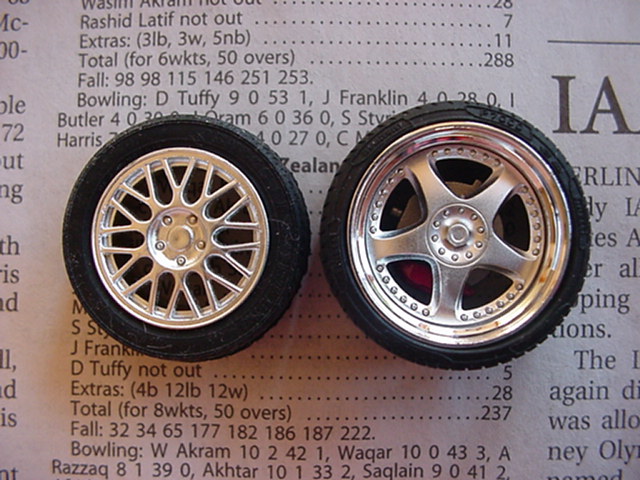 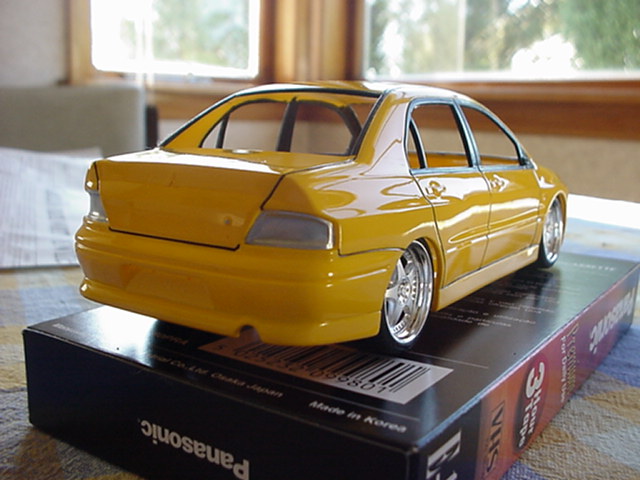 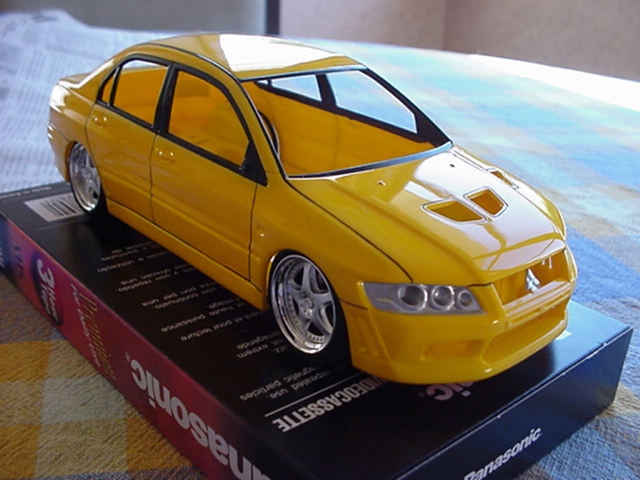 
__________________
Current Build.....1/12 Scale Camaro......Almost finished!!! View All My Models Here. |
|
|
|
|
|
04-13-2002, 01:32 AM
|
#5 | |
|
AF Regular
Join Date: Mar 2002
Posts: 76
Thanks: 0
Thanked 0 Times in 0 Posts
|
Looks killer Wish I could dothat great of a job lowering cars and grat paint jobs. Can't wait to see it finished.
|
|
|
|
|
|
04-13-2002, 07:14 AM
|
#6 | |
|
Car Mod guy
Join Date: Feb 2002
Location: Manchester
Posts: 5,180
Thanks: 6
Thanked 11 Times in 9 Posts
|
That looks 'king ace, i was going to say that maybe u should have trimmed the inner edge of the wheel to get them to fit, but it looks like u pulled this one off just fine. Would i be right in thinking that the way u did it is easier on a fujimi kit than a tamiya, bcoz of the simplicity of the way they mold all the running gear?
What wheels are they again?
__________________
CHRIS... Catch me on FACEBOOK http://www.c1-models.com http://www.facebook.com/C1Models |
|
|
|
|
|
04-13-2002, 09:05 AM
|
#7 | |
|
AF Enthusiast

Join Date: Sep 2001
Location: Edmonton
Posts: 499
Thanks: 0
Thanked 0 Times in 0 Posts
|
I don't know man... :huh: not a big fan of "TOO" over sized wheels... as you guys can probably see from my modeling style..
but hey, Pman, your modeling skills are unquestionable  the body is looking real good already the body is looking real good already 
__________________
All projects stalled... Need to settle in on my new job, and don't have time to built models just yet. |
|
|
|
|
|
04-13-2002, 11:59 AM
|
#8 | |
|
AF Regular
Join Date: Jan 2002
Posts: 95
Thanks: 0
Thanked 0 Times in 0 Posts
|
 You are too good with that spray can! I've read Guiddy's thread on how to paint bodies and everything, but I still can't get a shine like that. Do you have any tips or does it just take practice? You are too good with that spray can! I've read Guiddy's thread on how to paint bodies and everything, but I still can't get a shine like that. Do you have any tips or does it just take practice? |
|
|
|
|
|
04-13-2002, 01:14 PM
|
#9 | |
|
AF Enthusiast
 
Join Date: Mar 2002
Location: oxford
Posts: 456
Thanks: 0
Thanked 0 Times in 0 Posts
|
hi Pman looking nice so far,
not sure if u notice this you marked the left side one in but left the right side one -->> 
__________________
todo -->> Dan Finks speedwagon, taurus, lotus 107, `60 chevy hardtop, austin martin db6, austin healey 100-six, datsun 610? and bmw http://www.pearce.50megs.com/model.htm |
|
|
|
|
|
04-13-2002, 01:33 PM
|
#10 | |
|
AF Newbie
Join Date: Feb 2002
Posts: 46
Thanks: 0
Thanked 0 Times in 0 Posts
|
a beautiful and fast modelling as usual
the only thing that looks little bit of a problem for me is the panel lines. maybe its the pictures but they are too dark and fat i think. i read from tamiyas site that for light colored cars you can use dark gray or very very washy black, or even washy black mixed with the body color(yellow in this case). but on the other hand you kick my ass in modelling so if you think im wrong probably im really wrong. |
|
|
|
|
|
04-13-2002, 08:41 PM
|
#11 | |
|
"P-Man"
Join Date: Mar 2001
Location: Manawatu
Posts: 15,179
Thanks: 0
Thanked 3 Times in 3 Posts
|
FOTW...The wheels are Aoshima "VIP Car".. "Scara 19"
Maxpower...Just practice. Very light coats (about 2-3) first. The paint should just be able to land on the model. Wait about 10 minutes between coats. After the third coat has dried i go for a pretty heavy coat. I start from the back of the car and spray the complete back of the car. Then do the same to the front. Then i spray from the bottom of the side shirts working my way up to the window sills on both sides. Then i spray around the windows. Last of all i spray the boot/bonnet and roof last. Leave for 10 minutes then do the same again.....just what i have found works best for me. Sirwelshy......Man, i owe you one !!! Parkcaka.....i wondered if any one would say that. If there is a fault with the body mold its the door lines. They are very wide and so deep you could drive a 18wheeler truck through them .The lines were done with the Gundammarker marker pen which is very fast and easy to do. They should be black. but they stand out abit to much on this kit.
__________________
Current Build.....1/12 Scale Camaro......Almost finished!!! View All My Models Here. |
|
|
|
|
|
04-13-2002, 09:26 PM
|
#12 | |
|
Ferrari Guy
 
Join Date: Jun 2001
Location: nowhere
Posts: 3,404
Thanks: 0
Thanked 0 Times in 0 Posts
|
PMan, I hate you! that is looking so good right now i could cry tears of joy. as for the panel lines, i don't think i've seen one model where they look right to me, so far i haven't done them on any of my models, it just doesn't do it for me.
__________________
The contents of this post may be fictitious. |
|
|
|
|
|
04-13-2002, 10:02 PM
|
#13 | |
|
AF Fanatic

Join Date: Apr 2002
Location: Auckland
Posts: 4,232
Thanks: 0
Thanked 0 Times in 0 Posts
|
DAMN PMan that looks awesome, but that is an $89 kit, I don't think the missus will be too impressed, what colour are you using it looks very similar to the Camel Yellow that I am painting my NSX, I think it is that Yellow cars look shinier, my NSX had an identical shine after 3 coats of paint and 2 of primer.
|
|
|
|
|
|
04-14-2002, 12:31 AM
|
#14 | ||
|
AF Newbie

Join Date: Apr 2002
Posts: 10
Thanks: 0
Thanked 0 Times in 0 Posts
|
Quote:
Still an amazing look to that body, especially the shine of it. Will make a beautiful finished product, no doubt... |
||
|
|
|
|
09-23-2002, 03:40 PM
|
#15 | |
|
AF Newbie
Join Date: Sep 2002
Posts: 12
Thanks: 0
Thanked 0 Times in 0 Posts
|
That's an awesome job you did there
I am working on my first model ever rightnow (Revell Integra Type R) and since I don't have an airbrush, and the only paint cans I have are black and silver (not what I want to paint the car) I will be holding off on painting body Love those rims & the lowering job, maybe my next kit will not be 'box stock' and have some nice wheels and stuff |
|
|
|
|
| ||||||||||||||||||||||||||||||||||||||
|
POST REPLY TO THIS THREAD |
 |
|
|


