|
|
|

|
|
| Search | Car Forums | Gallery | Articles | Helper | Quality Dog Food | IgorSushko.com | Corporate |
|
| Latest | 0 Rplys |
|
|||||||
| WIP - Street Post topics for any "Works In Progress" street vehicles projects in this sub-forum. |
 |
 Show Printable Version | Show Printable Version |  Email this Page | Email this Page |  Subscribe to this Thread
|
|
|
Thread Tools |
 03-19-2007, 08:17 PM
|
#1 | |
|
AF Enthusiast

Join Date: Oct 2004
Location: H.B., California
Posts: 3,667
Thanks: 18
Thanked 109 Times in 104 Posts
|
Orange 7 WIP
Yes, I am building another 7, surprised? I'm not
I will also chronicle this build as I go along.
While it will be much like an out of the box build in many respects, I reserve the right to deviate from what comes in the kit for any reason I choose. It is not meant to out-do the Blue Seven. It is to build and enjoy and have fun. (OK, that part is the same as the Blue 7.) Also, if any of you are building, or have built one of these kits, please note that I am going to be all over the place regarding what I build in what order compared to the way the instruction book has you build it. Nothing wrong with following the instructions, in fact I highly recommend it if you have not built one of these kits before, but I have built enough of these to skip around for my own enjoyment and not become ensnared in any of the possible pitfalls of building out of order. Tamiya Caterham Super Seven 1/12 Scale Masters Coachwork Series So follow along if you wish, feel free to ask questions, I'll try to be as clear as I can with my answers. Let's dive in... I started with the engine on this one. Scale Motor Sports Faux Fabrix was used to simulate the sand cast texture of the engine block. 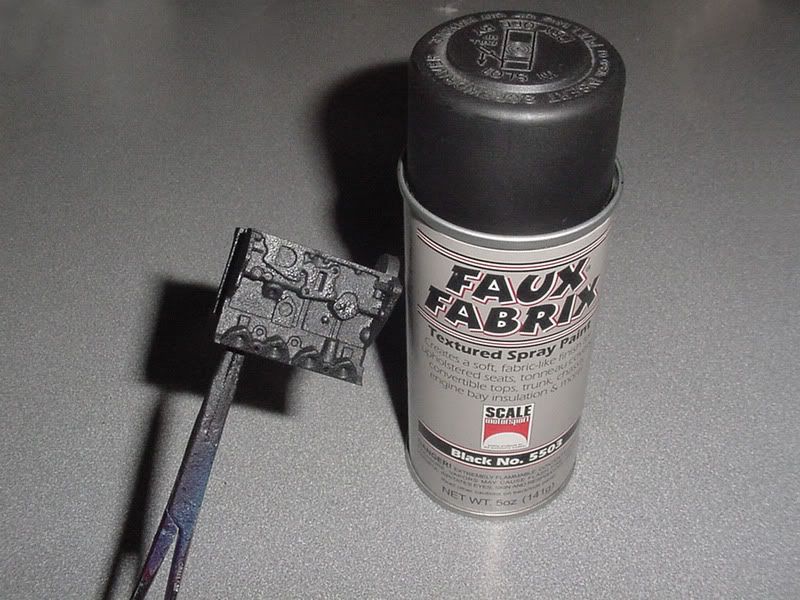 Tamiya TS-21 Gold was used for the color. The gloss of the gold was toned down with Testors Dullcote.  The head was painted aluminum and the freeze plugs painted a light steel color. The oil pan is Tamiya Clear Orange over silver for an anodized look.  More to come, comments welcome... - Mark |
|

|

|
|
03-19-2007, 08:25 PM
|
#2 | |
|
Image Hosting Exceeded
 Join Date: May 2003
Location: Flying in circles
Posts: 4,233
Thanks: 23
Thanked 97 Times in 87 Posts
|
Re: Orange 7 WIP
Cool, another one. More reference and inspiration!
Looks a bit like a Ford Kent block, so the BDR kit? Going to keep with the BDR engine? And here I thought you were throwing in late for the group build.
__________________
PHOTOBUCKET SUCKS |
|
|
|
|
|
03-19-2007, 09:21 PM
|
#3 | |
|
AF Fanatic

Join Date: Feb 2004
Location: Hartford, Connecticut
Posts: 5,601
Thanks: 7
Thanked 108 Times in 103 Posts
|
Re: Orange 7 WIP
Nice, another one. The sms paint looks great, i need to get my hands on it. The paint made it look almost realistic. Will keep my eye on this one.
__________________
In Progress    
|
|
|
|
|
|
03-19-2007, 10:24 PM
|
#4 | |
|
AF Enthusiast
 Join Date: Jul 2005
Location: Cheshire, Connecticut
Posts: 872
Thanks: 0
Thanked 1 Time in 1 Post


|
Re: Orange 7 WIP
Danggit, now I have to follow this thread from the beginning. I liked the other one because I only caught on near the end of the Blue Seven, which allowed me have lots to look at all at once. I could see it all in front of me. Now I have to be patient!
Great work as always, man.
__________________
 
|
|
|
|
|
|
03-19-2007, 11:18 PM
|
#5 | |
|
Captain Over Engineer
Join Date: Feb 2003
Location: New York, New York
Posts: 6,711
Thanks: 27
Thanked 29 Times in 23 Posts
|
Re: Orange 7 WIP
I know Matthew will be happy with the result. Everything looks great so far.
__________________
-Mike AF Director of Media / Photographer  [email protected] | AutomotiveForums.com | Flickr Gallery Last edited by mike@af; 03-20-2007 at 11:37 AM. |
|
|
|
|
|
03-20-2007, 09:53 AM
|
#6 | |
|
AF Enthusiast
Thread starter
Join Date: Oct 2004
Location: H.B., California
Posts: 3,667
Thanks: 18
Thanked 109 Times in 104 Posts
|
Seats
Yes, it is the BDR, I should have included that in my opening.
Like any new project, the participation level is high at the beginning, that holds true here too Testors Black Chrome Trim makes a good look for vinyl seat covers. The seat inserts were brush painted with Tamiya acrylic JN Grey, the brush strokes were left intentionally to make the pattern look more like an animal hide.  SMS Giraffe pattern decals were applied. Mr. Mark Softer (decal solvent) and a good decaling brush made it an easy task.  Tamiya Clear Yellow was airbrushed in different random densities and streaks, again to make it look more like a natural animal hide. I used an Iwata airbrush and was pleased the spray pattern was so fine I did not even have to mask off the black.  The seats were finished by spraying them with a 50/50 mix of Testors Glosscote and Dullcote lacquers.  Stay tuned for more... - Mark |
|
|
|
|
|
03-20-2007, 11:43 AM
|
#7 | |
|
Captain Over Engineer
Join Date: Feb 2003
Location: New York, New York
Posts: 6,711
Thanks: 27
Thanked 29 Times in 23 Posts
|
Re: Orange 7 WIP
Mark, can you tell me what animal that hide came from? The finish on the seats makes a nice leathery look.
__________________
-Mike AF Director of Media / Photographer [email protected] | AutomotiveForums.com | Flickr Gallery |
|
|
|
|
|
03-20-2007, 11:50 AM
|
#8 | |
|
AF Enthusiast
Thread starter
Join Date: Oct 2004
Location: H.B., California
Posts: 3,667
Thanks: 18
Thanked 109 Times in 104 Posts
|
Re: Orange 7 WIP
Mark, can you tell me what animal that hide came from?
Sure Mike, It's from a Decalasaurus... Shot it myself... Them's good eatin' too... They smell like lacquer when you're grillin' 'em though... - Mark |
|
|
|
|
|
03-20-2007, 11:53 AM
|
#9 | |
|
AF Enthusiast
Join Date: Apr 2005
Location: Waregem
Posts: 503
Thanks: 0
Thanked 0 Times in 0 Posts
|
Re: Orange 7 WIP
I tought you were going to take a break after you're bleu caterham but no sir... lets just make another one... you're 6the?
good start, altough i don't really like the giraffe-seats. Are you going to use that theme on the entire car? Perhaps tiger stripes for the exteriour ;-) |
|
|
|
|
|
03-20-2007, 11:56 AM
|
#10 | |
|
AF Enthusiast

Join Date: Sep 2004
Location: los angeles, California
Posts: 796
Thanks: 3
Thanked 9 Times in 8 Posts
|
Re: Orange 7 WIP
Looks great so far.
__________________
http://www.bhop73.com/ |
|
|
|
|
|
03-21-2007, 12:57 PM
|
#11 | |
|
AF Regular
 Join Date: Feb 2006
Location: Moscow
Posts: 493
Thanks: 0
Thanked 0 Times in 0 Posts
|
Re: Orange 7 WIP
another one... that`s also great
|
|
|
|
|
|
03-22-2007, 09:07 AM
|
#12 | |
|
AF Enthusiast
Thread starter
Join Date: Oct 2004
Location: H.B., California
Posts: 3,667
Thanks: 18
Thanked 109 Times in 104 Posts
|
Re: Orange 7 WIP
The frame was cleaned up like normal and painted semi flat black. The floor panels are covered with SMS Kevlar #1312 decal. Really no trick to it, just a little patience, and a little decal solvent around the edges and rivets. Let the decal dry for about 20 minutes before working it to conform with solvent. Keeps it from sliding around.
The steering rack cross member was textured to look sand cast with the Faux Fabrix... - Mark   |
|
|
|
|
|
03-22-2007, 06:26 PM
|
#13 | |
|
AF Newbie

Join Date: Feb 2007
Location: Clinton, Connecticut
Posts: 34
Thanks: 0
Thanked 0 Times in 0 Posts
|
Re: Orange 7 WIP
Mark if you can,please give me an idea on what should be done to tamiya acrylic to use it with a brush and leave no brushstrokes. What kind of additive can you put in it so it doesn't dry so fast and laeve brush marks. Also you detail work is amazing on this build so far. i will keep watching. thanks,Q
|
|
|
|
|
|
03-22-2007, 06:51 PM
|
#14 | |
|
AF Enthusiast
Thread starter
Join Date: Oct 2004
Location: H.B., California
Posts: 3,667
Thanks: 18
Thanked 109 Times in 104 Posts
|
Re: Orange 7 WIP
I don't have a solution for you to paint any acrylic by brush without leaving brush strokes. Except for detail work, I usually paint with an air brush, and even then, I don't use much in the way of acrylics.
I used a brush and acrylic paint on the seats because it was the color I wanted and had on hand, and I wanted stoke marks and unevenness. Ironic huh... - Mark |
|
|
|
|
|
03-22-2007, 08:01 PM
|
#15 | |
|
AF Newbie
Join Date: Feb 2007
Location: Clinton, Connecticut
Posts: 34
Thanks: 0
Thanked 0 Times in 0 Posts
|
Re: Orange 7 WIP
Thanks Mark. I use an Iwata myself but all this detail work and painting is new to me. i really like doing models this way. Q
|
|
|
|
|
|
|
POST REPLY TO THIS THREAD |
 |
|
|

