|
|
| Search | Car Forums | Gallery | Articles | Helper | Air Dried Beef Dog Food | IgorSushko.com | Corporate |
|
|||||||
| Graphic Manipulation Post and discuss different automotive art works- photoshopped, 3d graphics, and hand-drawn. |
| View Poll Results: Did you like this tutorial? | |||
| Yes |
|
38 | 92.68% |
| No |
|
3 | 7.32% |
| Voters: 41. You may not vote on this poll | |||
 |
 Show Printable Version | Show Printable Version |  Subscribe to this Thread
|
|
|
Thread Tools |
|
#1
 04-21-2003, 10:47 AM
|
|||
|
|||
|
Misc. Photoshop Tutorials etc. Post all your tips and hints here!
I wrote this tutorial because I feel this is just an easy way to do things for me here, and might help some of you while you photochop. If you think you've mastered photoshop already and don't need to listen to my blabbering, then close this window now or click back on your browser. There is always more than one way to do something, and this is just what I think is easiest. If you have another idea, you can always make your own tutorial.
This tutorial is done on Photoshop 7.0, but it'll work with other versions also, although tools might be in different locations. Also, if you have a photoshop site, feel free to post this tutorial on there if you like. But please give credit, you can email me at [email protected] . 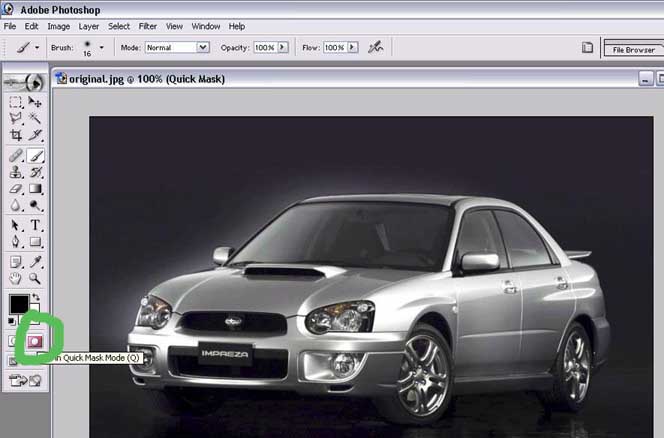 Ok, first obtain a picture and open it with photoshop.(duh!) Make sure your foreground color is set to black. Then double-click on the "Edit in Quick Mask Mode" tool. 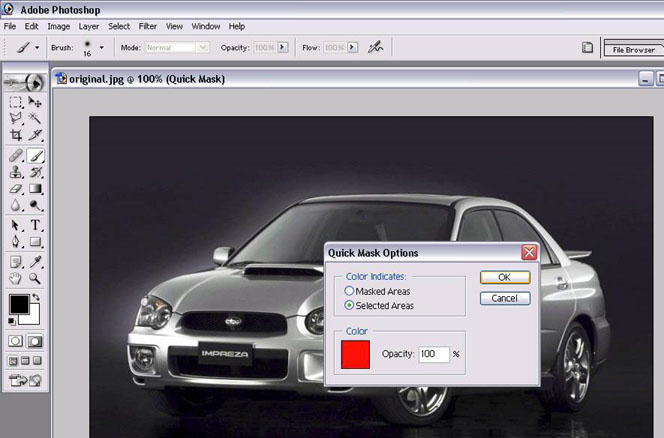 Here, select "Selected Area" under Color Indicates, and set opacity to 100%, leave the color as red. 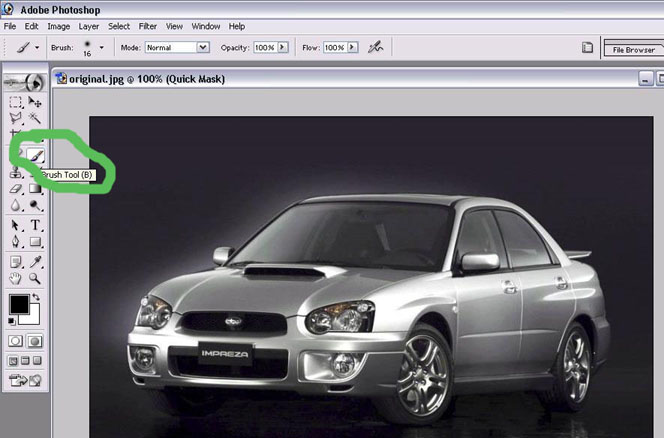 Now take your brush tool, and just color in the parts you want to change color for. 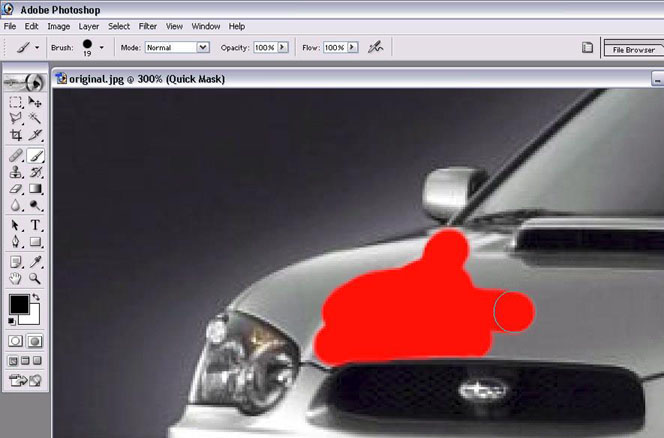 Like so. 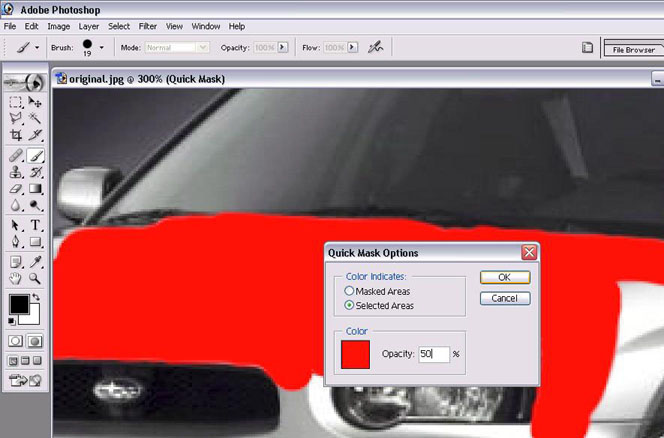 You can double click on the "Edit in Quick Mask Mode" again, and change opacity to 50%. This way, the red will be semi-transparent, and it'll be easier for you to see the spots where you covered accidentally. 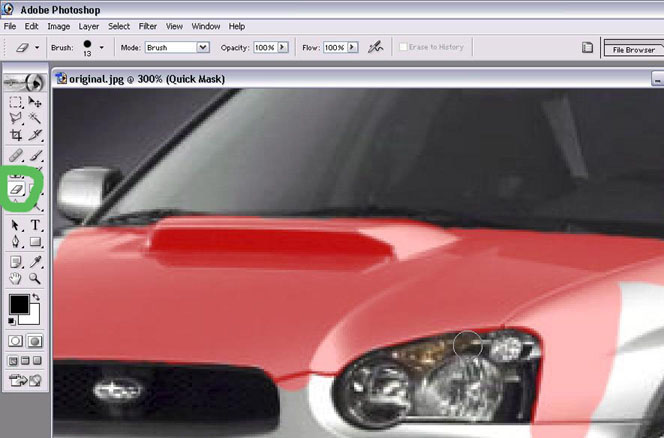 If you do see any mistakes, no problem, you can grab the Eraser Tool, and Erase those parts(don't worry, it'll only erase the mask, not the actual picture). 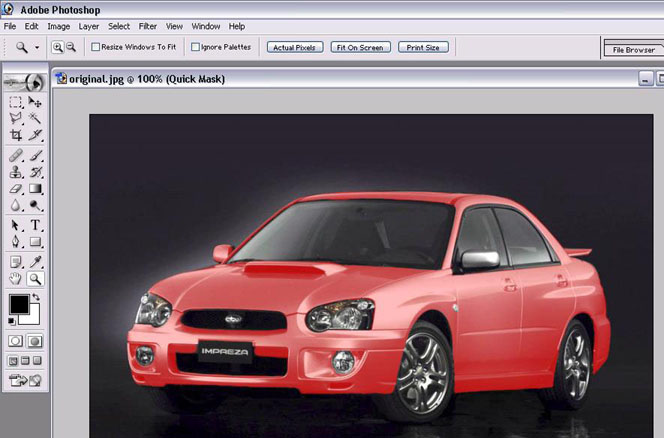 And now, the finished product! A hot pink 2003 WRX. mmm j/k. 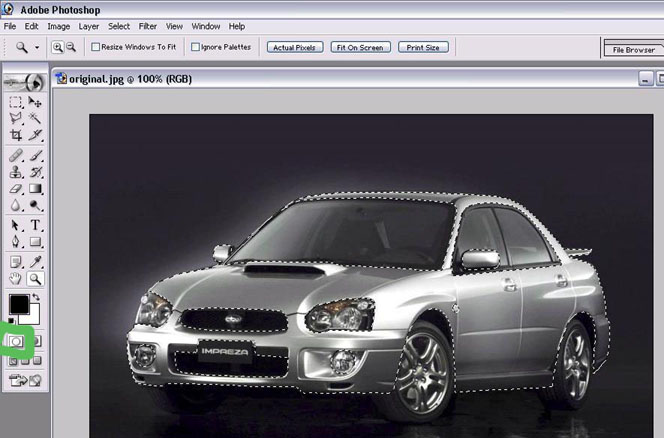 Now, left click on the button left of the Edit in Quick Mask Mode button, it is labelled, "Edit in Standard Mode". Now, the car will "turn back" to its original color, and the area you colored before is selected. 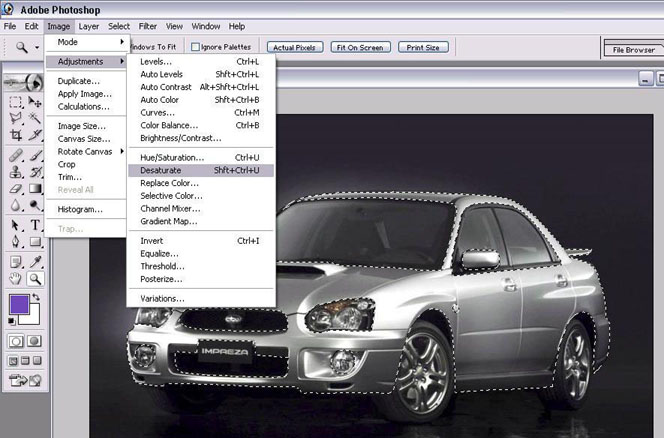 From here on, you can use whatever color changing method you like, depending on what you want the car to look like. This is how I do it for plain color. Edit-->Adjustment-->Desaturate.  Then, Edit-->Adjustment-->Color Balance... Now just drag the bars around, remember you can also change the Tone Balance for Highlights and Shadows, making it more realistic.  And now the REAL final product. 2003 Bayside Blue WRX! 
Last edited by mentel; 02-09-2005 at 07:34 PM. 
|
|
#2
04-21-2003, 08:09 PM
|
||||
|
||||
|
nice tut. i think i might use that.
|
|
#3
04-21-2003, 10:17 PM
|
||||
|
||||
|
Good job making that tutorial.
 Just a note, it is not necessary to continually change the quick mask mode from 50% to 100% and back to 50% and so on...50% is fine for most situations. Just a note, it is not necessary to continually change the quick mask mode from 50% to 100% and back to 50% and so on...50% is fine for most situations.I actually make my selection with the magnetic lasso usually, and then fine-tune it in qm mode. Since my job is doing photos for the local newspaper (amongst other things) I have my qm mode changed to "masked areas" and the color "white" instead of red, and the opacity at 80%. In this way, I "draw off" the portions of the image I don't want to see whenever I'm doing a cutout. It is very useful for cutouts, because the white acts like the background color, but since it's only at 80% transparency I can see through it just enough. Hope that makes sense.
__________________
Just because offense is offered, does not mean you have to take it.
|
|
#4
04-22-2003, 05:32 AM
|
||||
|
||||
|
pah use copy paste and erase
__________________
Two off the best things in the world are duct tape & araldite 95% of the worlds problems can be fixed with them Want To See The Wildest Cars & Learn How To Make Them Visit www.photo-chop.com or ZTi 
|
|
#6
04-22-2003, 08:25 PM
|
|||
|
|||
|
Its because thes server got moved
 . .
__________________
 05' Civic Si - Tokico D-Specs/Progress Springs/Progress Rear Sway/CorSport Endlinks/Ingalls Torque Dampner/Energy Suspension Motor Mounts/Falken Ziex/HFP Spoiler/RSX Rims
|
|
#7
04-23-2003, 03:05 AM
|
||||
|
||||
|
ok when i tried it and i went to desaturate it took all the color out of everything BUT what i wanted it to. and i'm new at this so i don't know how to make it do what i want it to.
|
|
#8
04-23-2003, 03:12 PM
|
|||
|
|||
|
That means when you double clicked on Quick Mask, you selected for Color Indicates, "Masked Area", instead of "Selected Area". If you realized this mistake too late, no problem... keep coloring the parts you want. After you click on Standard Mode, simply go to Select->Inverse.
I'm guessing I'll have to reupload all those pics. I'll get 'em up ASAP.
|
|
#9
04-23-2003, 04:36 PM
|
||||
|
||||
|
mmmm... hot pink
Last edited by Nookie_Monster; 04-24-2003 at 03:41 AM.
|
|
#10
04-24-2003, 01:40 PM
|
|||
|
|||
|
Nice work!
__________________
  Wanna be in a magazine? Read these links and i'll tell you how. http://www.photoshopchop.com/pasmag http://www.photoshopchop.com/pasmag_info
|
|
#12
04-28-2003, 12:55 PM
|
|||
|
|||
|
i like to change the color just by selecting the paint and changing the color balance. it doesnt look as washed out that way. what the masks are really good for is if you want to get the carbon fiber effect. expecially if you have a carbon fiber pattern. The mask is also good for doing the chamealon effect as well. because you can use the gradiant tool
__________________
 "Mustangs are like tampons, every pussy has to have one"
|
|
#15
06-25-2003, 02:27 PM
|
|||
|
|||
|
The tutorial's all very well if you a beginner, but I wouldn't seriously consider manually brushing over every pixel I wanted to mask off. There's a useful tool for this, and it's called the pen tool. It uses bezier paths similar to those used in Illustrator and Macromedia programs (like Flash, Freehand, etc) and enables the user to draw very precise lines that can be used to stroke lines, create masks, make a selection, etc. Once a selection is made, you can even decide how much of a feather you want around the edges- this gives a very professional and clean finish, and doesn't look like you've been drawing with a mouse.....
In my opinion, Photoshop works the best with a graphics tablet. Check out http://www.wacom.com for these.
|
|
|
POST REPLY TO THIS THREAD |
 |
|
|


 <-- yellow is rap...

