|
|
|

|
|
| Search | Car Forums | Gallery | Articles | Helper | Air Dried Beef Dog Food | IgorSushko.com | Corporate |
|
| Latest | 0 Rplys |
|
|||||||
| How-to | Technical Info A wealth of information at your disposal. |
 |
 Show Printable Version | Show Printable Version |  Email this Page | Email this Page |  Subscribe to this Thread
|
|
|
Thread Tools |
 10-22-2005, 11:31 PM
|
#1 | |
|
AF Regular
 Join Date: Oct 2005
Location: Chanute, Kansas
Posts: 161
Thanks: 0
Thanked 0 Times in 0 Posts
|
              Last edited by blazee; 02-21-2011 at 02:41 PM. |
|

|

|
|
10-23-2005, 12:16 AM
|
#2 | |
|
AF Enthusiast
 
Join Date: Sep 2004
Location: Fayetteville, Arkansas
Posts: 945
Thanks: 0
Thanked 0 Times in 0 Posts

|
Re: 4.3 CPI Injector replacement pictures
I lubed all o-rings upon assembly with plain old motor oil. The O-rings on the back of the plennum where the nut kit's collars go got it, the O-rings in the fuel lines going to the injector get it...however, there were no o-rings on the fuel lines going into the nut kit collars, nor in any other fuel line I have removed and replaced. Including the fuel filter. There are flared ends and as long as they are *clean*, when you snug up the collars, they should seal fuel tight, no problems. But petroleum jelly does make a good sfety blanket and keeps the ends from getting stuck when they have to get removed later on. Good show! I should have taken photos when I did mine, but the interior of my plenum was so FILTHY, there was no way in hell I was going to operate my rather expensive camera with funky hands. It took the better part of a week for my hands to completely clean up after this job. Good work!
|
|
|
|
|
|
10-23-2005, 12:35 AM
|
#3 | |
|
AF Enthusiast
Join Date: Jun 2004
Location: Schuylkill Haven, Pennsylvania
Posts: 1,886
Thanks: 9
Thanked 1 Time in 1 Post

|
Re: 4.3 CPI Injector replacement pictures
Nice post like the pics and descriptions.I agree with you if you got a manual or instructions anything is possible as long as you follow them>wolfox my hands are still filthy from rebuilding 5.7 i went to class thursday night and im like its not coming off no matter how hard i try.
__________________
1991 Chevy S-10 Blazer 5.7 V8 RIP 1999 Chevy Blazer 2dr 4.3 |
|
|
|
|
|
10-23-2005, 12:57 AM
|
#4 | |
|
AF Enthusiast
Join Date: Sep 2004
Location: Fayetteville, Arkansas
Posts: 945
Thanks: 0
Thanked 0 Times in 0 Posts
|
Re: 4.3 CPI Injector replacement pictures
Yeah, the blending of motor oil from the PCV system, raw, untreated exhaust pumped in through the EGR before the catalyst, and years of micro-fine dust that an air filter will never catch makes for a greasy amalgam that can only be described as really disgusting, sticky Xerox toner.
  |
|
|
|
|
|
10-23-2005, 01:28 AM
|
#5 | |
|
AF Enthusiast

Join Date: Aug 2005
Location: Honolulu, Hawaii
Posts: 531
Thanks: 0
Thanked 1 Time in 1 Post
|
Re: Re: 4.3 CPI Injector replacement pictures
Excellent Post. Just reading through you comments makes it all the easier to do the job. I've replaced 3 CPI and nut kits on my 3 Blazes already. The first time was like you. By the book, and it took so long going back and forth. If I had this. I would of been just screaming along and done in half the time. Great Job!!!!!!!!!!!!!!
__________________
1994 1st.Gen. S10 Blazer Tahoe Aloha Gabe My Fleet     
|
|
|
|
|
|
10-23-2005, 01:51 AM
|
#6 | |
|
AF Enthusiast
Join Date: Sep 2004
Location: Fayetteville, Arkansas
Posts: 945
Thanks: 0
Thanked 0 Times in 0 Posts
|
Re: 4.3 CPI Injector replacement pictures
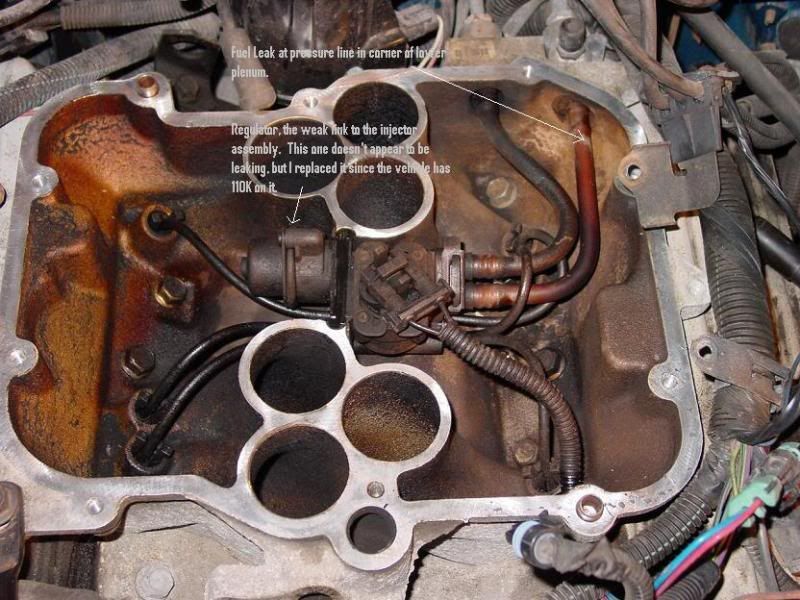
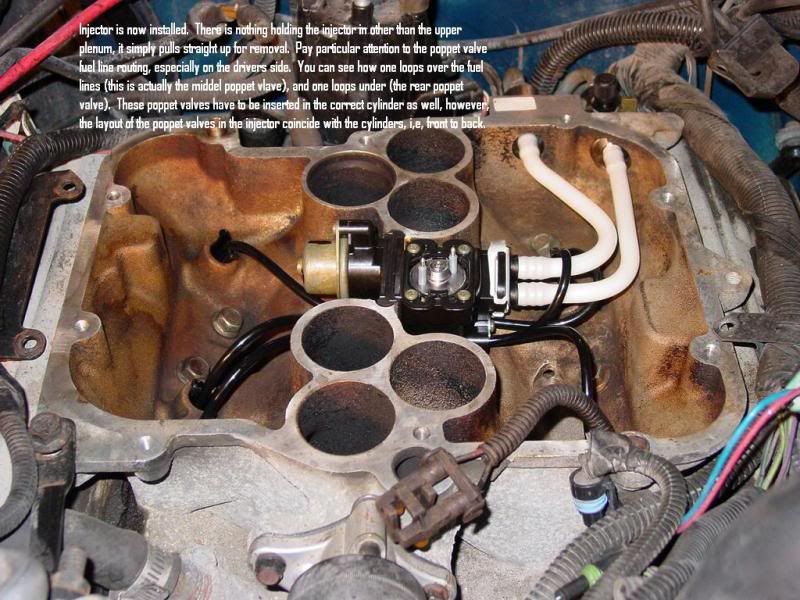
Oh, oh! I ran into this problem when taking the old poppets out:
I had three of the clips breaks off, locking the poppet into place in the lower plenum's intake ports. Using a thin, and I mean *thin* pair of needle nose pliers, reach into the port along the side where the "ear" for the retainer broke off and grasp what's left. It takes just a firm tug to break the rest of the ear and the retaining tab off on that side. Then using the side of pliers' nose as a brace, I pushed on the remaining, intact tab and was able to wiggle the poppet out of the socket eassily. When putting the new ones in, seat the new injector assembly first after installing the fuel lines. Install the fuel lines first so you can work out the routing of the poppets on the driver's side with a bit of ease. Contrary to belief however, it is not important which order they go in, as the system is batch fired. However, the varying length of the injector pigtail tubing will define where the injector goes. Remember, no sharp bends or kinks and you will be alright. One of my injector lines indeed have to go over the fuel lines, as this was the only way it would go without any rubbing which would lead to pre-mature failure. I figured what the heck, while I was in there and did what you did, replaced cap and rotor and also took off my EGR to clean it up thoroughly and put it back in. It was sticking due to carbon build up brought on by my regulator leaking. It also fouled out the #4 plug. Though she started up and idles much better, it still loped because of that. A quick replacement with a fresh plug took care of all of it. It's a very satisfying job when it comes together and works, eh? Rock on! |
|
|
|
|
|
10-23-2005, 07:49 AM
|
#7 | |
|
AF Enthusiast

Join Date: Feb 2005
Location: Burbank, Illinois
Posts: 571
Thanks: 0
Thanked 0 Times in 0 Posts
|
Re: 4.3 CPI Injector replacement pictures
93LT Excellent, Excellent picture post, you may have just helped out a thousand 4.3 owners, that said, This thread should be stickied...
__________________
1998 BLAZER LS Vin-W 4Dr 2wd 2004 Cavalier LS 4Dr 2.2 Ecotec "Good Part's ain't Cheap--Cheap Parts ain't Good" |
|
|
|
|
|
10-23-2005, 09:26 AM
|
#8 | |
|
AF Regular
Join Date: Oct 2005
Location: Chanute, Kansas
Posts: 161
Thanks: 0
Thanked 0 Times in 0 Posts
|
Re: 4.3 CPI Injector replacement pictures
Thanks everyone, I just noticed a typo. It was supposed to say "without a manual". I don't have one. Would like to get a factory service manual some time though. It took about an hour for me to tear it down, making note of what bolt went where (not all upper plenum bolts and studs were the same length). When the parts arrived the next day, it took about an hour and a half to reassemble. To give those still in doubt how simple this repair actually is, there was no cussing or throwing of tools involved.
I had read enough on this board and another to get an idea of what to look for and was aware of the plastic tabs breaking on the poppet valves, fortunately for me, mine didn't break. While this was a pretty simple repair, I'm a seeing is believing kind of guy and thought posting some picutres might help some others that might not be so sure about the repair, now maybe they can get on to better running and better gas mileage. |
|
|
|
|
|
10-23-2005, 04:11 PM
|
#9 | |
|
AF Newbie
Join Date: Jul 2004
Location: Madison, Wisconsin
Posts: 22
Thanks: 0
Thanked 0 Times in 0 Posts
|
Re: 4.3 CPI Injector replacement pictures
Where did you get the "NUT"kit witht he fuel lines? I am replacing my CPI and everything to go with it but Checker doesnt carry this so called NUT KIT. Do you have a GMpart number I could reference?
|
|
|
|
|
|
10-23-2005, 04:34 PM
|
#10 | |
|
Problem?
 
Join Date: Dec 2004
Location: Florida
Posts: 6,248
Thanks: 63
Thanked 114 Times in 94 Posts
|
Re: 4.3 CPI Injector replacement pictures
Nice, this is will help alot of people. By far the best CPI/NutKit replacement pics that I've seen.
|
|
|
|
|
|
10-23-2005, 04:41 PM
|
#11 | |
|
AF Enthusiast
Join Date: Sep 2004
Location: Fayetteville, Arkansas
Posts: 945
Thanks: 0
Thanked 0 Times in 0 Posts
|
Re: 4.3 CPI Injector replacement pictures
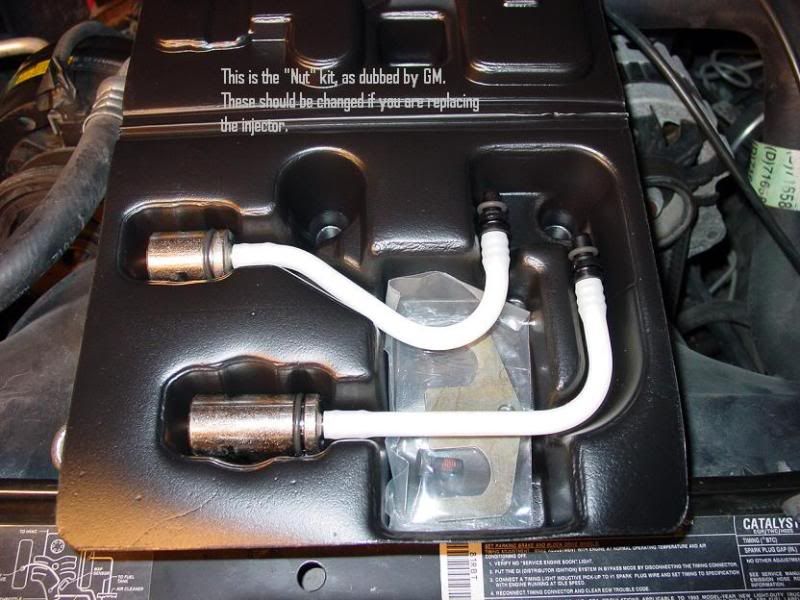
The AC/Delco part numbers are:
Nut Kit: 17112705 Fuel Injector: 17113673 |
|
|
|
|
|
10-23-2005, 05:11 PM
|
#12 | |
|
AF Newbie
Join Date: Jul 2004
Location: Madison, Wisconsin
Posts: 22
Thanks: 0
Thanked 0 Times in 0 Posts
|
Re: 4.3 CPI Injector replacement pictures
Thank you so much! This is goin very smoothly so far with the help of all these forums!
|
|
|
|
|
|
10-24-2005, 08:27 AM
|
#13 | |
|
GM S-Series Mod

Join Date: Aug 2005
Location: Westminster, Maryland
Posts: 2,650
Thanks: 0
Thanked 1 Time in 1 Post
|
awsome pics. i did my first cpi replacement in august. i had a busted fuel regulator and a hole in the nut kit. i'll throw up a pic of it later. i had a manual but i only needed it for the tightening sequence for the plenum bolts. the biggest problem i ran into was that the torx bolt holding the nut kit was stripped. i had to buy $100 worth of stud removers to get it out. i worked on it for a hole weekend but got it done. i also changed the oil and performed a complete tune-up. the truck runs great know.
__________________
2000 Chevy Blazer ZR2 Performance Mods: Numerous Suspension Mods: Some, but not enough Exterior Mods: Just Right 1987 Buick Turbo T Dark Red Low 11 sec sleeper  .030 4.1 block, PT6262E, & other odds and ends.... My Cardomain |
|
|
|
|
|
10-24-2005, 12:36 PM
|
#14 | |
|
AF Newbie
Join Date: Jul 2004
Location: Madison, Wisconsin
Posts: 22
Thanks: 0
Thanked 0 Times in 0 Posts
|
Re: 4.3 CPI Injector replacement pictures
can someone tell me the torqueing specs and pattern for the bolts that hold down the lower intake manifold? i took it all off cause my gasket was blown!
|
|
|
|
|
|
10-24-2005, 05:40 PM
|
#15 | |
|
AF Enthusiast
Join Date: Aug 2005
Location: Honolulu, Hawaii
Posts: 531
Thanks: 0
Thanked 1 Time in 1 Post
|
Re: 4.3 CPI Injector replacement pictures
You have a total of 12 bolts that hold down the lower manifold. 6 on the left and 6 on the right. Tighten all bolts hand tight first. The following is the tightening squence you need to use. Left side starting with front bolt. Tighten order is 12, 5, 4, 2, 7, 10, Right side starting with the front bolt. 11, 6, 1, 3, 8, 9.
Start with bolt number one and work your way to bolt number 12. You need to tork them down to 35 ft. pounds (48Nm). Sorry didn't have any diagrams handy.
__________________
1994 1st.Gen. S10 Blazer Tahoe Aloha Gabe My Fleet
|
|
|
|
|
|
|
POST REPLY TO THIS THREAD |
 |
|
|

