|
|
|

|
|
| Search | Car Forums | Gallery | Articles | Helper | Air Dried Beef Dog Food | IgorSushko.com | Corporate |
|
| Latest | 0 Rplys |
|
|||||||
| WIP - Street Post topics for any "Works In Progress" street vehicles projects in this sub-forum. |
 |
 Show Printable Version | Show Printable Version |  Email this Page | Email this Page |  Subscribe to this Thread
|
|
|
Thread Tools |
 02-06-2015, 12:09 PM
|
#1 | |
|
AF Enthusiast
Join Date: Nov 2004
Location: San Diego, California
Posts: 833
Thanks: 2
Thanked 6 Times in 6 Posts
|
My return to modeling: Tamiya Prelude XX
Good morning (afternoon/evening). It has been many years since I've posted on here but recently came across a thread titled "What happened to scale modeling on the internet?" in the main car modeling forum. It was definitely an interesting read and got me thinking about why I haven't been contributing over the last few years. Without going into much detail about my personal reasons I've decided that there really isn't any reason not to contribute any longer. I've never really stopped building but always felt that my work wasn't necessarily worth sharing. I hope to change that this year and hopefully learn and develop my skills a bit more. So let's get on with it.
The subject matter here is the Tamiya Prelude XX (83-87 Honda Prelude in the US, as pictured 1982 Prelude for Japan). I purchased the kit a couple of years ago and painted the body blue...and then tucked it away. I figured this would be a good kit to start with since it's got an engine and allows a bit of customization if I so choose. So I took it out of the box after reading the previously mentioned thread. The intent was to just build it straight out of the box but my mind started wandering about upgrades. The first thing I thought was to utilize these Sakatsu carbs that I had ordered probably 10 years ago. They are the right size and allowed me to claim a customized engine piece. It required a manifold adapter so I made a crude piece that got the job done. After looking at it, I felt it needed an upgraded exhaust manifold. My first attempt was a generic high rise style header that didn't turn out so well but my second attempt was a Bisimoto style header that came out pretty decently I think. It took me about 6 hours to make it from styrene including time spent on many mistakes. I apologize in advance, all pictures are taken with my iPhone4 so quality isn't as good as it could be. 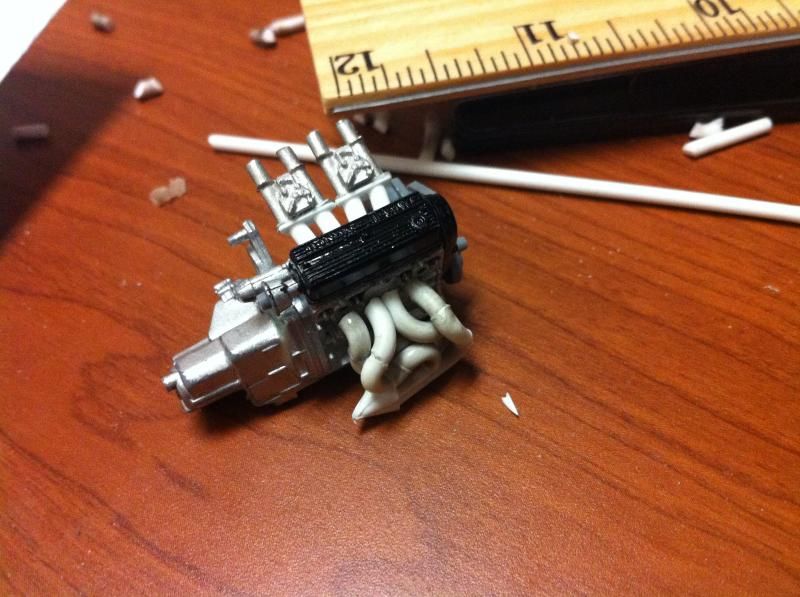  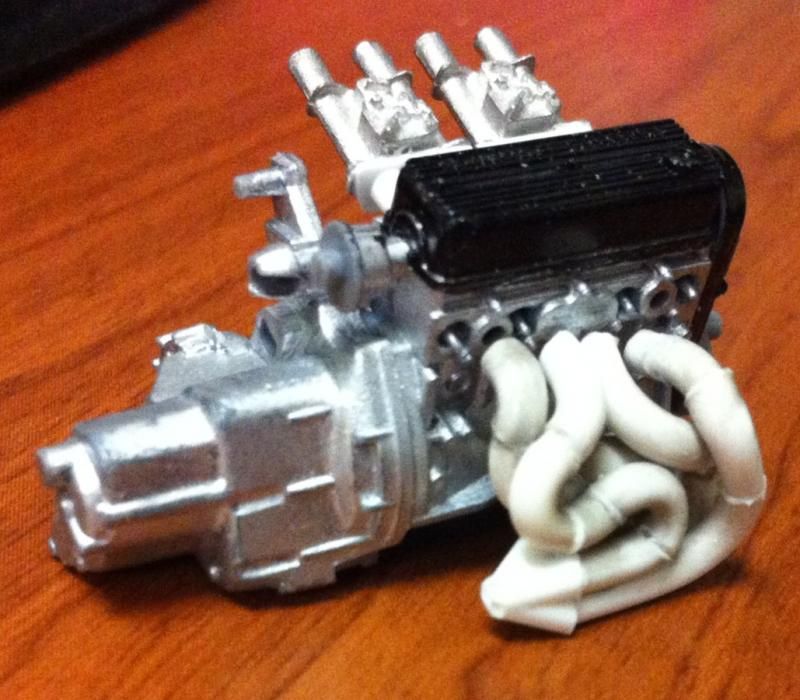 Satisfied with the general shape and appearance I added pins to attach it to the exhaust ports and did a test fit into the engine bay to see if the assembled manifolds interfered with the chassis. 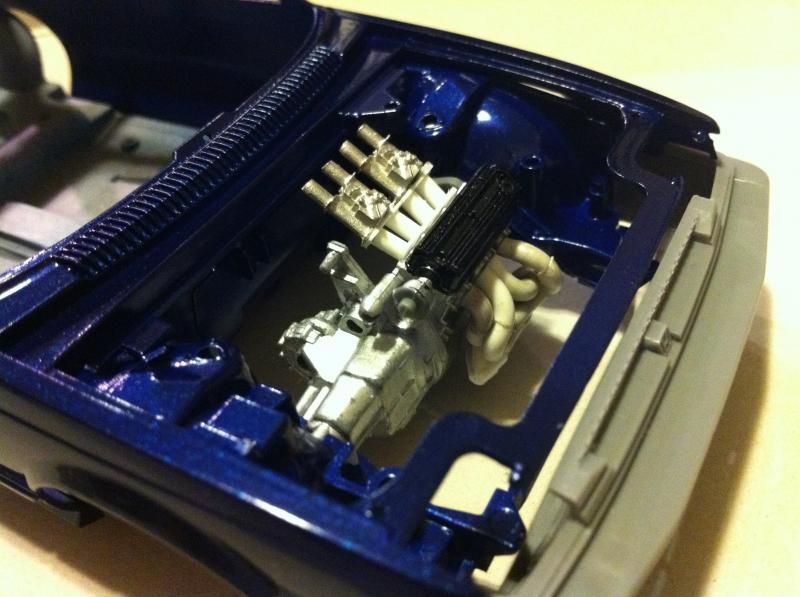 I did a quick dry brush of the valve cover to capture some details. All was good but then I noticed the funnels on the carbs just didn't look correct so I dug through my stash of parts and tried two different sets of funnels but neither fit. Using styrene tubes I heated and stretched, I fabricated new funnels that aren't exactly what I wanted but look much better than the solid pieces cast into the Sakatsu carbs. 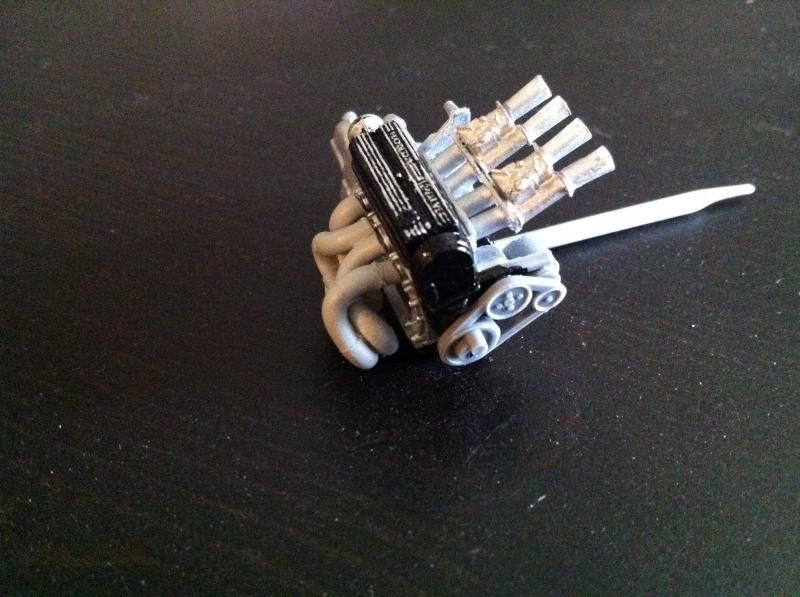 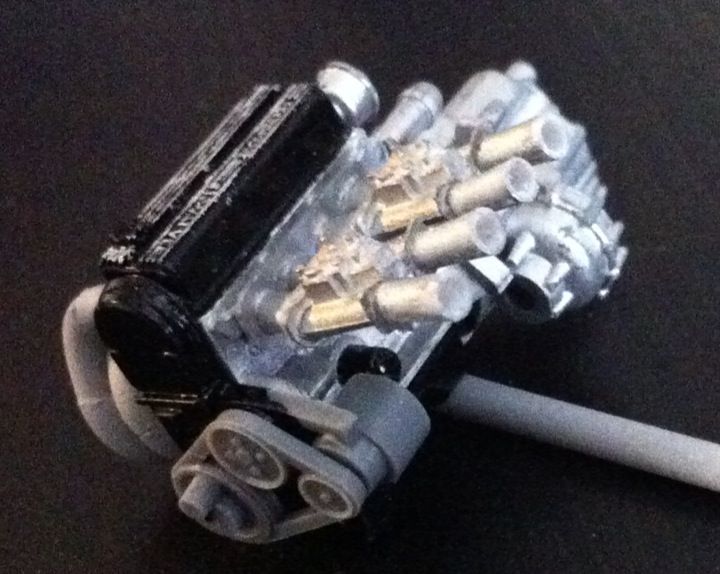 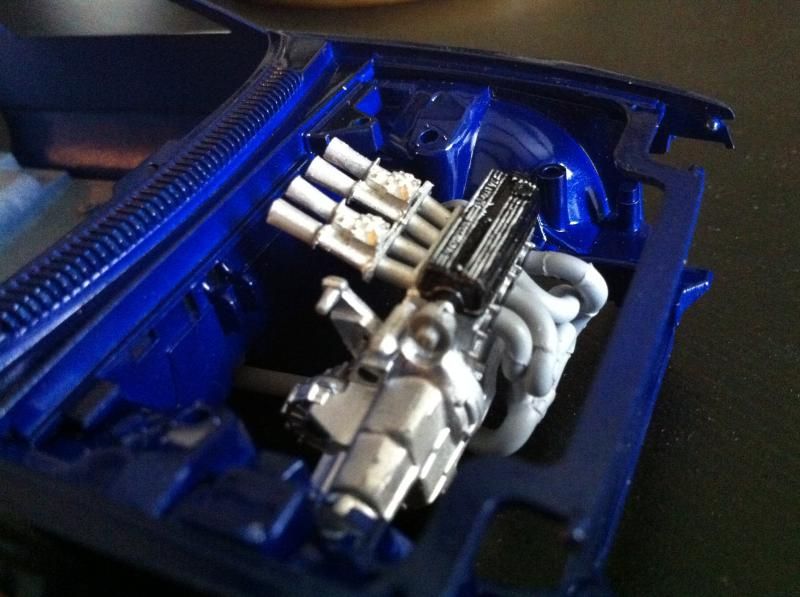 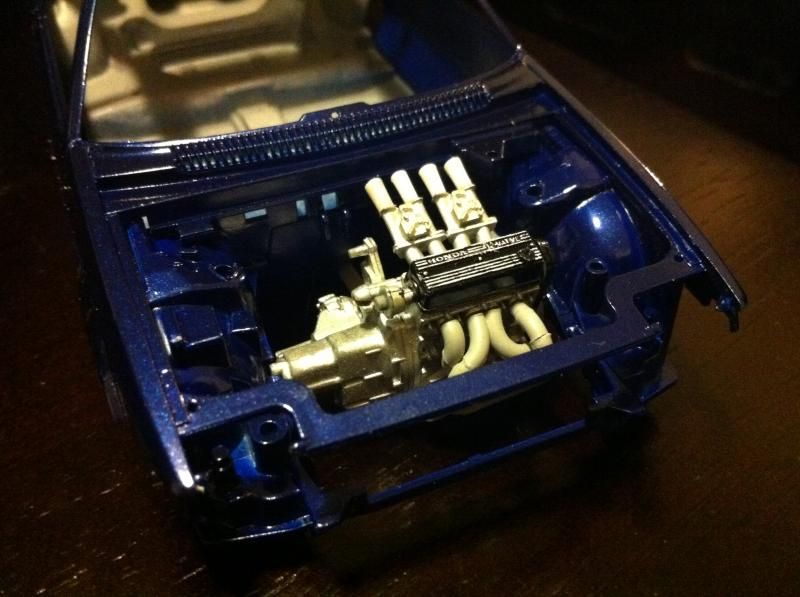  I added some Alclad II chrome to the funnels, a much needed improvement. Eventually I used it on the header too. 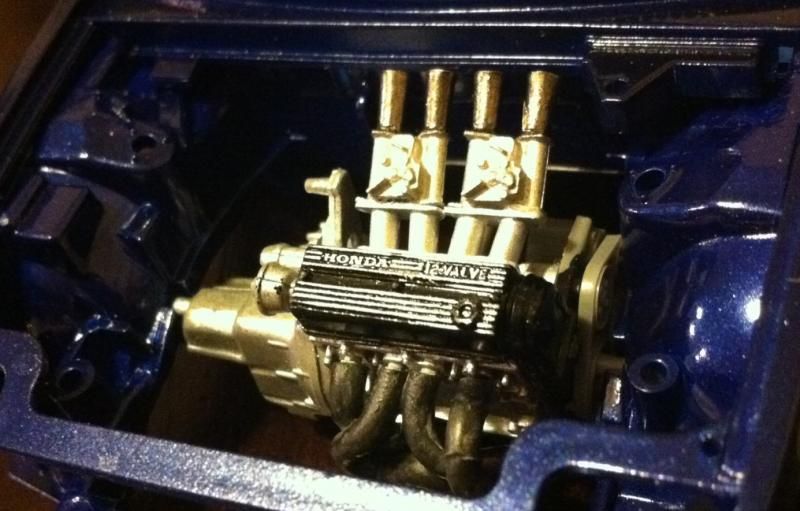 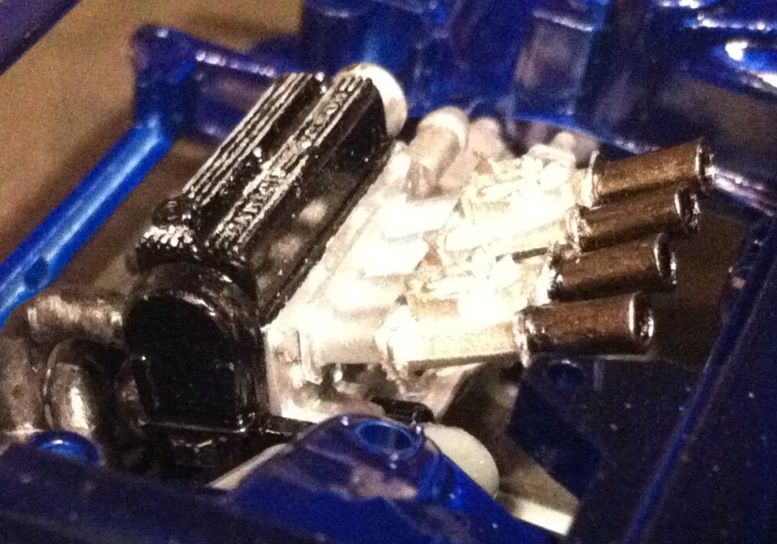 Then I got to wiring the distributor. The distributor is cast with the plug wires facing directly to the side. I didn't think much of it so I proceeded as is but after looking online at pics of the real engine I see that I should have went with my gut and re-positioned them to be at an angle for a more natural look. So that's on my rework list now. 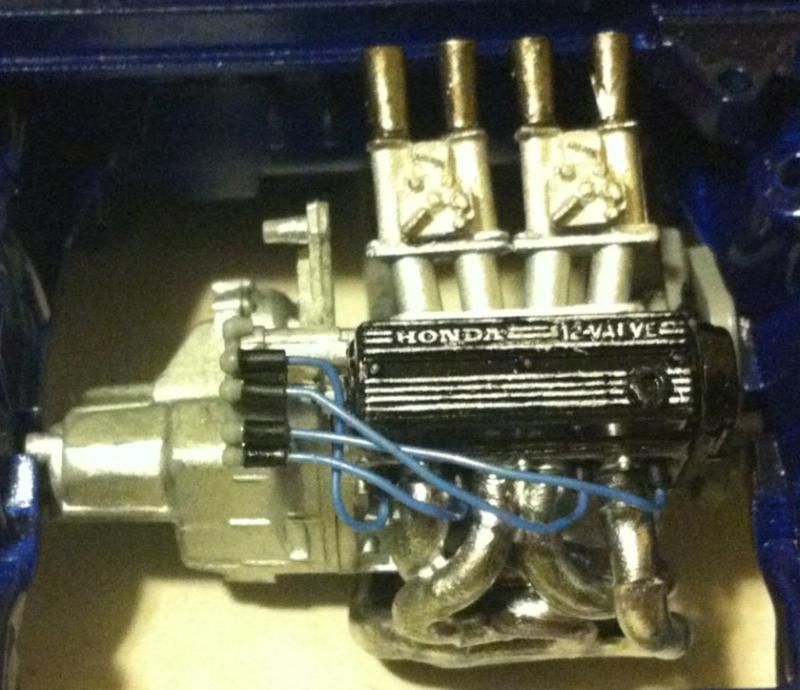 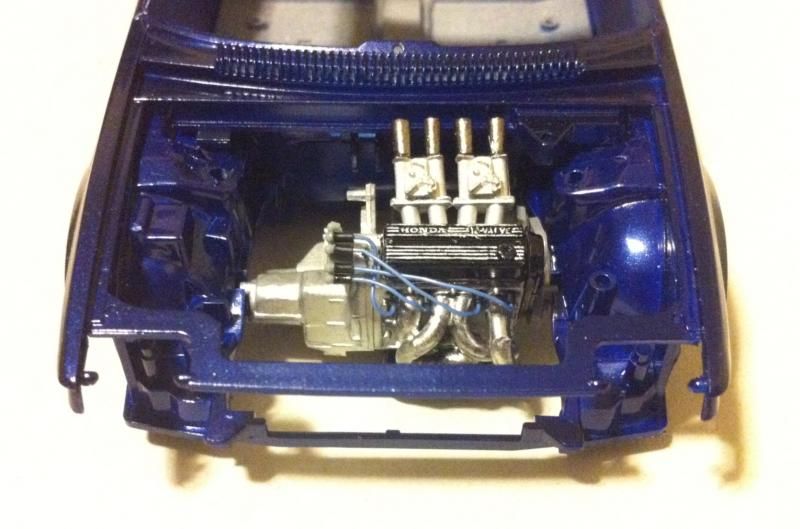 While digging through my parts bin I found a few pieces I could incorporate into this model so I said what the heck let's go for it (so much for box stock).  The resin Optima battery was full of pin holes and is warped. It doesn't show in the pics but I plan on trying my hand at entering this model into a contest in a couple of months so I'm going to scratch build another one. Add that to the rework list.    That's it for now. Rework items I hope to complete over the weekend. Aside from those I also hope to add some fuel lines, fuel filter (kit piece), steel braided hoses for the radiator, scratch build a half sized radiator, and hopefully both the throttle cable and clutch cable.
__________________

Last edited by mrceej; 03-02-2015 at 03:03 PM. |
|

|

|
|
02-06-2015, 02:27 PM
|
#2 | |
|
AF Enthusiast
Join Date: Sep 2011
Location: Redwood City, California
Posts: 651
Thanks: 0
Thanked 39 Times in 39 Posts
|
Re: My return to modeling: Tamiya Prelude XX
Looks great so far, and thanks for posting! It seems to me that perhaps the intake funnels are a bit close to the firewall? Could they or the intake manifolds be shortened slightly?
ianc |
|
|
|
|
|
02-06-2015, 04:07 PM
|
#3 | |
|
AF Enthusiast
Thread starter
Join Date: Nov 2004
Location: San Diego, California
Posts: 833
Thanks: 2
Thanked 6 Times in 6 Posts
|
Re: My return to modeling: Tamiya Prelude XX
Well that was what I wasn't really fond of about them (funnels). That's why I said "not exactly" what I wanted in the first post but since you were able to spot that flaw I guess I'll be adding that to the rework list for the weekend. I appreciate the criticism and such a close eye early on.
__________________
|
|
|
|
|
|
02-09-2015, 12:37 PM
|
#4 | |
|
AF Enthusiast
Thread starter
Join Date: Nov 2004
Location: San Diego, California
Posts: 833
Thanks: 2
Thanked 6 Times in 6 Posts
|
Re: My return to modeling: Tamiya Prelude XX
Week 2 of working on this and the progress is slow but taking shape. I was only able to complete 2 out of the 3 rework tasks. First one was creating the new funnels. I had spent about 4 hours in total experimenting with a candle to make these things. I tried the heat and stretch method, I tried sticking pieces into my dremel so as to mimic a lathe, I even went out and bought different sized styrene tubes. From my experience, the lathe technique wasn't accurate with the dremel but I believe it was mainly because the styrene tubes were smaller in diameter than the clamp built into the dremel head. I made an adapter out of the next sized styrene tube and it worked but after trying to machine a few pieces I found that the tubes were spinning off center. It gave me a good nice funnel shape that was offset from the center line of the tube itself. So that was a no go but I will say it might still be worth trying again if I can correct the issue. My next idea was to heat up the tubes and push them onto an appropriate sized punch tool so that it would form to the radius of the tool as it flares to the handle/hex side. That didn't work either. What I ended up with was a bunch of random pieces seen here:
 After playing around with the candle and some scrap I found a decent enough method to at least visually create a similar look that I wanted but still found it extremely difficult to replicate the funnel 4 times. So what I did was make about 20 of them and then selected the 4 that were closest in shape and size. Here is the end result: 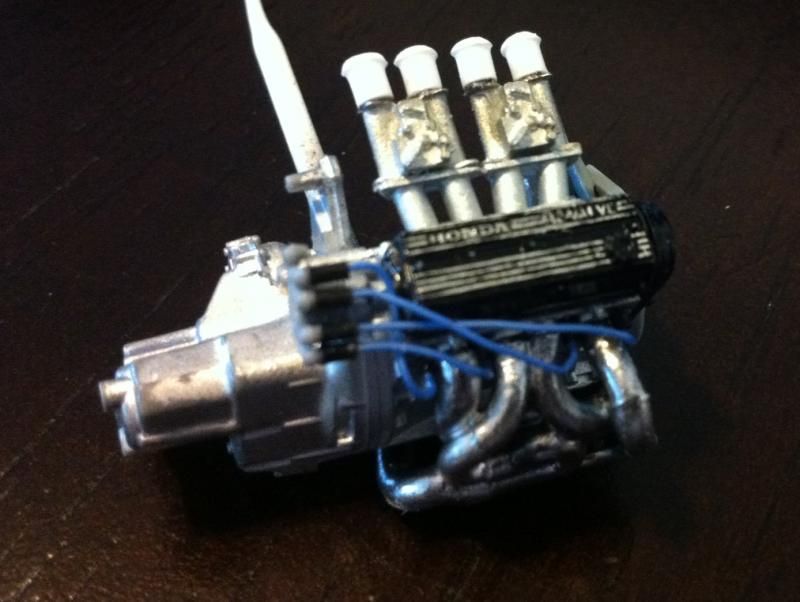 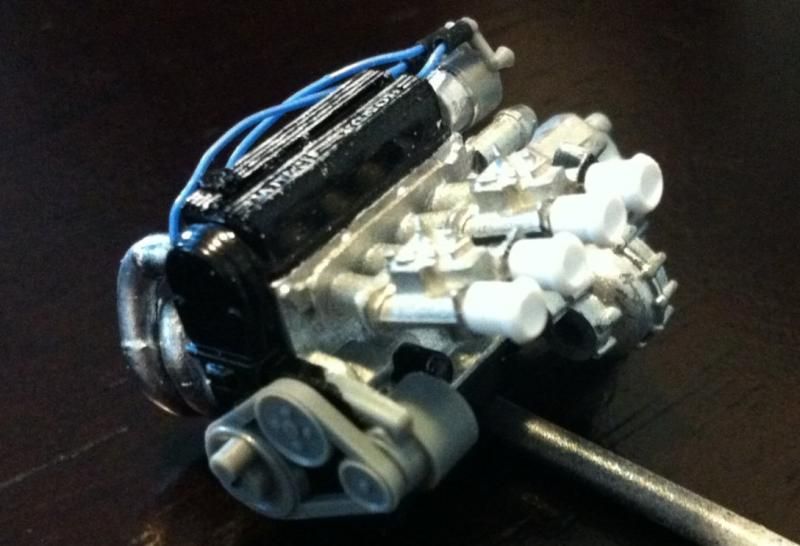 And just so you can see how difficult it was to match them in size compared to the failed attempts: 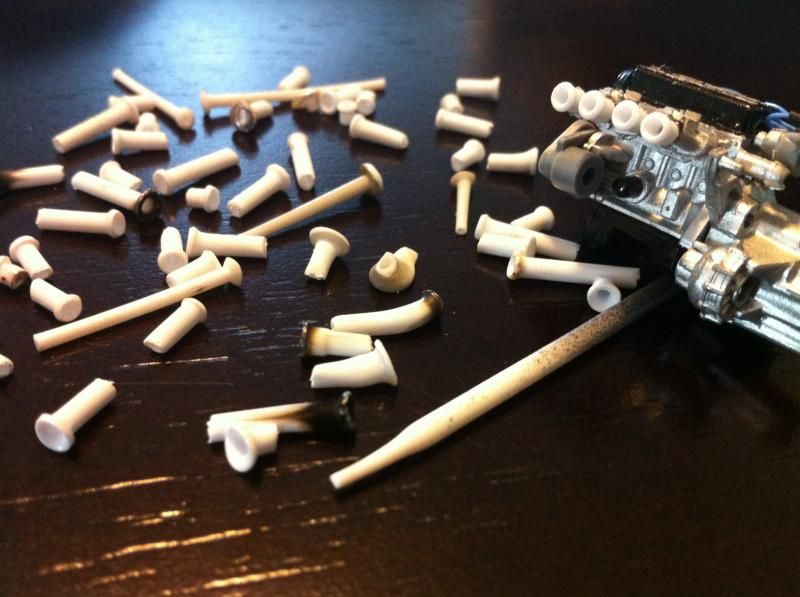 I'm satisfied with the outcome and will leave them as is. Maybe on another build I can utilize the nice metal ones I bought that didn't fit on this model. So onto the next task, the battery. Aside from the resin piece being flawed a friend of mine had pointed out that the battery was humongous!! It's nearly the size of the engine if you look at it. Since I was already planning to scratch build a new one I made the effort to make it an appropriate size. It was rather simple, just glue 6 pieces of rod together (I believe I used 2mm, not positive though) and add styrene sheet top and bottom trimmed to size. Here you can see the base battery shape sitting next to the resin piece. It is MUCH smaller and I feel it is looking a bit more sharp in definition: 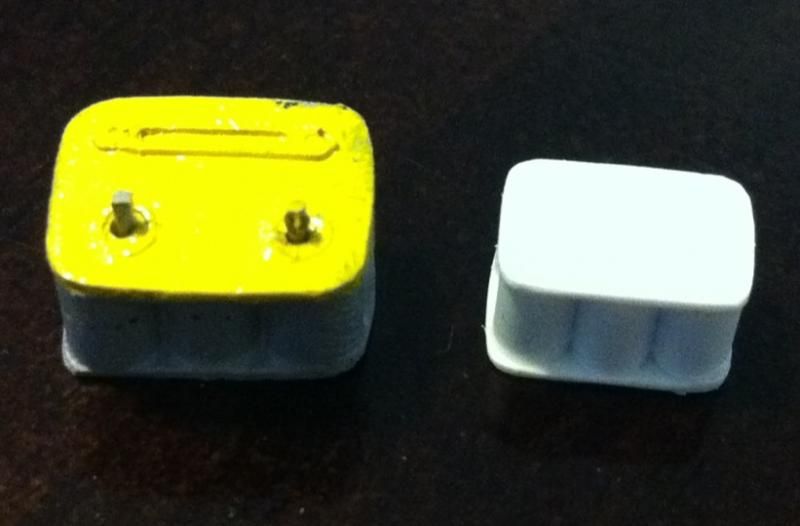 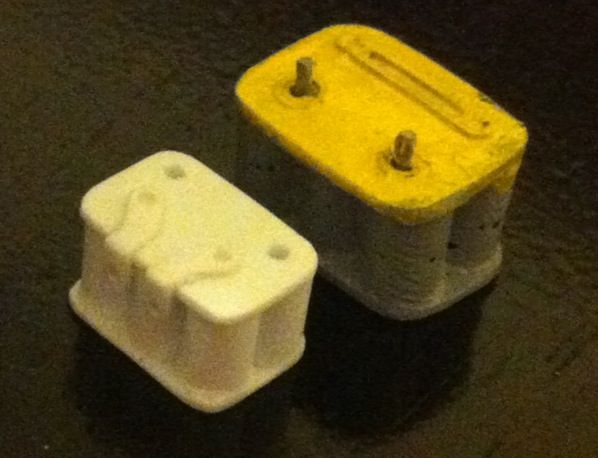 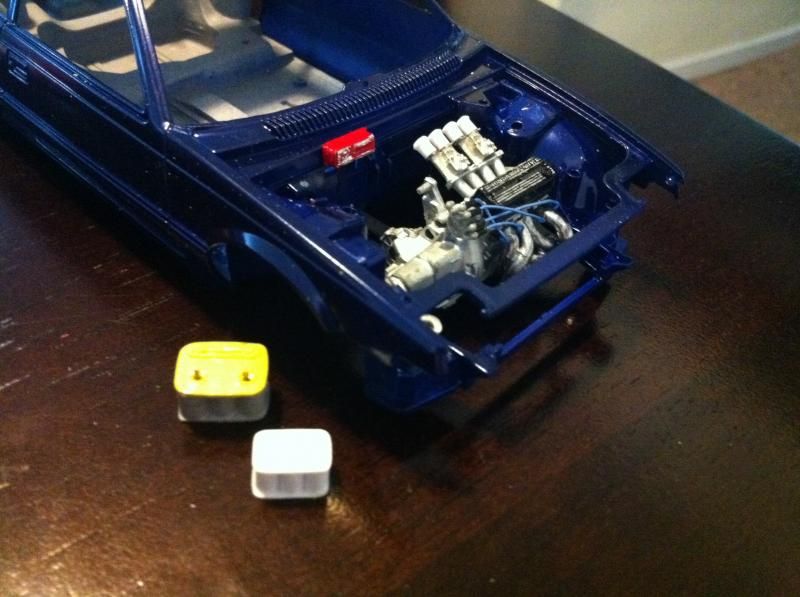 For your own comparison I snapped a few pics of the resin battery, my scratch built battery, and the kit battery (it had the expansion tank for the radiator connected to it but I removed it). 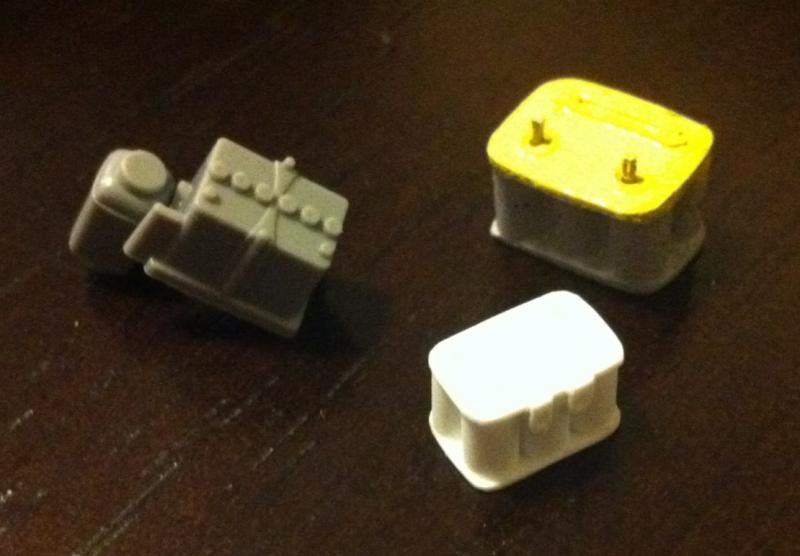 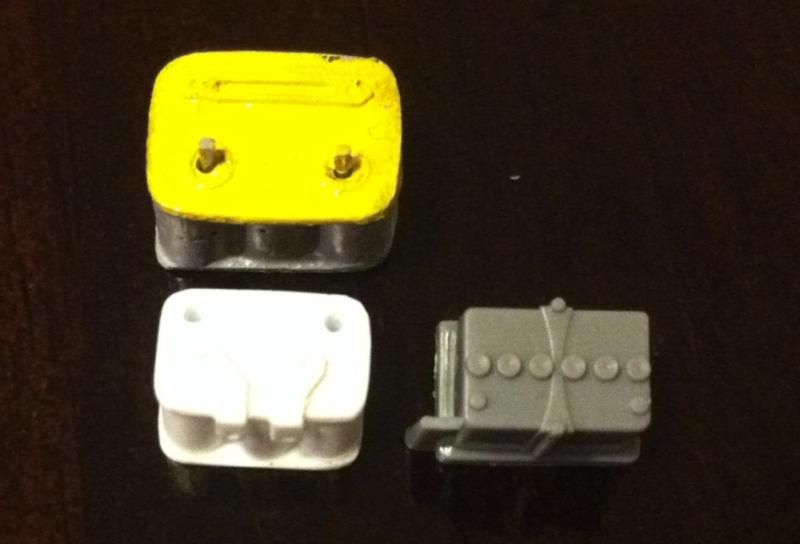 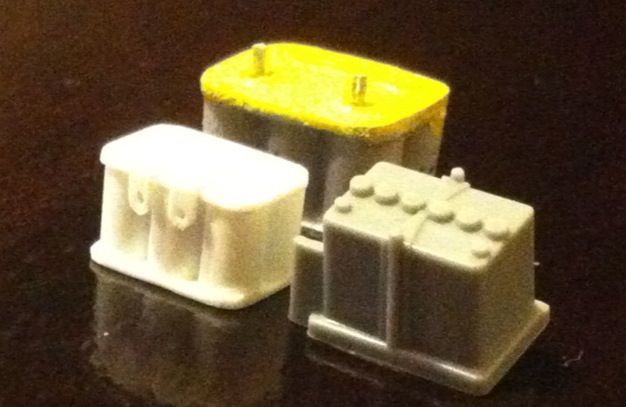 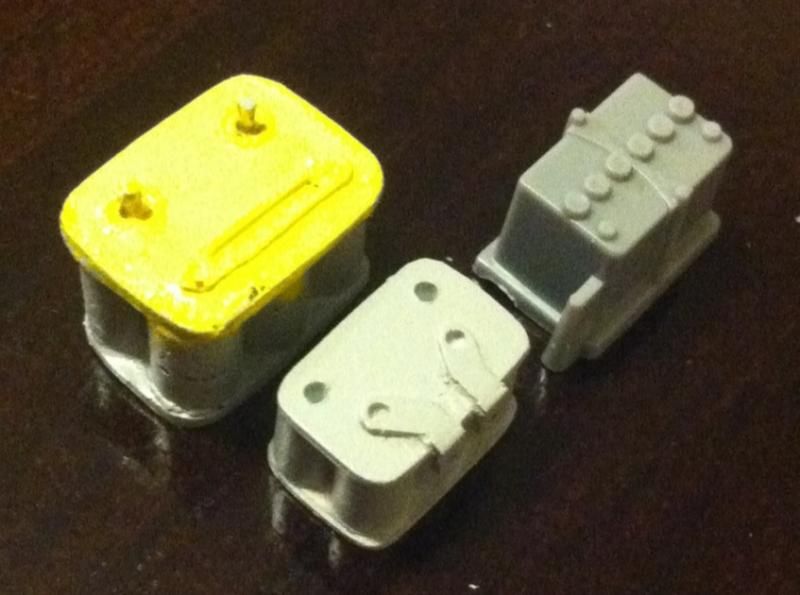 Again I'm satisfied with the outcome. Just need to add the battery terminals and paint. After the initial mock up I noticed that the exhaust manifold I had put so much time and effort into constructing wouldn't be seen. The hood on this car tilts forward so you won't be able to see the curvature of the piping which is what is visually eye catching about the manifold. My solution is to make a half sized radiator so at least the exhaust manifold can be seen through the grill of the front bumper. It's not much but at least it's possible. My time constraint lead me to just cutting the kit radiator in half.  Easy solution right? Well the front side of the radiator has ejector pin marks and even though you can't see them when it's installed it still bugs me. I can sand both halves and glue them together making a slightly thicker core similar to the koyo radiator I have on my real car or I can just leave it since it's not visible anyway. I'll make a decision about that later. Here are the last pics with the new components mocked up. 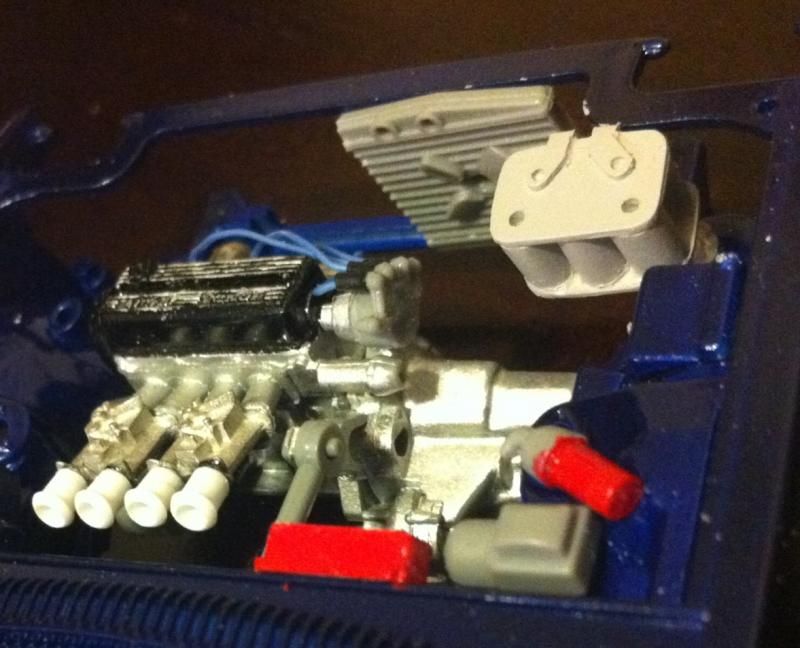 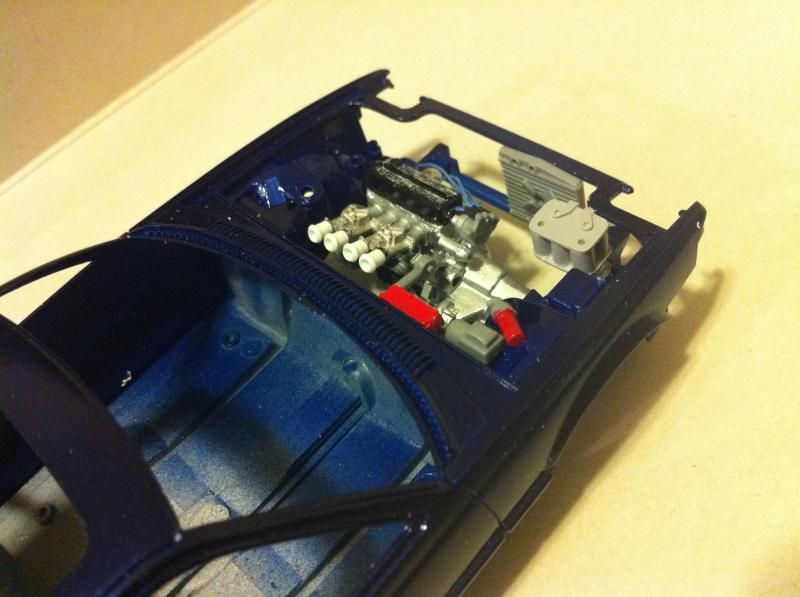 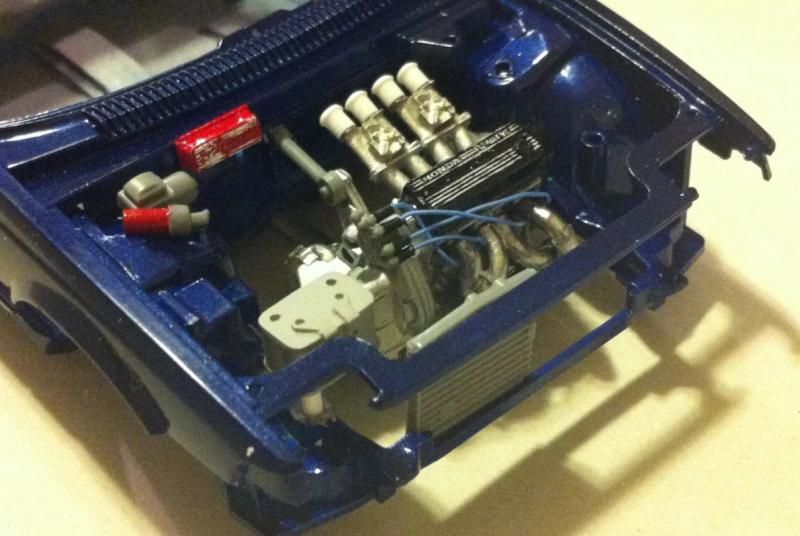 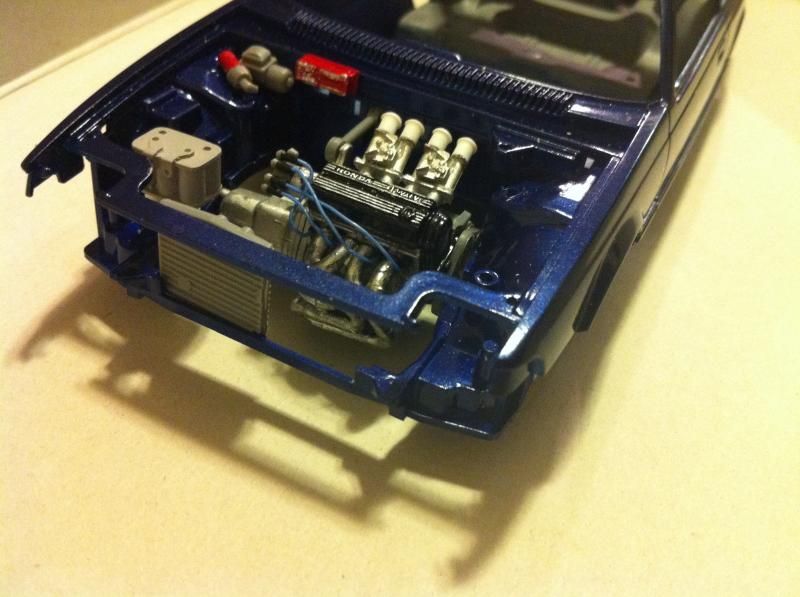 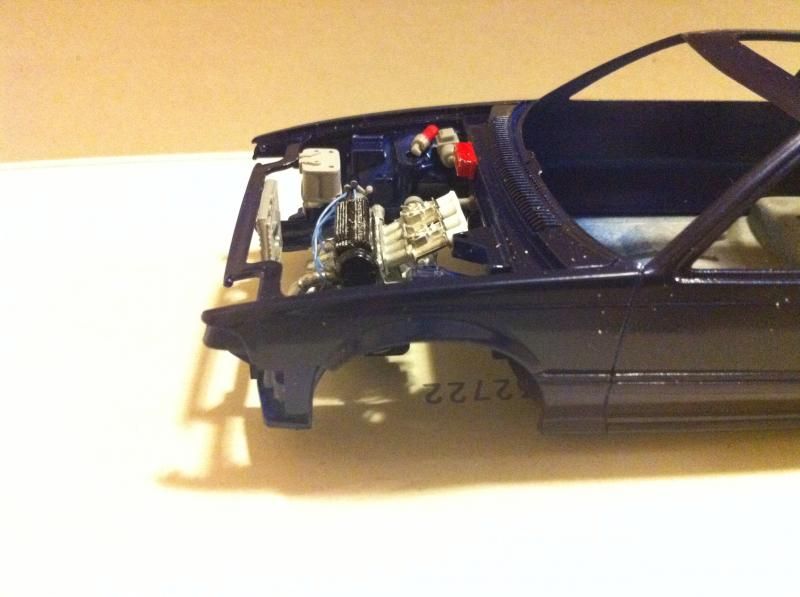
__________________
|
|
|
|
|
|
02-11-2015, 02:07 PM
|
#5 | |
|
AF Enthusiast
Thread starter
Join Date: Nov 2004
Location: San Diego, California
Posts: 833
Thanks: 2
Thanked 6 Times in 6 Posts
|
Re: My return to modeling: Tamiya Prelude XX
New update for today, I woke up extremely early and did a bit of work before I went to...work. I used some styrene rods, .75mm and 1.6mm to be exact, to make some fuel line fittings. Using a pin vise and drill bit I made the following pieces. My initial idea was just to cut and glue everything as needed by overall size but by drilling the holes and inserting longer lengths of the rod I was able to build a stronger piece and at the same time the extra lengths made it easier to handle. In this first picture you can't even tell what I'm doing yet but it'll make sense as you see the progression of the part(s).
 Here you'll see a couple of practice pieces on top with the 3 main pieces I was planning to use: 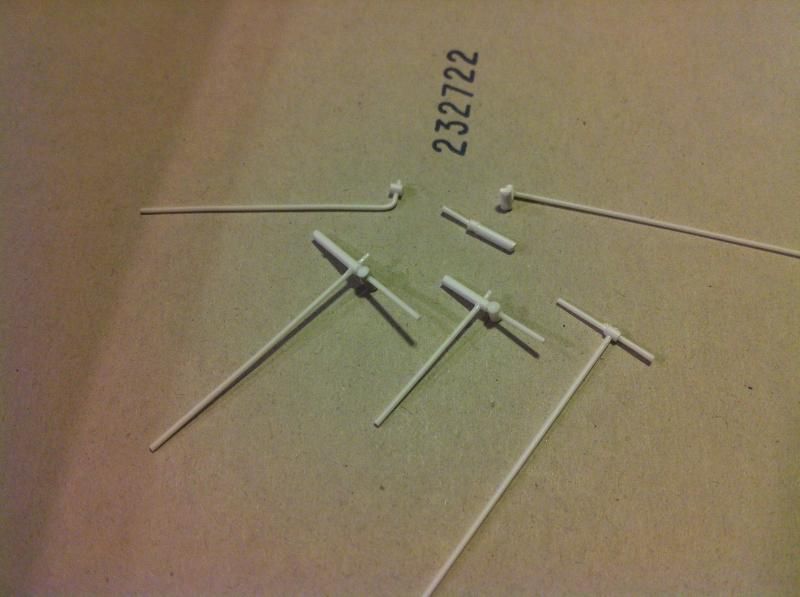 On the left of the following picture you'll see the nearly complete piece that has been trimmed down while on the right the raw piece is seen. At this point I also added 1mm hex rod on top:  And this point I felt it would be best to combine the final fitting with the t-connection I had made: 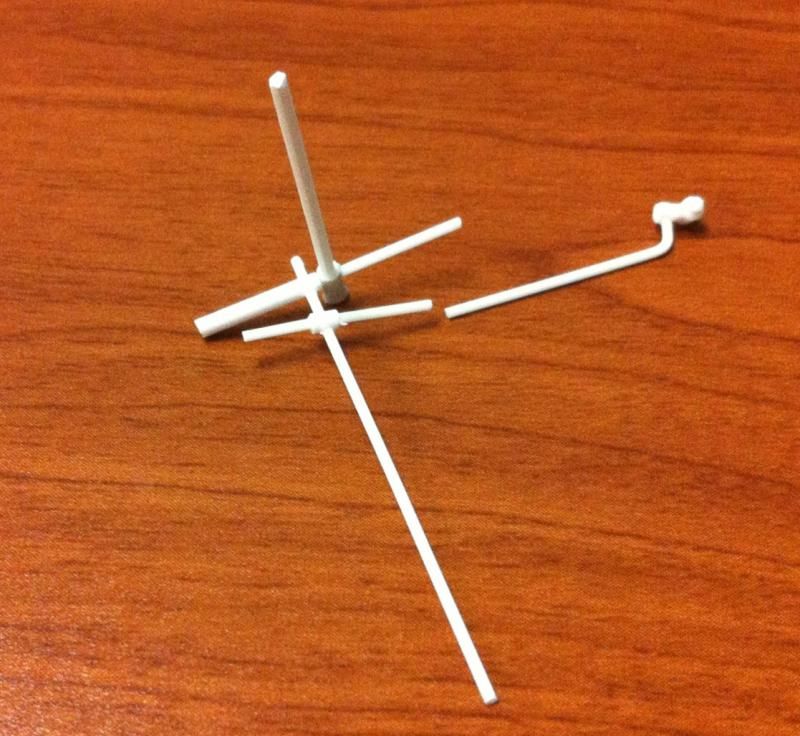 Trimmed down some more, you can see it taking shape now:  Added a hose to connect the two pieces: 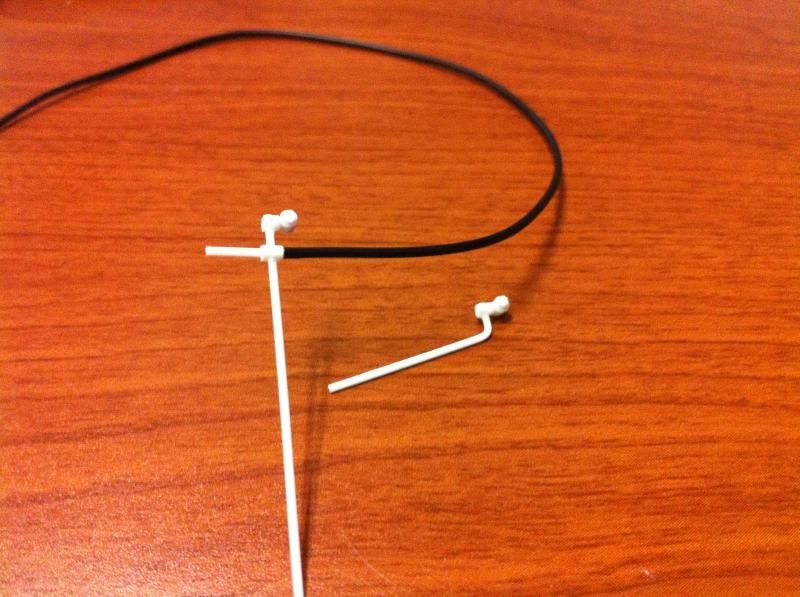 And now it's nearly complete. I left the extra length of rod for ease of handling until I was ready to glue it in place. 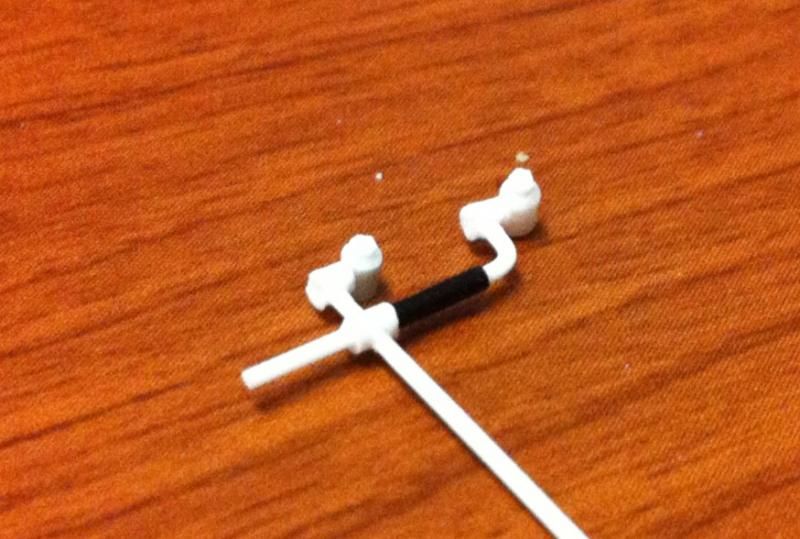 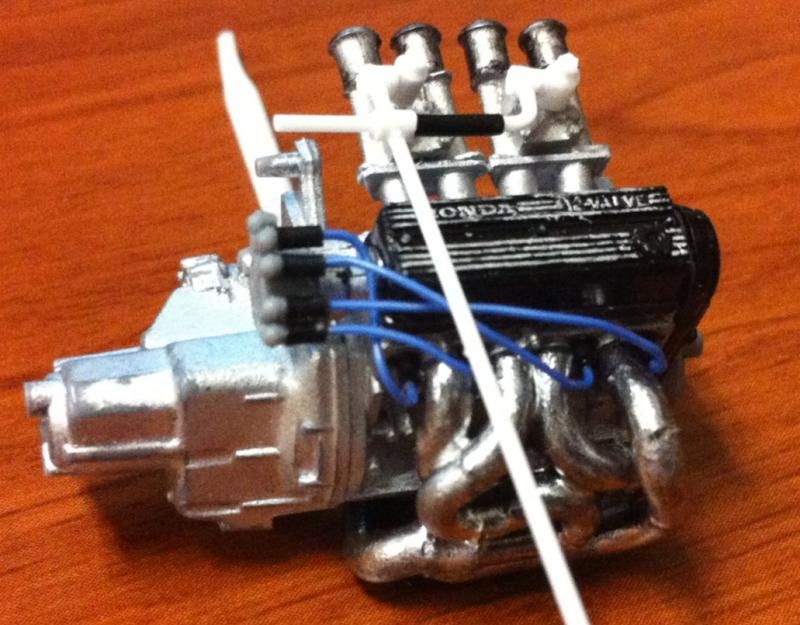 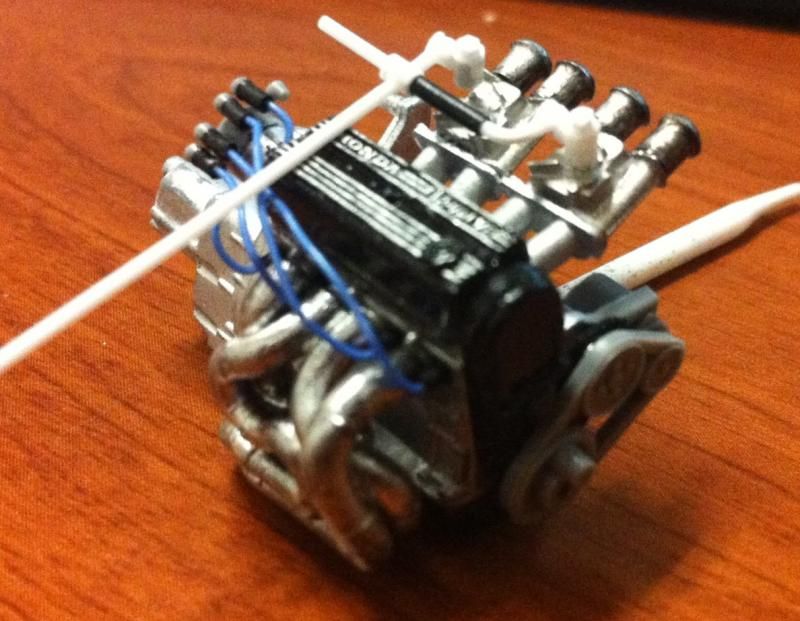 Satisfied with the outcome I trimmed off the extra length of rod and glued it in place. It's not perfect by any means but this is my first attempt at doing this so I'm content. 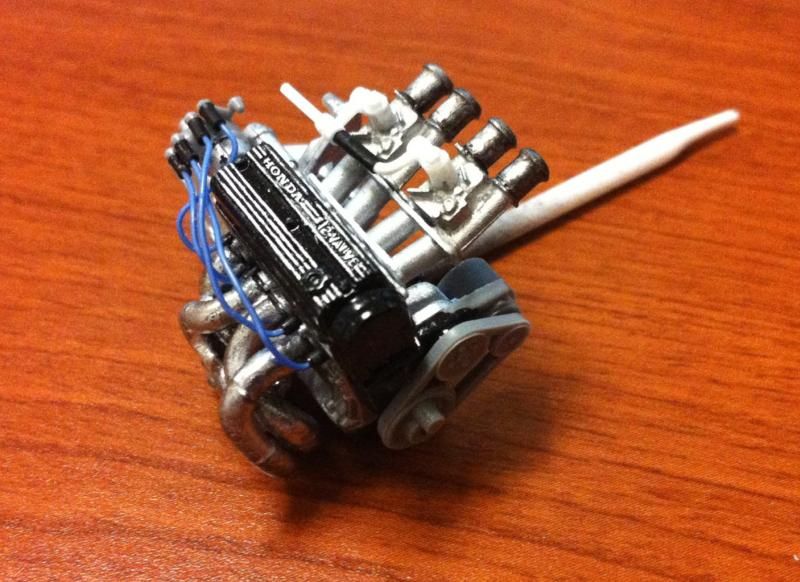 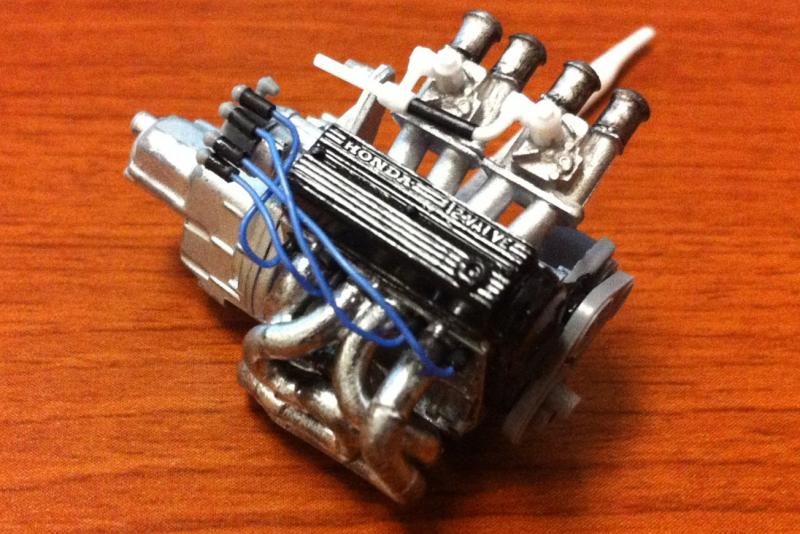
__________________
|
|
|
|
|
|
02-12-2015, 11:24 AM
|
#6 | |
|
AF Regular
Join Date: Aug 2008
Location: Santo Domingo, Massachusetts
Posts: 273
Thanks: 13
Thanked 8 Times in 8 Posts
|
Re: My return to modeling: Tamiya Prelude XX
I enjoy your work! NIce!!
|
|
|
|
|
|
02-12-2015, 01:33 PM
|
#7 | |
|
AF Moderator
 
Join Date: Jun 2002
Location: Cincinnati, Ohio
Posts: 12,565
Thanks: 363
Thanked 47 Times in 43 Posts

|
Re: My return to modeling: Tamiya Prelude XX
Looks to be quite a nicely detailed build so far!!!

__________________
http://public.fotki.com/tonioseven/ |
|
|
|
|
|
02-13-2015, 12:50 AM
|
#8 | |
|
AF Enthusiast
Thread starter
Join Date: Nov 2004
Location: San Diego, California
Posts: 833
Thanks: 2
Thanked 6 Times in 6 Posts
|
Re: My return to modeling: Tamiya Prelude XX
Thanks for the compliments guys.
Small update for tonight. I thought I'd try to run brake lines in the engine bay but doing so I would need to scratchbuild the proportioning valve. Unfortunately at this time I'm only capable of creating it slightly bigger than it should be. I went forward just to see what it would look like. It took about 2 hrs for the three attempts. 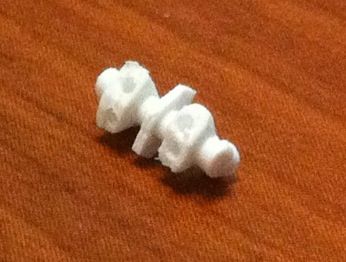 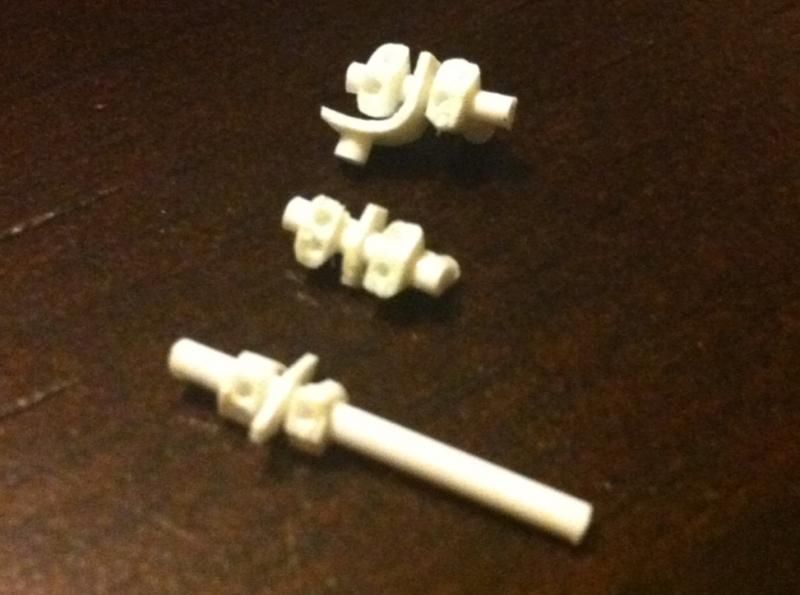 And here it is mocked up along with the brake master cylinder. 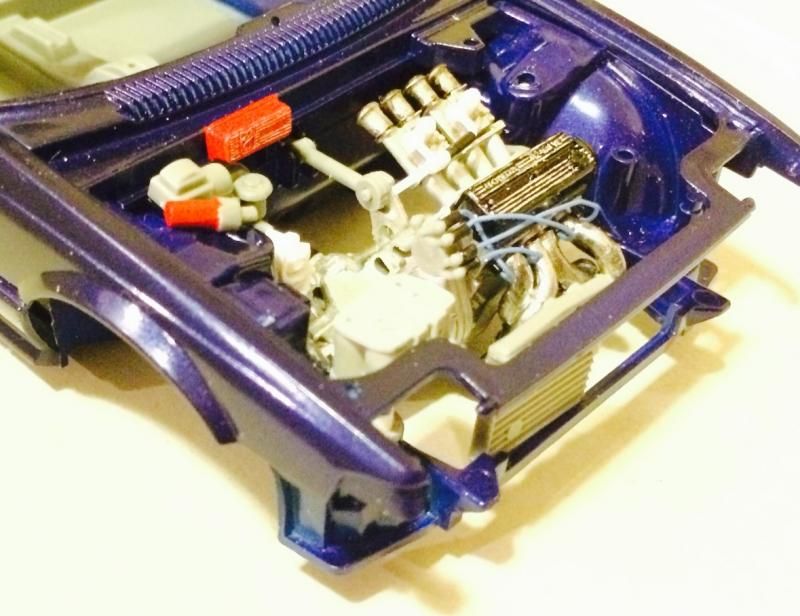 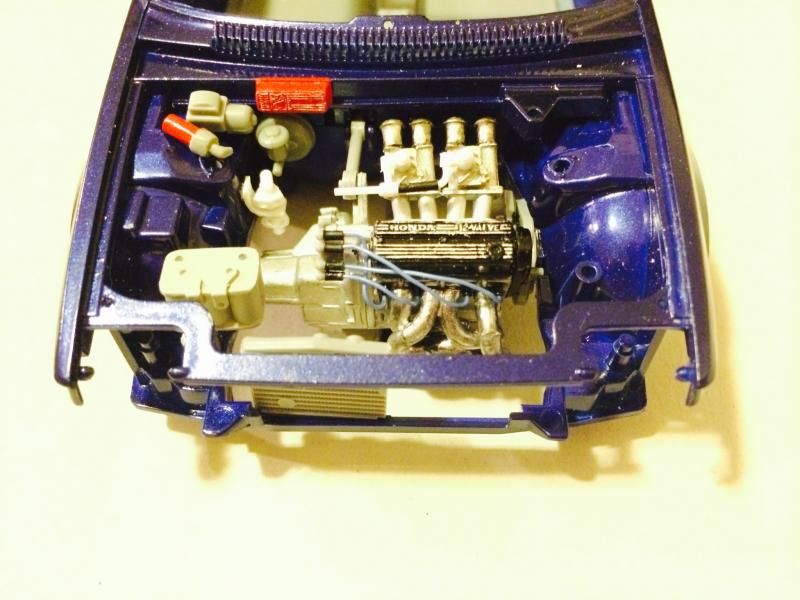 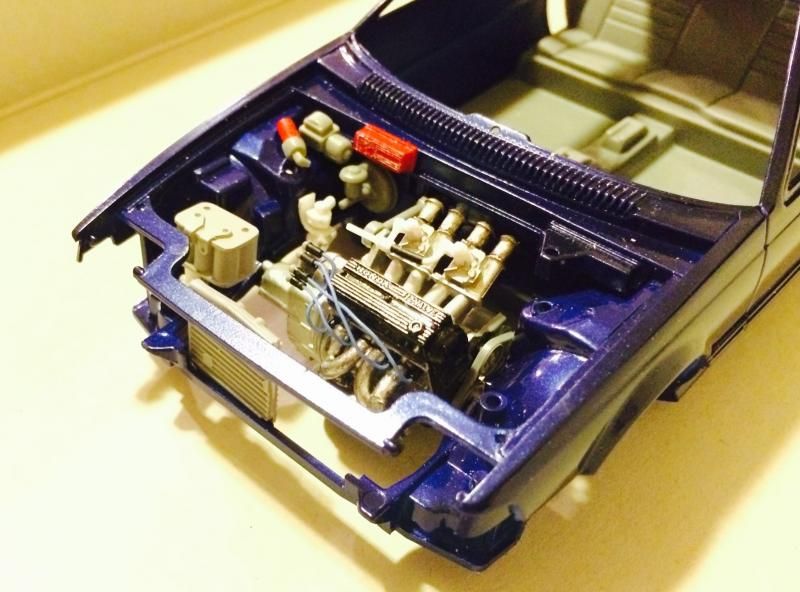 Hopefully I'll have the brake lines in place by the next update.
__________________
|
|
|
|
|
| The Following User Says Thank You to mrceej For This Useful Post: |
Zyraf82 (02-13-2015)
|
|
02-17-2015, 03:39 AM
|
#9 | |
|
AF Enthusiast
Thread starter
Join Date: Nov 2004
Location: San Diego, California
Posts: 833
Thanks: 2
Thanked 6 Times in 6 Posts
|
Re: My return to modeling: Tamiya Prelude XX
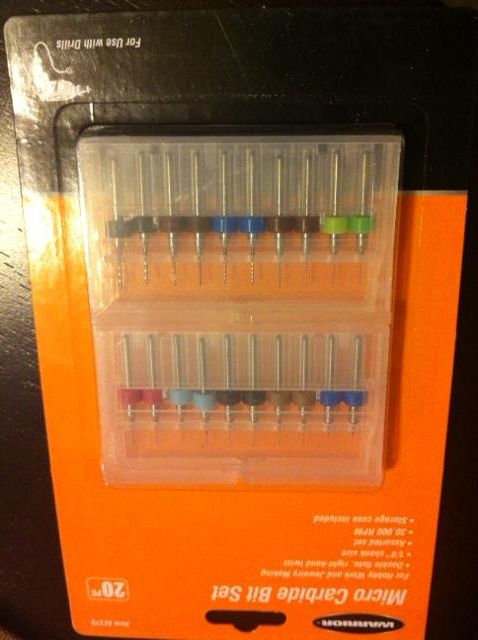
Week 3 has passed and I have some new tidbits that I worked on. Last post I added the brake proportioning valve and although I liked it visually on it's own I just couldn't stand how big it was. I went out and bought some micro drill bits from Harbor Freight which allowed me to make the valve the size I wanted. They only cost about $10-$11 so if you don't have these I'd recommend grabbing a set as they come in handy.
 Here is the new brake proportioning valve mocked up, such a big difference compared to the other one: 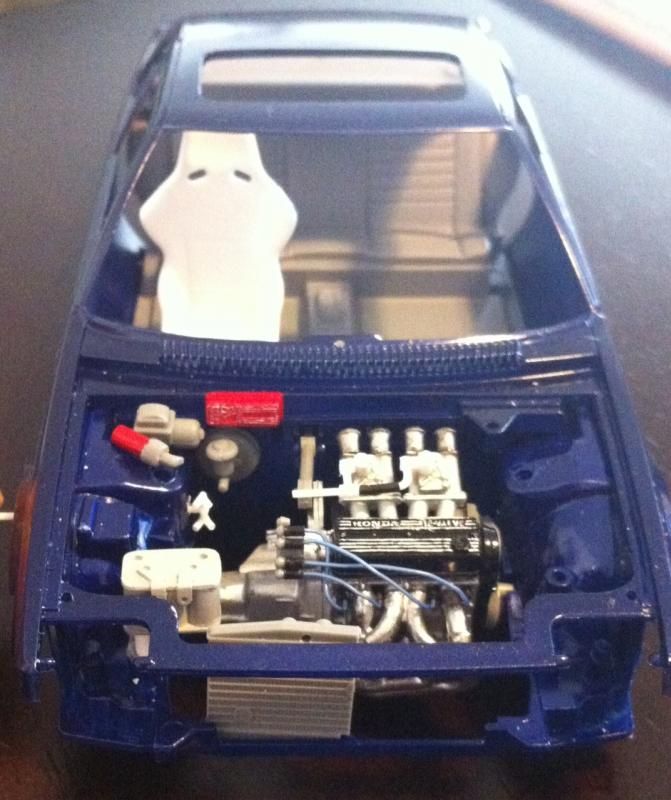 So the next thing I wanted to do was run the brake lines but found that I should finish everything around the bay and do the lines last as these will have to snake around any objects that are mounted close by. So instead of the brake lines I focused on the battery, more specifically how it will be mounted. I needed a new battery tray and I figured I might as well make a decent battery tie down while I was at it. Here is the basic tray and battery tie down: 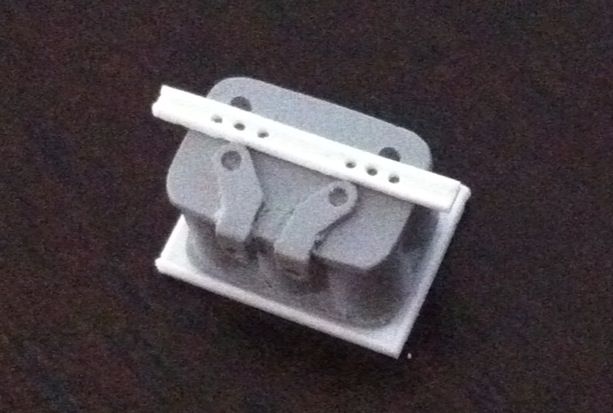 Both the tray and tie down are made from a piece .020in styrene sheet edged with .010x.010 styrene strip. Didn't turn out half bad and those micro drill bits came in handy for the tie down. 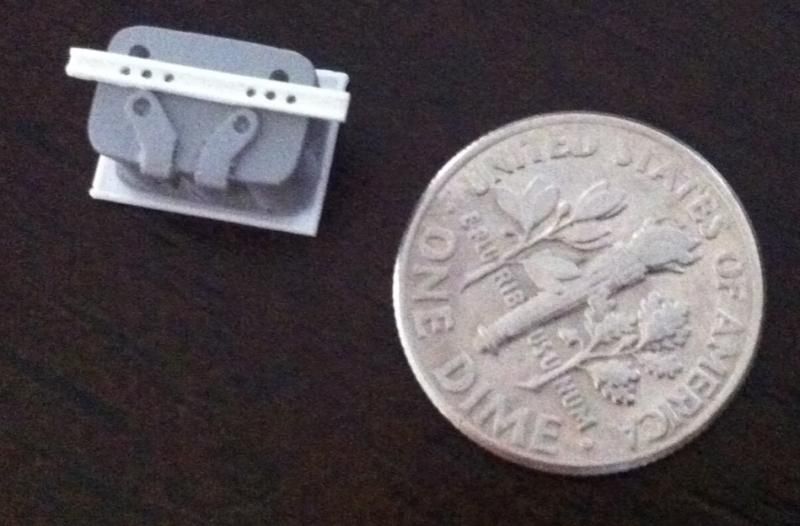 And here is the finished tray along with the battery painted. I also fabricated a fuse panel cover because the kit has it molded into the engine bay. Doing this little piece separate adds so much more depth and also allowed me to make it a bit more accurate compared to the generic box shape that the kit has molded in. 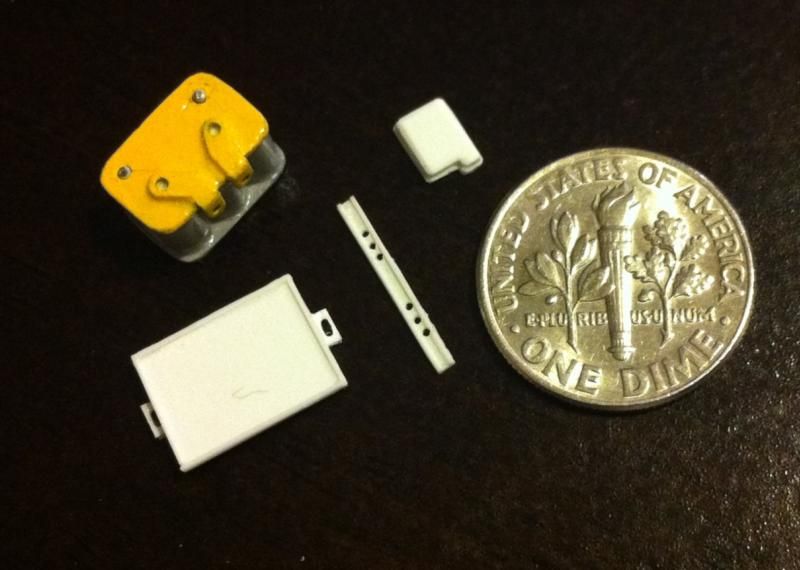 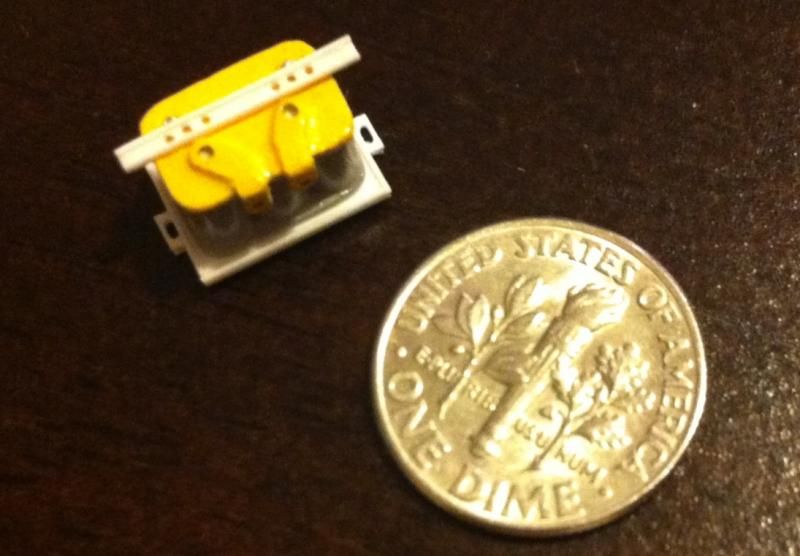 Off subject, this past weekend was Valentine's Day and I decided to pick up a new camera for my wife as her gift. She was nice enough to let me use it so the remaining pictures are using the new camera. Pictures are much clearer now! Finally got to mock up the battery fully painted with it's decal in place. If you look closely the black square around the "A" in OPTIMA came off so I'll need to do a bit of touch up with some black paint later on.  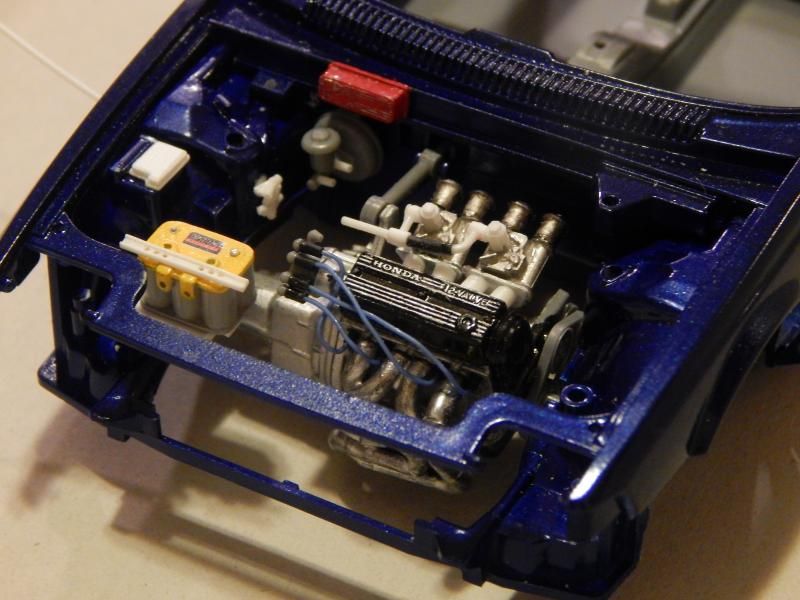  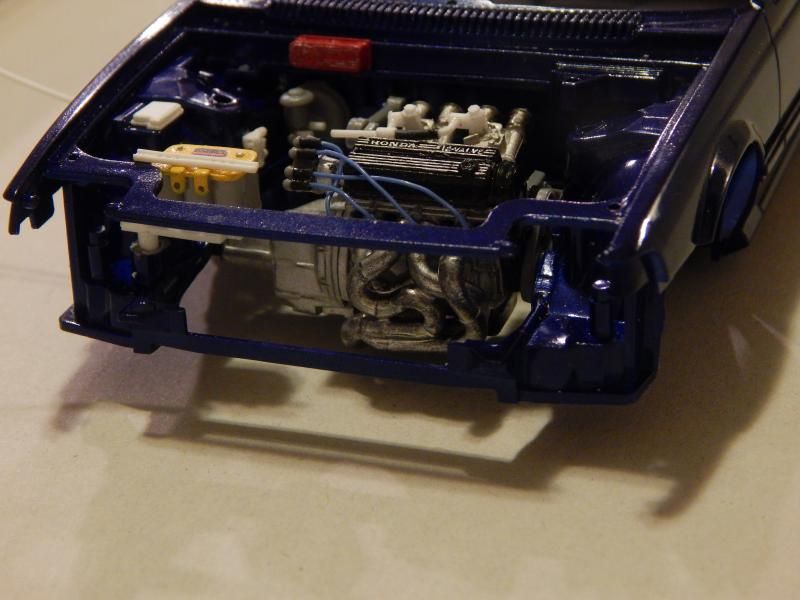 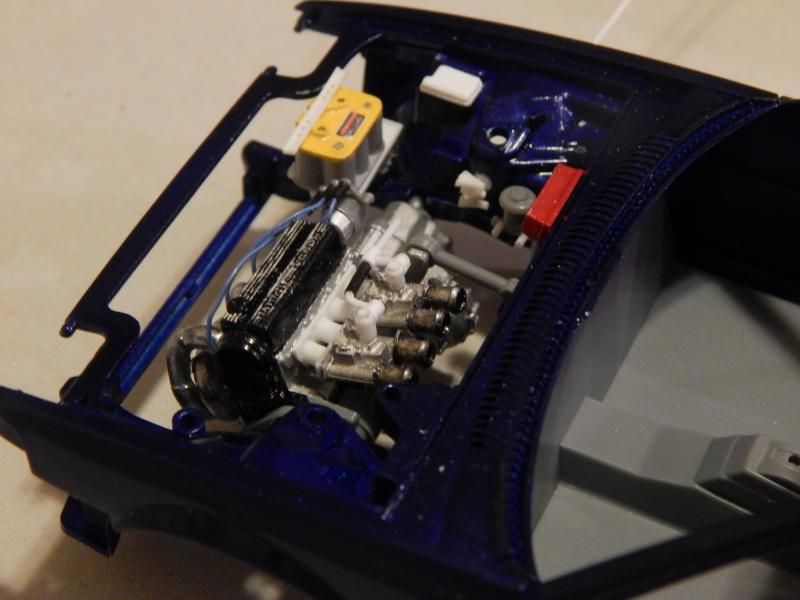 Testing out the close up capabilities of the new camera: 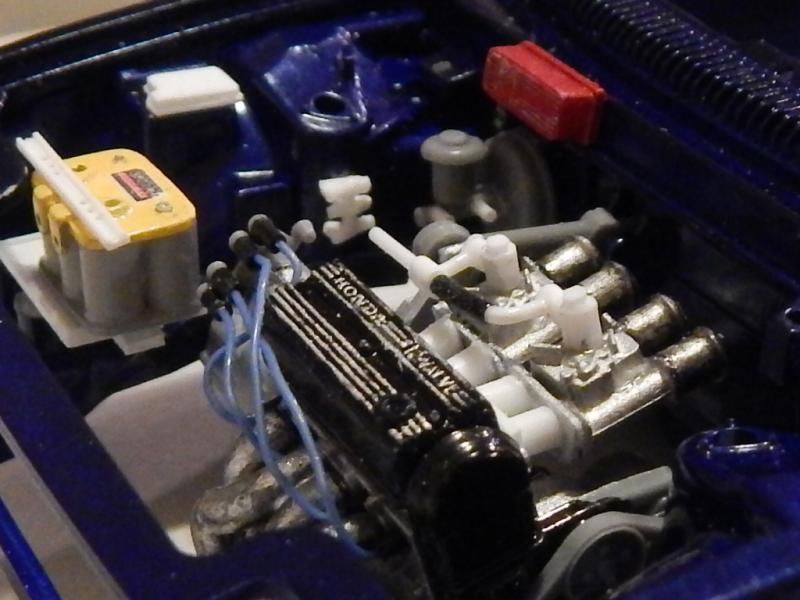 Here you can see I have the brake master cylinder prepped for the hard lines and you can also see where the rear brake hard lines will terminate on the firewall: 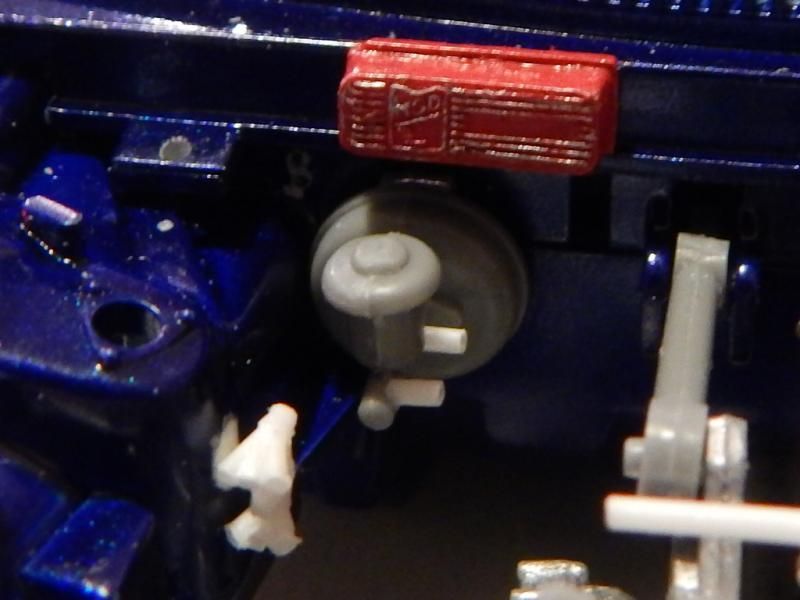 That's all I have for this update. I believe in the next update I'll have the plug wires corrected as the new micro drill bits will allow me to make some decent replacement plug ends out of styrene instead of the black hose seen in the pictures so far. Also I plan to fabricate the remaining fuse box/panel covers and then run 4 of the 6 hard lines for the brakes. Hope you guys are enjoying what is taking shape and if you have any comments/suggestions or constructive criticisms please speak freely. The competition is still a little while away but it feels like it's coming up fast!
__________________
|
|
|
|
|
|
02-17-2015, 11:49 AM
|
#10 | |
|
Blarg! Wort Wort Wort!
Join Date: Mar 2006
Location: Quezon City
Posts: 2,120
Thanks: 64
Thanked 101 Times in 100 Posts
|
Re: My return to modeling: Tamiya Prelude XX
wow, all that detailing!
__________________
olly olly oxen free |
|
|
|
|
|
02-17-2015, 11:53 AM
|
#11 | |
|
AF Enthusiast
Thread starter
Join Date: Nov 2004
Location: San Diego, California
Posts: 833
Thanks: 2
Thanked 6 Times in 6 Posts
|
Re: My return to modeling: Tamiya Prelude XX
Thank you fellow modeler from my motherland
 . I forgot to mention up above that I redid the intake manifold adapter for the carbs. I originally had them slightly angled upwards and the hood still closed but I made a new one to allow for some clearance in case I decide to add a strut tower bar later on (still undecided on that). . I forgot to mention up above that I redid the intake manifold adapter for the carbs. I originally had them slightly angled upwards and the hood still closed but I made a new one to allow for some clearance in case I decide to add a strut tower bar later on (still undecided on that).
__________________
|
|
|
|
|
|
02-17-2015, 12:35 PM
|
#12 | |
|
AF Fanatic

Join Date: Feb 2004
Location: Hartford, Connecticut
Posts: 5,601
Thanks: 7
Thanked 108 Times in 103 Posts
|
Re: My return to modeling: Tamiya Prelude XX
Great work.....welcome back......we need more people coming back from their hiatus and post.
__________________
In Progress    
|
|
|
|
|
|
02-17-2015, 07:23 PM
|
#13 | |
|
AF Enthusiast
Thread starter
Join Date: Nov 2004
Location: San Diego, California
Posts: 833
Thanks: 2
Thanked 6 Times in 6 Posts
|
Re: My return to modeling: Tamiya Prelude XX
Thanks buddy, another familiar name from way back when.
__________________
|
|
|
|
|
|
02-22-2015, 08:36 PM
|
#14 | |
|
Sweet, sweet tiny Hondas.
 Join Date: Jul 2003
Location: Austin, Texas
Posts: 5,723
Thanks: 50
Thanked 89 Times in 65 Posts
|
Re: My return to modeling: Tamiya Prelude XX
Woah, there are not a lot of this kit getting built so well! Your detail scratchbuilding is incredible! Your fuel system is awesome, the brake parts are great, and you really did handle that battery perfectly. So much better proportioned and better looking. This is going to be a great little model!
__________________
It ain't cool 'till your wife hates it. Imagine a world without Alabama Recent builds: Rocket Bunny FR-S and stock BRZ Toyota bB Bro-style Civic K20 powered SiR converted EK WIP I build slowly and poorly. 
|
|
|
|
|
|
02-24-2015, 12:52 PM
|
#15 | |
|
AF Enthusiast
Thread starter
Join Date: Nov 2004
Location: San Diego, California
Posts: 833
Thanks: 2
Thanked 6 Times in 6 Posts
|
Re: My return to modeling: Tamiya Prelude XX
Thanks willimo, you're one of the builders I followed back in the day so that means a lot to me. I still remember the shock I felt when my resin RNRs ended up on your hatchback model. I was stunned because I sent them to someone else haha
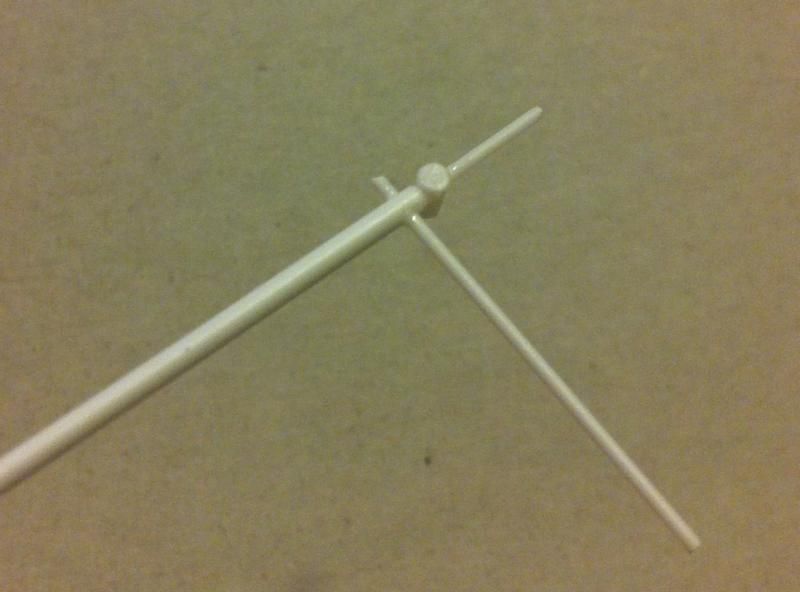
New update. A little more progress. First two pictures show the new battery tray installed and painted along with the initial mock up of the brake lines: 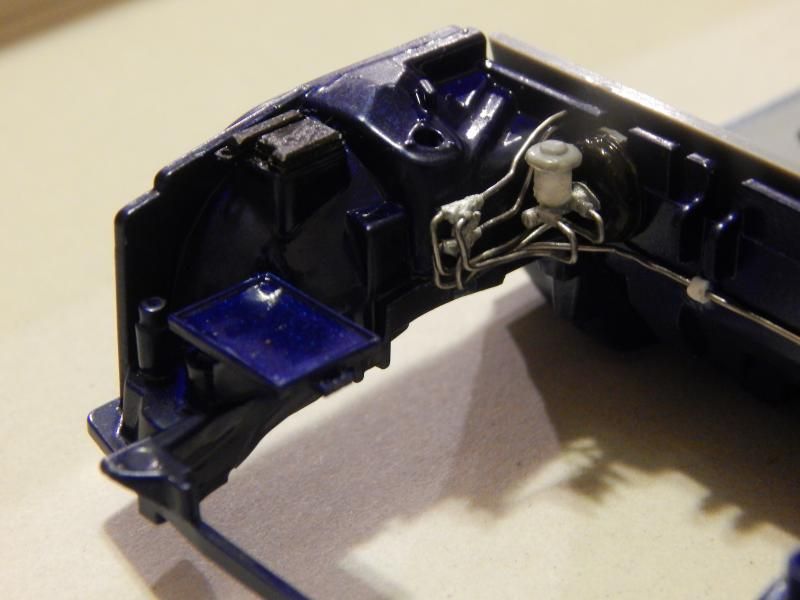  Then I put the engine and battery in to make sure all was good:  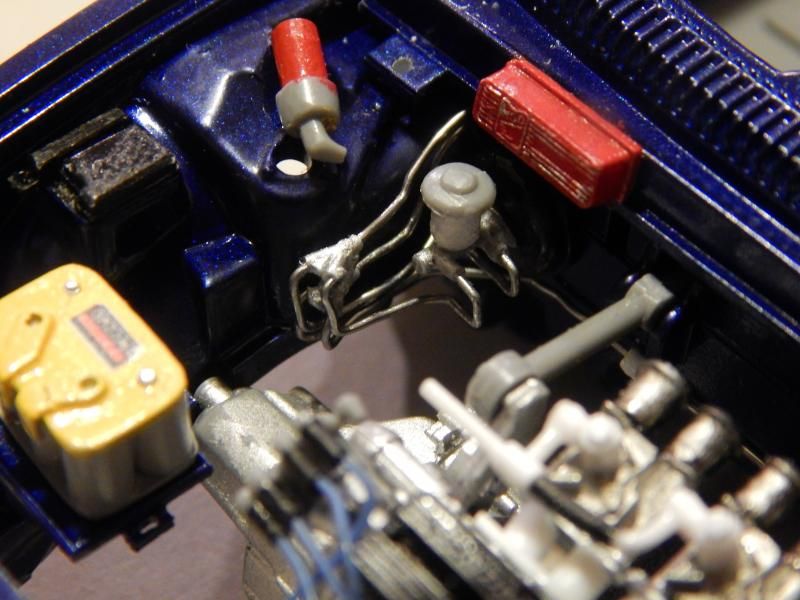 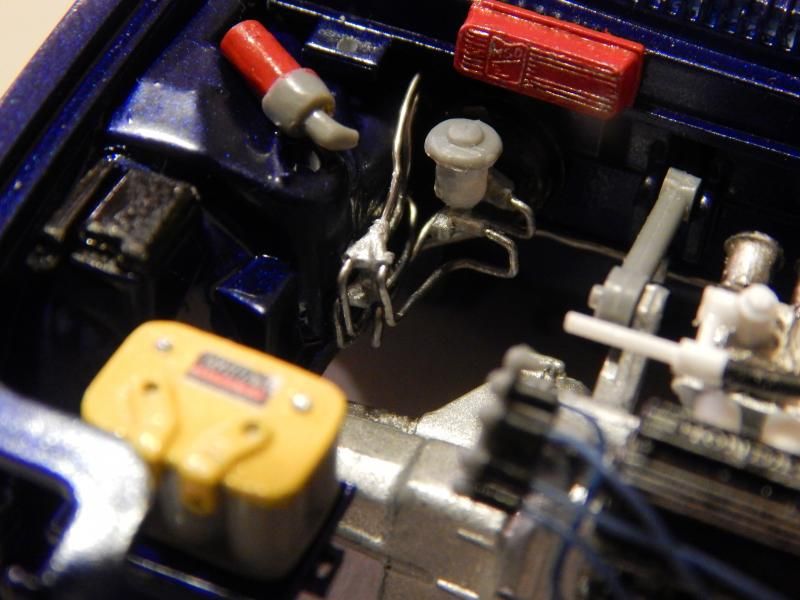 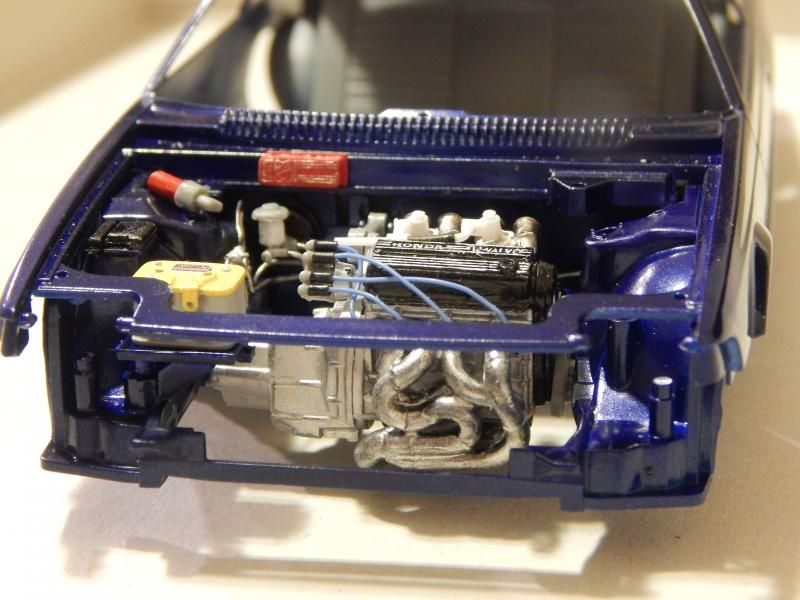 Feeling pretty content but I might redo the brake lines in brass rod. The sakatsu lines were very soft which was good for shaping but lost some of the original bend radii that I had initially created. Speaking of brass rod, here's my first attempt at hinging a hood. I created the hinge as straight forward as could be (worth noting is the hood hinges forward from the factory on the real car). 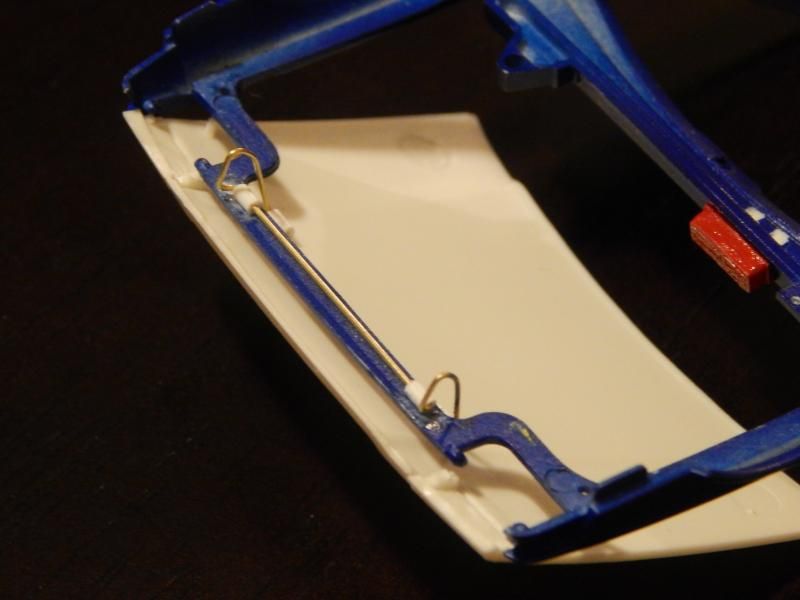 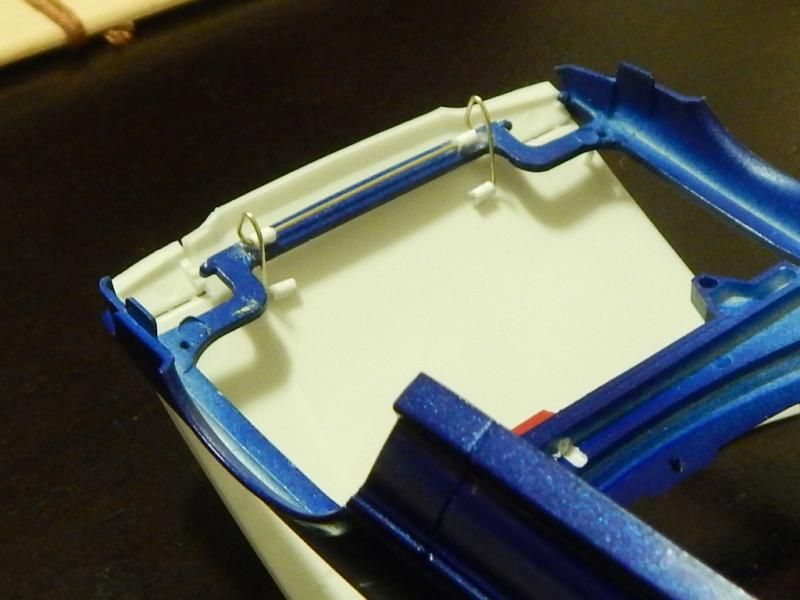 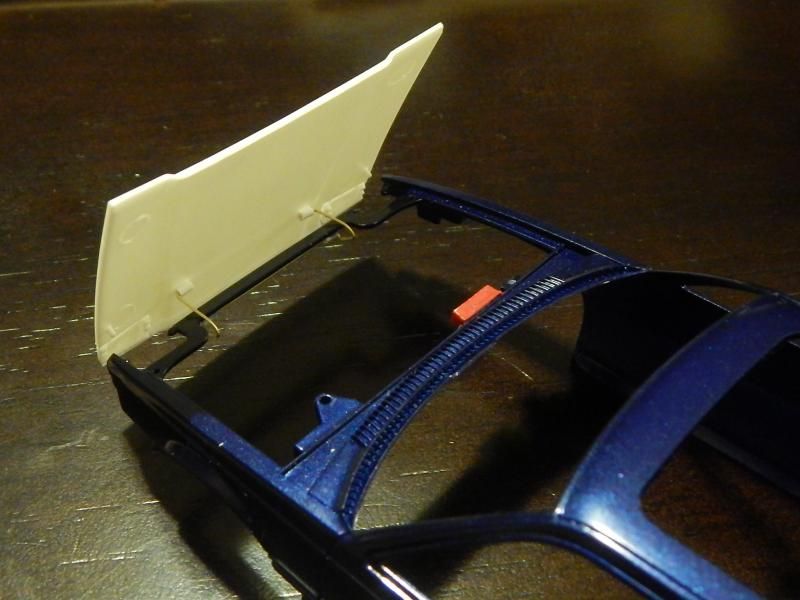 It works! Moving back to the engine once again, I tried to address the plug wire boots. I started by creating the individual boots seen here: 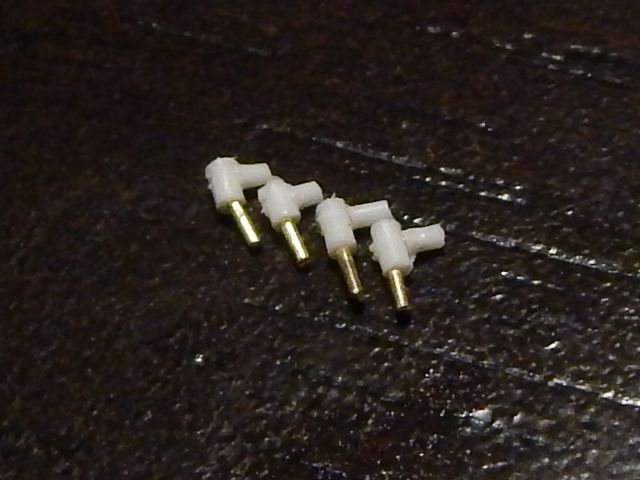 Then decided to make more without the pin, instead opting to recreate the distributor with the pins on that piece: 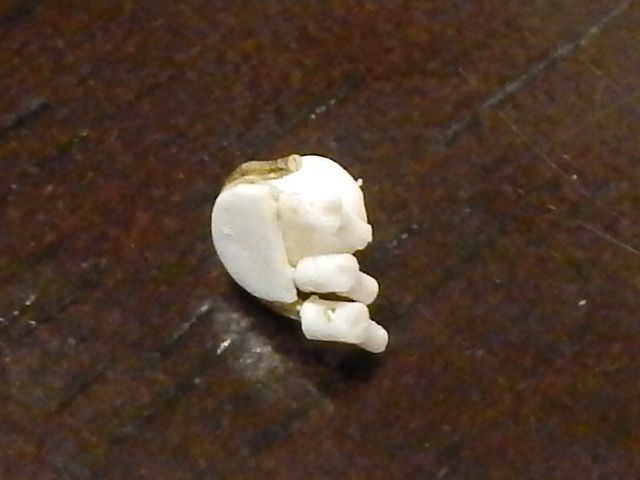 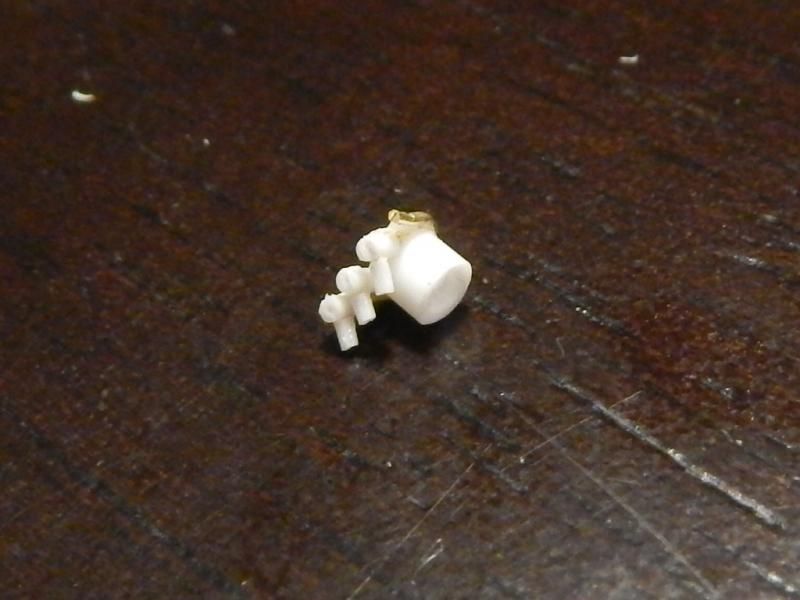 That's as far as I was able to make it because my eyes hurt. One more boot to go and then I can install it on the engine.
__________________
|
|
|
|
|
|
|
POST REPLY TO THIS THREAD |
 |
|
|

