|
|
|

|
|
| Search | Car Forums | Gallery | Articles | Helper | Air Dried Dog Food | IgorSushko.com | Corporate |
|
| Latest | 0 Rplys |
|
|||||||
 |
 Show Printable Version | Show Printable Version |  Email this Page | Email this Page |  Subscribe to this Thread
|
|
|
Thread Tools |
 01-24-2006, 10:02 PM
|
#1 | |
|
AF Enthusiast

Join Date: Mar 2005
Location: bowling green, Kentucky
Posts: 600
Thanks: 2
Thanked 1 Time in 1 Post
|
wiping my rear (a how-to w/ lotsa pics!)
For years now, I've had difficulties wiping my rear.
Of course, my girlfriend is able to wipe up-front, but I've never been able to wipe my rear. In my Jimmy, when I try to wipe my rear, I always hear a grinding sound. Finally, I found a rear-wiper motor on EBAY for 20 BUCKS! Woohoo! Darn good price! Now, when my backside is dirty ... I'll be able to wash and wipe! Here's how to replace your rear-wiper motor. It's not a difficult thing to do but perhaps this will give the less-then-mechanically-inclined person the knowledge and confidence that it's possible to do by themselves. Here's the EBAY motor that will go in: 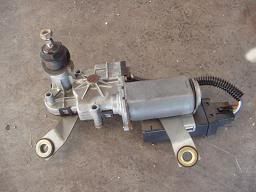 Here's the 97 Jimmy: 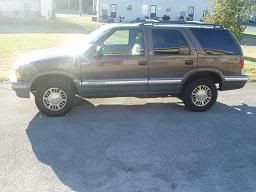 Here's the gaping rear: 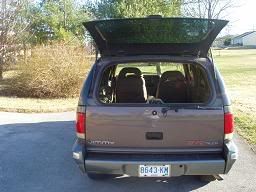 Here's the tools you'll need. Phillips screwdriver, 4mm hex, 10mm and 13mm sockets or nutdrivers, 10mm wrench, large pliers: 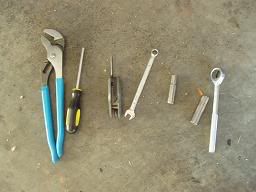 STEP 1: Open the glass-hatch and remove this Phillips screw ... 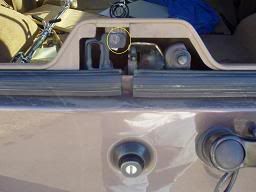 STEP 2: Open the whole rear-hatch. Lift the inside hatch-handle. Remove the screw that is up in there. It is a torx, but my 4mm hex key worked perfectly.  STEP 3: with the whole rear-hatch open, remove trim. After removing the screw and bolt from STEP 1 and 2, the trim is only held in place by "friction clips" (sorry I don't know the technical name). Just tug on the plastic trim and it'll just pop right out. Be careful not to force anything too much. Work your way gently around the whole trim. I started here ... 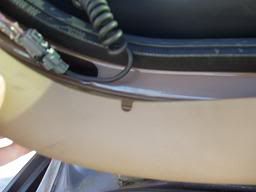 Once the trim is out, it's a good opportunity to clean with soap and water. 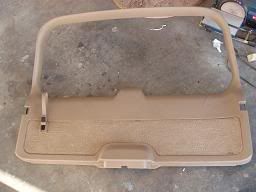 STEP 4: remove these two Phillips screws. This will give you room to slide the motor out. Trust me, this makes it easier. Even though I didn't, this would be a good time to disconnect your negative battery cable just to be safe. 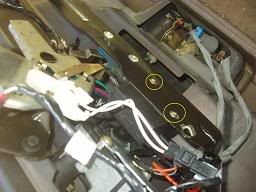 STEP 5: remove this electrical clip. Just this one, not both. 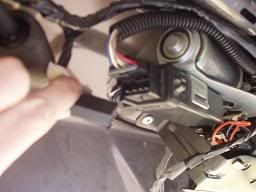 STEP 6: Now there are two 10mm bolts to remove. The first one is easy. 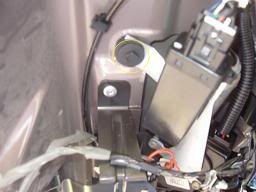 Here's how I go to the second one with the 10mm wrench. The rear-hatch is up. Takes some patience though ... 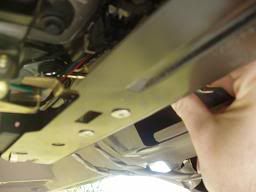 STEP 7: Now pull the rear-hatch down and remove this rubber boot with your fingers ... 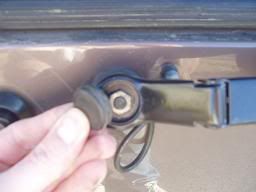 STEP 8: simply pull on the rubber washer line to remove ...  It's a good idea here to double-check your plastic washer line. Trace it back as far as you can and make sure you don't find any wet leaks. In the past, mine had disconnected under the trim and was squirting fluid in between the trim and the body. The plastic line is in sections and had come apart. The line is taught and tolerances are tight but I managed to re-connect. STEP 9: Remove the 13mm nut and the whole wiper. Then use pliers to remove the large plastic nut. Use your fingers and pry out the rubber pieces. Take note of how they go togther and their orientation. 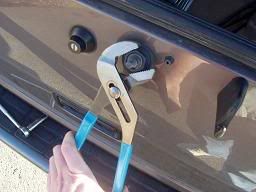 STEP 10: The rear-wiper motor should now slide right out. STEP 11: installation is the reverse of removal. To re-install the plastic trim, I'd recommend raising the rear-hatch and beginning pushing close to the latch. Simply push it into place. It will click when it catches. Work your way around slowly. Don't forget to replace the screw and bolt from STEP 1 and 2!  Watch that these wires are routed around the trim ... 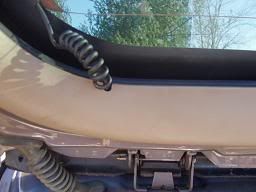 STEP 12: SMILE AS YOU WASH-AND-WIPE YOUR REAR! Other thread titles for this post include: *Finally, I can wipe ... *It's been difficult to wipe lately ... *Trouble wiping *20 bucks to wipe! *wiping my backside ... |
|

|

|
|
03-25-2006, 10:17 PM
|
#2 | |
|
AF Newbie
Join Date: Mar 2006
Location: sound beach, New York
Posts: 3
Thanks: 0
Thanked 0 Times in 0 Posts
|
Re: wiping my rear (a how-to w/ lotsa pics!)
hi
before i picked up my 96 Jimmy when I ran the car fax report I found out that some of them were recaled for bad solderjoints on the pc board. so its kind of comon with them.( mine works sometimes its on the fix list) dom  |
|
|
|
|
|
03-26-2006, 01:39 AM
|
#3 | ||
|
AF Enthusiast
Thread starter
Join Date: Mar 2005
Location: bowling green, Kentucky
Posts: 600
Thanks: 2
Thanked 1 Time in 1 Post
|
Re: wiping my rear (a how-to w/ lotsa pics!)
Quote:
I thought the pc boards were for front wipers only. Also, there was a recall awhile back but, I forget the details ... I'd have to look it up ... |
||
|
|
|
|
03-26-2006, 02:25 AM
|
#4 | |
|
AF Newbie
 Join Date: Feb 2006
Location: glendale, Arizona
Posts: 22
Thanks: 0
Thanked 0 Times in 0 Posts
|
Re: wiping my rear (a how-to w/ lotsa pics!)
Man, did I get the wrong impression when I read the title to this post. Thought i was gonna see pics of a big hairy butt. Thanks for the laugh
 |
|
|
|
|
|
03-26-2006, 03:17 PM
|
#5 | |
|
AF Regular
 Join Date: Dec 2005
Location: Sault Ste Marie
Posts: 243
Thanks: 0
Thanked 0 Times in 0 Posts
|
Re: wiping my rear (a how-to w/ lotsa pics!)
Cool writeup, wish I had this info when I did mine. I bought a chiltons because I wanted an outline of where all the "secret" screws and special clips would be hidden, know what Mr. Chiltons told me for the write-up? "Remove rear plastic mouldings, remove rear wiper motor, replace with new wiper motor, re-assemble reverse of removal." ??!?! Wtf? Not a single peice was listed in the chiltons I bought. So I took it all apart 100% fine but did NOT know about the scre hidden by the 3rd brake light, and due to the mentality of those retarded clips "just pull a lil more to get it to snap out" I sure did snap the plastic off around that screw. DAMNIT! Ah well, the install went ok other than that.
Now if I could just figure out where my washer line blew, did I mention that everytime I use my rear wash nothing comes out of the rear wiper but rather pours out of my ceiling? lol. |
|
|
|
|
|
03-26-2006, 07:28 PM
|
#6 | |
|
AF Regular
 Join Date: Mar 2006
Location: pembroke pines, Florida
Posts: 181
Thanks: 0
Thanked 0 Times in 0 Posts
|
Re: wiping my rear (a how-to w/ lotsa pics!)
very thankfully disappointed, but what you wanted happened, i had to click on this link just because of the name!! but you knew that!! glad to see car parts, as i was worried one snuck my the moderator and i was goona see big hairy "bear behinds." great piks, great write up, wish there were more like you . thanks for the procedure. chilton always assumes your a journeyman/master mech., and is light on things like "you have to wedge the wrench under the roof bracket and force it over the nut........"
good one. |
|
|
|
|
|
03-26-2006, 07:46 PM
|
#7 | |
|
Problem?
 
Join Date: Dec 2004
Location: Florida
Posts: 6,248
Thanks: 63
Thanked 114 Times in 94 Posts
|
Re: wiping my rear (a how-to w/ lotsa pics!)
Oops wrong thread.
 |
|
|
|
|
|
02-20-2010, 08:39 PM
|
#8 | |
|
AF Newbie
Join Date: Jan 2010
Location: Chewelah, Washington
Posts: 3
Thanks: 0
Thanked 0 Times in 0 Posts
|
Re: wiping my rear (a how-to w/ lotsa pics!)
Thanks, very much. As soon as I get a motor and figure out how to get the hatch unlocked, (another recent problem), I'll give it a try. Plus I wo9uld like the weather to be about 70 degrees, sunny, and a cool one to sip on from time to time.
Best wishes, JJ |
|
|
|
|
|
03-01-2010, 09:51 PM
|
#9 | |
|
AF Newbie
 Join Date: May 2004
Location: mt morris, Michigan
Posts: 67
Thanks: 0
Thanked 0 Times in 0 Posts
|
Re: wiping my rear (a how-to w/ lotsa pics!)
I have done this tutorial step by step and tried 2 different wiper motors and I get nothing. The original motor come to find out is fine-- however sporatically I can hear the motor coming on even when switch is off-- what would be the plan of attack on this-- this thing has kicked me in the rear-- I WOULD LOVE TO WIPE IT-- gets dirty frequently!! HELP
|
|
|
|
|
|
|
POST REPLY TO THIS THREAD |
 |
|
|

