

|
| Search | Car Forums | Gallery | Articles | Helper | Quality Dog Food | IgorSushko.com | Corporate |
|
| Latest | 0 Rplys |
|
|||||||
| How-to | Technical Info A wealth of information at your disposal. |
 |
 Show Printable Version | Show Printable Version |  Email this Page | Email this Page |  Subscribe to this Thread
|
|
|
Thread Tools |
|
|
#1 | |
|
AF Newbie
Join Date: Oct 2006
Location: bolivia, North Carolina
Posts: 58
Thanks: 0
Thanked 0 Times in 0 Posts
|
floppy steering wheel
sons 89 has a floppy steering wheel. out of nowhere it stays flacid neither of us have had to work on a steering colum before p.s. it's a tilt wheel
 |
|
|
|

|
|
|
#2 | |
|
AF Enthusiast
 |
Re: floppy steering wheel
Going to need WAY more info then that
__________________
2002 Pontiac Gram Am K&N Air Filter Mobil1 5W-30 Extended 15K 2 JL Audio 12" Subs Sealed JL Audio Box Coustic 400 Watt Class D Mono Amp Pioneer Head Unit 50X4 MP3, WMA, AAC Super Tuner Polk DB750 6.5" all around Yankees Suck!!!!!!!! |
|
|
|

|
|
|
#3 | |
|
AF Newbie
Thread starter
Join Date: Oct 2006
Location: bolivia, North Carolina
Posts: 58
Thanks: 0
Thanked 0 Times in 0 Posts
|
Re: floppy steering wheel
89 S-10 w/tilt wheel,wheel will not lock in the up position just kinda flops around , but you can still steer with it
 (at least for now) whatever info you need let me know, my sons in a panic! (at least for now) whatever info you need let me know, my sons in a panic! |
|
|
|

|
|
|
#4 | |
|
Registered Offender
 Join Date: Mar 2006
Location: Rural
Posts: 6,562
Thanks: 8
Thanked 346 Times in 341 Posts
|
Re: floppy steering wheel
Your truck will be a little easier than some since there is no VATS wiring and SIR coil/wiring/gas bag. If you have VATS, there are only two more wires that need to be handled. With SIR, you have an entire additional procedure to remove and reassemble the system. You really should have a service manual in hand for that procedure.
Start by centering the steering wheel, so that the wheel can be replaced in exactly the same position on the shaft easily. The steering shaft is both marked and keyed, but centering the wheel makes the job easier to "eyeball", and keeps the turn signal cancelling cam out of the way in later steps. Next, remove the hazard flasher knob on the lower right side of the steering column. There should be a small (#0) Phillips screw holding the knob in place. Find the release clip or bolts for the horn sounder pad and remove it. As the pad is removed from the wheel, unplug the horn wire from the connector on the pad. Remove the horn sounder wire and the insulator that guides the wire through the steering wheel. The insulating sleeve needs to be pushed inward slightly, twisted ¼ turn anticlockwise, and removed from the wheel. There is a light spring in the sleeve, so make sure all the parts are removed together. Remove the safety clip from the steering shaft, then remove the nut. You might have to have an assistant help hold the wheel while you turn the nut loose. Install the bolts from your steering wheel puller into the tapped holes in the wheel, and turn the puller screw to release the wheel from the steering shaft. Depress the notched wheel locking plate and remove the locking ring located at the center of the plate. There is a special tool for holding the wheel locking plate while the snap ring is removed, and it will be worth the $15.00 you'll pay for it. It can be done without the tool, but it is an exercise in frustration unless you are an octopus. I've done it several times using the "Armstrong" method, now I have the tool and use the "Brainstrong" method instead.  When the wheel locking plate is removed, you can look at the left lower side of the turn signal switch and see a pan head Phillips screw that hold the turn signal lever in place. Remove this screw and plate, then move the lever out of the way. There are three more pan head screws that hold the turn signal/hazard lamp switch to the upper column. Remove those and lift the turn signal switch out of the way. You may need to feed some extra wire from under the column to allow the switch to clear the steering shaft and move out of the way completely. 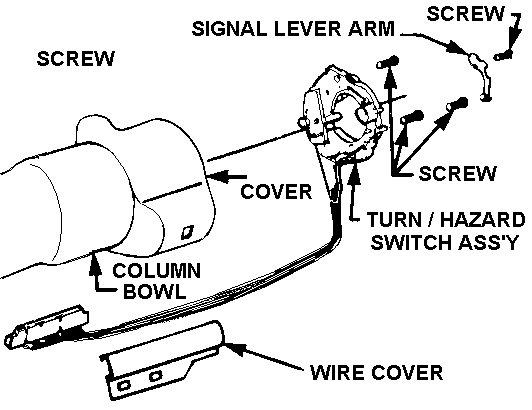 Once the turn signal/hazard switch base is out of the way, you should see another pan head screw on the upper right side of the column. This screw holds the lock cylinder in place. Before you remove the lock cylinder, make sure you hold the plastic/metal foil contact assembly in place so you don't lose it down the column when the lock is removed. This switch assembly is what actuates the key warning buzzer/chime. If you have VATS, there should be an additional pair of wires to umplug and feed down along the column. 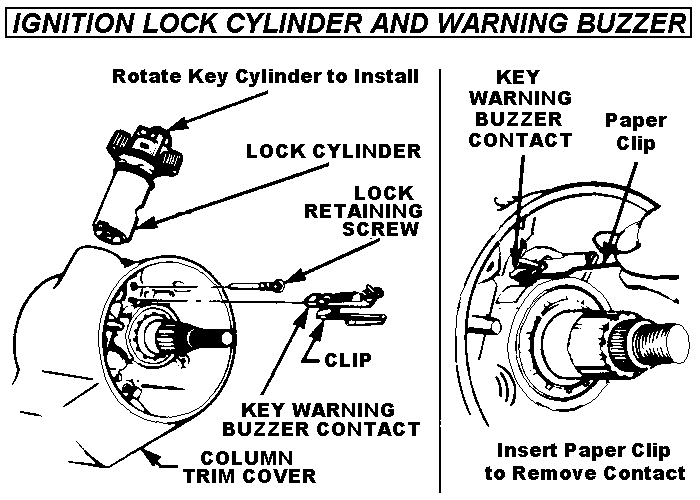 Remove the column tilt release lever by unscrewing it. Set it nearby since you will need to reinstall it after the upper bowl trim jacket is removed. Remove the turn signal / multifunction lever shaft by carefully pulling it out of the switch. Unplug the cruise control wire harness (if equipped). Remove the remaining upper bowl trim screws and lift the upper bowl off the column. Find the column tilt release lever and thread it back in hand tight for now. Remove the upper steering shaft bearing nut and retainer clip. Remove the upper bearing set. Remove the actuator rod link from the rack/sector that operates with the lock cylinder. Disconnect the link from the clip in the lower column. 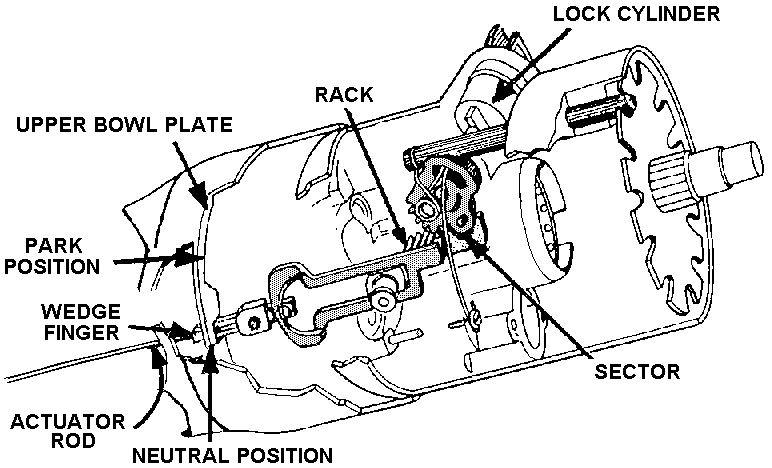 Remove the balance spring cap with a #2 or larger Phillips driver or larger square drive. This will allow the upper column fall to the lowest tilt position. Remove the pivot pins from either side of the upper column using an 8-32 screw and nuts as a puller. 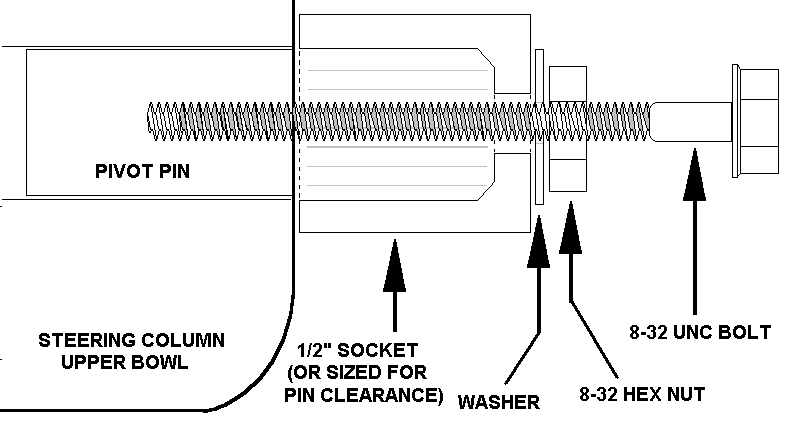 Once the pins are removed, operate the column tilt release lever and remove the upper column half. Note the routing of the ignition switch linkage rod(s) when you remove the upper column half. Tilt the upper stub shaft and universal joint to allow the joint to be separated. At this point, you should be viewing the top of the lower column half and four Torx cap screws. It will look similar to this: 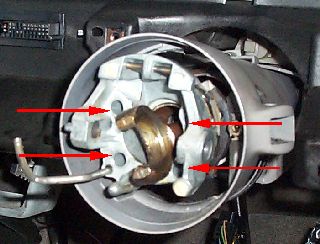 Remove these screws one at a time, clean the threads, and apply a light coating of LocTite 242 or an equivalent medium strength removable thread locker. Tighten the bolts by hand until all four are reinstalled. Torque these bolts to 80 in/lb. Reassemble the upper column half in reverse order. Take time to clean and grease all the moving parts so you can have another ten years of reliable operation. Every moving part, including the turn signal switch and cancelling cam, should be cleaned and lubricated with white lithium grease. When assembly is complete, torque the steering wheel nut to 35 ft/lb. There are already enough loose nuts behind steering wheels on our roadways.... There is a possibility that some of the pan head screws are Torx instead of Phillips. I believe this was more common on 1985 and later cars, but your's may have them as well. There is also a very remote possibility that your car has an inflatable restraint, in which case you'll need to disconnect the battery and insulate all connections before you start. You should also have a service manual to detail the proper procedure for removing and re-centering the triggering coil and pickup for the SIR. You don't want to have that done incorrectly. (Before anyone starts to argue about having an air bag on an older car, I know that some GM vehicles had SIR systems as early as 1977. My mother had a '77 Toronado with an air bag, but back then GM called it the "Air Cushion Restraint System" - almost 15 years before the SIR was standard on many cars. GM knew that the air bags sucked eggs back then, and they know that they still suck. But no one can reason with the government when they get involved in our personal lives. Gimme a five point any day. ) Last edited by Blue Bowtie; 05-04-2010 at 12:40 AM. |
|
|
|

|
|
|
#5 | |
|
AF Newbie
Thread starter
Join Date: Oct 2006
Location: bolivia, North Carolina
Posts: 58
Thanks: 0
Thanked 0 Times in 0 Posts
|
Re: floppy steering wheel
Thank you so much I'll give this to him today !
 |
|
|
|

|
|
|
#6 | |
|
AF Newbie
 Join Date: Oct 2004
Location: buffalo, New York
Posts: 46
Thanks: 0
Thanked 0 Times in 0 Posts
|
Re: floppy steering wheel
Blue Bowtie Where did you get those exploded view from? Those are a great help when do a project for the first time. Thanks for any information on this.
|
|
|
|

|
|
|
#7 | |
|
AF -Advisor
 Join Date: Sep 2003
Location: Sudbury
Posts: 13,565
Thanks: 0
Thanked 1 Time in 1 Post
|
Re: floppy steering wheel
Nice!
__________________
1995 Factory Blazer Service Manual for sale, PM if interested. |
|
|
|

|
|
|
#8 | |
|
AF Newbie
 Join Date: Jun 2007
Location: McEwen, Tennessee
Posts: 20
Thanks: 0
Thanked 0 Times in 0 Posts
|
Re: floppy steering wheel
Would that servic e manual cover the 98 Jimmy with 4x4 and 3 button push switch? Does it have the wiring diagrams for the transfer case, switch, encoder motor, and TCCM? If so I am interested. Very interested. I need this diagram to fix this contraption or rewire it to work, whichever comes first.
|
|
|
|

|
|
|
#9 | |
|
AF Newbie
 Join Date: Apr 2009
Location: Merrimac, WI, Wisconsin
Posts: 18
Thanks: 0
Thanked 0 Times in 0 Posts
|
Re: floppy steering wheel
can you re-upload the pictures again??
|
|
|
|

|
|
 |
POST REPLY TO THIS THREAD |
 |
|
|