|
|
|

|
|
| Search | Car Forums | Gallery | Articles | Helper | Air Dried Dog Food | IgorSushko.com | Corporate |
|
| Latest | 0 Rplys |
|
|||||||
| WIP - Motorsports Post topics for any "Work In Process" motorsports vehicles in this sub-forum. |
 |
 Show Printable Version | Show Printable Version |  Email this Page | Email this Page |  Subscribe to this Thread
|
|
|
Thread Tools |
 06-16-2008, 02:28 AM
|
#1 | |
|
AF Fanatic

Join Date: Dec 2004
Location: Up the creek with no paddle
Posts: 5,889
Thanks: 7
Thanked 16 Times in 15 Posts
|
Audi R8 2000 - Le Mans Minatures
I tried a Speed build over the weekend of a Le Mans car to celebrate the race. I decided on the Le Mans Minatures kit of the 2000 Audi R8
I started at 06.00 on Saturday morning and my goal was to finish by Sunday evening. Unfortunately I was not able to devote 100% of my time to the build so it required juggling act and a plan to build in the right sequence. The kit played its part by being simple with a low parts count and being very well cast with very little flash or mold lines and only two tiiiiiny bubbles. It also has a great fit straight out of the box. 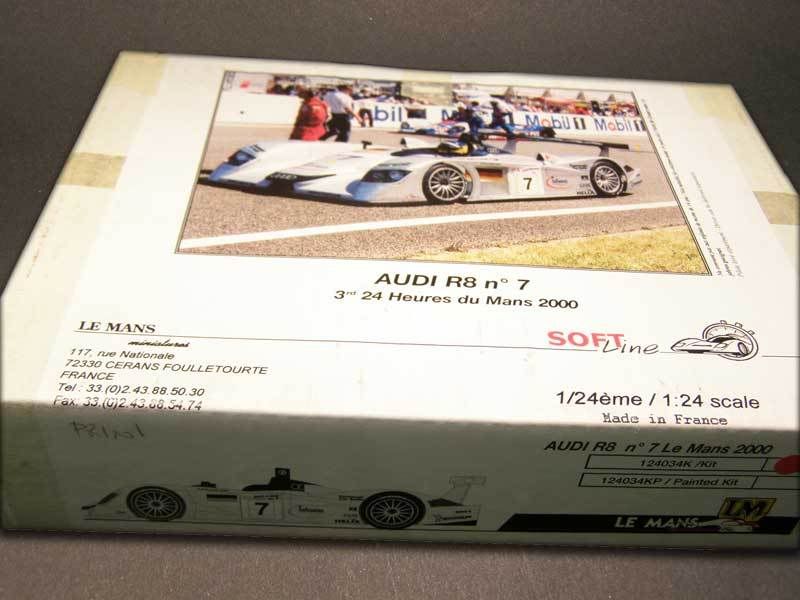 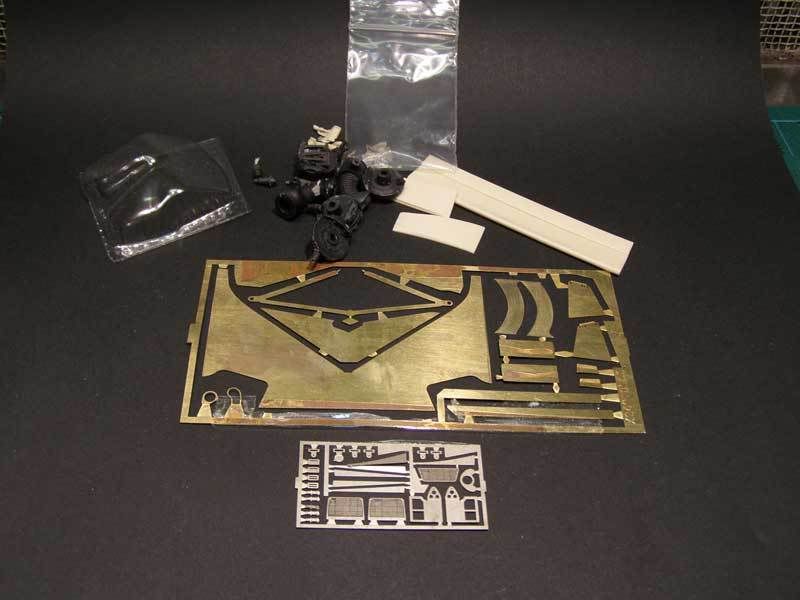 My original plan was to build the Revell R10 but a superficial inspection highlighted enough problems with fit, flash and mold lines to tell me that I would need a whole weekend just to prep this kit!!  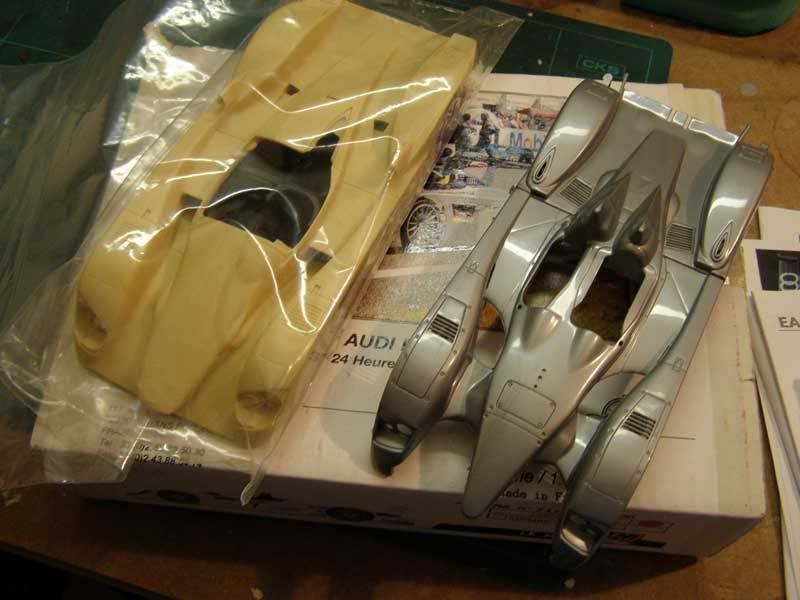 06.00 10.00 Saturday Cleaning, fitting, priming and putting down some black coats. P/E fins added to the front diffuser. Excellent p/e parts in this kit BTW fantastic fit and easy to remove cleanly from the fret. The rotor/caliper may be molded as one piece but they look outstanding IMHO and are very detailed. P/E on these would be a waste of time and money. 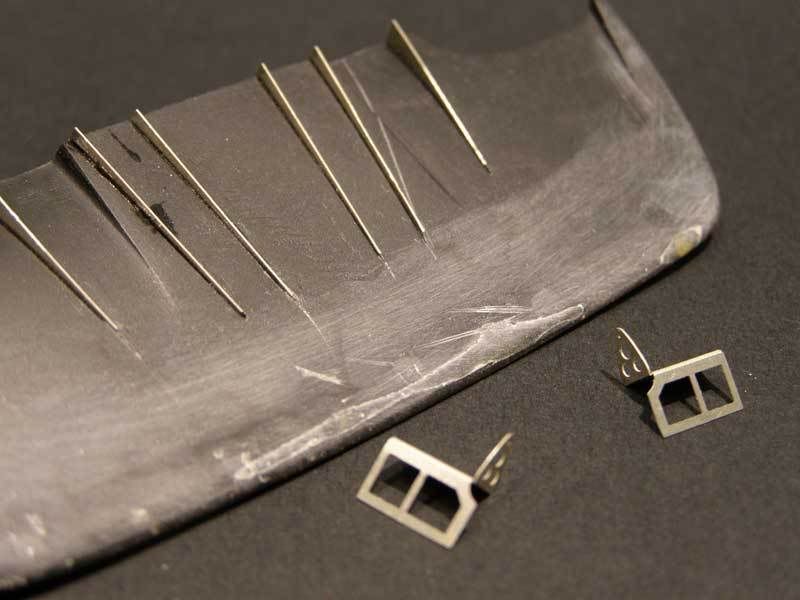 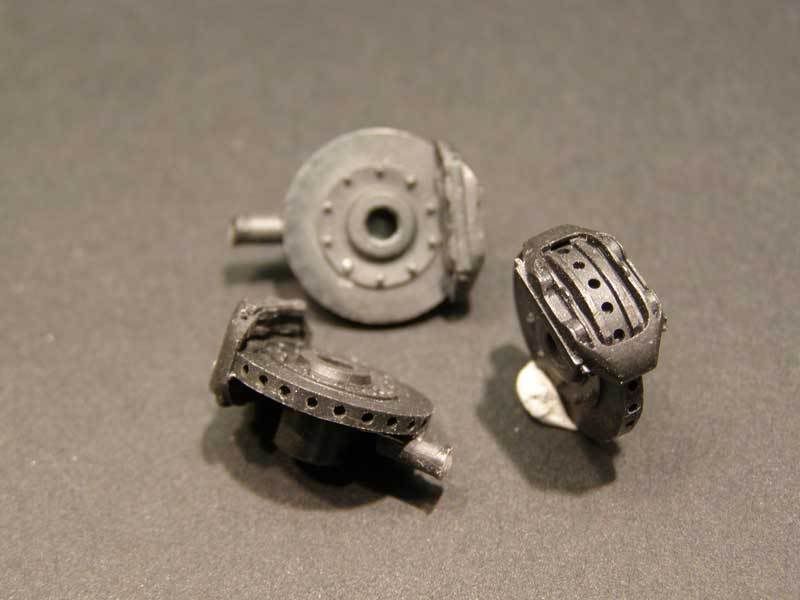 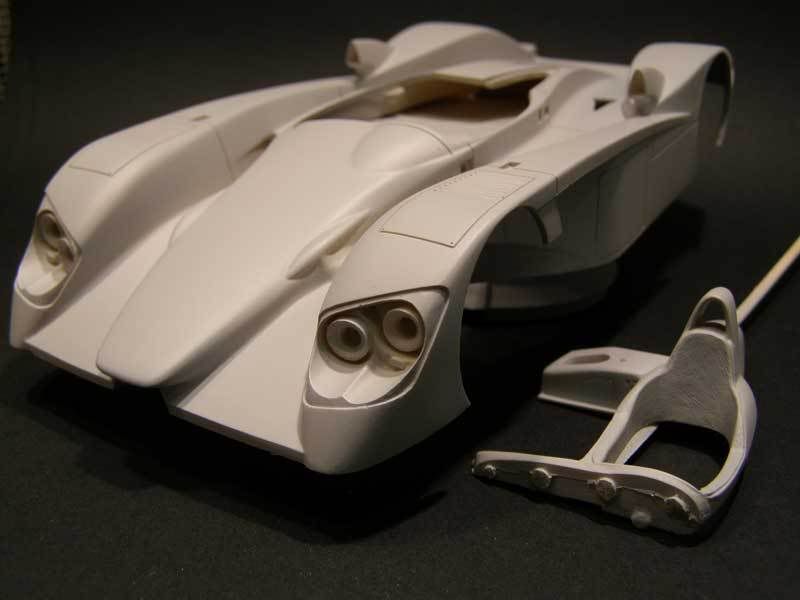  11.00-14.00 Saturday Some body work on the only bad fitting part of the kit that I can see. Separate panels to close off the bottom of the rear vents. I splopped some light curing putty on it and 5 minutes later job is done. Cleaned and prepped the remainder of the brass etched parts. (had to fit in a trip to the supermarket at this point  ) )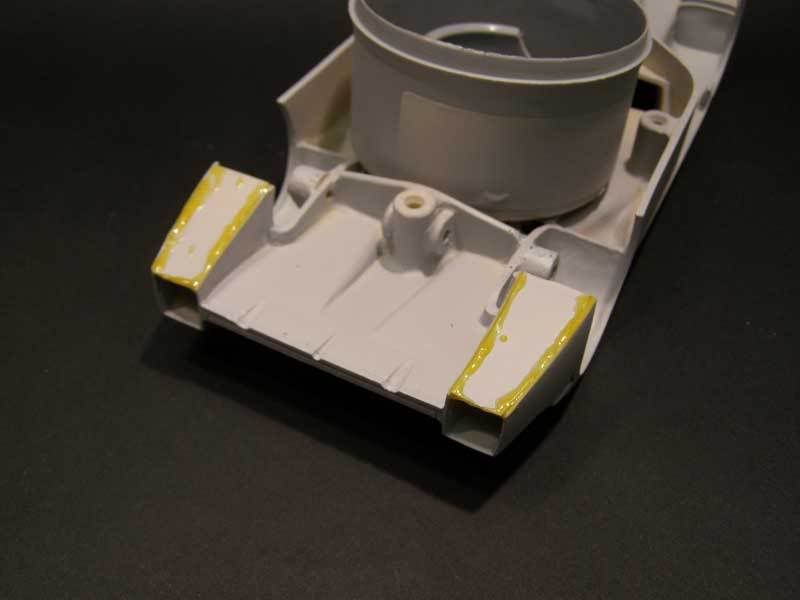 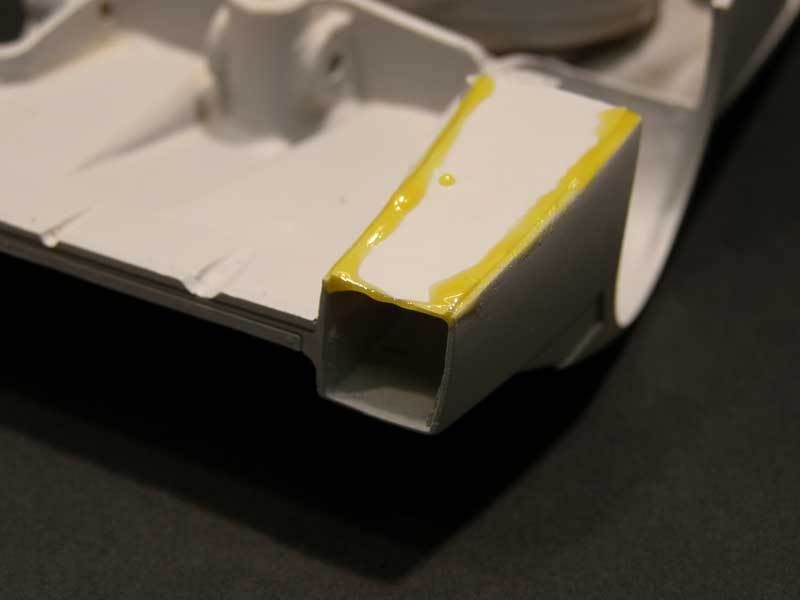 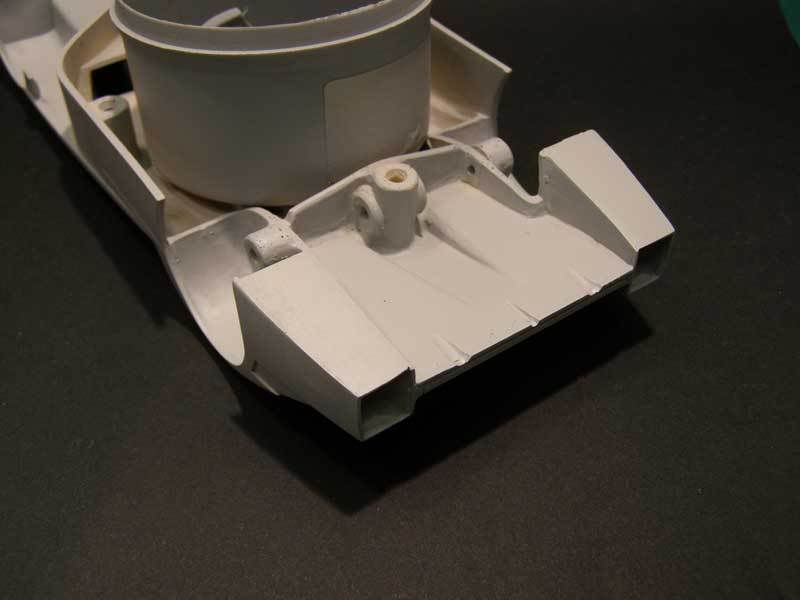 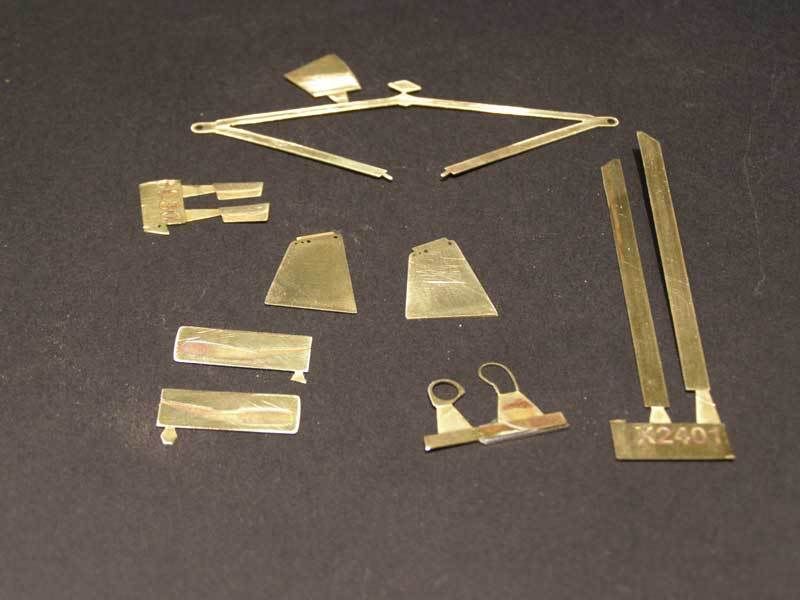 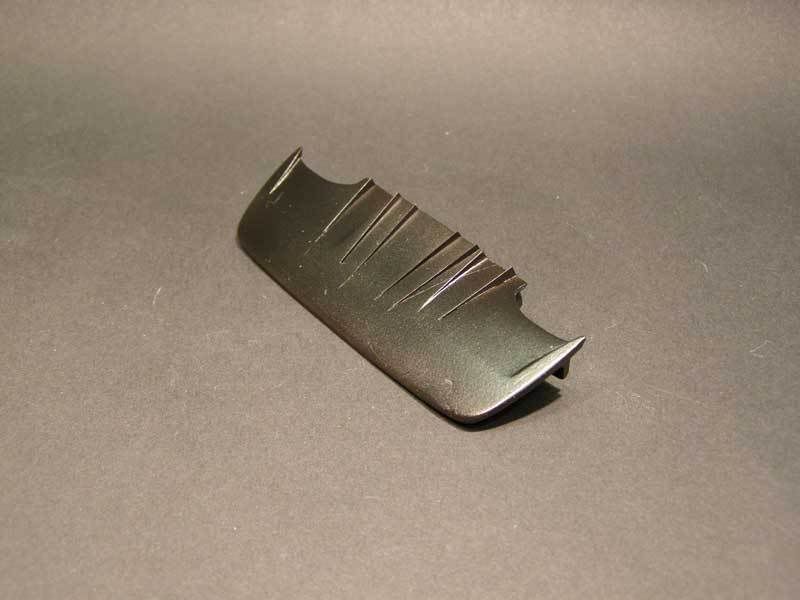 14.00-19.00 Saturday Base color is on the body and given a light coat of Mr. Topcoat. All the other parts are primed. At this point I had to take my youngest daughter and dog for a walk in the forest or face a household mutiny  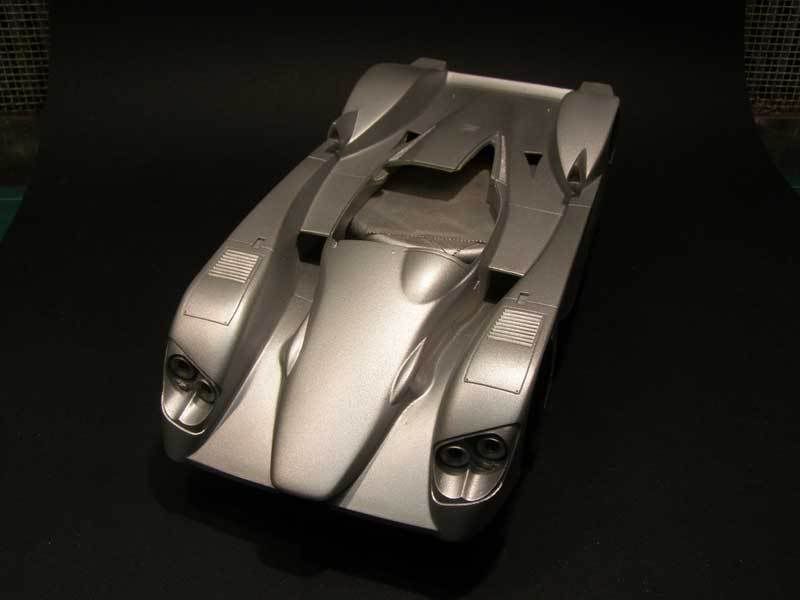 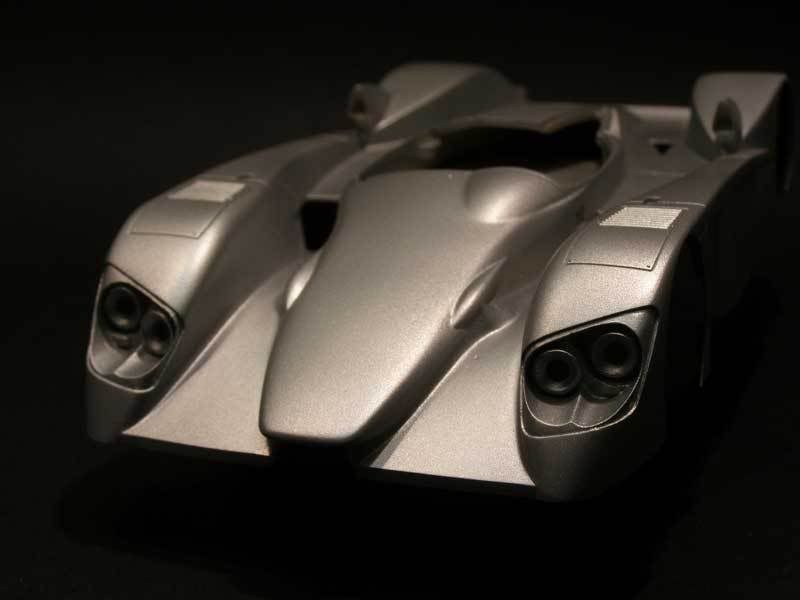 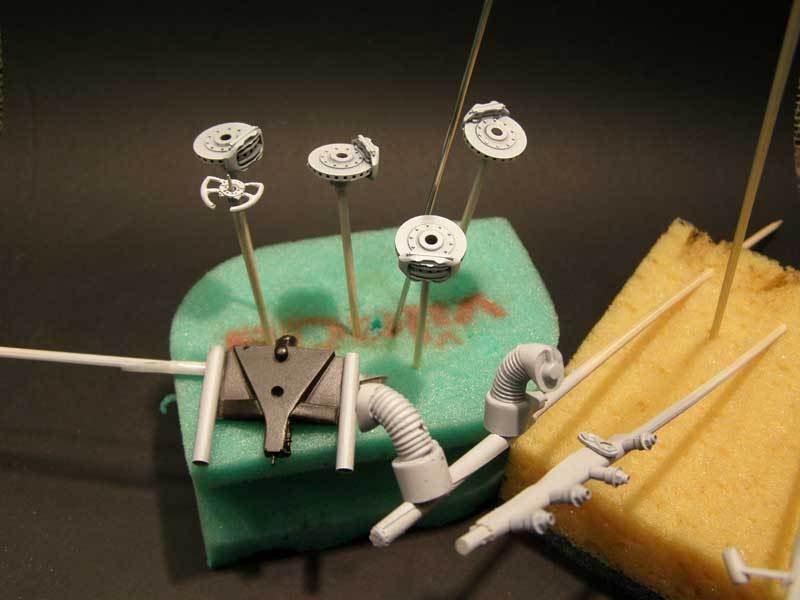 19.00-23.00 Saturday Put down some metallic colors on the radiator grilles (Alclad Alu), wheels (Alclad Pol. Alu) and calipers (Alclad Pale Gold). Front brake cooling ducts were partially painted ducting will be red. I also discovered something strange about Alclad Pl Gold it curdles!!! :0 My jar was ruined and I had to throw it away although I managed to get enough through the airbrush to cover the calipers. 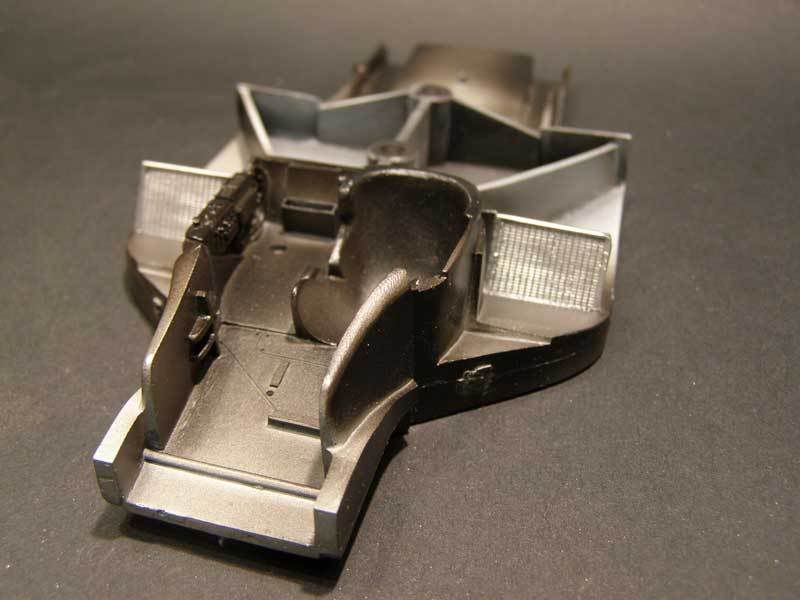 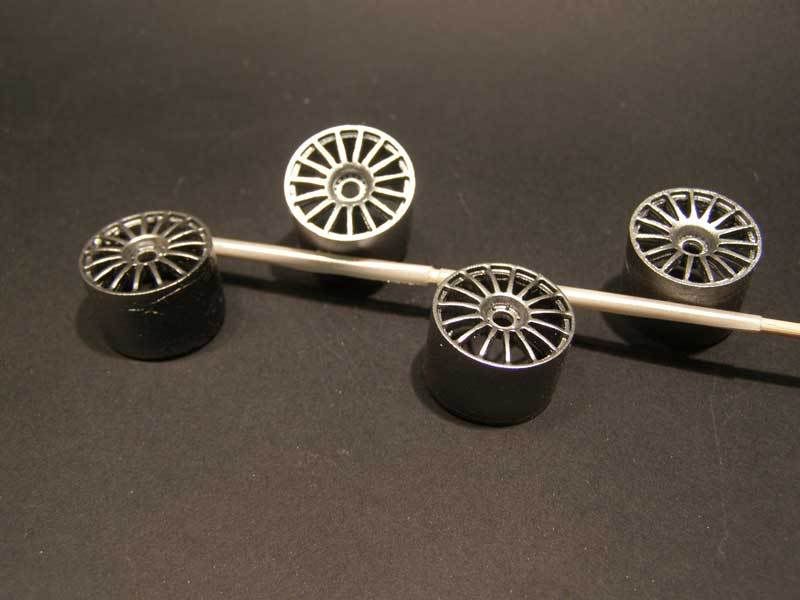  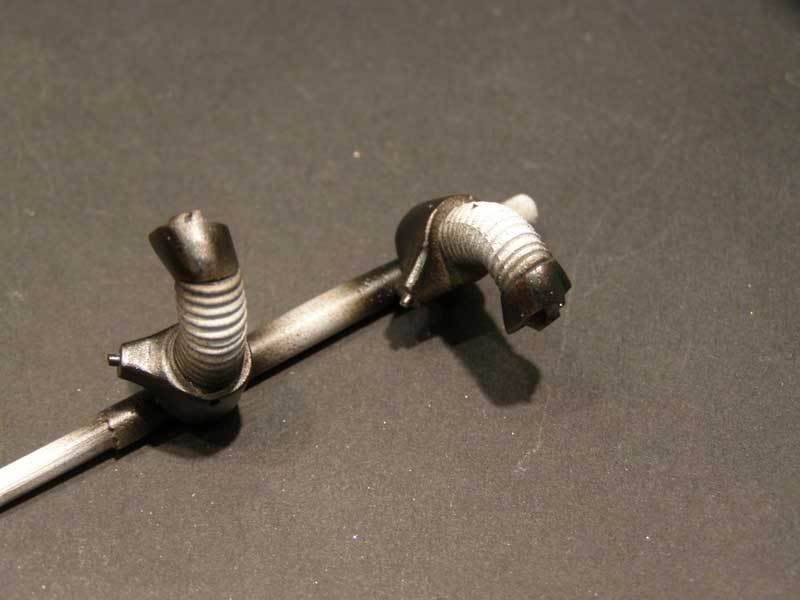 23.00-06.00 Saturday Pit stop zzzzzzzzzzz 06.00-14.00 Sunday Ouch! I forgot that a Le Mans car will have decals  Luckily the LMM decals are well printed with only some minor issues with color registration on the odd decal. They respond well to MicroSOL. The black on the nose and around the cockpit fairing are decals but fit well and SOL gets them down nicely. My only complaint so far about this kit are the instructions they are simplistic and poorly printed so hard to read but above all, decal placement instructions are next to non-existent. 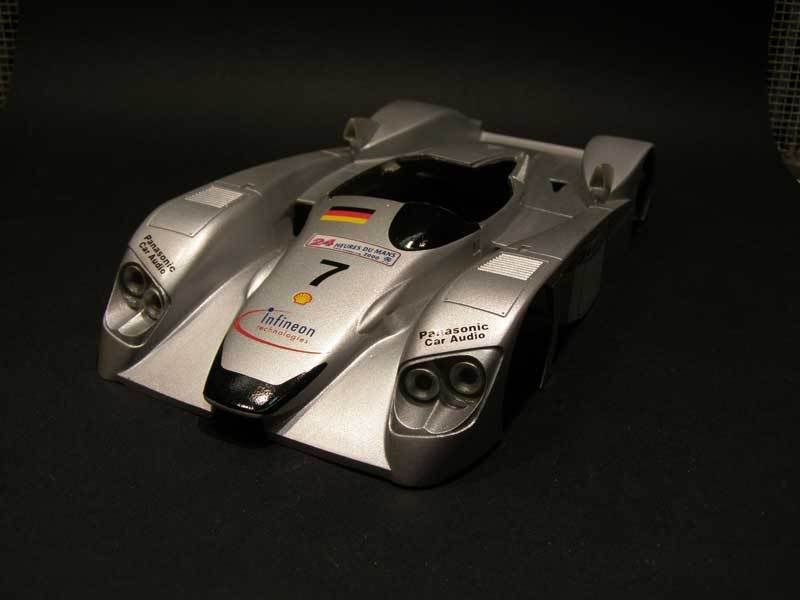 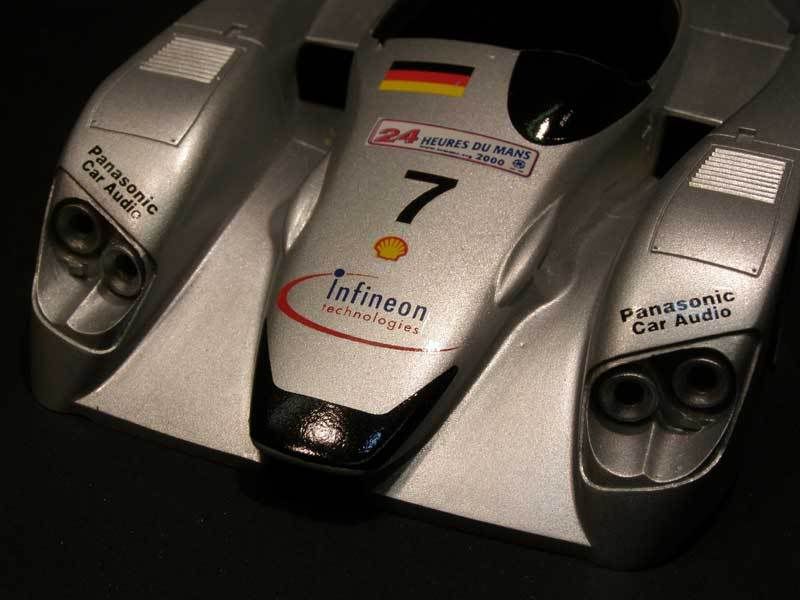 14.00-22.00 Sunday Finished the decals and detail painting but things started to go wrong and I started making mistakes. The Zero Gloss Black I used on the air intake/cockpit went down very badly and scratch-X smudged the paint rather than polish it I sprayed Jet Black over it and then coated with clear much better. I got some runs in the clear which fizzed I masked off the light buckets for satin black but when I removed the masking tape, it pulled up lumps of some decals I removed completely the badly damaged decals and polished out the clear where they had been.   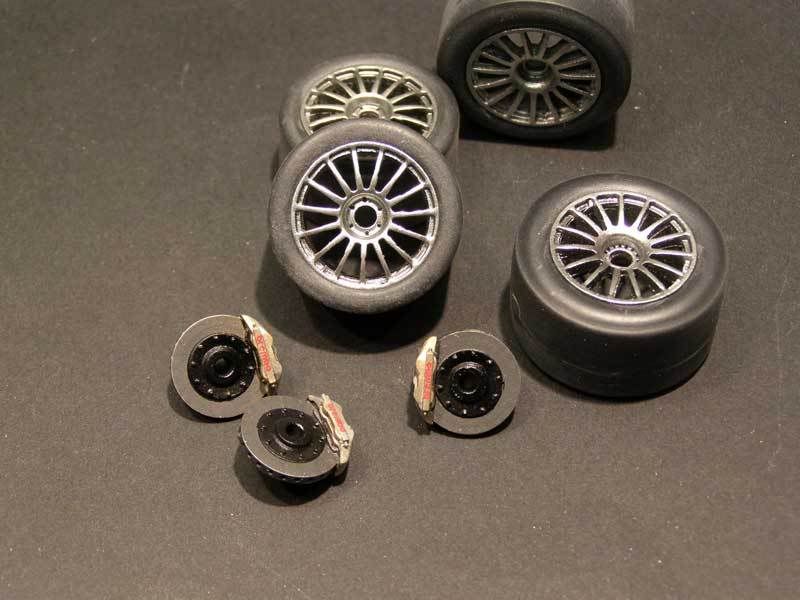 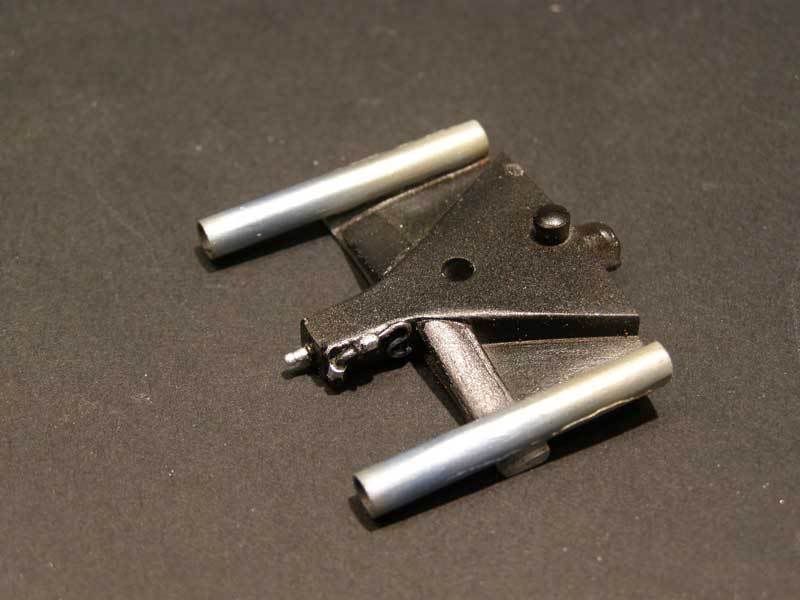  22.30 Sunday Officially classified as DNF (In other words, this gets posted in the WIP section rather then the completed thread  ) ). I called it "game over" at this point so as not to completely FUBAR this nice kit. None the less, I had a blast trying. It will take a few hours work to get the track and stance correct and to correct my mistakes. But most of all the clear parts are vacu-formed acetate and I know from my experience with the Aston DBR9 that this should not be hurried. 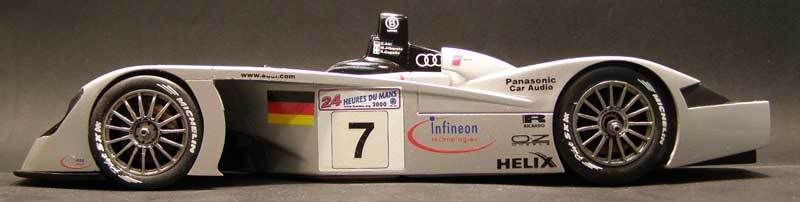 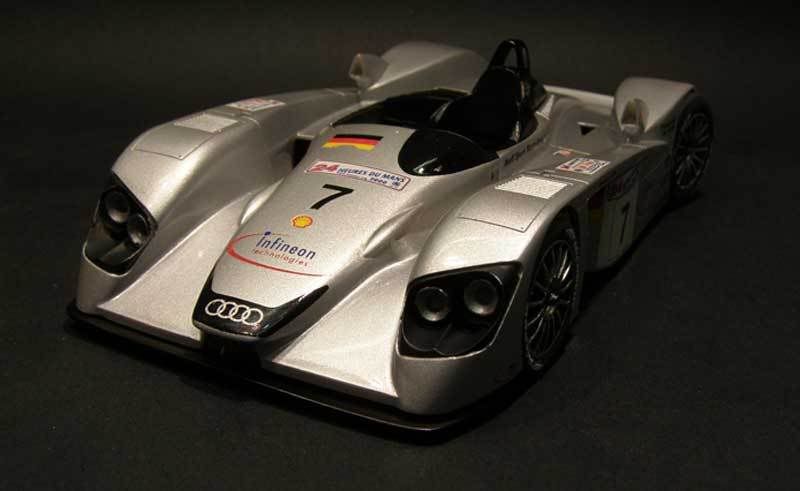 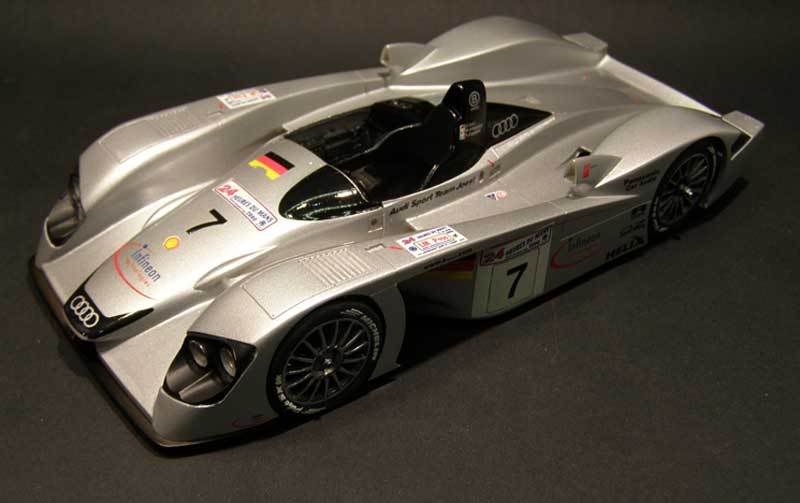  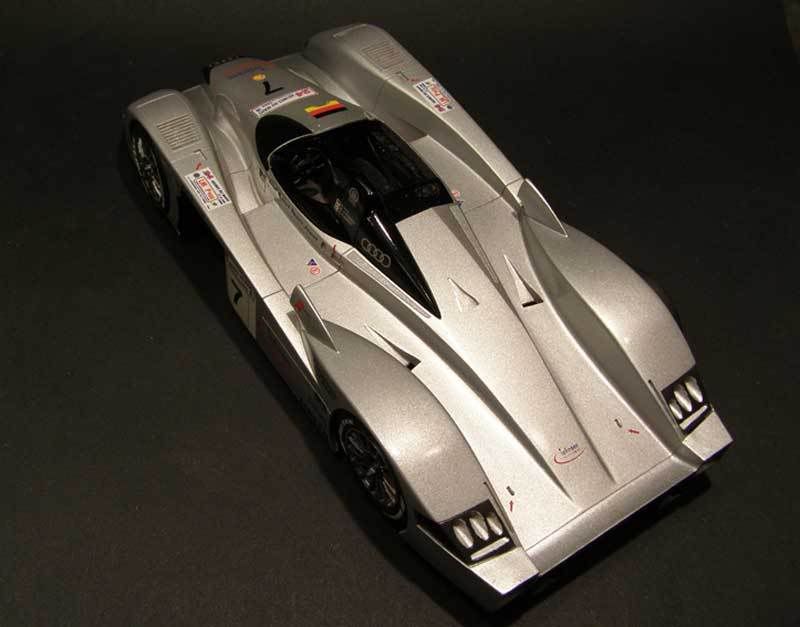 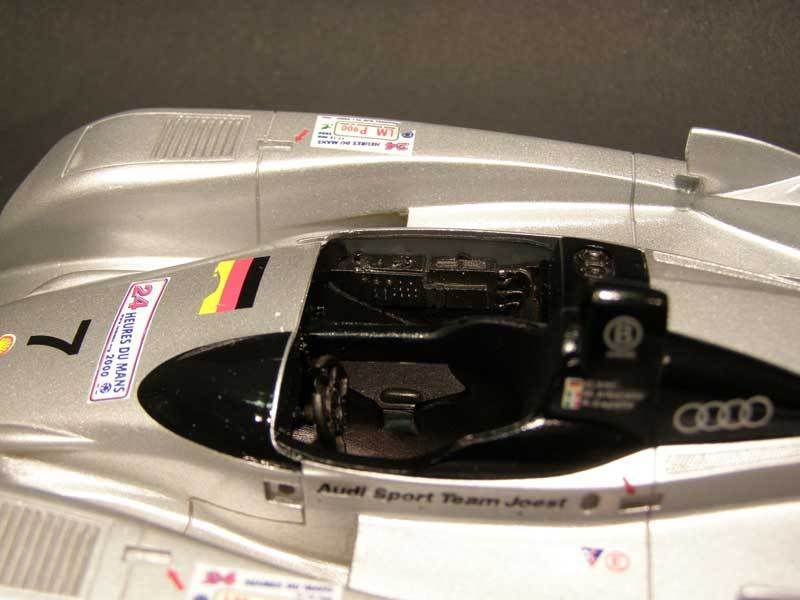 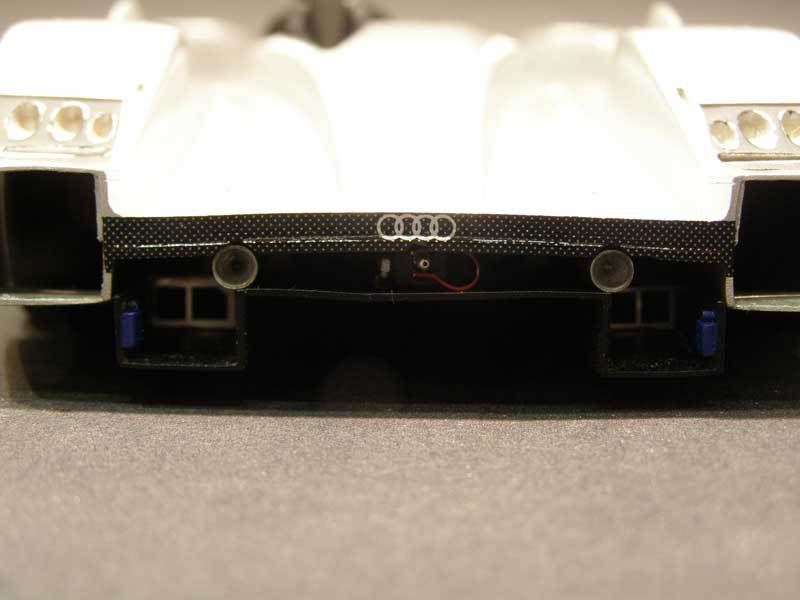
__________________
Guideline for happy modeling: Practice on scrap. Always try something new. Less is more. "I have a plan so cunning, you could put a tail on it and call it a weasel" - Edmund Blackadder |
|

|

|
|
06-16-2008, 04:50 AM
|
#2 | |
|
AF Enthusiast
Join Date: Dec 2004
Location: Warsaw
Posts: 553
Thanks: 4
Thanked 6 Times in 4 Posts
|
Re: Audi R8 2000 - Le Mans Minatures
Impressive!
I would darken panel lines a bit more. The rest looks really good! |
|
|
|
|
|
06-16-2008, 05:19 AM
|
#3 | ||
|
AF Fanatic
Thread starter
Join Date: Dec 2004
Location: Up the creek with no paddle
Posts: 5,889
Thanks: 7
Thanked 16 Times in 15 Posts
|
Re: Audi R8 2000 - Le Mans Minatures
Dzięki
 Quote:
It only looks good because it is so hard to take photos of silver paint 
__________________
Guideline for happy modeling: Practice on scrap. Always try something new. Less is more. "I have a plan so cunning, you could put a tail on it and call it a weasel" - Edmund Blackadder |
||
|
|
|
|
06-16-2008, 10:14 AM
|
#4 | |
|
AF Enthusiast

Join Date: Mar 2007
Location: Lisle, Illinois
Posts: 809
Thanks: 0
Thanked 2 Times in 2 Posts

|
Re: Audi R8 2000 - Le Mans Minatures
awesome job on the real Audi R8
since Audi won again, I really should finish up my R10 can't wait to see this completed
__________________
Steve |
|
|
|
|
|
06-16-2008, 12:02 PM
|
#5 | |
|
AF Fanatic

Join Date: Sep 2002
Posts: 5,085
Thanks: 66
Thanked 119 Times in 92 Posts
|
Re: Audi R8 2000 - Le Mans Minatures
Looks great; I'll be posting ACME's LeMans Palooza shortly with pics from our event. We finished 6 cars during the race
 
__________________
My Fotki Album |
|
|
|
|
|
06-16-2008, 01:19 PM
|
#6 | |
|
AF Regular

Join Date: Feb 2005
Location: Copenhagen
Posts: 276
Thanks: 4
Thanked 14 Times in 11 Posts
|
Re: Audi R8 2000 - Le Mans Minatures
Hi
I have just finished the 2001 car, and I can see that you have the most 'interesting' parts left... Take your time with the headlight covers. I ended up riveting the buggers to the body. There is simply no way to glue them on without them looking 'glued on' :-( Same with the rear light covers, which I omitted. Not too obvious as the car had led lights deep in the rear body. Next up is the brass bottom plate and side plates. They have to be mounted on the bottom of the car that fits inside the body. No matter how much I shaved off the body inside or the bottom part would the floor of the bottom match up with the sides. I had to modify the brass parts so that they get fixed to the bodyshell rather than the bottom. The raintires in the kit are too big for the wheel wells, so a lot of resinremoving in those areas as well. See the model here: http://www.ipms.dk/Kvart2-2008/09.jpg It all ended up ok, but I'm amazed how fast you got to that point in the pictures! Flemming |
|
|
|
|
|
06-16-2008, 01:22 PM
|
#7 | |
|
AF Enthusiast
Join Date: Oct 2004
Location: Schweinfurt
Posts: 1,229
Thanks: 1
Thanked 13 Times in 13 Posts
|
Re: Audi R8 2000 - Le Mans Minatures
Hi Gio,
you tried and DNF'd.... so what. I bet you had tons of fun doing it |
|
|
|
|
|
06-16-2008, 02:40 PM
|
#8 | ||||
|
AF Fanatic
Thread starter
Join Date: Dec 2004
Location: Up the creek with no paddle
Posts: 5,889
Thanks: 7
Thanked 16 Times in 15 Posts
|
Re: Audi R8 2000 - Le Mans Minatures
Quote:
 I'm flattered - I think... Quote:
I always knew that I wasn't in your league and now we have proof! 6 finished to my one DNF Quote:
 I just finished working on the two headlight covers this evening, It's interesting to note the design changes between the 2001 and 200 cars. Especially in the pillars behind the front wheels. I wonder if this has impacted on how the model goes together? At least during test fitting, the brass bottom pieces on my kit seemed to be OK but we'll see in a couple of days Is there anywhere I can see some more photos of your build?
__________________
Guideline for happy modeling: Practice on scrap. Always try something new. Less is more. "I have a plan so cunning, you could put a tail on it and call it a weasel" - Edmund Blackadder |
||||
|
|
|
|
06-16-2008, 03:31 PM
|
#9 | ||
|
AF Regular
Join Date: Feb 2005
Location: Copenhagen
Posts: 276
Thanks: 4
Thanked 14 Times in 11 Posts
|
Re: Audi R8 2000 - Le Mans Minatures
Quote:
Not at the moment no. I have suffered a slight setback by breaking my right (modelling!) hand, so everything is at a standstill. I may post something when my hand gets back to operating properly again :-( And yes there are differences between the 2000 and 2001 car which may contribute to some of the problems I have had. I'd guess that LMM made a new body and kept the old underbody or something like that? Flemming |
||
|
|
|
|
06-16-2008, 04:18 PM
|
#10 | |
|
AF Enthusiast

Join Date: Jun 2005
Location: Céroux-Mousty
Posts: 506
Thanks: 11
Thanked 5 Times in 5 Posts

|
Re: Audi R8 2000 - Le Mans Minatures
Hello Steve,
Nice work you did on such a short tiem! congrats! Jamme
__________________
WIP: LaFerrari Tamiya 1/24 |
|
|
|
|
|
06-16-2008, 04:43 PM
|
#11 | |
|
AF Regular

Join Date: Feb 2008
Location: Haywards Heath
Posts: 172
Thanks: 0
Thanked 5 Times in 5 Posts
|
Re: Audi R8 2000 - Le Mans Minatures
It looks perfect to me, you've done a great job, good idea. I wish I could build my kits that quick, so does the wife!!! they usualy take a few months. at best.
|
|
|
|
|
|
06-16-2008, 05:15 PM
|
#12 | |
|
AF Enthusiast
Join Date: Aug 2005
Location: where "sky grey" is a colour
Posts: 822
Thanks: 3
Thanked 32 Times in 29 Posts
|
Re: Audi R8 2000 - Le Mans Minatures
Nice work and so quick! I'm impressed!
Isn't it remarkable, that one would choose a resine "garage" kit over a mass production plastic kit because it looks like the better engineered one!? :-) |
|
|
|
|
|
06-17-2008, 01:13 AM
|
#13 | |
|
AF Enthusiast

Join Date: Dec 2004
Location: Germany
Posts: 3,431
Thanks: 28
Thanked 80 Times in 74 Posts
|
Re: Audi R8 2000 - Le Mans Minatures
Looks good so far, Steve, so you´ll finish it after the checkered flag, no problem.
I have the "crocodile"-kit on my "to do"-list
__________________
Micha       
|
|
|
|
|
|
06-17-2008, 03:10 AM
|
#14 | ||
|
Authorized Vendor

Join Date: Oct 2005
Location: Vicenza - veneto de rassa
Posts: 3,910
Thanks: 6
Thanked 47 Times in 41 Posts
|
Re: Audi R8 2000 - Le Mans Minatures
Quote:
BTW great job gio!  I would like to know the name of the mouse that eat your decals, in place indeed! what's happened? I see them in good form 1 pict before.Also: I guess this is "those" R8, so "those-the other " rims would be muuuuuch betta! really!
__________________
gio
|
||
|
|
|
|
06-17-2008, 03:47 AM
|
#15 | |
|
AF Enthusiast
Join Date: Jun 2007
Location: Vienna
Posts: 2,399
Thanks: 57
Thanked 27 Times in 26 Posts
|
Re: Audi R8 2000 - Le Mans Minatures
Good job for a week end try!
I think that getting new decals will be the reason for a longer pit stop! Should have tried the R10, they won again last week end. PS: Now I see why you asked the wheel nut color question! |
|
|
|
|
|
|
POST REPLY TO THIS THREAD |
 |
|
|


