|
|
|

|
|
| Search | Car Forums | Gallery | Articles | Helper | Quality Dog Food | IgorSushko.com | Corporate |
|
| Latest | 0 Rplys |
|
|||||||
| WIP - Motorsports Post topics for any "Work In Process" motorsports vehicles in this sub-forum. |
 |
 Show Printable Version | Show Printable Version |  Email this Page | Email this Page |  Subscribe to this Thread
|
|
|
Thread Tools |
 09-23-2002, 06:39 PM
|
#1 | |
|
AF Regular
 
Join Date: Sep 2002
Posts: 465
Thanks: 0
Thanked 1 Time in 1 Post
|
clk gtr progress
working on this off and on...
body- ~1 month (now i remember why i hate decals...) 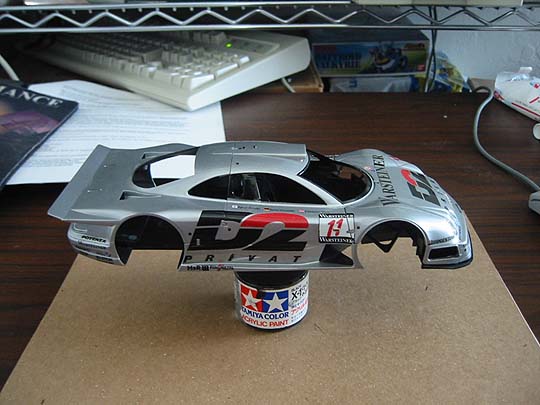      front suspension- 1week 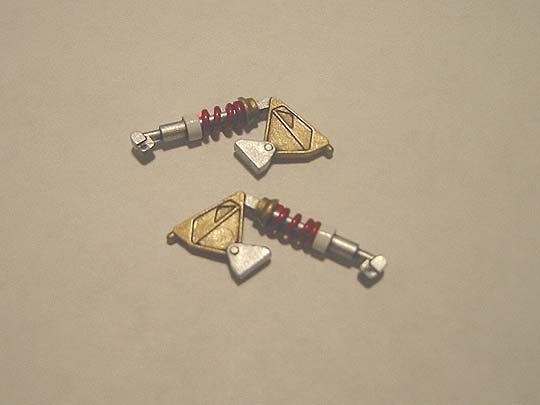 current crown jewels- 1week 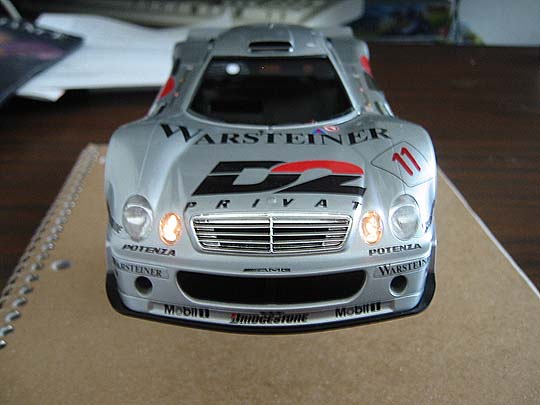  a. |
|

|

|
|
09-23-2002, 07:53 PM
|
#2 | |
|
Car Mod guy
 
Join Date: Feb 2002
Location: Manchester
Posts: 5,180
Thanks: 6
Thanked 11 Times in 9 Posts

|
Looking super sexy! Paint looks really good and the lights are well done too!
Can u tell us more about the lights? Circuit etc???
__________________
CHRIS... Catch me on FACEBOOK http://www.c1-models.com http://www.facebook.com/C1Models |
|
|
|
|
|
09-23-2002, 07:56 PM
|
#3 | |
|
AF Fanatic
 
Join Date: Nov 2001
Location: Auckland
Posts: 7,218
Thanks: 0
Thanked 0 Times in 0 Posts

|
Looks great!

__________________
My latest ride!  1998 Nissan Skyline R34 GT-t 
|
|
|
|
|
|
09-23-2002, 08:23 PM
|
#4 | |
|
"P-Man"

Join Date: Mar 2001
Location: Manawatu
Posts: 15,179
Thanks: 0
Thanked 3 Times in 3 Posts
|
Take your time and it will look great....cant fault what i see so far
__________________
Current Build.....1/12 Scale Camaro......Almost finished!!!    View All My Models Here. |
|
|
|
|
|
09-23-2002, 08:31 PM
|
#5 | |
|
AF Fanatic

Join Date: Sep 2002
Posts: 4,706
Thanks: 8
Thanked 77 Times in 70 Posts
|
The time you are investing in the CLK is really paying off, don't rush at the end!
__________________
There is a lesson in every kit. |
|
|
|
|
|
09-23-2002, 09:46 PM
|
#6 | |
|
AF Enthusiast

Join Date: Jun 2002
Location: spore
Posts: 136
Thanks: 0
Thanked 0 Times in 0 Posts

|
WOW!
WOW!
 Nice. You cut the body up? (Somehow that didn't come out right)
__________________
Dreaming of an M3 SMG  |
|
|
|
|
|
09-23-2002, 10:05 PM
|
#7 | |
|
AF Fanatic

Join Date: Sep 2002
Location: Toronto
Posts: 7,007
Thanks: 0
Thanked 0 Times in 0 Posts
|
that looks awesome, dude. i would never have the patience to do big decals like that. is it that hard? the biggest decal i did was a CF hood decal on one of my friends' models. i got a few bubbles and whatnot.
__________________
-Brian 2013 Subaru BRZ Sport-Tech 6MT. Not stock. |
|
|
|
|
|
09-24-2002, 12:45 AM
|
#8 | |
|
AF Regular
Join Date: Sep 2002
Posts: 465
Thanks: 0
Thanked 1 Time in 1 Post
|
thanks for the comments. you're too kind :alien:
i'm not too happy with the results. i had much more agressive plans for this kit. the reason it took me so long was that i just kinda lost interest in finishing it up... i envisioned doors which opened and closed with a removable front end that had some sort of 'catch' to keep it on. it wasn't until i removed the passenger side door that i realized that the plastic was too weak to support the hinges (not to mention the door was very weak due to the shape) so i decided to scrap that idea and put the door back on only to realize i used the wrong putty and could not recreate the panel lines. the tamiya putty is brittle and would crack it you do this. you will need some sort of epoxy putty. so strike one... authenticity down the tube. when i finally got around to do the decal work... microsol all over the driver side door decal... had to airbrush the messed up part on. it looks okay but the decal folded leaving a bit of a 'lip'... strike two... when i hit the third strike, i'm going out to buy a new kit! but to answer your questions... i removed the front and added a 'lip' for support and cut out the plastic molded latches. i recreated them with .020mm plastic sheet (did this for all the latches) i angled them inward so that when the hood is back on, it will have an interference fit with the body and the new latches will fall in place holding the piece together. 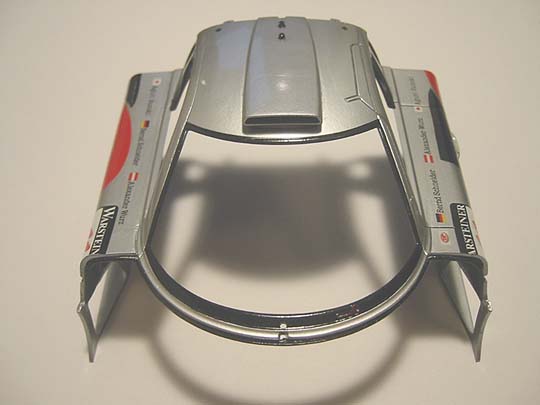  here is a pic of the circuit layout. i used a piece of wire mesh to hide the hardware from being seen from the outside. otherwise the source and switch will be seen through the grill. i used a 397 battery for this application. any 1.5v source would do the trick if you use a parallel setup. keep in mind that you need a 3.0v source if you intend to use the series method. i used the parallel method. there are alot of advantages to using parallel over series but i think i'd just bore you with the details. the switch is a sub mini slide switch. 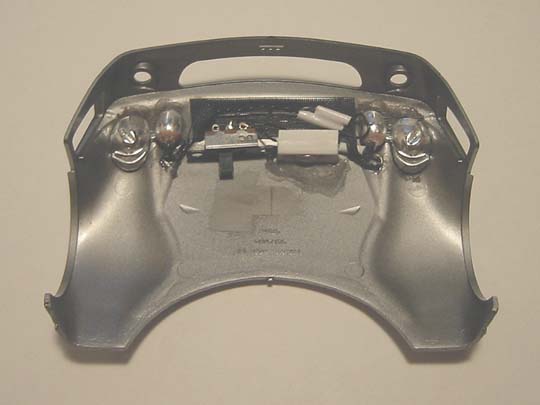 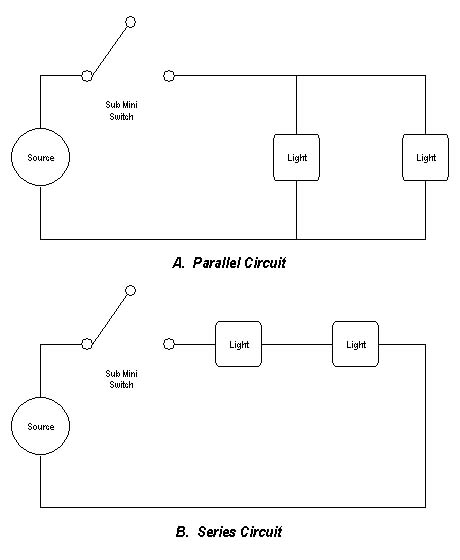 a. |
|
|
|
|
|
09-24-2002, 01:27 AM
|
#9 | |
|
AF Regular
 Join Date: Aug 2002
Posts: 95
Thanks: 0
Thanked 0 Times in 0 Posts
|
This was also the last kit I finished be for I went on Hiatus, that was two years ago, and I must say you did a hell of alot better job than I did, especially with the decals. By the way, my model won second place in my local model competion so I'd say your quite an excellent modeler, looks fantastic. I two was a perfectoinist until i realized that living with the little mistakes is better than melted bodies( i did this about three times, when I stripped a mustang, a dodge ram, and a supra
 ) Learn form your mistakes, we make them for a reason. ) Learn form your mistakes, we make them for a reason. |
|
|
|
|
|
09-24-2002, 03:50 AM
|
#10 | |
|
AF Enthusiast
Join Date: Apr 2002
Posts: 579
Thanks: 0
Thanked 0 Times in 0 Posts
|
despite your two strikes, i think your model looks pretty nuts. plus you have lights. good job so far, looking forward to the finished product.
__________________
Current Project: Fujimi Toyota Altezza RS200 bye bye handles, moldings, rain gutters, license plate holders View some pics of it here http://www.automotiveforums.com/vbulletin/t72123.html  
|
|
|
|
|
|
09-24-2002, 04:44 AM
|
#11 | |
|
AF Enthusiast

Join Date: Jun 2002
Location: Singapore
Posts: 2,399
Thanks: 0
Thanked 0 Times in 0 Posts
|
Awesome job on it..
The LED is cool ..
__________________
 |
|
|
|
|
|
09-24-2002, 09:43 AM
|
#12 | |
|
AF Enthusiast
Join Date: Jun 2002
Posts: 546
Thanks: 0
Thanked 0 Times in 0 Posts
|
even tough it looks great, you cut the front end incorrectly. lower valance in the front is suppost to stay on. if you look at the front bumper you will see that these is a thin piece of body work that is separated by a panel line from the rest of the front cowl.
other wise, it looks VERY good. the decal work is very good, looks like it bleand in with the paint very well. how did you manage to put the D2 side decals without messing up? I found that with is the only hard decal on this car. I love the light idea, and I VERY impressed how nicely the hood was cut and the lights we installed. I am not sure but maybe you can build a "box" around the lights for a more clean look? |
|
|
|
|
|
09-24-2002, 09:44 AM
|
#13 | |
|
AF Enthusiast
Join Date: Jun 2002
Posts: 546
Thanks: 0
Thanked 0 Times in 0 Posts
|
also, someone made a GTR with opening doors, anyone know who it is? I think it wa son a japanese site.
|
|
|
|
|
|
09-24-2002, 11:56 AM
|
#14 | |
|
AF Enthusiast
Join Date: Aug 2002
Location: Zoutleeuw
Posts: 2,285
Thanks: 0
Thanked 0 Times in 0 Posts
|
I've a review of a GTR with open doors on my site. It's done by Christophe Wera. You might want to check it out on http://users.skynet.be/automotomover
Back to the GTR here. Looks very cool. Like the front lights, question is though are the rear lights working as well? I also like the way you cut the front and added the extra lip, cool. Did you rebuild the front suspension springs yourslef? Also very cool. I have 4 CLK-GTR's at home, waiting to be build ... at some point... Well done! |
|
|
|
|
|
09-24-2002, 01:07 PM
|
#15 | |
|
AF Regular
Join Date: Sep 2002
Posts: 465
Thanks: 0
Thanked 1 Time in 1 Post
|
thanks for the comments. i know i still have to clean up the bodies. i still have to work on the underside of the bodies. i don't have any more room on the underside of the front end to do anything more.
the front suspension springs were rebuilt using aluminum wire. it was the first time i tried anything of the sort (which explains why painting something like that should take 15min dragged on to 1 week  ) getting the springs to look right took two rods of aluminum rod stock! ) getting the springs to look right took two rods of aluminum rod stock!i only have one reference pix for the front end. i found this on the web by chance. i couldn't tell if the lower valence is supposed to stay on or not. it had a small anchor so i just left it on as it helped to keep the front end in place after it was cut. does anyone have any reference pix for the front end details?  a. |
|
|
|
|
|
|
POST REPLY TO THIS THREAD |
 |
|
|

