|
|
|

|
|
| Search | Car Forums | Gallery | Articles | Helper | Quality Dog Food | IgorSushko.com | Corporate |
|
| Latest | 0 Rplys |
|
|||||||
| WIP - Street Post topics for any "Works In Progress" street vehicles projects in this sub-forum. |
 |
 Show Printable Version | Show Printable Version |  Email this Page | Email this Page |  Subscribe to this Thread
|
|
|
Thread Tools |
 04-15-2007, 04:40 AM
|
#1 | |
|
AF Newbie

Join Date: Nov 2006
Location: melbourne
Posts: 80
Thanks: 1
Thanked 1 Time in 1 Post
|
Holden Monaro V2
I needed a break from my Delorean build, as well as a chance to practice some things on a build that didn't matter too much, so I dug out this one which I have been looking at for a while. I plan to use this to try out a few things I haven't done before - I'm going to open at least one door, maybe the boot, in addition to converting it to RHS and redoing the front.
I know Fusionrr is converting a GTO into a VZIII Monaro, but I kinda prefer the look of the original V2 model. So here's the box, and what I'm hoping to turn it into... 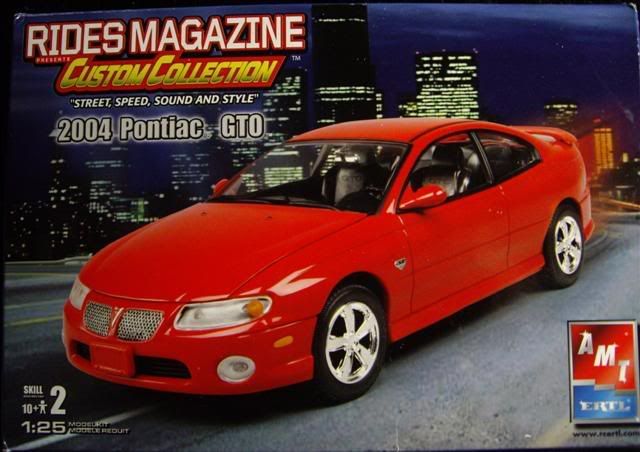 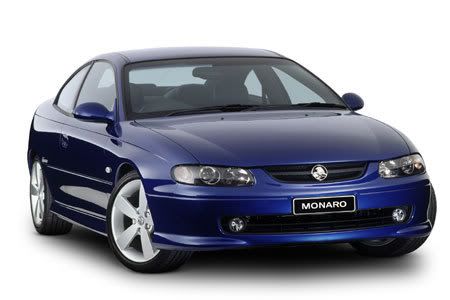 Been at this one on and off for a couple of months, but progress has been slow and I didn't think I had much to show for it. The kit is a snap-together, so is pretty basic, but it's nice and simple to work with! Much scope for improvement. The wheels, for example: 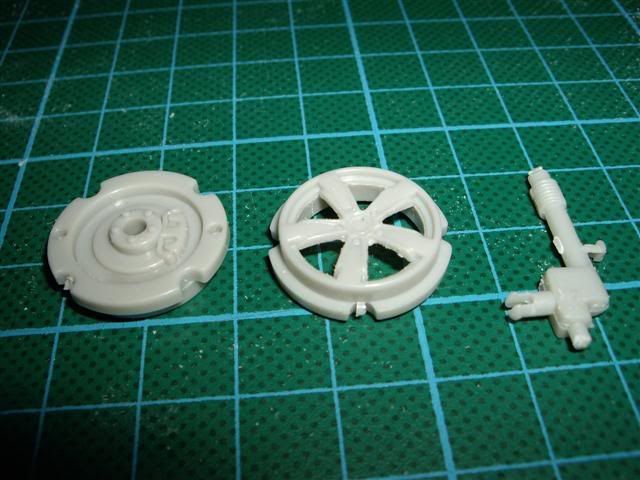 I like the rims - you often see them on Monaros in the street. But that's the brake disc and caliper attached to the back of the wheel. Two parts, with a hole for the axle. I removed the rim part of the wheel back and made a single rim, then sanded down the centre until I had just the disc... 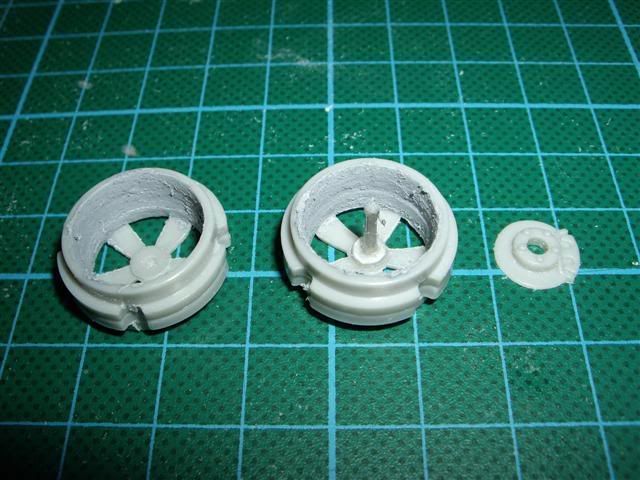 Finally: 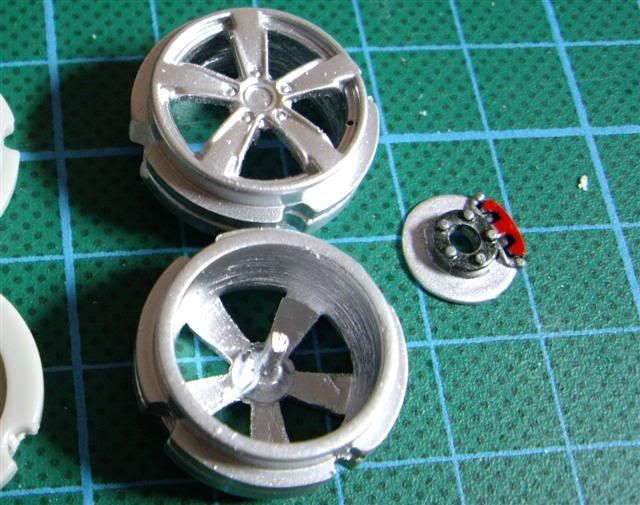 The stub axle is a piece of styrene rod glued into a slight hole drilled in the hub of the wheel, with a piece of styrene tube for reinforcement. Seems to be holding! I cut off the snap fitting on the front strut and drilled it out to take the axle. While working on the front suspension, I realised that the kit is designed so the wheels are not steerable. With a little work, I managed to rectify that. 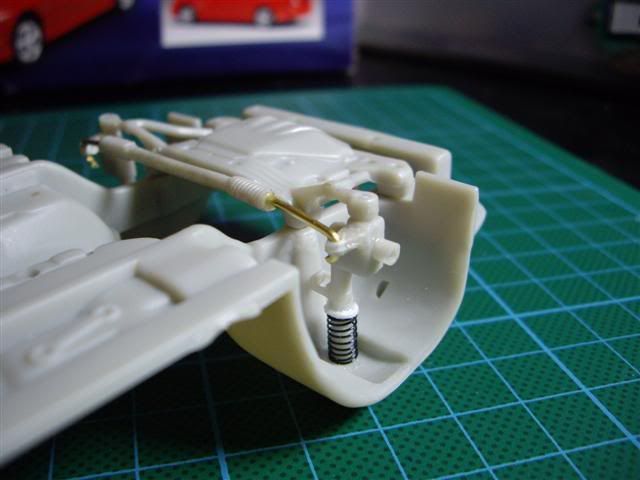 The tie rod was molded to the sump guard/ suspension arm piece. I cut it off and made ends from brass rod, epoxied into holes drilled in the tie rod. The parts that the tie rod ends go through were molded as part of the tie rod, so I removed them, attached them to the struts and drilled them out. It seems to work, and still leaves clearance for the engine and exhausts. Thanks for looking! More later... Last edited by evilbob; 07-08-2007 at 03:33 AM. |
|

|

|
|
04-15-2007, 06:18 AM
|
#2 | |
|
AF Enthusiast

Join Date: Feb 2003
Location: ASTLEY MANCHESTER
Posts: 1,073
Thanks: 0
Thanked 0 Times in 0 Posts

|
Re: WIP Monaro V2
Ambitious but great idea.
|
|
|
|
|
|
04-16-2007, 05:08 AM
|
#3 | |
|
AF Newbie

Join Date: Jul 2006
Location: madrid
Posts: 91
Thanks: 0
Thanked 0 Times in 0 Posts
|
Re: WIP Monaro V2
nice work!!
|
|
|
|
|
|
04-16-2007, 07:39 PM
|
#4 | |
|
AF Newbie
Thread starter
Join Date: Nov 2006
Location: melbourne
Posts: 80
Thanks: 1
Thanked 1 Time in 1 Post
|
Re: WIP Monaro V2
Some small progress. Working on various parts at the moment. Improved the seats, from this:
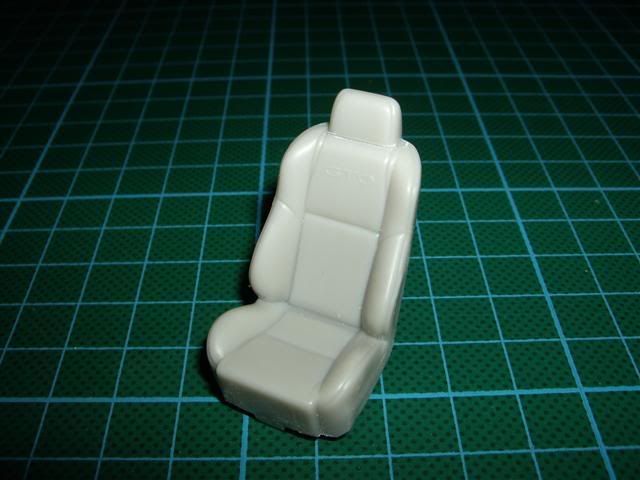 To this: 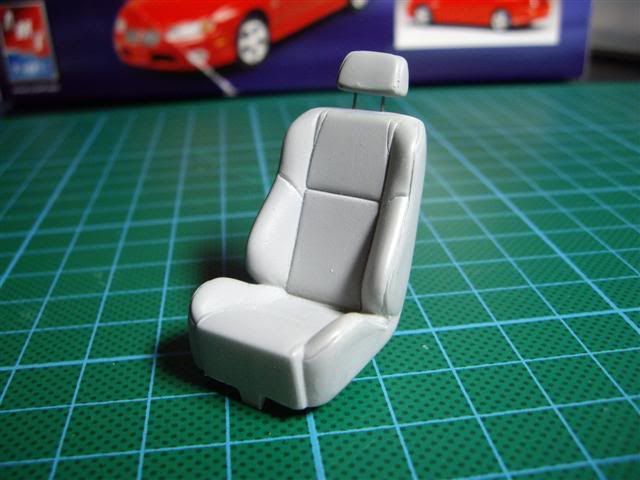 Needed to move the petrol filler cap, and work on the front of the car - that's going to be the biggest issue for me I think, as it's a fairly major change - a lot of putty! Here's a mockup: 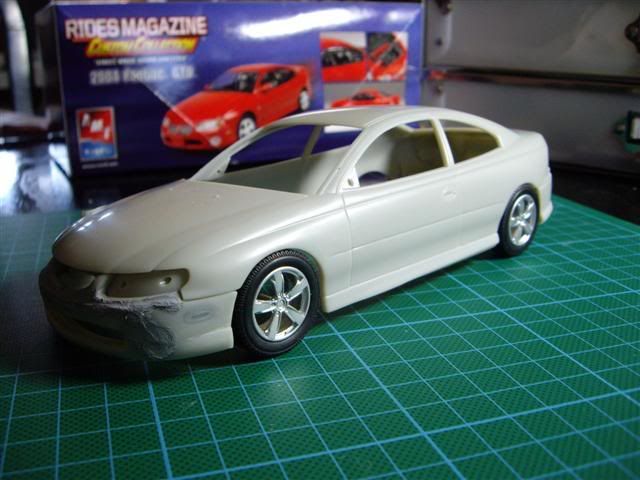 And I've opened the driver's-side door and made a working hinge (much to my surprise!)... Here you can also see where I've reversed the firewall for RHS. 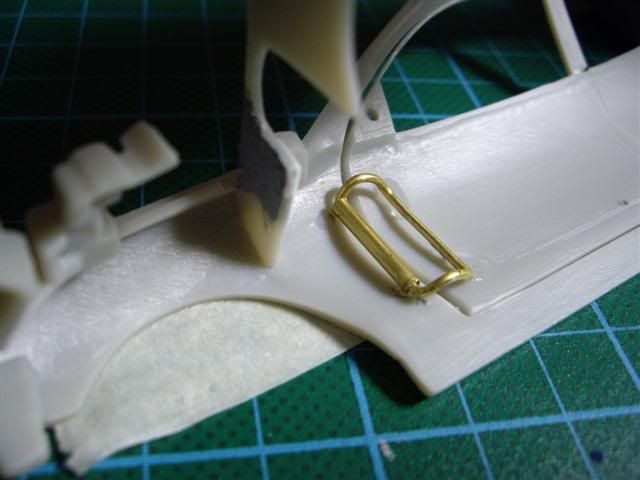 That's about all for now. The epoxy's setting on the hinge, so I'll resist the temptation to play with it! |
|
|
|
|
|
04-18-2007, 01:46 AM
|
#5 | |
|
AF Newbie
Join Date: Jul 2006
Location: Carlisle , Pennsylvania
Posts: 67
Thanks: 0
Thanked 0 Times in 0 Posts
|
Re: WIP Monaro V2
Nice, start, but, considering the kit youre starting with, you have your work cut out for you...
|
|
|
|
|
|
06-11-2007, 04:27 AM
|
#6 | |
|
AF Newbie
Thread starter
Join Date: Nov 2006
Location: melbourne
Posts: 80
Thanks: 1
Thanked 1 Time in 1 Post
|
Re: WIP Monaro V2
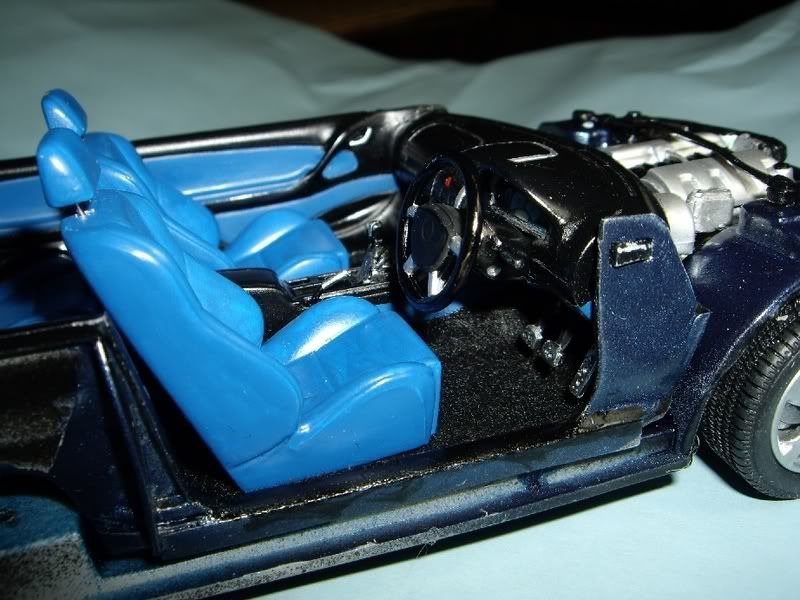
Ok, finally enough for a respectable update! Progress has been slow on this, working out what I have to do, and how to do it. This is my first attempt at serious modification of a kit, so it's all new to me!
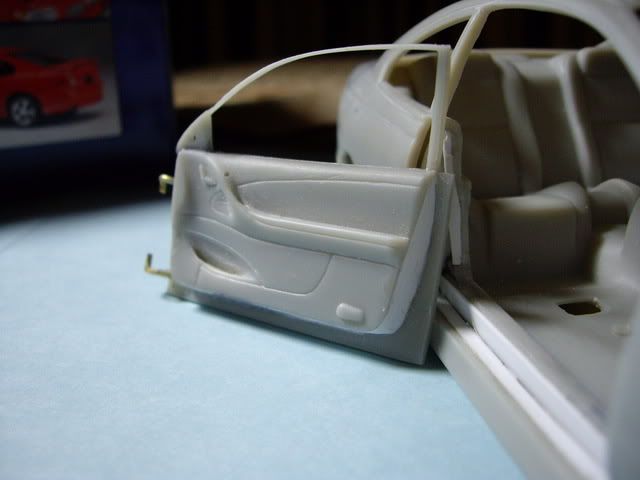 Here's the driver's door completed, with the doorsills done. 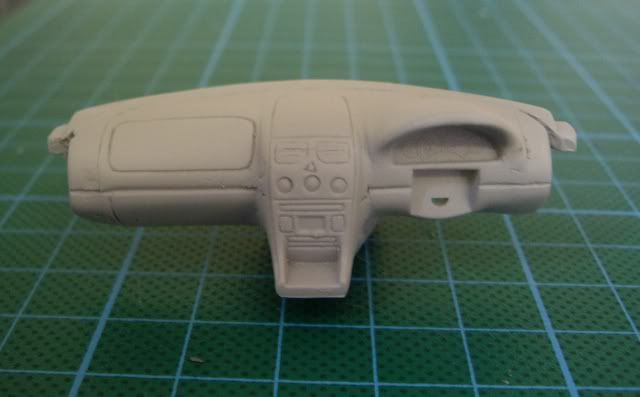 Using Willimo's tutorial, I converted the dash to RHS. Not as clean as I'd hoped, but better than I expected!  The engine's pretty much done and ready for the chassis - hope to have that together tonight... 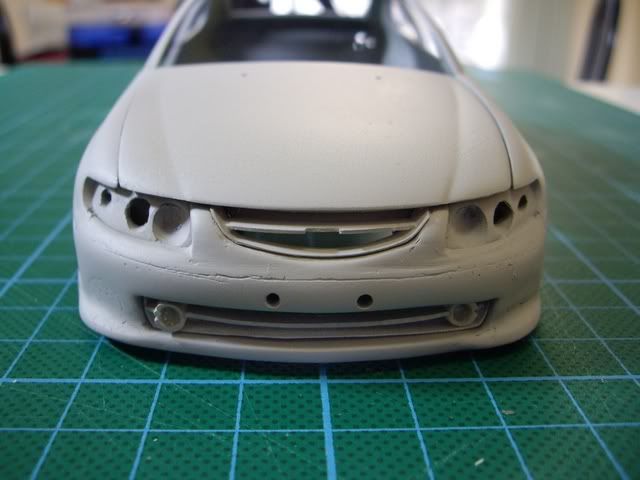 And here's what's really been taking the time. Still a lot of work to be done here, but I think it's looking fairly Monaro-ish. At least now it's primed, I can see what still needs to be done. Thanks for looking! |
|
|
|
|
|
06-11-2007, 05:00 PM
|
#7 | |
|
AF Fanatic

Join Date: Apr 2004
Location: somerdale, New Jersey
Posts: 4,660
Thanks: 63
Thanked 38 Times in 35 Posts


|
Re: WIP Monaro V2
Great job so far.
|
|
|
|
|
|
06-13-2007, 09:58 AM
|
#8 | |
|
AF Regular
Join Date: Jul 2003
Posts: 446
Thanks: 5
Thanked 1 Time in 1 Post
|
Re: WIP Monaro V2
Dang Bob, That looks excellent so far. Will be keeping an eye on this one. I still have to do the GTS Coupe.
__________________

|
|
|
|
|
|
06-13-2007, 03:46 PM
|
#9 | |
|
Sweet, sweet tiny Hondas.
 Join Date: Jul 2003
Location: Austin, Texas
Posts: 5,723
Thanks: 50
Thanked 89 Times in 65 Posts
|
Re: WIP Monaro V2
Great work so far! I like how you've fixed the wheels and the suspension. You're really going to make a gem out of a just fairly passable kit. I'm looking forward to seeing what you do here.
__________________
It ain't cool 'till your wife hates it. Imagine a world without Alabama Recent builds: Rocket Bunny FR-S and stock BRZ Toyota bB Bro-style Civic K20 powered SiR converted EK WIP I build slowly and poorly. 
|
|
|
|
|
|
07-08-2007, 02:33 AM
|
#10 | |
|
AF Newbie
Thread starter
Join Date: Nov 2006
Location: melbourne
Posts: 80
Thanks: 1
Thanked 1 Time in 1 Post
|
Re: WIP Monaro V2
Ok, starting to see it coming together here. Chassis is finished:
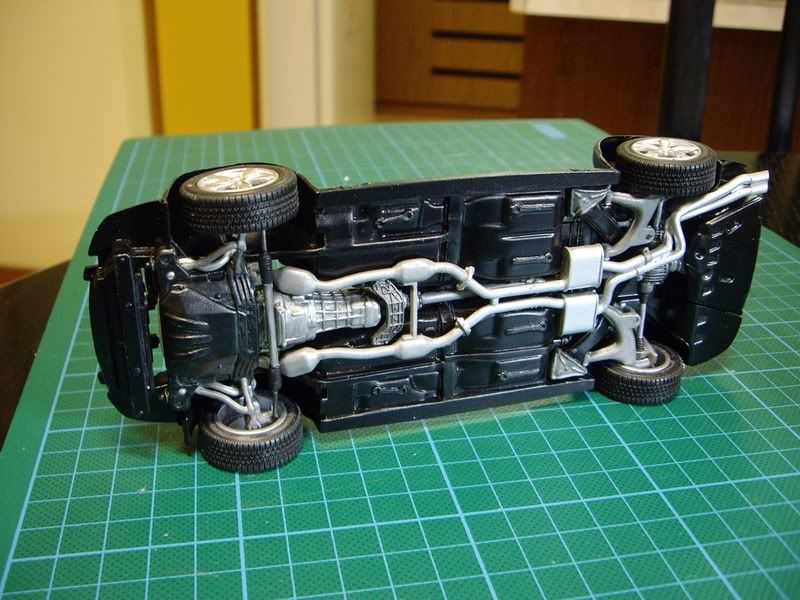 Body is primed and ready for some colour to go down. Here's a dryfit: 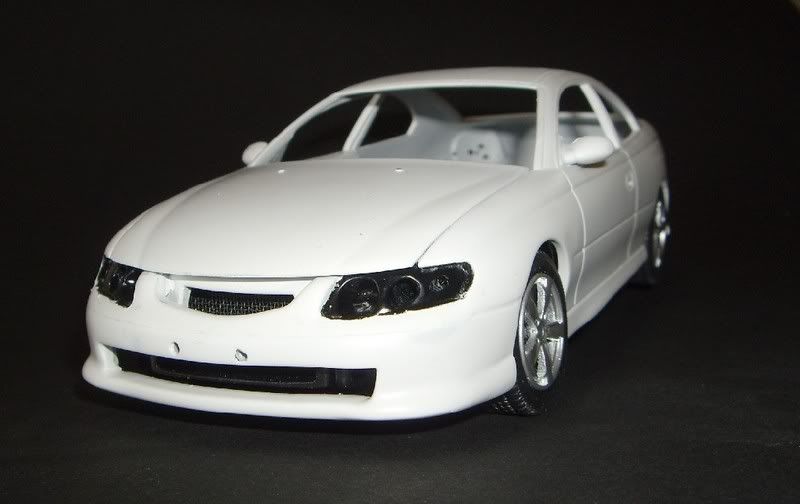 And the engine in the body: 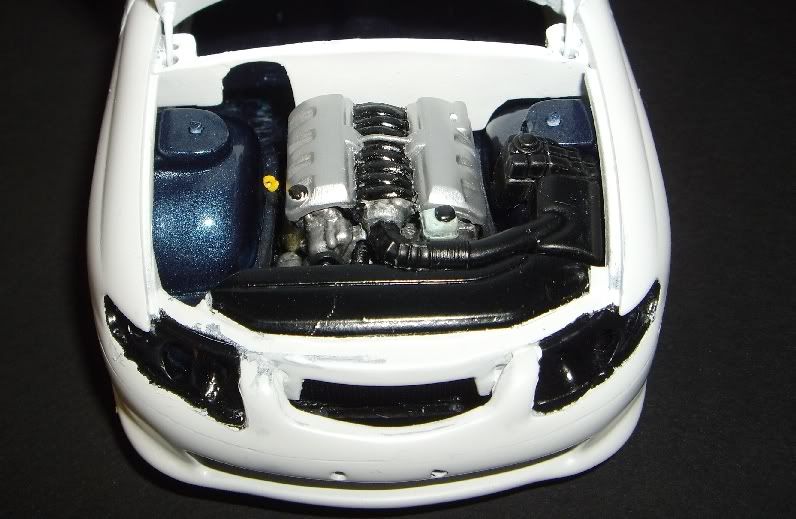 Here also you can see the colour I'm going to be using (on the arches). It's called 'Delft blue', and I think it looks magic. The first monaro I spotted in the street was that colour, and I've loved it ever since. Unfortunately, being metallic, most of what you can see here is flash bounce... it looks like this.... 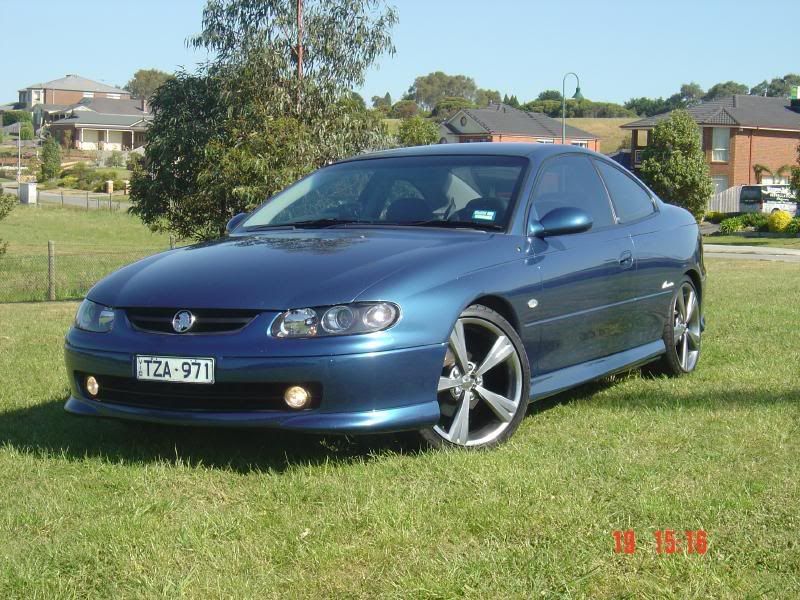 I'm going to leave the primer for a week to harden before I start on the colour, so I'm working on the tub at the moment. Hope to have some pics soon! Thanks for looking! Dylan. |
|
|
|
|
|
07-15-2007, 07:45 AM
|
#11 | |
|
AF Newbie
Thread starter
Join Date: Nov 2006
Location: melbourne
Posts: 80
Thanks: 1
Thanked 1 Time in 1 Post
|
Re: WIP Monaro V2
After a busy week, the interior is pretty much done. I just need to weather the front seats a bit, and later I'll add a couple of details.
 My first attempt at flocking - I found it a bit easier than I expected. Came out not too bad... 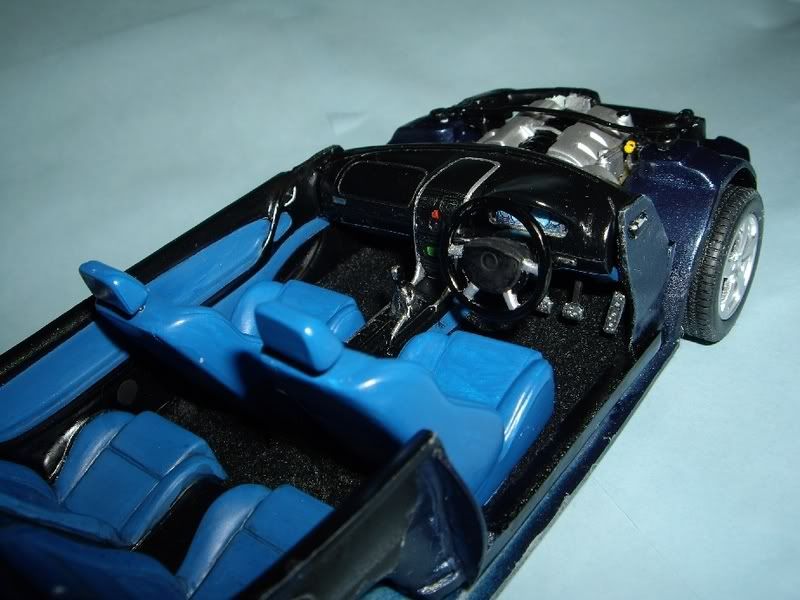 Also my first experience with the BMF, on a couple of little details: the pedals and the gearstick and handbrake being the more obvious ones. 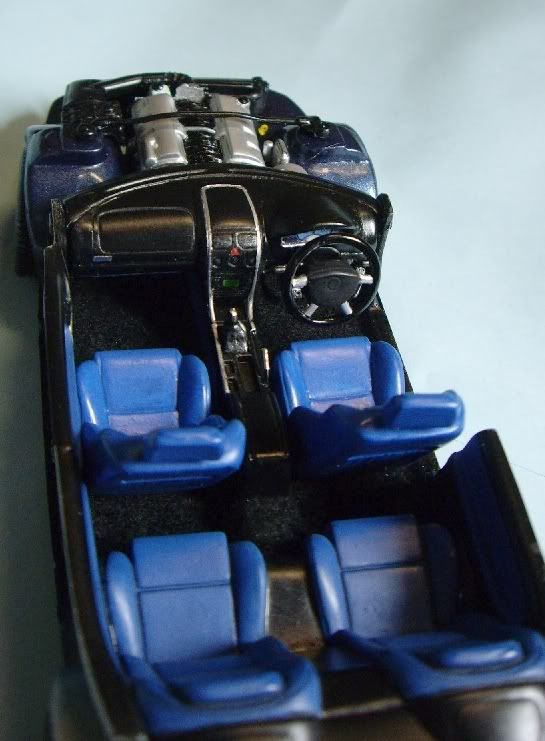 I didn't put seat belts on this one, simply because I couldn't be bothered! Going away for a few days. When I get back, the painting of the body begins. Thanks for looking. Dylan. |
|
|
|
|
|
07-16-2007, 04:19 PM
|
#12 | |
|
One Off model builder.

Join Date: Jun 2007
Location: Kansas city, Kansas
Posts: 184
Thanks: 16
Thanked 6 Times in 6 Posts
|
Re: WIP Monaro V2
cool i didnt know they had a GTO model, but seeing how simplified they made it ill pass on that kit. I dont like the new kits by Amt but you make the kit look as if it was a top notch model. Keep it up lookin good!
|
|
|
|
|
|
07-22-2007, 12:50 AM
|
#13 | |
|
AF Newbie
Thread starter
Join Date: Nov 2006
Location: melbourne
Posts: 80
Thanks: 1
Thanked 1 Time in 1 Post
|
Re: WIP Monaro V2
Well, on my holiday, I finally went and bought myself an airbrush. It's a Paasche VL, and I bought a compressor to go with it, so now I just have to learn how to use it!
I did the initial mist coat on this using PowerPlus automotive paint, decanted from the can and applied using the airbrush. I figured the paint was pretty forgiving, and a big area was a simple canvas to practise on. It worked, but then I realised I didn't have anything that would thin the paint - the Tamiya acrylic thinner just made it a large blob. A quick run down to the automotive shop solved that one - if anyone wants to know how to thin it, PM me and I'll let you know. It's pretty potent and dangerous stuff. So the wet coats have been applied with the can, although touch-ups will be done with the airbrush. Here's how it's looking: 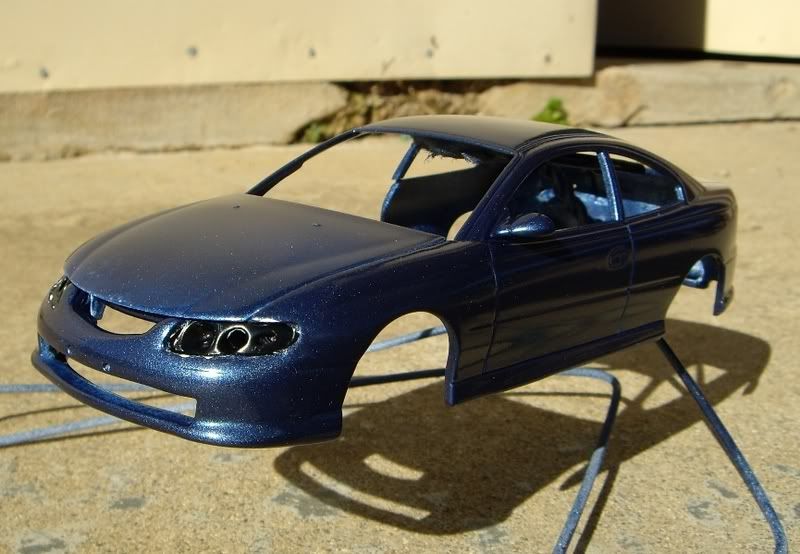  Still thinking about how to make badging. And I have to fix the headlights and things. Thanks for looking. Comments and constructive criticism are welcome! Dylan. |
|
|
|
|
|
07-22-2007, 11:59 PM
|
#14 | |
|
AF Newbie
Thread starter
Join Date: Nov 2006
Location: melbourne
Posts: 80
Thanks: 1
Thanked 1 Time in 1 Post
|
Re: WIP Monaro V2
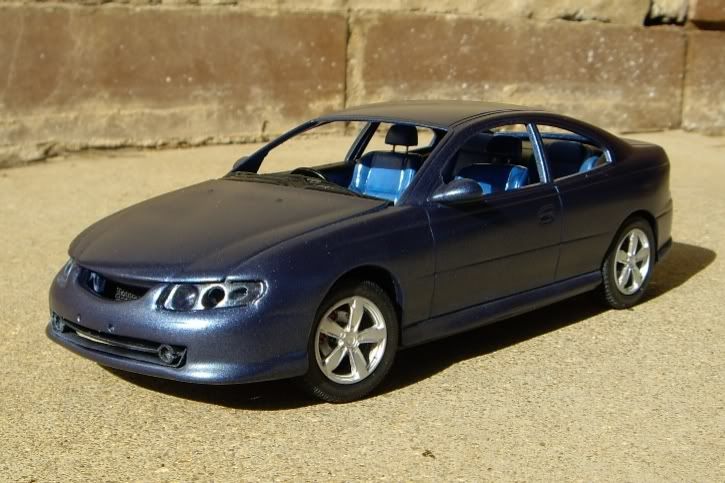
Couldn't help myself - put the body on the chassis and took some daylight shots...
  More later! |
|
|
|
|
|
07-24-2007, 09:59 AM
|
#15 | |
|
AF Newbie
 Join Date: Nov 2006
Location: Buk
Posts: 32
Thanks: 0
Thanked 0 Times in 0 Posts
|
i don't know why but that one in 1st painted post look better
it shine more At least excellent work with interior 
__________________

|
|
|
|
|
|
|
POST REPLY TO THIS THREAD |
 |
|
|


