Quote:
Originally posted by Guiddy
As for P-Man, he is just a git!
|

To answer your question 2.....(I've posted this in other place's but cant find the link at present)...This is the way i do all mine. Everybody has ther own ways of doing things...it's just a matter of working out what works best for you.
P.S I think the yellow one you mean is a EVO7
Make sure you sand the car well...removing molding lines etc. Start with 600, then 800 then 1000 and finish off the whole car with 1200 grit paper.
Once you have finished removing the molding lines and sanding the body, give it a good wash in hot soapy water, then finally wash the whole car with hot water straight from the tap....using a good soft brush to get into all parts of the body. This gets rid of all the small sanding particles left on the body
Once you have done this, shake as much water off the car as you can, then using your soft brush, brush all the water off the car so it dont dry in "spots" on the body.
Once you have done this, you want to keep the car as clean as possible from dust. Place the body straight into a plastic container with a lid to stop any crap getting into the box and onto the car. This is AS CLEAN as you will get it and you want to keep it like it !! See pic....
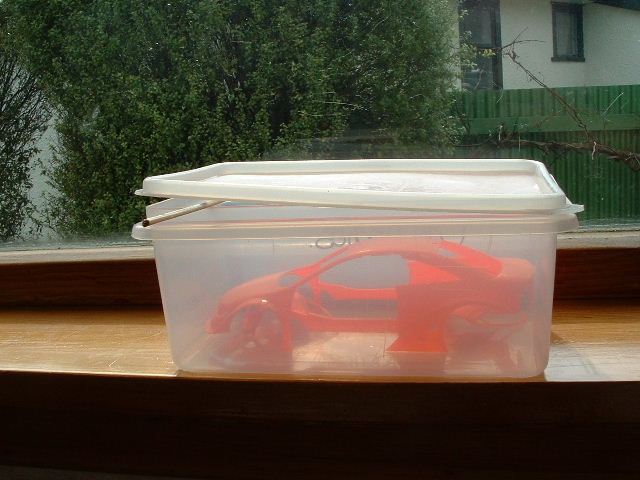
I put a tooth pick under the lid just so that it can "breath" a little as it dries. Leave the car to dry for awhile. A good day is how long i leave mine.
IMO this is so important as there is so much crap floating around in the air, and it lands on your model....SO KEEP IT CLEAN !!
After a day or two, take the body out ready for painting. Attach it to your painting frame and give it a final brush and a good blow.
Spray the primmer on.
In between coats i put it straight into the microwave as this is a great DUST FREE place....this is were i think alot of people muck up as they leave it in the room to dry....but as its drying its also attracting the very small dust particles.....this is what is giving you alot of paint finishes that are "rough" looking....because the dust is being trapped under the paint.
Before painting, heat the can up in hot water for 10 minutes so it flows better from the can.
2 Coats of white primer. First coat very light, the second so that it covers the model. Dont be to fussy if it still looks a bit "see-though"
Leave for a week to harden the primmer.
The Finish Coat
3-4 Coats of finish coat about
5-10 minutes apart....thats it...nice a simple.(keep the can warm)
The first coat is a very light mist coat...the paint should only just be landing on the car.
Do the same for the second coat
The third coat you can spray a bit more heavy.
The last coat is the one you want to get perfect.
I always spray the front and rear bumpers first...then both sides along the whole length of the car body.
Then the last bit i do is the bonnet/boot and roof last
Dont bother sanding between coats as i dont really see the point...all you are doing is making more dust and removing half the paint you have just stick on.
After you have finished the last coat...leave for 10-12 days.......rub with some compound then finish with a wax.
After one day....leave the car in the sun or a warm place to harded the paint untill you polish it up.