|
|
|

|
|
| Search | Car Forums | Gallery | Articles | Helper | AF 350Z | IgorSushko.com | Corporate |
|
| Latest | 0 Rplys |
|
|||||||
| WIP - Street Post topics for any "Works In Progress" street vehicles projects in this sub-forum. |
 |
 Show Printable Version | Show Printable Version |  Email this Page | Email this Page |  Subscribe to this Thread
|
|
|
Thread Tools |
 04-04-2011, 06:27 PM
|
#1 | |
|
Razor Sharp Twit
 
Join Date: Mar 2004
Location: london
Posts: 5,863
Thanks: 0
Thanked 25 Times in 21 Posts
|
This is possibly my first exposure to a proper sports car when I were a wee lad because one of my uncles had one in that 'lovely' bronze metallic that was all the rage back in the day.
I also had a big radio control 928 that I never had batteries for but loved all the same. So here it is after a long time looking for it in 1:24 scale. For those interested, this is a rebox of the Italeri kit of the same name except that kit had body parts molded all in black. For some reason, in the kit I got, the body was blue and the bumper parts were black. If I'm correct, this kit was also reboxed in the US by Testors. They used to come up quite regularly on ebay but these days, they seem to be getting scarcer. First things first. Attached front and rear bumpers to help fix a break at the rear and to check for alignment with chassis.    Body proportions look good and top down, you can see the coke bottle/narrow waist thing that they have going on. You can also see the break in the rear here. Fixing on the bumper helps give the whole area strength.  Had to fix a badly cut part of the windscreen frame. All I did was slowly add surface primer to fill the cut area and then when it was not quite fullt set/cured, took a sharp blade and carefully trimmed it to match. A little sanding later tidied it up.  Also had a couple of sink marks to fill in. You can also just about see where I filled in some of the panel gap because it was a bit too wide here and uneven.  Same on the other side with panel gap.  First coat of primer. After a good sanding all over with 2000 grit, I brushed the surface with a hog hair paint brush that's nice and stiff so it gets all of the sanding dust out of the panel gaps. Then when it's dry I gave it a decent coat of warmed primer. Primer is Halfords Automotive Primer.  Gap here still not quite right.  Gap here is much better.  Still need to fix that join line, tidy up sink holes and that boot hatch shut line too.  Looks rough here but the fix on the window trim here hasn't been sanded yet.  Other things done. I (over) scribed the panel gap at the lower part of the front bumper. On the kit, this was where you had to glue so the panel line was gone altogether. I noticed afterwards in photos that the real gap in very, very fine.  I also over did the same gap at the rear bumper. Apart from that, panel gaps are all very prominent, very even, very Porsche.  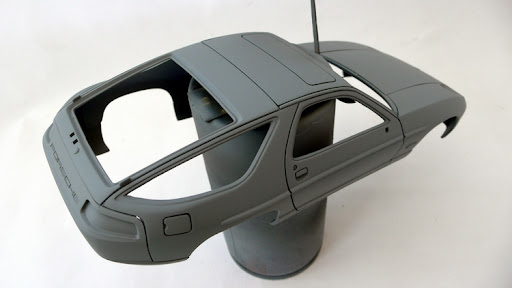 While I was at it, I also prepped and primered some other parts. 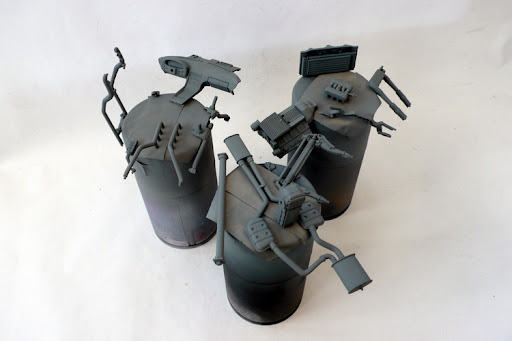 More prep. Usually, my first coat of primer almost gets sanded all away as it's used purely as a surface filler for all of the fine scratches you get from the sanding of the bare body. With this one though, probably because of the simple surfaces, after a generally all over with 2000 grit again, I noticed there wasn't much texture in the primer and it was pretty much as flat as normally like so a lot of primer was still left.  Fixed windscreen trim.  So, I was happy enough with it to put on some proper primer. Tamiya White Fine Surface Primer. At this point, I had removed the bonnet as per instructions.  And after a little sanding with 2000 grit again, I took some micromesh to it to get it really flat and smooth and shiney.  Because I mention it all of the time about shiney primer, I turned off all of the lights to capture a reflection in it. 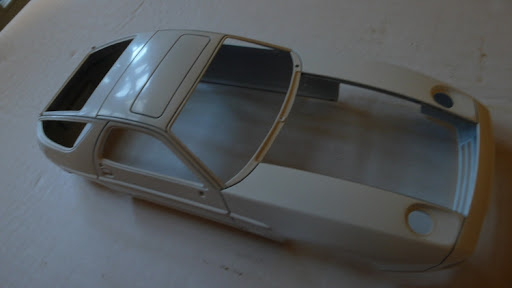 And a closer shot.  You can at this point, still see some distortion in that reflection and that the lines of the reflected image aren't that sharp. This means that it could do with at least one more seeing to with the micromesh before applying colour. And that's it so far. Colour has yet to be decided as I'm torn between some funky and 70s/80s or good old reliable black.
__________________
AF's Guidelines Read them. __________________  Currently in the process of re-hosting my photos. If any go missing, drop me a PM. Last edited by drunken monkey; 04-05-2011 at 10:58 AM. Reason: consolidating back to back posting |
|

|

|
|
04-05-2011, 11:48 AM
|
#2 | |
|
Not A Hoarder!

Join Date: Jun 2003
Location: Englewood, Colorado
Posts: 2,240
Thanks: 0
Thanked 19 Times in 19 Posts

|
Re: Airfix Porsche 928 S4 1:24 WIP
Great start. The Testors 928/s kits i have have opening doors, but i don't know their mfg.
__________________
SCCA 7, The lost Z Contest entry thread: Mystery? Beetle + Boxster = Bugster, P.T. Panel:click here Diablo Roadster: click here, & Porsche C2 Cab |
|
|
|
|
|
04-05-2011, 12:08 PM
|
#3 | |
|
AF Newbie
Join Date: Sep 2010
Location: Peterborugh
Posts: 59
Thanks: 6
Thanked 0 Times in 0 Posts
|
Re: Airfix Porsche 928 S4 1:24 WIP
I'm really glad someone has taken the time to do a WIP for a paint job. This is my biggest down fall on the the models i make in getting a sweet finish and i thikn i understand a little more now where i may be going wrong.
I've just been building an evo 5 and had pre sanded car before applying tamiya white primer. Applied that but didnt sand it down. I then laid down a coat or two of semi gloss black, sanded that back smooth and noticed where the washer wipes were i was going down to the base plastic ( even using 12000 grit ). Anyhow to cut a long story short my paint job isnt looking as good as this prospectively is so i'm appreciating the tutorial. Thanks |
|
|
|
|
|
04-05-2011, 01:21 PM
|
#4 | |
|
AF Enthusiast

Join Date: Oct 2002
Location: Republic of Wallonia (ex-Belgium)
Posts: 2,059
Thanks: 6
Thanked 14 Times in 14 Posts

|
Re: Airfix Porsche 928 S4 1:24 WIP
Good job with the small corrections you brought to the body
 I'll follow this carfeull 'cos I'm sure it's going to be perfect once finished.
__________________

|
|
|
|
|
|
04-06-2011, 04:49 AM
|
#5 | |
|
AF Newbie
Join Date: Mar 2010
Location: Miami FL/Athens GR
Posts: 59
Thanks: 1
Thanked 5 Times in 4 Posts
|
Re: Airfix Porsche 928 S4 1:24 WIP
I would like to follow this closely also as a learning curve too but, it seems that I cannot see the photos... Could anyone suggest what I should do and if this is only on my computer?
|
|
|
|
|
|
04-06-2011, 08:21 AM
|
#6 | ||
|
Razor Sharp Twit
Join Date: Mar 2004
Location: london
Posts: 5,863
Thanks: 0
Thanked 25 Times in 21 Posts
|
Re: Airfix Porsche 928 S4 1:24 WIP
Quote:
Last 2 of the body in primer. I went over the body again where I still saw some texture with 4000 micromesh, taking care not to go over the edges of the bodywork. If at this stage I got down to grey primer, it would mean going over it with white primer again and with each extra layer of primer (and paint for that matter), you will risk getting more texture onto the surface. Just a couple of close up shots of the kind of reflection I get on my Primer before I apply any colour coat. They're a little blurry because I couldn't get my camera to focus properly on the reflected image so I left camera at a fixed focus setting and moved until it looked sharp to me.   Interior was kept a simple black on black.  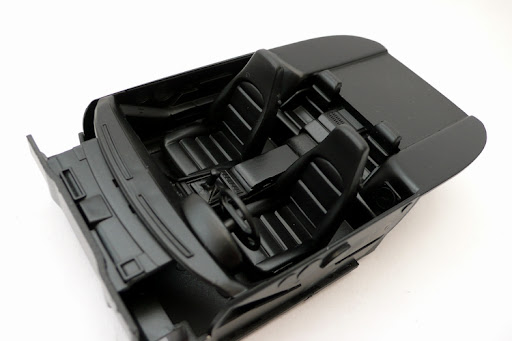 I broke up the monotony by applying some texture to the transmission tunnel, floor and rear parcel shelf with some Plastikote Suede Touch paint before spraying on Halfords Automotive Satin Black paint. In hindsight, Black on black was probably not a good idea as I think I will just paint the body Tamiya's lovely TS14 Black. Should Probably have painted the "carpet" sections flat black too. Here you can see the very fine texture the Suede Touch paint gives the surface. 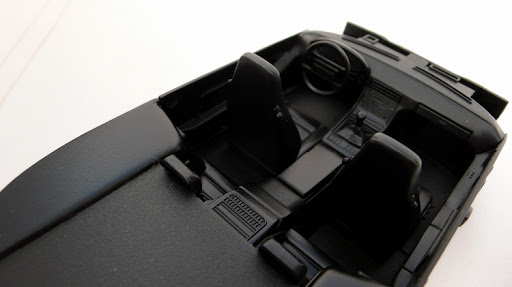 I reckon this would do nicely for getting the sand-cast texture on certain red cam covers and intakes... While the primer was curing or drying after sanding and washing, I made a start on the other bits. Rear suspension nicely done; a little fiddly to align together to fit on model chassis but pretty good looking. 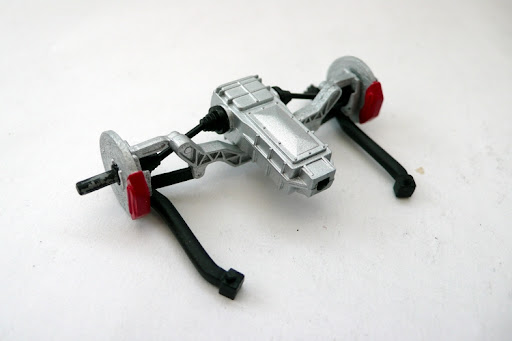  And some other bits.  Engine wires are normally black on Porsches but this looks like it will be a very black car so I figured a little red in the engine bay would be a nice touch. Hoses to radiator are bits of bent 4mm and 2mm styrene rod. Will add some BMF hose clamps later.
__________________
AF's Guidelines Read them. __________________ Currently in the process of re-hosting my photos. If any go missing, drop me a PM. |
||
|
|
|
|
04-06-2011, 11:27 AM
|
#7 | ||
|
AF Enthusiast
Join Date: Oct 2002
Location: Republic of Wallonia (ex-Belgium)
Posts: 2,059
Thanks: 6
Thanked 14 Times in 14 Posts
|
Re: Airfix Porsche 928 S4 1:24 WIP
Quote:
__________________
|
||
|
|
|
|
04-06-2011, 12:47 PM
|
#8 | |
|
Razor Sharp Twit
Join Date: Mar 2004
Location: london
Posts: 5,863
Thanks: 0
Thanked 25 Times in 21 Posts
|
Re: Airfix Porsche 928 S4 1:24 WIP
Here's where I may horrify some people.
First of all, let me say that I am a lazy painter. Every time I add another layer of paint or primer, I notice more textures appearing which is why I spend so much time and effort making my base primer as perfect as possible; so I can avoid spraying too many coats of primer and/or paint. If you look back, so far I have only put on one layer of grey primer, sanded then one layer of white primer which I have sanded "perfect". The idea being that the less texture in my primer, the less texture in my paint. Now comes the horrifying bit. I don't do mist coats. I start by doing one even, light(ish) wet coat over my finished primer and this is what it looks like. 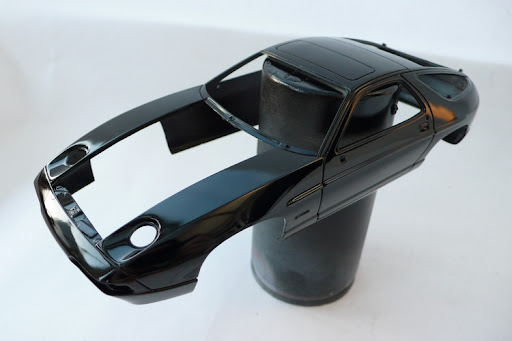  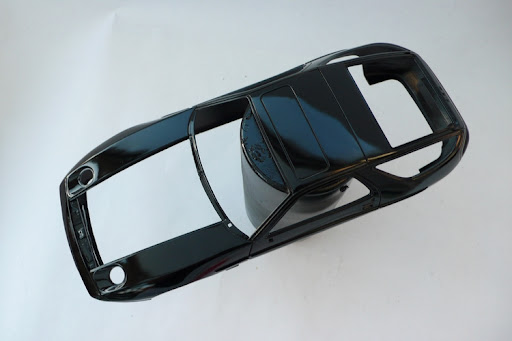 There are a couple of spots of dust, one fisheye and one spot that might have gotten too much paint. This doesn't matter to me as this layer of paint, like my layer of primer underneath it, I am willing to sand away as much as necessary to get it smooth and perfect. I tried misting over vulnerable areas for a while but that never worked for me, mainly as I don't have an airbrush and with a can, I never found it easy to get a consistant and meaningful mist coat. This single layer of paint I tend to leave for at least two days in a warm place before I touch it. After it has been checked, sanded and checked again, IF it needs another layer of paint (i.e some primer is showing through) then I will add another wet coat on top. So in summary, my method is one layer grey primer one layer white primer one layer paint. Of course that is the perfect painting scenario for me. Extra coats of paint are done when necessary, not as part of the course. If I need to add an extra coat of paint, I will work the existing coat of paint more to avoid getting too thick a coat of paint on it. In short, I sort of treat the first layer of paint like primer when I need to add more paint.
__________________
AF's Guidelines Read them. __________________ Currently in the process of re-hosting my photos. If any go missing, drop me a PM. |
|
|
|
|
|
04-08-2011, 11:04 AM
|
#9 | |
|
Razor Sharp Twit
Join Date: Mar 2004
Location: london
Posts: 5,863
Thanks: 0
Thanked 25 Times in 21 Posts
|
Re: Airfix Porsche 928 S4 1:24 WIP
Gave the paint a quick once over with 2000 grit
 Then went over it with 4000 micromesh. For reference: left = after 2000 right = after 4000  And now there's a couple of spots that need to be fixed before one more coat of paint. Fisheye that's left a pin hole.  I will spray out some paint so I can dab/fill in the hole with a needle. When cured, that will need to be sanded. Where there was a little overspray. 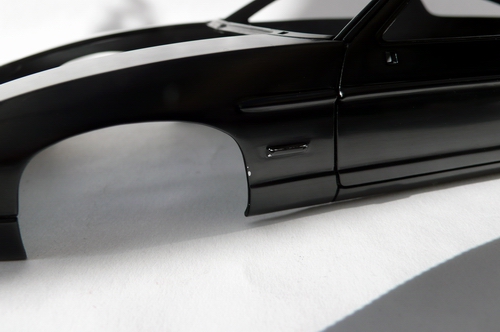 Took a small chip out here whilst sanding the over-spray so this will also need to be filled with needle on paint as before.
__________________
AF's Guidelines Read them. __________________ Currently in the process of re-hosting my photos. If any go missing, drop me a PM. |
|
|
|
|
|
04-17-2011, 11:56 AM
|
#10 | |
|
AF Regular
Join Date: Apr 2011
Location: Cape Town
Posts: 151
Thanks: 0
Thanked 1 Time in 1 Post
|
Re: Airfix Porsche 928 S4 1:24 WIP
Very nice so far!
 Love it. Love it. |
|
|
|
|
|
04-18-2011, 10:09 PM
|
#11 | |
|
Image Hosting Exceeded
Join Date: May 2003
Location: Flying in circles
Posts: 4,233
Thanks: 23
Thanked 95 Times in 86 Posts
|
Re: Airfix Porsche 928 S4 1:24 WIP
No problem seeing the pics here.
Cool, funky kit of a cool funky car. Fun to see a 928 here. Paint looks great- but why spray white primer over grey, and then black paint? I'm thinking that the white layer isn't doing anything for you. 
__________________
PHOTOBUCKET SUCKS |
|
|
|
|
|
04-19-2011, 03:36 AM
|
#12 | |
|
AF Newbie
Join Date: Sep 2010
Location: Peterborugh
Posts: 59
Thanks: 6
Thanked 0 Times in 0 Posts
|
Re: Airfix Porsche 928 S4 1:24 WIP
i wondered too. I found tamiya white primer pants.
|
|
|
|
|
|
04-19-2011, 03:50 AM
|
#13 | ||
|
AF Regular
Join Date: Apr 2011
Location: Cape Town
Posts: 151
Thanks: 0
Thanked 1 Time in 1 Post
|
Re: Airfix Porsche 928 S4 1:24 WIP
Quote:
|
||
|
|
|
|
04-19-2011, 09:56 AM
|
#14 | |
|
AF Regular
Join Date: Dec 2005
Location: London
Posts: 444
Thanks: 6
Thanked 4 Times in 4 Posts
|
Re: Airfix Porsche 928 S4 1:24 WIP
I'm following this with great interest, especially since this is the first thread I've seen of this kit. Really looking forward to seeing your progress!
__________________
Paul  '67 Amazon 122S B20 o/d Estate & '61 A-H Sprite Mk2 948cc |
|
|
|
|
|
04-19-2011, 01:02 PM
|
#15 | |||
|
Razor Sharp Twit
Join Date: Mar 2004
Location: london
Posts: 5,863
Thanks: 0
Thanked 25 Times in 21 Posts
|
Re: Airfix Porsche 928 S4 1:24 WIP
Quote:
Quote:
Tamiya Primer's are by far the best primers I have used out of a can. Nothing else comes close to laying down a flat surface that's easy to work smooth. A couple of new pics. The exhaust. A little trick of mine. I have a jar of Tamiya Flat Aluminium (XF-16) that I've added Tamiya Acrylic Thinner and a water to. What this does, is make the paint go bad and seperate. After a while, all of the paint particles clump together at the bottom of the jar and you get a layer of the solvent on top. The reason I do this is so that now, I can paint using the clumpy part which leaves a nice grainy texture when it's dry. 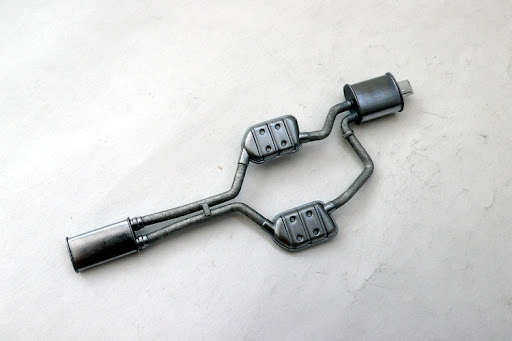 You can see it a little better here  After that, I mix a little Citadel Skaven Brown Ink with Citadel Mithril Silver to get a rusty steel kinda of colour and use this to wash over the textured Tamiya Flat Aluminium. This smooths down some of the grainy texture and takes off some of the shine that XF-16 has and you end up with this.  Drivetrain: The molded on belts have been removed from the parts leaving just the pullies and the belts are replaced with Tamiya Masking Tape cut to size and painted Flat Black.  Normally, I replace the shocks and springs with some styrene tube+rod scratch built items with coiled wire but I wanted a quick build so I just painted them here. First I sprayed everything Automotive Satin Black. Then I carefully painted over the top edge of the molded on spring/coil with Citadel Skull White which I find is better for this than Tamiya's Acrylics (Flat or Gloss) followed by Tamiya Gloss Red (X-7). Here, the belts have been done and I made a start on what I think is part of the throttle controls that are attached to the side of the intake plenum. It's just little bits of 0.5mm styrene sheet drilled then cut (it won't work the other around) and painted Citadel Mithril Silver. 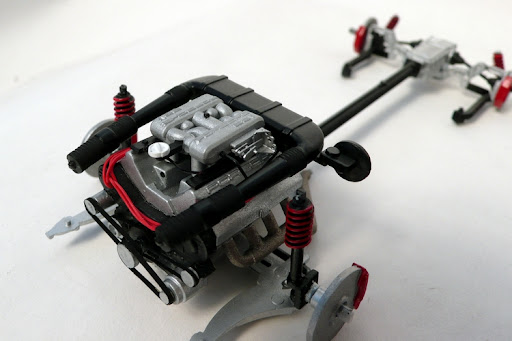 And that's it so far. There were a couple of spots on the body that went through to Primer so my hopes for a two coat finish died rather quickly. I may just mask off and spray those two panels and if I do, I'll make a point of taking photos of that.
__________________
AF's Guidelines Read them. __________________ Currently in the process of re-hosting my photos. If any go missing, drop me a PM. |
|||
|
|
|
| ||||||||||||||||||||||||||||||||||||||
|
POST REPLY TO THIS THREAD |
 |
|
|


