|
|
|

|
|
| Search | Car Forums | Gallery | Articles | Helper | AF 350Z | IgorSushko.com | Corporate |
|
| Latest | 0 Rplys |
|
|||||||
| WIP - Motorbikes Post topics for any "Works In Progress" motobikes projects in this sub-forum. |
 |
 Show Printable Version | Show Printable Version |  Email this Page | Email this Page |  Subscribe to this Thread
|
|
|
Thread Tools |
 06-27-2007, 07:01 PM
|
#1 | |
|
AF Enthusiast
 
Join Date: Mar 2005
Location: Barnsley
Posts: 3,199
Thanks: 8
Thanked 111 Times in 107 Posts
|
1999 Suzuki Hayabusa 1/12th
First a little history.Way back in June 2000 I purchased a brand new Suzuki Hayabusa in Red and Black.It really was a great bike which I kept for just over 2 years in total before I sold it,a decision I later wished I hadn't made.I wish I had kept it.
Anyway I've wanted to build the Tamiya kit of this bike ever since it first came out but just never got round to it.So I'm hoping to rectify this now.I've made a start on the kit which will be built in the same colours as the one I owned. This one.Not the best picture but one of the few I have of my bike.  I'll be using some of the Crazy Modeler etched set and the correct colours to depict my bike from the Zero paint range,kindly matched by Steve Hemming (thanks Steve!!!) Here are a few progress pics of what I have done so far.It's my first bike kit since Tamiya's Yamaha YZF-R1 kit in 1998 and I'm a little rusty so be gentle.Comments welcome. The engine was painted Alclad Aluminium and all the bolts on the engine covers where replaced with etched parts. 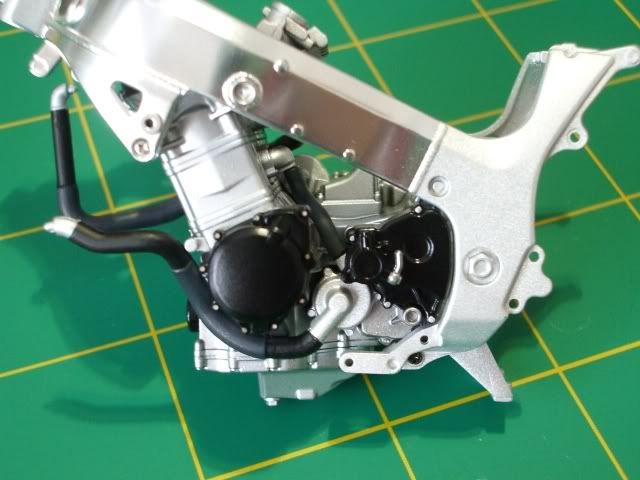 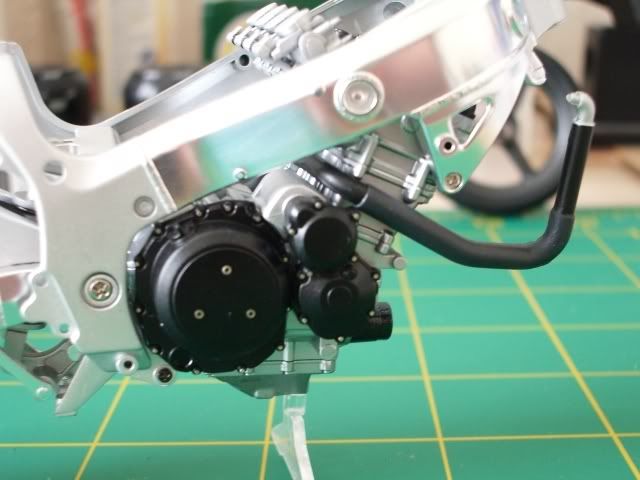 The frame was left in it's plated finish (it is a little too bright) I masked and sprayed the sections at the rear (where the swingarm fits to the frame) and the top of the swingarm (where the spring passes through) as these are cast and should be a rougher,duller and textured finish.I also painted the wheels in the correct Suzuki Dark Grey Metallic satin finish not the black as suggested by Tamiya on the instructions sheet.Luckily I had a small touch up of this colour left over from when I had the real bike. 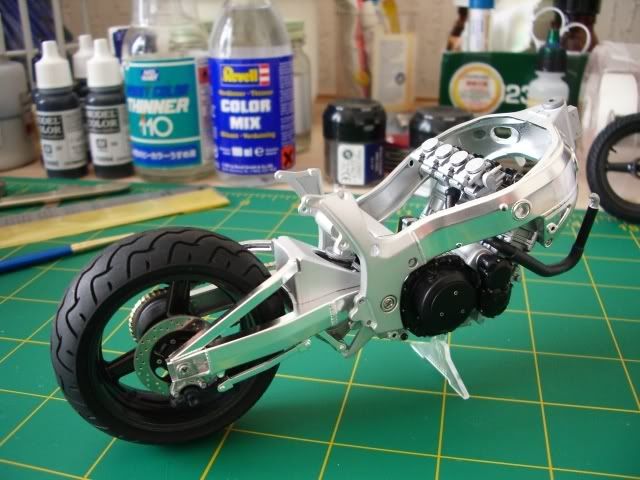 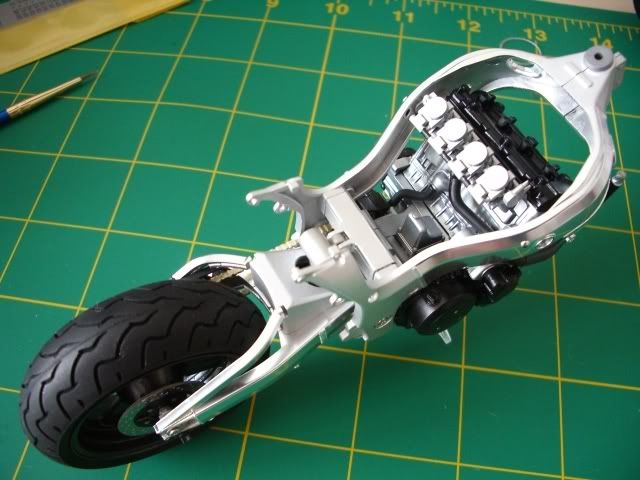 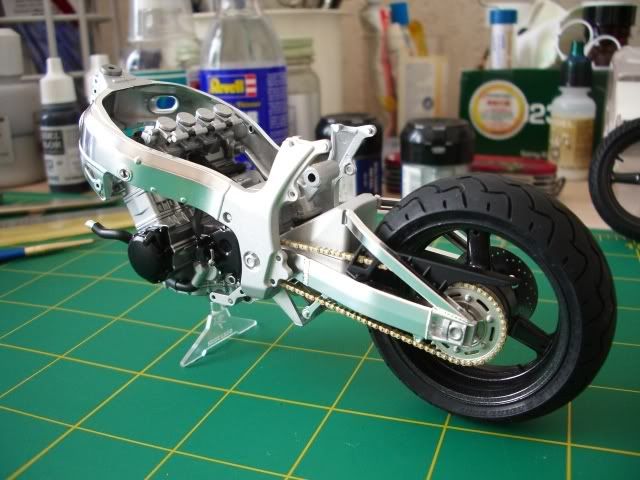 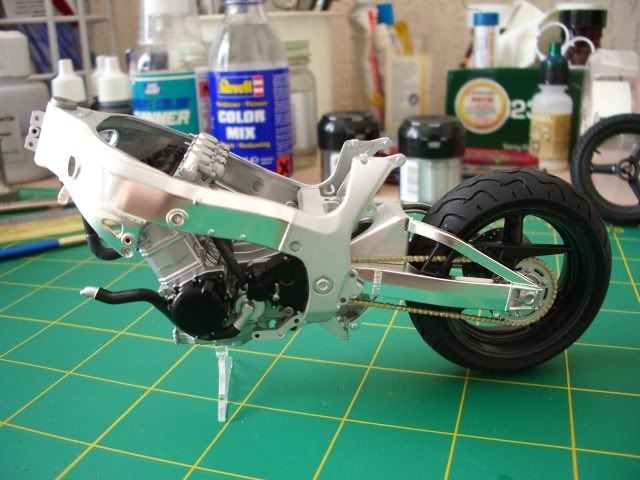  The rear brake fitted from the Crazy Modeler set with photo etched nuts. 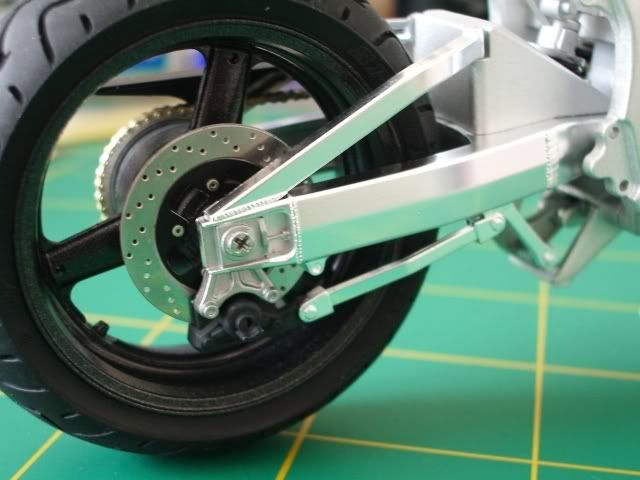 The Crazy Modeler front brake disk assembled.Just needs some paint. 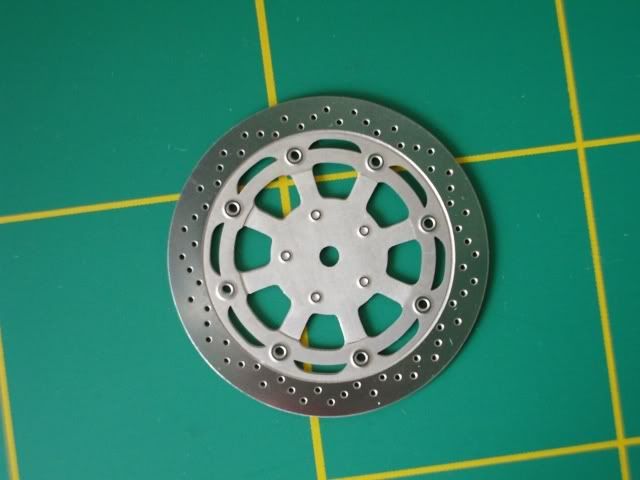 Well that's it for now.I'll be working on the front forks and wheel assembly next so more pictures as it comes together.Let me know what you think so far.
__________________
Steve Noble |
|

|

|
|
06-28-2007, 02:54 AM
|
#2 | |
|
AF Enthusiast

Join Date: Feb 2006
Location: beringen
Posts: 682
Thanks: 0
Thanked 6 Times in 6 Posts
|
Re: 1999 Suzuki Hayabusa 1/12th
great start. Don't forget the seam on the wheels.

__________________

|
|
|
|
|
|
06-28-2007, 05:28 PM
|
#3 | |
|
AF Regular
 Join Date: Aug 2006
Location: Richmond, Virginia
Posts: 260
Thanks: 0
Thanked 0 Times in 0 Posts
|
Re: 1999 Suzuki Hayabusa 1/12th
You're off to a great start. This is one of the nicer Tamiya kits.... they're all nice really, but this one stands out.
|
|
|
|
|
|
06-28-2007, 11:26 PM
|
#4 | |
|
AF Fanatic

Join Date: Dec 2004
Location: Up the creek with no paddle
Posts: 5,888
Thanks: 7
Thanked 16 Times in 15 Posts
|
Re: 1999 Suzuki Hayabusa 1/12th
I'll be following you along your trip down memory lane
 Look forward to picking up some useful tips for when I do mine (next century).
__________________
Guideline for happy modeling: Practice on scrap. Always try something new. Less is more. "I have a plan so cunning, you could put a tail on it and call it a weasel" - Edmund Blackadder |
|
|
|
|
|
06-30-2007, 10:42 AM
|
#5 | |
|
AF Enthusiast
Join Date: Mar 2005
Location: Barnsley
Posts: 3,199
Thanks: 8
Thanked 111 Times in 107 Posts
|
Re: 1999 Suzuki Hayabusa 1/12th
I've been on the late shift at work this week so progress has been a little slow.
The front brake discs had the centers picked out in Alclad Pale Gold.I'm going to add photoetched nuts onto them once installed. 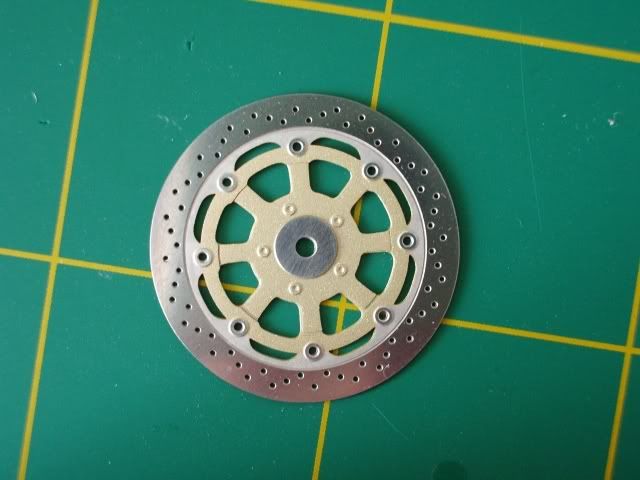 The large radiator and oil cooler were painted and installed.Colours were Alclad Semi Matt Aluminium and Vallejo Air Black for the oil cooler. 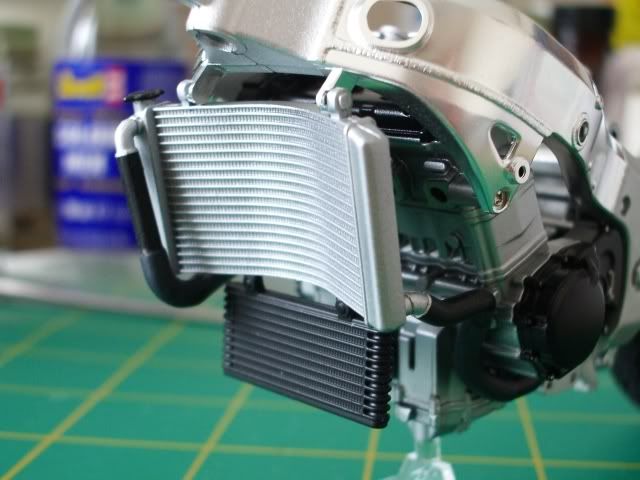 The front mudguard was painted.For this I used Zero Paints Candy Red over the fine metallic silver basecoat.The colour is perfect and the Candy paint sprayed beautifully.The picture below shows the real bike for comparison and the next picture the mudguard from the model.(although it is very shiny I haven't clear coated it yet.) So the shine should be fantastic when cleared.I'll be using Zero 2K Clear which I haven't used before but have heard only good things about. 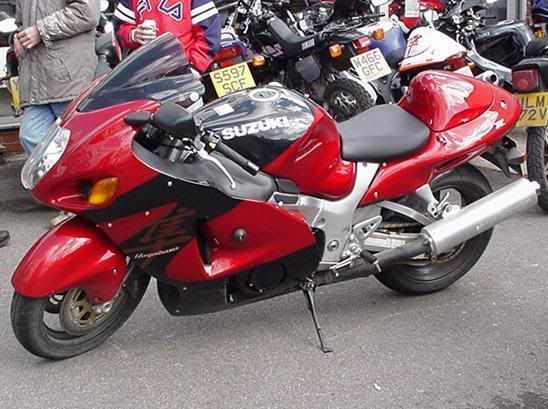 I'm very happy with the colour match for the red. 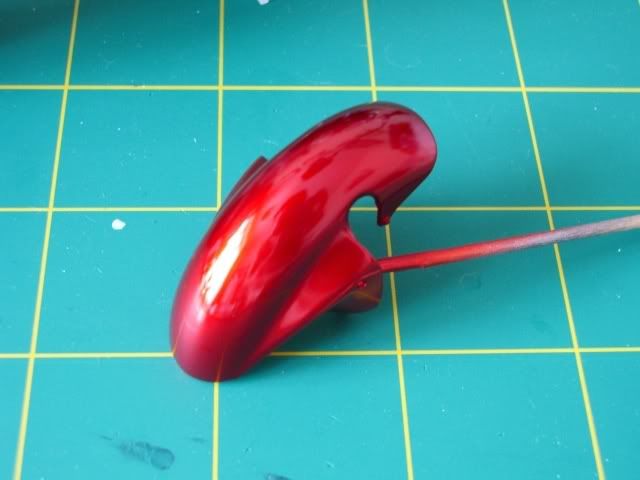 I'm working on the front fork assembly today so I may have another update later.
__________________
Steve Noble |
|
|
|
|
|
06-30-2007, 01:53 PM
|
#6 | |
|
AF Fanatic
Join Date: Dec 2004
Location: Up the creek with no paddle
Posts: 5,888
Thanks: 7
Thanked 16 Times in 15 Posts
|
Re: 1999 Suzuki Hayabusa 1/12th
Hola! That color match is outstanding
 Bet you are happy 
__________________
Guideline for happy modeling: Practice on scrap. Always try something new. Less is more. "I have a plan so cunning, you could put a tail on it and call it a weasel" - Edmund Blackadder |
|
|
|
|
|
06-30-2007, 02:39 PM
|
#7 | |
|
AF Enthusiast
Join Date: May 2004
Location: Kalmar
Posts: 2,047
Thanks: 66
Thanked 25 Times in 25 Posts
|
Re: 1999 Suzuki Hayabusa 1/12th
Great shine on that mud guard Steve! Perfect start!
/joel
__________________
Visit my FB page www.facebook.com/one12th |
|
|
|
|
|
07-01-2007, 07:55 AM
|
#8 | |
|
AF Enthusiast

Join Date: Jan 2007
Location: South Eastern, Wisconsin
Posts: 667
Thanks: 1
Thanked 0 Times in 0 Posts
|
Re: 1999 Suzuki Hayabusa 1/12th
WOW! Fantastic start on this bike. That must have been fun to own one in real life.
Everything looks extremely clean and detailed. I just bought this one on eBay and will be using your WIP as a guide for mine!
__________________
Recently completed projects:      |
|
|
|
|
|
07-01-2007, 10:18 AM
|
#9 | |
|
AF Enthusiast
Join Date: Mar 2005
Location: Barnsley
Posts: 3,199
Thanks: 8
Thanked 111 Times in 107 Posts
|
Re: 1999 Suzuki Hayabusa 1/12th
Just a small update.I finished the main parts for the forks and front brakes.I also used the Zero 2K Clear coat on the front mudguard and the comments about the quality of this stuff were correct.It goes on so easily,dries smoothly and the finish is like glass with absolutely no orange peel texture.I sprayed a light tack coat then 3 reasonably wet coats.I didn't even polish it at all it was that good from the airbrush there was no need to.I am very impressed! It won't be the last time I use it for sure.
The front end mocked up on the chassis.I still have to add various photo etch fasteners and bolt heads to the brakes and mudguards.The Crazy Modeler brakes are excellent and add a lot to the front end.They alone are worth the asking price of the set.But there's so much more on the frets as well. 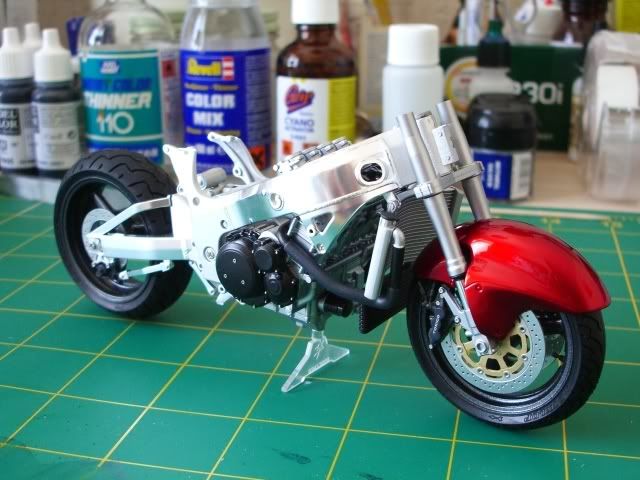 Mudguard up close.The Zero 2K Clear provides an incredible shine.The Tokico logo's on the calipers are also from the Crazy Modeler set and are self adhesive saving painting them by hand. 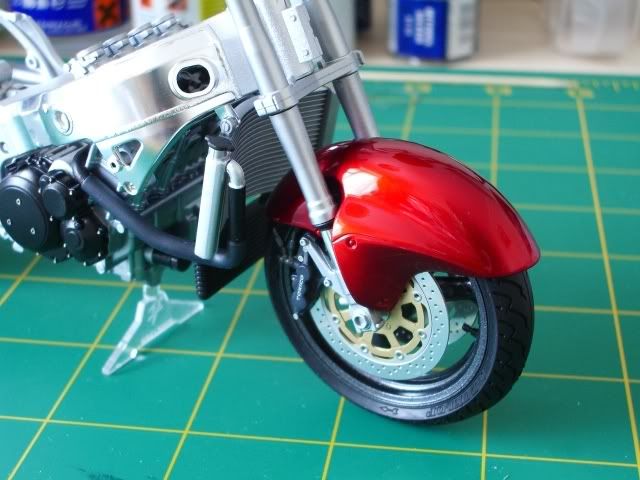 I'm working on the handle bars and top yoke now.I should have another update later.
__________________
Steve Noble |
|
|
|
|
|
07-01-2007, 01:04 PM
|
#10 | |
|
AF Enthusiast
Join Date: Feb 2006
Location: beringen
Posts: 682
Thanks: 0
Thanked 6 Times in 6 Posts
|
Re: 1999 Suzuki Hayabusa 1/12th
that soez is looking great Steve. I'm waiting for further progress.
__________________
|
|
|
|
|
|
07-01-2007, 02:18 PM
|
#11 | |
|
AF Enthusiast
Join Date: Mar 2005
Location: Barnsley
Posts: 3,199
Thanks: 8
Thanked 111 Times in 107 Posts
|
Re: 1999 Suzuki Hayabusa 1/12th
Last update for today.My eyes have gone funny fixing all the photo etch nut and bolt heads.
 I've assembled the front end and fixed it to the chassis.This side is almost finished,I just have to add the bolt head details to the very centre of the brake disc.One thing I had forgotten is how much fun the Tamiya motorcycle kits can be to build.For the first time in a long time I really am enjoying making this one.It's such a refreshing change after so many rally and F1 models. I've assembled the front end and fixed it to the chassis.This side is almost finished,I just have to add the bolt head details to the very centre of the brake disc.One thing I had forgotten is how much fun the Tamiya motorcycle kits can be to build.For the first time in a long time I really am enjoying making this one.It's such a refreshing change after so many rally and F1 models.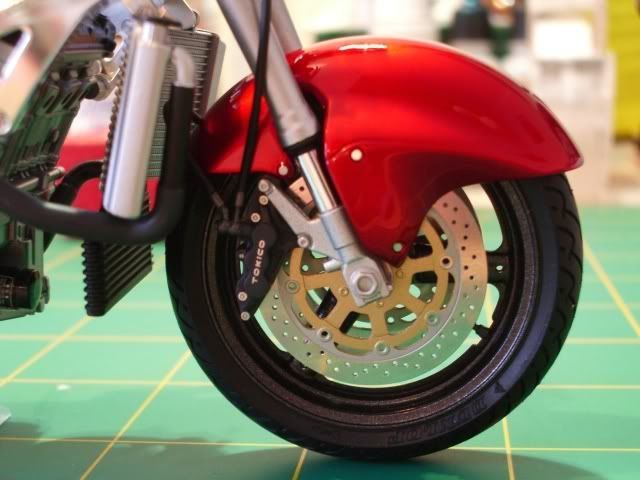 I'll post more progress reports as I progress further.
__________________
Steve Noble |
|
|
|
|
|
07-03-2007, 02:55 PM
|
#12 | |
|
AF Enthusiast
Join Date: Mar 2005
Location: Barnsley
Posts: 3,199
Thanks: 8
Thanked 111 Times in 107 Posts
|
Re: 1999 Suzuki Hayabusa 1/12th
Quick update on the model.I got the tank and seat unit painted this afternoon.The seat unit was fine.There are a few small dirt nibs in the lacquer but nothing that a polish with Micromesh and some compounding won't fix when it's properly dry.
The seat unit painted.It doesn't photograph well especially in indoor light. 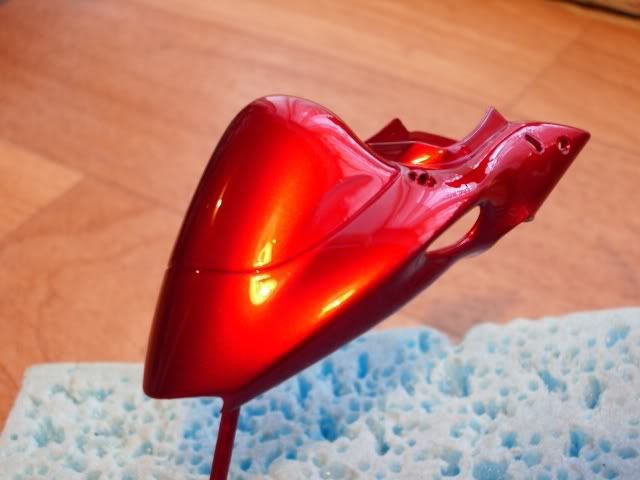 I had a few minor issues with the tank regarding the painting (all my own doing I might add) I didn't let the silver undercoat for the Candy Red dry long enough and whilst adding the Candy colour coat it softened the silver layer slightly causing a slight colour shift.However as luck would have it it was right bang in the middle of where the tank was going to be painted black,so I pressed on with the Candy layer and simply gave the affected area a light sanding with 8000 Micromesh before applying the black which covered it over perfectly.For the masking on the tank I used cut down Tamiya tape and a good eye instead of the Tamiya masks included in the kit.After about an hours drying both the seat unit and tank were given 3 to 4 light coats of Zero 2K Clear. A few views of the painted tank. 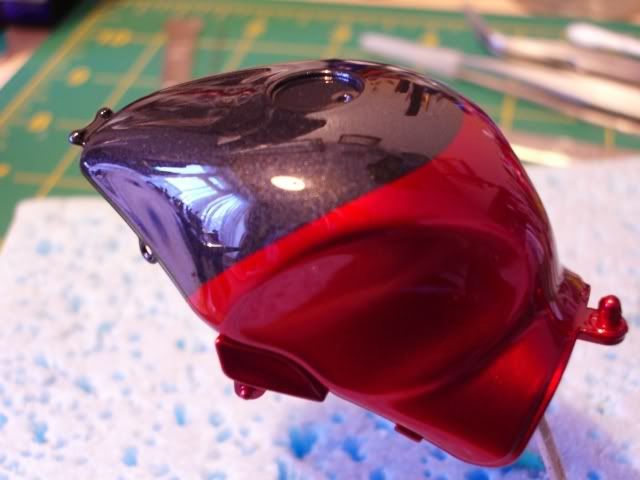 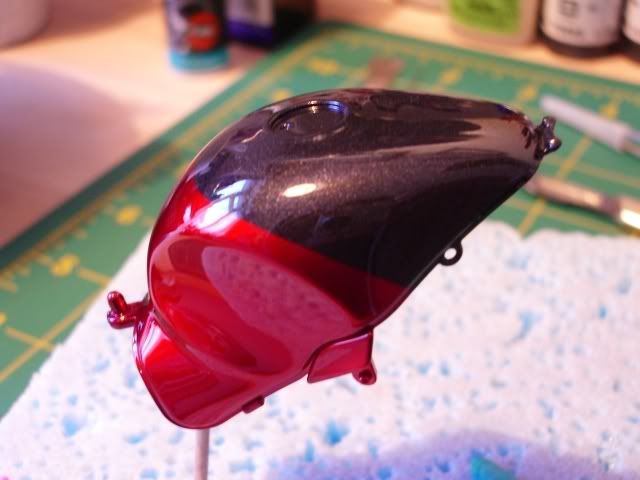 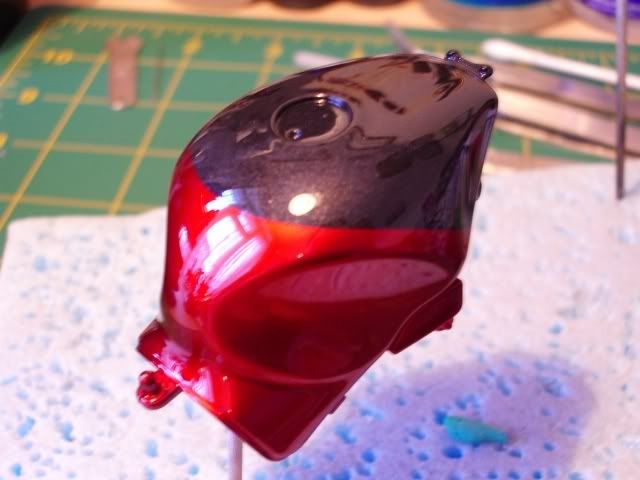 I'll polish up both parts after some drying and take my time a little whilst painting the fairing parts so I don't get a repeat of the tank problem.Once again the Zero 2K Clear Lacquer impressed me no end.The shine straight from the gun is incredible and if you can coax it to run you really are trying too hard.Highly recommended.See you on the next update.
__________________
Steve Noble |
|
|
|
|
|
07-03-2007, 03:02 PM
|
#13 | |
|
AF Fanatic
Join Date: Dec 2004
Location: Up the creek with no paddle
Posts: 5,888
Thanks: 7
Thanked 16 Times in 15 Posts
|
Re: 1999 Suzuki Hayabusa 1/12th
That paint job is to die for!!
How long do you wait between your light coats of Zero 2k clear?
__________________
Guideline for happy modeling: Practice on scrap. Always try something new. Less is more. "I have a plan so cunning, you could put a tail on it and call it a weasel" - Edmund Blackadder |
|
|
|
|
|
07-03-2007, 03:08 PM
|
#14 | ||
|
AF Enthusiast
Join Date: Mar 2005
Location: Barnsley
Posts: 3,199
Thanks: 8
Thanked 111 Times in 107 Posts
|
Re: 1999 Suzuki Hayabusa 1/12th
Quote:
__________________
Steve Noble |
||
|
|
|
|
07-04-2007, 01:39 AM
|
#15 | |
|
AF Enthusiast
Join Date: Feb 2006
Location: beringen
Posts: 682
Thanks: 0
Thanked 6 Times in 6 Posts
|
Re: 1999 Suzuki Hayabusa 1/12th
what a shine

__________________
|
|
|
|
|
|
|
POST REPLY TO THIS THREAD |
 |
|
|

