|
|
|

|
|
| Search | Car Forums | Gallery | Articles | Helper | AF 350Z | IgorSushko.com | Corporate |
|
| Latest | 0 Rplys |
|
|||||||
| 240Z | 260Z| 280Z | 300ZX (Past Z Cars) The original Z cars - ones that started it all. |
 |
 Show Printable Version | Show Printable Version |  Email this Page | Email this Page |  Subscribe to this Thread
|
|
|
Thread Tools |
 06-22-2005, 02:23 AM
|
#1 | |
|
Z Cars Fanatic
 
Join Date: Jan 2004
Location: Chicago, Illinois
Posts: 6,739
Thanks: 0
Thanked 0 Times in 0 Posts

|
Twin Turbo Swap...
Twin Turbo Swap Write-Up:
Parts Needed: -VG30DETT Motor -TT Transmission* -TT AC lines -TT AC condenser -TT Radiator, Upper Radiator Mounts, and Upper radiator hose (Lower radiator hoses are the same) -Intercoolers w/ Ducts and Mounting Brackets -Intercooler Piping -Twin Turbo ECU or N/A Re-mapped -Twin Turbo OEM EFI Harness or Boost Controller** -Custom Drive-shaft or Use TT front half shaft (if you have a 2+2, it would be more difficult to source a 2+2 TT half-shaft, so do yourself a favor and buy a custom drive shaft) -Motor Mounts*** -Oil Cooler and Lines -TT Clutch & Flywheel -N/A Power steering pump and mounting bracket -N/A AC compressor if you bought a JDM motor -TT Mid-pipes of you bought a A-spec motor. N/A mid-pipes if you bought a J-spec motor. *You can make the 5-speed N/A transmission work by fabricating a shimmy between the starter and bell housing. this will allow you to fit the slightly larger TT flywheel in the transmission. **If you buy a TT EFI Harness, the boost solenoids will connect directly up to the wiring harness and therefore be controlled by the ECU. You can use a N/A EFI harness but you will need to buy an external boost controller, I am buying and recommend the Greddy Profec B. **When, pulling the engine out of the Z32, you are just about guaranteed to break the motor mount in half. Therefore, you will need to purchase a new set. I went ahead and ordered a set of solid motor mounts. I also strongly recommend if you plan to attempt this, to purchase a Service Manual. This will come in handy when you receive your TT motor and all the hoses are cut in half and you do not have a clue where they go. Transmission Removal: [Excuse me if I miss a few things, it has been a while since I did this part of the swap  ] ]1 Jack the car approximately 2ft off the ground at least. Once the Rear End is supported in the air, you can put the car in neutral and/or remove the parking brake. 2 Remove the Mid-section of the exhaust...my Stillen cat-back is 2 different sections in itself so I left the mufflers. The stock cat-back exhaust may need to be totally removed. 3 Remove Drive Shaft Heat Shield and the Drive Shaft itself. 4 Remove all wiring harnesses and Starter from the transmission. 5 Now, place a support jack or transmission lift to support the transmission. It is fine to support it by the pan. Nissan used nice heavy duty oil pans. 6 Remove Rear Transmission Support. 7 Unbolt all Bolt that hold the transmission to the rear of the engine, the top 2 will not be able to be reached directly. 8 To unbolt the top 2 bolts you will need about a 3 ft extension. Slowly lower the transmission until you can see the top 2 bolts, but make sure that the transmission is still supported. Then wiggle the extension around until you get it on the bolt. This can be a little tricky and frustrating so be patient. 9 Now the Transmission should be completely supported by the jack or stand...Slowly back the transmission off of the motor. Gradually lower it down and remove it from under the car. While your in the process of lowering it, you can easily reach the dipstick tubes bolt and remove the dipstick holster from the transmission. Motor Removal: 1 Remove the Hood. This makes it a lot easier to maneuver and get some good lighting under the hood but more importantly, you do not want to hurt it when the engine comes out. 2 Remove Radiator shroud and radiator. Radiator shroud is held on by a few bolts, 2 on the side and one at the top. the only thing holding the radiator in is the upper support brackets and the hoses. Make sure you drain the radiator and then remove the hoses or else you will have very nice mess on your hands. 3 Remove Air intake tubes and hoses attached to it. This could be a good idea to label the hoses you remove as I have found that finding where some hoses go is one of the harder things to do. 4 Now remove the Upper Air Balance Tube...this is so you can remove hoses and the EFI harness from the motor. 5 Remove all plugs and hoses held to the engine and lay over the fenders or out of the way. Do not forget to remove the power steering fluid hoses and the AC lines (Or drop the whole AC compressor and let it hang). 6 Remove Throttle and Cruise Control Cables. 7 Now their shouldnt be anything holding your engine in the car except the motor mounts. 8 There are 2 nuts that hold the bolt from the motor mounts into the lower support. Remove these 2 nuts. 9 Now support the motor to your hoist...have someone raise the hoist as you, with a floor jack, jack up on the bottom of the oil pan. 10 Now just slowly raise the motor out and guide it along the way to make sure the headers from the N/A do not catch on the brake booster or any other vital parts. ---------------------------------------------------------------------- ***If anyone needs details on anything you can start a new thread or Private Message me. I left details out to keep me from having to write a 100 page novel. I do realize that this is a guideline but it is just about as detailed a the Nissan manual without costing $100. I can give details on what or where to remove bolts that hold on certain parts.*** ---------------------------------------------------------------------- ------------Out with the Old, in with the New!!!------- So, now you have the old N/A drive-train out, its time to put the new one in...not quite yet. If you have any ideas of painting your engine bay or replacing old power-steering hoses or anything of that nature. Do it now...everything is able to be reached easy now that the motor is out of the way. I would at least advise you to scrub the bay a little bit and clean some of the caked on dirt and oil. Now is also the time, to install your clutch lines and pedal, if doing a 5-speed swap at the same time. Also, any gauges or anything that you plan on adding, I would go ahead and run the wiring and hardware now. So, now you have a engine bay ready for everything involved with Twin Turbofying your car. First, I would start by mounting your Intercoolers and piping that runs through the front of the chassis to the engine bay. This is not that hard, you may need to drill a few holes and put new mounting bolts and mounting brackets on. After that, take a few minutes and install your AC Lines. After you have you intercooler piping installed, you can now install the TT AC condenser. More than likely, the mounts for this and your radiator will need to be modified. If you have any questions about modifying these two items, I will probably be able to help you. The reason why these parts need modification is because they are taller to make up for the lack of width they have, due to the intercooler piping hat slides beside on both sides. Next, mount your oil cooler. To tell you the truth, I have no idea how or where the stock oil cooler mounts and it doesnt really matter. Just mount it someplace where it is going get good air flow. I bought an aftermarket PWR 15 row universal oil cooled and fabricated some brackets to mount it right in front of the AC condenser and radiator but behind the intake. This wont be possible with the stock air box but you should not have that anymore anyways. If you till have the stock air box, I recommend getting rid of it immediately as it just takes up space. So, now your engine bay is virtually ready for your TT motor but now you have to prepare the motor for your engine bay. The TT power steering pump needs to be removed as does a JDM AC compressor, if you did indeed purchase a JDM motor. I do not know if the US spec AC compressor is the same as the N/A but I assume it is. The TT power steering pump is different as it is much larger and has an extra port for the HICAS system. The bracket the mounts the pump to the block also needs to be changed in order for the N/A pump to bolt on. Once the brackets are changed over, it is as simple as bolting it on. I wont get into changing the AC compressors because it bolts directly in place of the other. Also, now I a good time to do any cleaning of the engine, inspection of parts, etc. I found out quickly the motor I received had two bad turbochargers, one having a toasted oil seal. Yes, it is a heart breaking and put a chip in my wallet, but its better that I find out now rather than later. Dont forget to install the boost piping leading away from the turbos. I could see that being a real pain in the ass when the engine is in the car. Now, your engine is ready as is your engine bay. If you decided to buy a TT EFI harness, make sure you install it before the engine is put back in. Now, drop the new motor in and plug in all your connectors. All your hoses need to be re-attached. Do the reverse of everything you did to take it out. Make sure to follow the diagrams in your service manual for re-attaching vacuum hoses and such. When you go to install your new transmission if you bought one from a TT. Make sure you change over the speed sensor as it coordinates with your rear differential. If you are doing the modification to the starter mount to fit your N/A 5-speed in you will not have to worry about this. Dont forget to install your boost controller if you decided to stick with your N/A harness or else you will be wondering why your 300hp motor is slower than your previous 222hp motor. Make sure you have changed over your ECUs. I am not going to get into details about changing over your ECU but if you have questions, feel free to ask away. ---------------------------------------------------------------------- Keep in mind, I have probably forgotten a million things because I did not type this while I was doing the swap. I took the time to type this out after I did most things and before I did some things. I will edit it when necessary and when I have realized I forgot something or decide to add more details. This is more or less a guideline to help answer quite a few questions before you post a new thread. So, before you open a new thread you can ask more detailed questions instead of What is involved in swapping in a Twin Turbo motor? or What parts do I need and How expensive is it to do? Remember, this will take time for the average person so expect to be without your car for a generous amount of time. There will always be problems you will run into and these problems usually take time to overcome because most of us do not have a complete auto shop and parts store around back of our houses. Good Luck and Enjoy the phenomenon we call Boost!!! *Pictures will be added at a later date and will focus more on the Twin Turbo parts installation.* ----------------------------------------------------------------------
__________________
 ZedEx Crew Member #4 ZedEx Crew Member #4
|
|

|

|
|
06-22-2005, 03:38 PM
|
#2 | |
|
AF Enthusiast
 Join Date: Jun 2004
Location: Cols, Ohio
Posts: 696
Thanks: 0
Thanked 0 Times in 0 Posts
|
Twin Turbo Swap...
very nice write-up jason and well done.
so now when r u gunna have your car running ? oh yeah ---STICKY
__________________
  Past Z Car Crew Past Z Car Crew -josh |
|
|
|
|
|
06-23-2005, 12:32 PM
|
#3 | ||
|
Z Cars Fanatic
Join Date: Jan 2004
Location: Chicago, Illinois
Posts: 6,739
Thanks: 0
Thanked 0 Times in 0 Posts
|
Re: Re: Twin Turbo Swap...
Quote:
__________________
ZedEx Crew Member #4
|
||
|
|
|
|
06-23-2005, 07:02 PM
|
#4 | |
|
AF Fanatic
 
Join Date: Mar 2004
Location: Kelowna
Posts: 5,092
Thanks: 0
Thanked 0 Times in 0 Posts

|
Re: Twin Turbo Swap...
good write up dude... i didn't read it, but i know it's good already...

__________________
 ZedEx Crew Member #6 ZedEx Crew Member #61988 300zx turbo 5spd. 3" mandrel exhaust, filter, afco rad, e-fan, poly engine mounts, mbc at 8.5 psi, turboxs rfl-h bov, gutted plenum, etc. blown turbo, under construction.. gt35 coming. |
|
|
|
|
|
06-23-2005, 11:39 PM
|
#5 | ||
|
Z Cars Fanatic
Join Date: Jan 2004
Location: Chicago, Illinois
Posts: 6,739
Thanks: 0
Thanked 0 Times in 0 Posts
|
Re: Re: Twin Turbo Swap...
Quote:

__________________
ZedEx Crew Member #4
|
||
|
|
|
|
06-24-2005, 11:55 AM
|
#6 | |
|
AF Newbie
Join Date: Mar 2004
Location: San Antonio, Texas
Posts: 48
Thanks: 0
Thanked 0 Times in 0 Posts
|
K real quick question k3 did you stick with your N/A Tranny or did u go TT? And If you stick with the N/A Pro's & Con's?
__________________
I dont drive anything with less that 3 pedals. |
|
|
|
|
|
06-24-2005, 01:14 PM
|
#7 | ||
|
Z Cars Fanatic
Join Date: Jan 2004
Location: Chicago, Illinois
Posts: 6,739
Thanks: 0
Thanked 0 Times in 0 Posts
|
Re: Twin Turbo Swap...
Quote:
anyways, it is the same nissan part number as far as i know, the transmissions are identical except for the the size of the bellhousing. you will need a custom made bracket that moves the starter farther off the housing to account for the slightly larger TT flywheel. other than that i havent really heard much about it... i heard a while back that the N/A transmission wasn't a good idea if you plan on making some decent power with the TT engine, but Z specialist shops (like Z1 motorsports) say they have never seen anything that would confirm that the N/A transmission is weaker and they do indeed use the N/A transmission when doing a swap.
__________________
ZedEx Crew Member #4
|
||
|
|
|
|
06-25-2005, 10:45 AM
|
#8 | ||
|
AF Newbie
 Join Date: Jun 2005
Location: Beaverton, Oregon
Posts: 16
Thanks: 0
Thanked 0 Times in 0 Posts
|
Re: Re: Twin Turbo Swap...
Quote:
NA-TT you need about a 1/8in SPACER between the starter and bellhousing is all as you stated initially. The trannies are the same except for this minor detail. I know because I had an NA VG30DE with a TT flywheel and an NA tranny. You probably want to add DETT front valence to the list? Other than that your list looks good. Some really good detail about NA --> TT is here : http://tinyurl.com/dnjdg I've heard about breaking motor mounts but I've removed/reinstalled my DETT perhaps 6-7 times (at around 15hrs each time, ugh!) and haven't busted one yet(?).
__________________
Dave Lum '71 510 Stage V+ VG30DETT www.datsuns.com 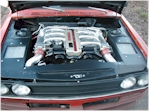
|
||
|
|
|
|
06-25-2005, 11:27 AM
|
#9 | |
|
AF Enthusiast
Join Date: Jun 2004
Location: Cols, Ohio
Posts: 696
Thanks: 0
Thanked 0 Times in 0 Posts
|
Re: Twin Turbo Swap...
yeah i was thinking about the whole N/A front end blocking the new intercoolers, but i figure id just remove my foglamps...i didnt really look into if that would allow addiquate air to get the the ICs. But it was an idea and thats always an option for anyone with a budget.
__________________
Past Z Car Crew -josh |
|
|
|
|
|
06-25-2005, 01:13 PM
|
#10 | ||
|
Z Cars Fanatic
Join Date: Jan 2004
Location: Chicago, Illinois
Posts: 6,739
Thanks: 0
Thanked 0 Times in 0 Posts
|
Re: Re: Twin Turbo Swap...
Quote:
__________________
ZedEx Crew Member #4
|
||
|
|
|
|
06-25-2005, 01:17 PM
|
#11 | ||
|
Z Cars Fanatic
Join Date: Jan 2004
Location: Chicago, Illinois
Posts: 6,739
Thanks: 0
Thanked 0 Times in 0 Posts
|
Re: Re: Re: Twin Turbo Swap...
Quote:
my motor mounts cracked in half on the first time as do most peoples but i have seen a few pictures of guys who's motor mounts dont need to be replaced. id call yourself lucky...either that, or you havent quite had the motor in their long enough for the rubber to 'glue' itself to the crossmember.
__________________
ZedEx Crew Member #4
|
||
|
|
|
|
06-26-2005, 03:41 PM
|
#12 | ||
|
AF Enthusiast
Join Date: Jun 2004
Location: Cols, Ohio
Posts: 696
Thanks: 0
Thanked 0 Times in 0 Posts
|
Re: Re: Re: Twin Turbo Swap...
Quote:
__________________
Past Z Car Crew -josh |
||
|
|
|
|
06-26-2005, 04:39 PM
|
#13 | ||
|
Z Cars Fanatic
Join Date: Jan 2004
Location: Chicago, Illinois
Posts: 6,739
Thanks: 0
Thanked 0 Times in 0 Posts
|
Re: Re: Re: Re: Twin Turbo Swap...
Quote:
i am trying to take my fog lights out and do some custom duct work all the way back to my front brakes.
__________________
ZedEx Crew Member #4
|
||
|
|
|
|
07-18-2005, 08:00 PM
|
#14 | |
|
AF Newbie
Join Date: Jul 2005
Location: Albuquerque, New Mexico
Posts: 5
Thanks: 0
Thanked 0 Times in 0 Posts
|
If you use the NA tranny with a TT flywheel/clutch, you have to grind the inside of the bellhousing to clear the larger flywheel.
|
|
|
|
|
|
07-18-2005, 08:20 PM
|
#15 | |
|
GO-FIGHT-KILL!

Join Date: May 2004
Location: Wilmington, North Carolina
Posts: 3,132
Thanks: 0
Thanked 0 Times in 0 Posts
|
Re: Twin Turbo Swap...
Nice Jason. Stickied thread for you
 -Wes
__________________
-2000 PY Acura Integra Type-R #686 - WhoRe -1997 EGP Honda Prelude Type-SH - Daily driver R.I.P Hypsi87:Andy Filson 
|
|
|
|
|
|
|
POST REPLY TO THIS THREAD |
 |
|
|

